
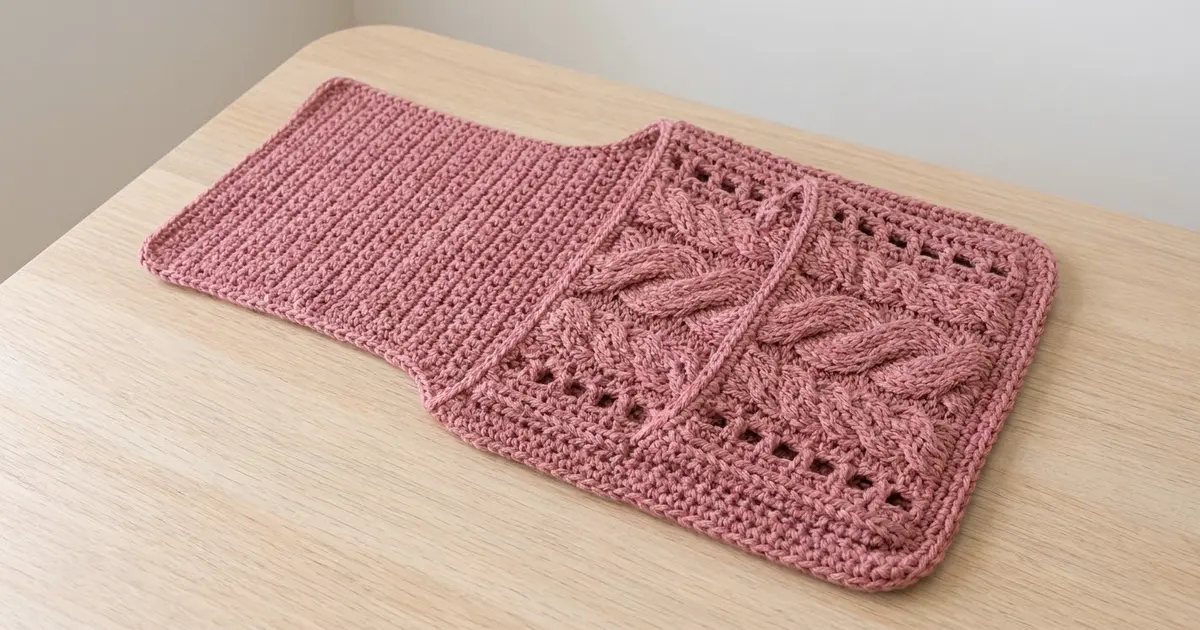
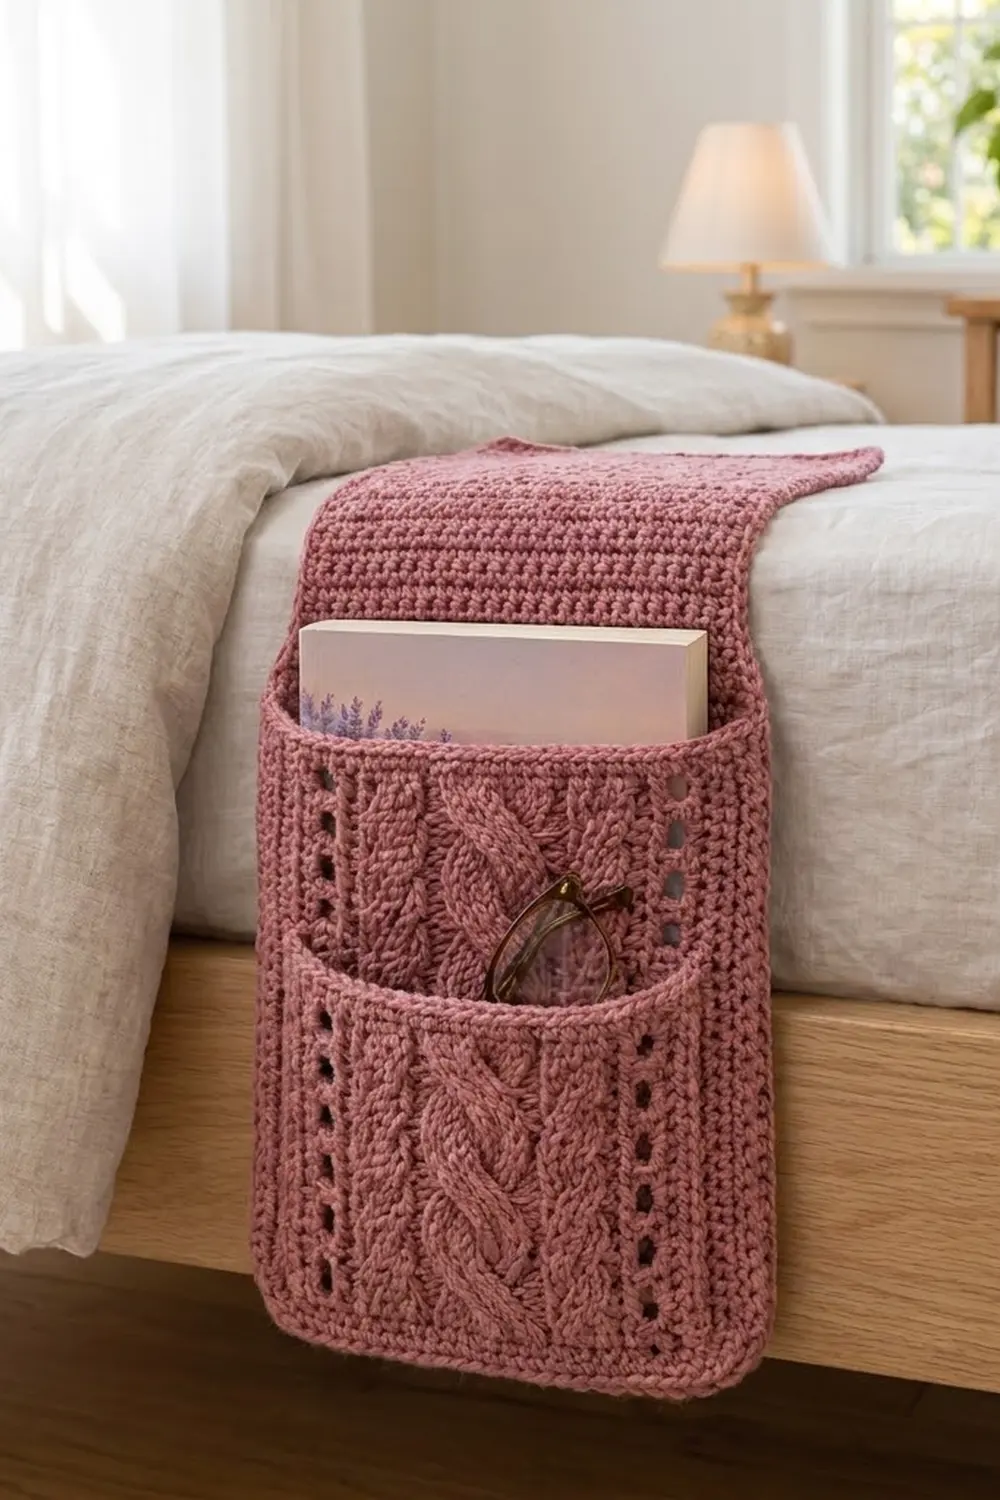
This bedside caddy hangs over the edge of your mattress and keeps a book, your glasses, and a phone within reach. The tall back panel narrows into a flap that tucks under the mattress. Two cabled pockets sit on the front: a deep one for books and a shorter one stacked in front of it.
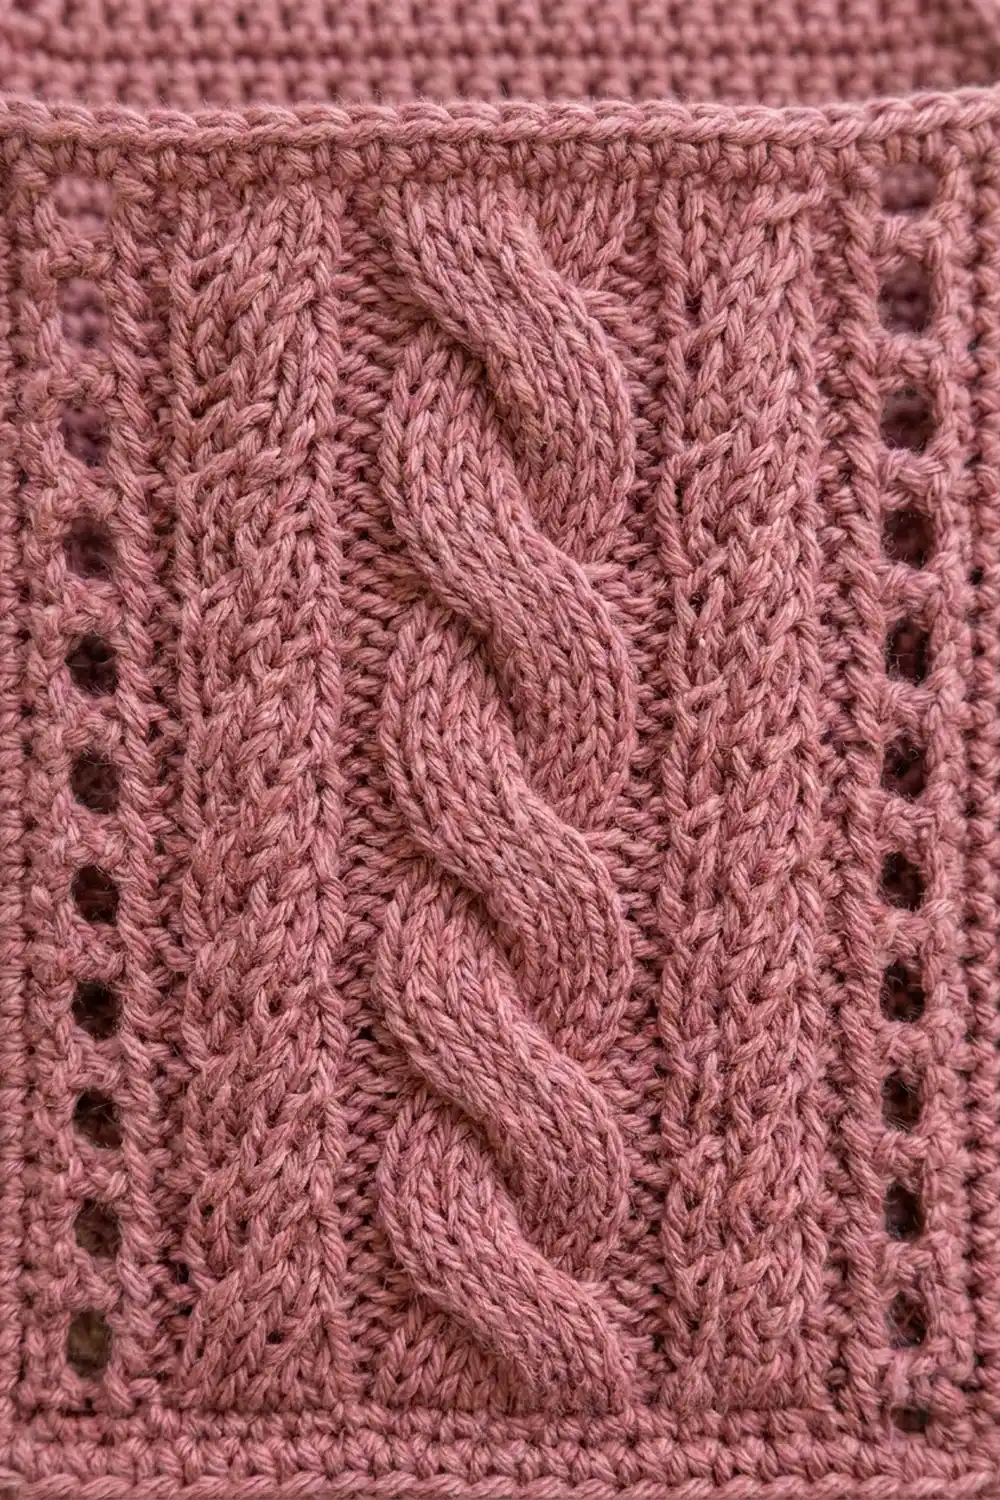
The sample is a soft dusty rose. Each pocket has a two-strand twisted rope cable down the center with two columns of small eyelets on each side, set against firm half double crochet. It also works well in cream or oatmeal if you want it to hang on a sofa arm. The look is cozy, textured, and a little vintage.
The pattern uses US crochet terms. The finished caddy measures 10.5 in (26.7 cm) wide across the pocket section, 6.5 in (16.5 cm) wide across the flap, and 21.5 in (54.6 cm) long overall.
You make three flat pieces: a back panel, a large pocket, and a small pocket. Line them up at the bottom and sides, then work one round of single crochet through all layers. That round joins the pockets and borders the whole caddy at the same time.
Finished Size and Construction
- Finished size: 10.5 in (26.7 cm) wide x 21.5 in (54.6 cm) long; flap 6.5 in (16.5 cm) wide
- Skill level: Intermediate (post stitches, simple cable crosses)
- Terminology: US
- Yarn weight: Worsted (#4)
- Hook: 4.5 mm (US 7)
- Number of pieces: 3 (back panel, large pocket, small pocket)
- Layout: Pockets stacked on the front of the back panel, all bottom-aligned
- Piece sizes before border: back panel 10 in (25.4 cm) x 21 in (53.3 cm); large pocket 10 in (25.4 cm) x 8 in (20.3 cm); small pocket 10 in (25.4 cm) x 5 in (12.7 cm)
- Size before border: 10 in (25.4 cm) x 21 in (53.3 cm)
- Border depth: 0.25 in (0.6 cm) on every side
Materials
Choose a smooth worsted-weight yarn with good stitch definition so the cables stand out. Cotton or a cotton-acrylic blend holds its shape best under the weight of a book. Avoid fuzzy or very stretchy yarns because the caddy will sag.
- Dusty rose (main color): 220 g / 440 m (481 yd)
- 4.5 mm (US 7) crochet hook
- Tapestry needle
- 6 to 8 locking stitch markers or clips
- Measuring tape
- Blocking mats and rust-proof pins
- Spray bottle or steamer
The quantity includes about a 25% margin for your gauge swatch and small differences in tension. For the cream version, buy the same amount in cream.
Abbreviations (US Terms)
- ch – chain
- sk – skip
- sl st – slip stitch
- sc – single crochet
- hdc – half double crochet
- hdc2tog – half double crochet 2 together
- FPdc – front post double crochet
- BPdc – back post double crochet
- FPtr – front post treble crochet
- st(s) – stitch(es)
- RS / WS – right side / wrong side
Special stitch: Cable Cross (6 sts). Sk the next 3 post sts. FPtr around each of the next 3 post sts. Working in front of the sts you just made, FPtr around each of the 3 skipped sts, from right to left. That makes 6 sts, crossing to the left.
Eyelet: ch 1, sk the next st or ch-1 space. Each ch-1 counts as 1 st.
Turning chain: ch 2 at the start of each hdc row does not count as a stitch.
Gauge and Checkpoints
Gauge: 16 hdc x 12 rows = 4 in (10.2 cm) in plain hdc.
Make the small pocket first and treat it as your test piece. It uses every technique in the pattern and is quick to finish.
- After Row 6 of the small pocket: the piece should be 10 in (25.4 cm) wide. The cable will pull in slightly, so a range of 9.75 in (24.8 cm) to 10.25 in (26.0 cm) is fine.
- Small pocket complete: 5 in (12.7 cm) tall before the top trim.
- Back panel Row 30: 10 in (25.4 cm) wide x 10 in (25.4 cm) tall.
- Back panel Row 63: 21 in (53.3 cm) tall.
If your piece is too big, go down one hook size, to 4.0 mm. If it is too small, go up to 5.0 mm. All three pieces must be 40 sts across and the same width, because the border joins them row-end to row-end.
Back Panel
Ch 42.
Row 1 (WS): Hdc in 3rd ch from hook and in each ch across. Turn. (40 hdc)
Rows 2–30: Ch 2, hdc in each st across. Turn. (40 hdc)
Check: 10 in (25.4 cm) wide x 10 in (25.4 cm) tall.
Shoulder Shaping
Row 31: Ch 2, [hdc2tog] 3 times, hdc in next 28 sts, [hdc2tog] 3 times. Turn. (34 sts)
Row 32: Ch 2, [hdc2tog] 3 times, hdc in next 22 sts, [hdc2tog] 3 times. Turn. (28 sts)
Row 33: Ch 2, [hdc2tog] 2 times, hdc in next 20 sts, [hdc2tog] 2 times. Turn. (24 sts)
The shaping takes 3 rows, or 1 in (2.5 cm). It removes 8 sts from each side to make the sloped shoulders.
Flap
Rows 34–63: Ch 2, hdc in each st across. Turn. (24 hdc)
Fasten off. The flap is 6 in (15.2 cm) wide and 10 in (25.4 cm) long. The whole back panel is 21 in (53.3 cm) long.
Pockets
Both pockets use the same 40-stitch layout. Here it is from the right edge of a RS row:
3 hdc | eyelet | 4 hdc | eyelet | 8 hdc | 6 cable sts | 8 hdc | eyelet | 4 hdc | eyelet | 3 hdc
3 + 1 + 4 + 1 + 8 + 6 + 8 + 1 + 4 + 1 + 3 = 40 sts.
Pocket Rows
Ch 42.
Row 1 (WS): Hdc in 3rd ch from hook and in each ch across. Turn. (40 hdc)
Row 2 (RS, setup): Ch 2, hdc in next 3 sts, eyelet, hdc in next 4 sts, eyelet, hdc in next 8 sts, FPdc around each of next 6 sts, hdc in next 8 sts, eyelet, hdc in next 4 sts, eyelet, hdc in last 3 sts. Turn. (40 sts: 30 hdc, 4 ch-1 eyelets, 6 FPdc)
Row 3 (WS): Ch 2, hdc in next 3 sts, eyelet, hdc in next 4 sts, eyelet, hdc in next 8 sts, BPdc around each of next 6 sts, hdc in next 8 sts, eyelet, hdc in next 4 sts, eyelet, hdc in last 3 sts. Turn. (40 sts)
The BPdc sts push the post sts forward on the RS, so the cable stays raised on both rows. Each eyelet skips the ch-1 space below it, so the holes line up in neat vertical columns.
Row 4 (RS, cross): Ch 2, hdc in next 3 sts, eyelet, hdc in next 4 sts, eyelet, hdc in next 8 sts, Cable Cross, hdc in next 8 sts, eyelet, hdc in next 4 sts, eyelet, hdc in last 3 sts. Turn. (40 sts)
Row 5 (WS): Repeat Row 3. (40 sts)
Row 6 (RS): Repeat Row 2, working the FPdc around the 6 post sts. (40 sts)
The 4-row repeat is Rows 3–6. You cross the cable every 4th row (Rows 4, 8, 12, and so on), and that builds the twisted rope.
Small Pocket
Work Rows 1–6, then repeat Rows 3–6 twice more (through Row 14). The cable crosses 3 times.
Row 15 (WS): Ch 2, hdc in each st and in each ch-1 space across. Turn. (40 hdc)
Check: 10 in (25.4 cm) x 5 in (12.7 cm).
Top Trim (RS): Ch 1, sc in each st across. (40 sc worked 1 per existing st + 0 added = 40 sc)
Fasten off. Leave a short tail.
Large Pocket
Work Rows 1–6, then repeat Rows 3–6 four more times (through Row 22). Then work Row 23 the same as Row 3. The cable crosses 5 times, on Rows 4, 8, 12, 16, and 20.
Row 24 (RS): Ch 2, hdc in each st and in each ch-1 space across. Turn. (40 hdc)
Check: 10 in (25.4 cm) x 8 in (20.3 cm).
Top Trim (WS): Ch 1, sc in each st across. (40 sc worked 1 per existing st + 0 added = 40 sc)
Fasten off. The trim adds about 0.25 in (0.6 cm) and gives the pocket opening a firm, non-stretch edge.
Make All Pieces
You need 1 back panel (dusty rose), 1 large pocket (dusty rose), and 1 small pocket (dusty rose). All three pieces are 40 sts wide at the bottom.
Layout (front view, all edges flush at the bottom and sides):
        [ flap 24 sts ]
       /   shoulders   \
[ back panel body 40 sts ]
[ large pocket  40 sts   ]  <- top at back Row 25
[ small pocket  40 sts   ]  <- top at back Row 16
[ shared bottom edge     ]
Joining
Lay the back panel RS up. Place the large pocket on top, RS up, with its foundation chain lined up with the back panel’s foundation chain. Place the small pocket on top of that the same way. Center both cables.
Stitch-to-stitch logic: All three bottom edges have 40 foundation loops, so they match 1 to 1. All three pieces use the same row gauge, so the side row-ends match 1 to 1 as well. Clip the layers together at the corners, at the top of each pocket, and every 2 in (5.1 cm) up each side.
You join the pieces while you work Border Round 1. Each sc goes through all the layers at once. If three layers feel too thick on the bottom edge, whipstitch the bottoms together loosely first. Then work the sc through the stitched edge.
Tension: Keep your sc relaxed through the layers. If you pull tight, the sides will pucker and the pockets will cup.
Size check after joining: The bottom edge should measure 10.5 in (26.7 cm) across and lie flat.
Border
Border gauge: 16 sc = 4 in (10.2 cm). Along the sides, that means 4 sc for every 3 hdc row-ends.
Round 1 (RS): With the back panel facing you, join the yarn at the bottom right corner. Work through all layers wherever the pockets overlap.
- Bottom edge: 2 sc in first foundation loop (rounded corner), sc in next 38 loops, 2 sc in last loop. (40 + 2 extra = 42 sc)
- Left body side (30 row-ends): sc in each of next 2 row-ends, 2 sc in next row-end, repeat 10 times. (30 + 10 extra = 40 sc)
- Left shoulder (3 shaped rows): Work 9 sc evenly along the slope. (9 sc)
- Left flap side (30 row-ends): Repeat the body-side sequence. (40 sc)
- Flap top: 2 sc in first st, sc in next 22 sts, 2 sc in last st. (24 + 2 extra = 26 sc)
- Right flap side: 40 sc.
- Right shoulder: 9 sc.
- Right body side: 40 sc, ending where you started.
Sl st to the first sc. Fasten off. (246 sc total: 42 + 40 + 9 + 40 + 26 + 40 + 9 + 40)
Why the math works: The bottom has 40 sts. Adding 2 extra in the corners keeps them rounded and flat, and the border’s 0.25 in (0.6 cm) on each side brings the width to 10.5 in (26.7 cm). Ten inches of side edge is 30 hdc rows. At sc gauge, 10 in (25.4 cm) needs 40 sc, so working 4 sc per 3 row-ends keeps the sides from rippling or pulling in. The shoulders slope about 2 in (5.1 cm) across and 1 in (2.5 cm) down. That is about 2.25 in (5.7 cm) of edge, so 9 sc fits. The flap top goes from 24 sts plus 2 corner extras to 26 sc, or 6.5 in (16.5 cm).
Final Blocking
- Weave in all the ends along the seams and borders, not through the eyelets.
- Pin the caddy RS up on a blocking mat. Make the body 10.5 in (26.7 cm) wide, the flap 6.5 in (16.5 cm) wide, and the whole caddy 21.5 in (54.6 cm) long.
- Pin the sides straight, but leave the pocket tops free.
- Mist the caddy until it is damp, or hold a steamer above it without touching the fabric. Don’t press the cables flat.
- Shape the cables with your fingers so they sit raised and centered.
- Leave it pinned until it is completely dry.
Final Quality-Control Checklist
- Every piece is 40 sts wide at the bottom.
- Both cables are centered and lined up vertically.
- The eyelet columns run straight, with 4 columns on each pocket.
- The large pocket top sits at about back panel Row 25, and the small pocket top at about Row 16.
- The border has 246 sc and all corners are rounded and flat.
- The pocket openings are open and are not caught in the border.
- The finished size is 10.5 in (26.7 cm) x 21.5 in (54.6 cm).
Troubleshooting
- The pocket is narrower than the back panel: The cable is pulling in. Loosen up on the post stitches, or go up one hook size just for the pockets.
- The eyelet columns drift: You worked into the ch-1 space instead of skipping it. Each eyelet should skip the space below it.
- The cable looks flat: You worked hdc instead of BPdc on a WS row. Rip back to that row and redo it.
- The sides ripple: You worked too many sc along the row-ends. Check the 2-2-then-increase sequence.
- The caddy slides off the bed: Tuck the flap further under the mattress. A longer flap also helps, so add rows in multiples of 3.
Care
Hand wash in cool water and lay flat to dry, reshaping while damp. Don’t hang it while wet, or the flap will stretch.
Final Notes
Here is the measurement chain. Gauge is 16 hdc x 12 rows = 4 in (10.2 cm). Every piece is 40 sts, or 10 in (25.4 cm), wide. The back panel is 63 rows, or 21 in (53.3 cm). The pockets are 8 in (20.3 cm) and 5 in (12.7 cm). The 246-sc border joins the three layers and brings the caddy to 10.5 in (26.7 cm) x 21.5 in (54.6 cm). If you hit each checkpoint, the pockets will line up exactly with the back panel.
Happy crocheting!