

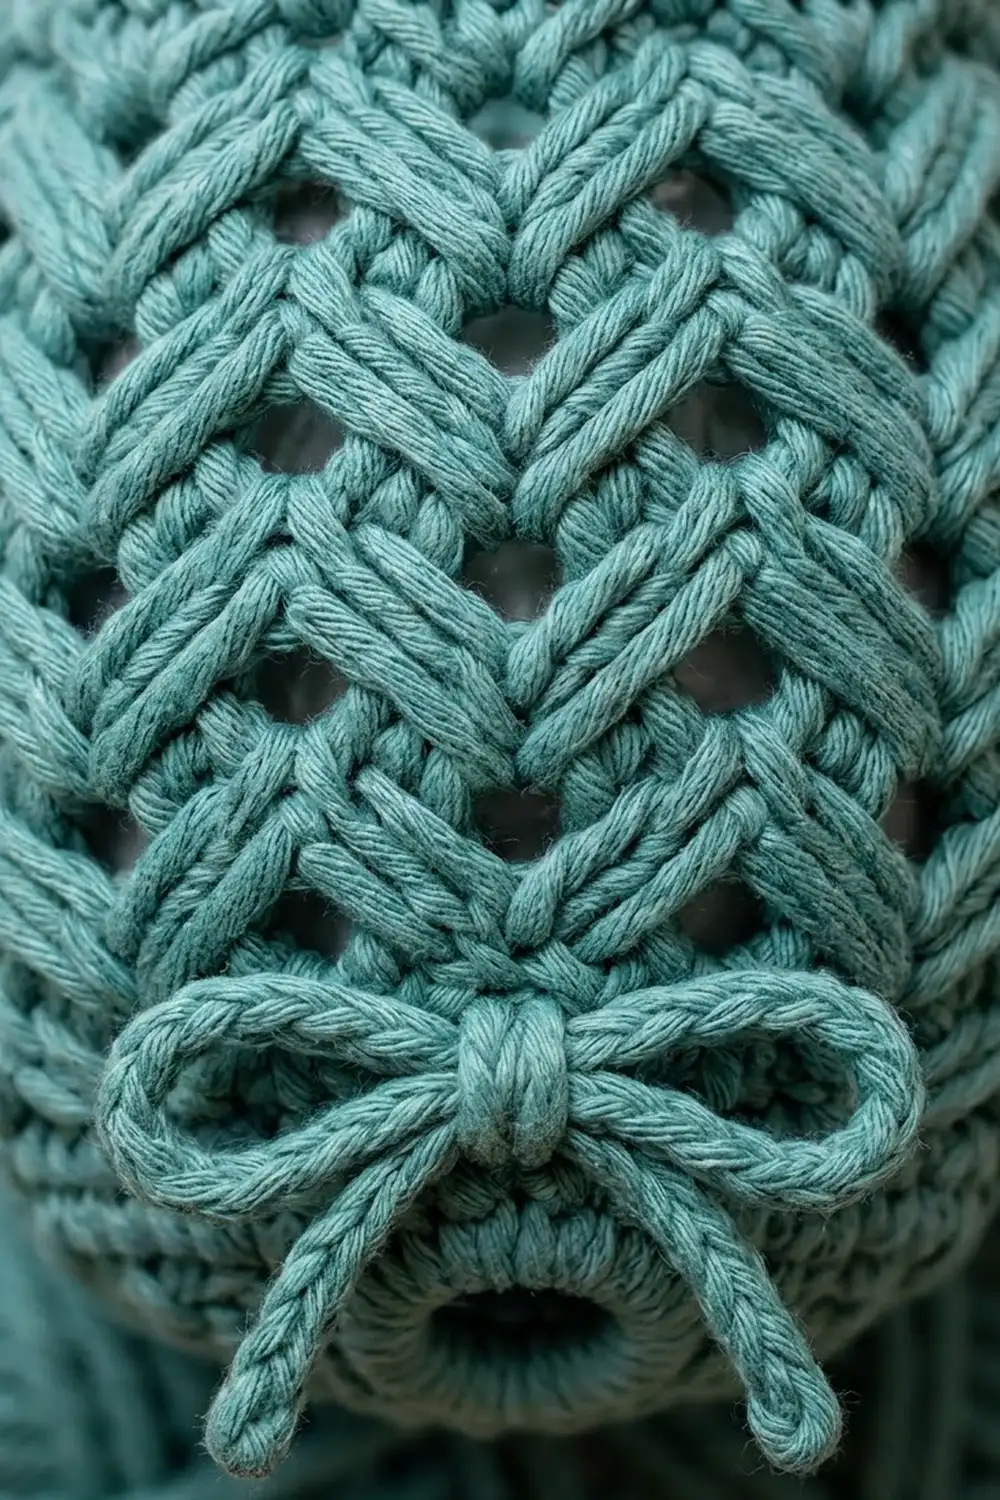
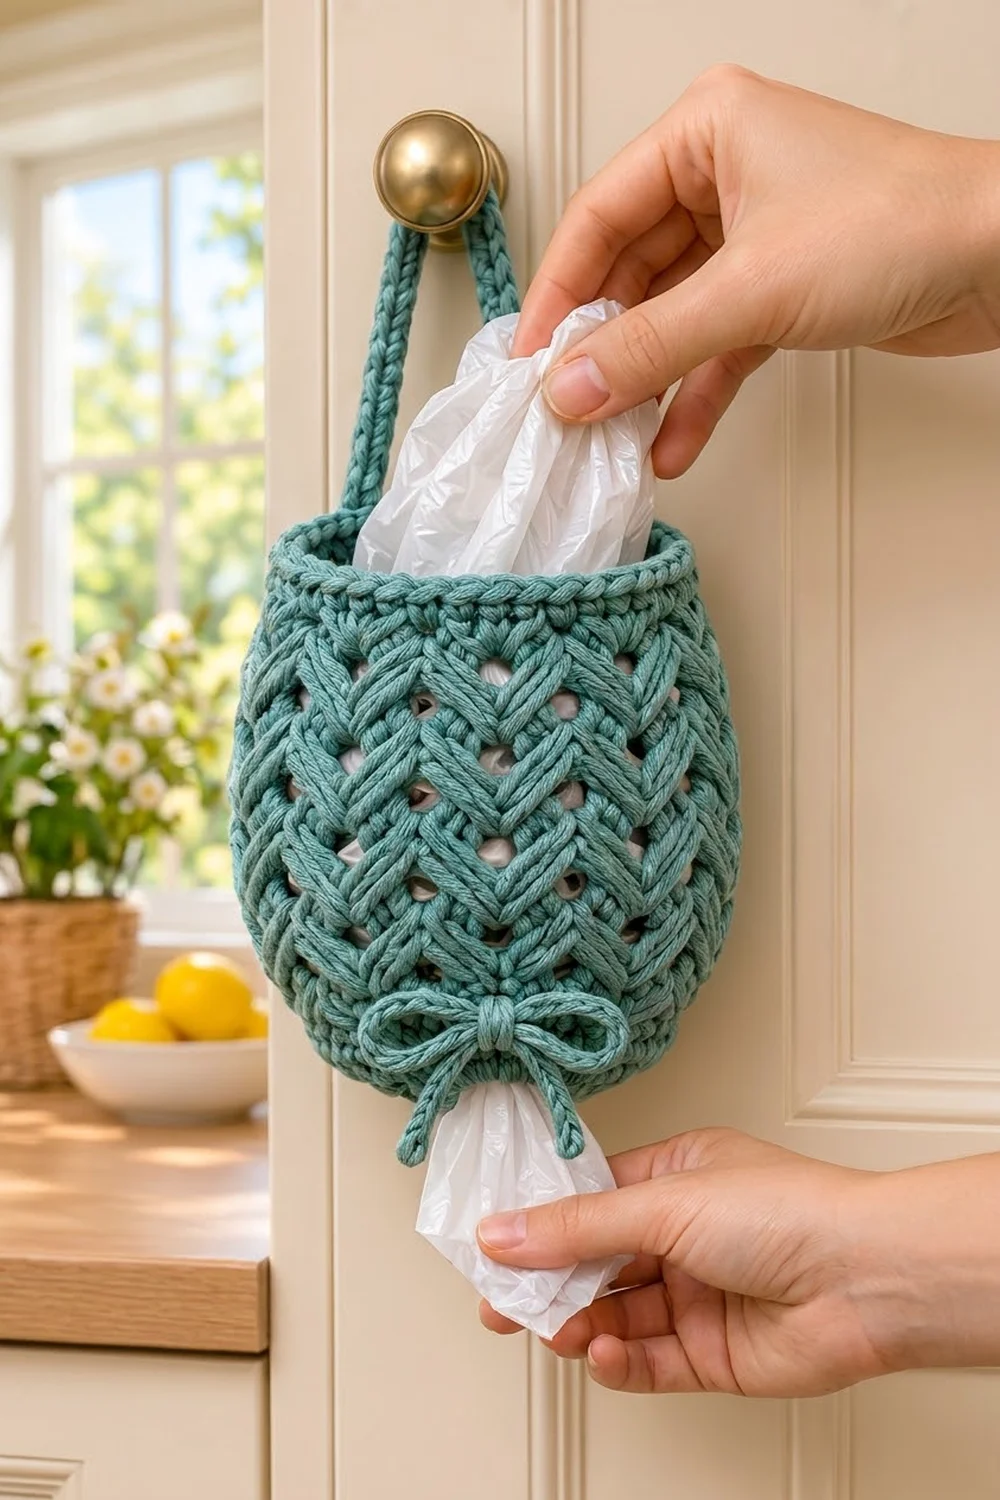
The Willow Chevron Bag Holder is a sturdy, textured pod that hangs from a cabinet knob or hook. You stuff plastic grocery bags in through the top and pull them out one at a time through a round opening at the bottom. The surface is a lattice of plump crossed-stitch chevrons and small eyelets, so it looks woven and lets you see when it’s time to refill.
The sample is in a dusty teal, and the same pattern looks just as good in rust, terracotta, sage or cream. Bulky cotton gives the stitches a rounded, rope-like look and keeps the holder firm enough to hold its shape even when it’s half empty. A small bow at the base adds a soft finishing touch.
This pattern uses US crochet terms. The finished holder is 8 in (20.3 cm) wide when laid flat at its widest point and 10.5 in (26.7 cm) tall, not counting the strap. The hanging loop adds about 4.5 in (11.4 cm).
You work the holder in joined rounds from the bottom up. First you make a firm ring around the dispensing hole. Next come two quick increase rounds and fourteen rounds of the chevron eyelet pattern, then a decrease round and a solid rim. The strap grows straight out of the rim and is sewn back down. Finally, you weave a chain cord through the base and tie it in a bow.
Finished Size and Construction
- Finished size: 8 in (20.3 cm) wide flat at the widest point × 10.5 in (26.7 cm) tall
- Rim width (flat): about 7.25 in (18.4 cm)
- Bottom opening: about 2 in (5.1 cm) across
- Strap loop height: about 4.5 in (11.4 cm) above the rim
- Skill level: Easy-intermediate
- Terminology: US
- Yarn weight: Bulky (#5) cotton or cotton blend
- Hook: 6 mm (J-10)
- Number of pieces: 1 body with built-in strap, plus 1 tie cord
- Layout: Seamless tube worked in joined rounds, bottom up
- Body circumference (pattern section): 48 sts = 16 in (40.6 cm)
- Size before rim: 9.5 in (24.1 cm) tall
- Rim (border) depth: 1 in (2.5 cm)
Materials
Yarn: Use a bulky cotton or cotton blend with a smooth, round ply so the crossed stitches look like rope. Avoid fuzzy or very loosely spun yarns, because they blur the eyelets and stretch under the weight of the bags.
- Teal (main sample): 170 g, about 240 m
- Rust / terracotta (optional second holder): 170 g, about 240 m
The quantities above are for one holder, tie cord included, and they include a safety margin of roughly 15%.
Tools:
– 6 mm (J-10) crochet hook
– 2 stitch markers
– Tapestry needle
– Scissors
– Measuring tape
– Spray bottle and pins for blocking
Abbreviations (US Terms)
- ch: chain
- sl st: slip stitch
- sc: single crochet
- sc2tog: single crochet 2 together
- dc: double crochet
- sk: skip
- st(s): stitch(es)
- sp: space
- rep: repeat
- rnd: round
Special stitch: Crossed double crochet (Xdc). Skip the next stitch and dc in the following stitch. Then, working in front of the dc you just made, dc in the skipped stitch. One Xdc uses 2 stitches and makes 2 stitches. The second dc lies diagonally over the first, which creates the chevron “V.”
Stitch-count note: Every ch-1 sp counts as 1 stitch. The ch-2 at the start of a dc round doesn’t count as a stitch.
Gauge and Checkpoints
Pattern gauge: 12 sts and 7 rnds = 4 in (10.2 cm) in the chevron eyelet pattern.
Single crochet gauge: 11 sts and 12 rows = 4 in (10.2 cm).
The holder itself is your best gauge swatch. Work through Rnd 11 and check your measurements before going further.
Checkpoints:
– After Rnd 2: The base ring measures about 2.75 in (7.0 cm) across the outside, with a hole about 2 in (5.1 cm) wide.
– After Rnd 4: It forms a shallow flared bowl, and the outer edge measures 16 in (40.6 cm) around.
– After Rnd 11: The 7 pattern rounds measure 4 in (10.2 cm) tall, and the tube is 8 in (20.3 cm) wide when flat.
– After Rnd 18: It measures 9.5 in (24.1 cm) tall from the bottom hole.
– After Rnd 21: It measures 10.5 in (26.7 cm) tall, and the rim is 7.25 in (18.4 cm) wide when flat.
If the holder is too big (wider than 8.5 in / 21.6 cm at Rnd 11), go down to a 5.5 mm hook and start over. If it’s too small (narrower than 7.5 in / 19.1 cm), go up to a 6.5 mm hook. Don’t change the stitch counts, because the pattern repeat needs exactly 48 stitches.
Body
Base Ring
Foundation: Ch 24 and join with a sl st to the first ch to form a ring, taking care not to twist the chain.
Rnd 1: Ch 1, then work 1 sc in each ch around. Join with a sl st to the first sc. (24 sc)
Rnd 2: Ch 1, then work 1 sc in each st around. Join. (24 sc)
These two firm rounds create the rolled ring around the dispensing hole. Keep your tension even, because the ring needs to hold its round shape.
Bottom Increases
Rnd 3: Ch 2 (doesn’t count as a stitch). Work 2 dc in the next st, then 1 dc in the next st. Rep from * 11 more times, then join. (36 dc)
Rnd 4: Ch 2. Work 2 dc in the next st, then 1 dc in each of the next 2 sts. Rep from * 11 more times, then join. (48 dc)
The piece now flares into a shallow bowl. This is the tapered bottom of the pod.
Chevron Eyelet Pattern
From here on, the stitch count stays at 48 in every round. That gives 12 repeats of 4 stitches.
Rnd 5 (Round A): Ch 2. Work 1 Xdc over the next 2 sts, ch 1, sk the next st, then dc in the next st. Rep from * 11 more times, then join to the first dc. (48 sts: 12 Xdc, which is 24 dc, plus 12 ch-1 sps and 12 single dc)
Rnd 6 (Round B): Ch 2, then sk the first st. Dc in the next st, work 1 Xdc over the next 2 sts, ch 1, then sk the next st. Rep from * 11 more times. The final “sk next st” lands on the stitch you skipped at the start. Join to the first dc. (48 sts: 12 dc, 12 Xdc and 12 ch-1 sps)
In Round B, each Xdc sits over a ch-1 sp and the dc next to it in Round A. Each new eyelet sits 2 stitches to the side of the eyelet below it. This staggered offset builds the diagonal lattice and stacks the crossed pairs into chevrons. When an Xdc’s skipped stitch is a ch-1 sp, work that dc into the space.
Rnds 7–18: Alternate Round A and Round B, starting with A on Rnd 7 and ending with B on Rnd 18. (48 sts in each round)
That makes 14 pattern rounds in total (7 of A and 7 of B), or 8 in (20.3 cm) of pattern height. Check the 9.5 in (24.1 cm) height now.
Rim (Border)
The rim is the border of this single piece. It pulls the top in a little so the holder keeps its pod shape. To keep track of the counts, think of the rim as two halves, front and back, when the holder is flat.
Border gauge: Same as the sc gauge: 11 sts and 12 rows = 4 in (10.2 cm).
Rnd 19 (decrease round): Ch 1. Work 1 sc in each of the next 4 sts (including any ch-1 sp), then sc2tog. Rep from * 7 more times, then join. You work 48 stitches into 40 stitches: 32 single sc plus 8 sc2tog. (40 sc, which is 20 per half)
Rnd 20: Ch 1, then work 1 sc in each st around. Join. (40 sc, 20 per half)
Rnd 21: Ch 1, then work 1 sc in each st around. Join and fasten off. (40 sc, 20 per half)
Why the math works: 40 sc at 11 sts per 4 in comes to about 14.5 in (36.8 cm) around, or 7.25 in (18.4 cm) when flat. That is just narrower than the 8 in (20.3 cm) body. Three sc rounds at 12 rows per 4 in add 1 in (2.5 cm), bringing the total height to 10.5 in (26.7 cm).
Strap
- Lay the holder flat with the rim join at one side fold, then choose the back half. Its 20 sts are numbered 1–20 from right to left.
- Place a marker in back st 6 and another in back st 15. The 10 sts between the markers, markers included, are the center of the back.
- Row 1: Join yarn in st 6. Ch 1, then work 1 sc in each of sts 6, 7 and 8. Turn. (3 sc)
- Rows 2–30: Ch 1, then work 1 sc in each st across. Turn. (3 sc)
- Fasten off and leave a 12 in (30.5 cm) tail.
- Without twisting the strap, sew Row 30 to back sts 13, 14 and 15 using whipstitch through both loops.
The strap is 3 sts wide, which is about 1.1 in (2.8 cm), and 30 rows long, or 10 in (25.4 cm). The 4 stitches between the strap ends (sts 9–12) are a gap of about 1.5 in (3.8 cm). Together these form a loop that rises about 4.5 in (11.4 cm) above the rim.
Tie Cord and Bow
- Ch 80. Starting in the second ch from the hook, work a sl st into the back bump of each ch across. (79 sl st) Fasten off and trim the ends close.
- The cord should be about 26 in (66.0 cm) long.
- Find the front center of Rnd 3, directly opposite the strap. Starting there, weave the cord around the round, passing over 3 dc and under 3 dc. Rnd 3 has 36 dc, so you’ll make 12 passes and come back out at the starting point.
- Pull the ends out evenly. Draw the cord just snug, but don’t cinch it: the hole should stay 2 in (5.1 cm) wide.
- Tie a bow with loops about 1.5 in (3.8 cm) long and tails about 2 in (5.1 cm) long. Tie a small overhand knot at each tail end.
Final Blocking
- Weave in all ends before blocking, running each one through at least 2 in (5.1 cm) of solid sc or dc.
- Stuff the holder firmly with plastic bags or a rolled towel until the body is 8 in (20.3 cm) wide when flattened.
- Mist the whole surface with water until it is damp but not soaked.
- Use your fingers to open each eyelet into a neat round hole, and nudge each Xdc so its top dc lies cleanly on the diagonal.
- Roll the base ring between your fingers so it curls outward around the hole.
- Pin the strap straight and flat, 10 in (25.4 cm) long, on a towel.
- Let it dry completely, which takes 12–24 hours, before removing the stuffing.
- Fluff the bow and adjust its tails so they hang evenly.
Final Quality-Control Checklist
- The base ring is 24 sc, firm and round, with a hole about 2 in (5.1 cm) wide.
- Rnd 4 has 48 dc, and every pattern round has 48 sts.
- There are 12 chevron columns around, and the eyelets step diagonally with a 2-stitch offset.
- The body is 8 in (20.3 cm) wide when flat and 9.5 in (24.1 cm) tall before the rim.
- The rim has 40 sc (20 per half) and is 1 in (2.5 cm) deep.
- The total height is 10.5 in (26.7 cm).
- The strap is 3 sts × 30 rows, isn’t twisted, and is sewn to the center back.
- The cord is about 26 in (66.0 cm) long, woven through Rnd 3 and tied at the front center.
- All ends are woven in securely.
Troubleshooting
The eyelets stack in vertical lines instead of diagonals. You probably worked the same round type twice. Make sure Round A and Round B alternate, and check that Round B starts by skipping the first stitch.
The stitch count drifts away from 48. Ch-1 sps count as stitches. Count them, and check that the final repeat of Round B ends on the stitch you skipped at the start.
The chevrons look flat. Always work the second dc of each Xdc in front of the first one. Working it behind hides the cross.
The base ring ruffles. Your foundation chain was too loose. Rework it with a smaller hook, then switch back for Rnd 1.
The rim flares out. Work Rnds 19–21 with a 5.5 mm hook.
The holder sags when full. The yarn is too soft or your gauge is too loose. Go down a hook size, or switch to 100% cotton.
Care
Hand wash in cool water with mild soap, press out the water in a towel, and dry the holder flat or stuffed with a towel to keep its shape. Don’t tumble dry, because heat can shrink cotton unevenly.
Final Notes
The whole design rests on one measurement chain. A 24-stitch base ring makes a 2 in (5.1 cm) hole. Two increase rounds bring the body to 48 stitches, which is 16 in (40.6 cm) around. Fourteen pattern rounds build 8 in (20.3 cm) of chevron lattice, and the work measures 9.5 in (24.1 cm) at that point. A 40-stitch rim adds 1 in (2.5 cm) for a finished height of 10.5 in (26.7 cm). Check each link of that chain as you go, and your holder will come out right. Make one in every kitchen color you love.
Happy crocheting!