
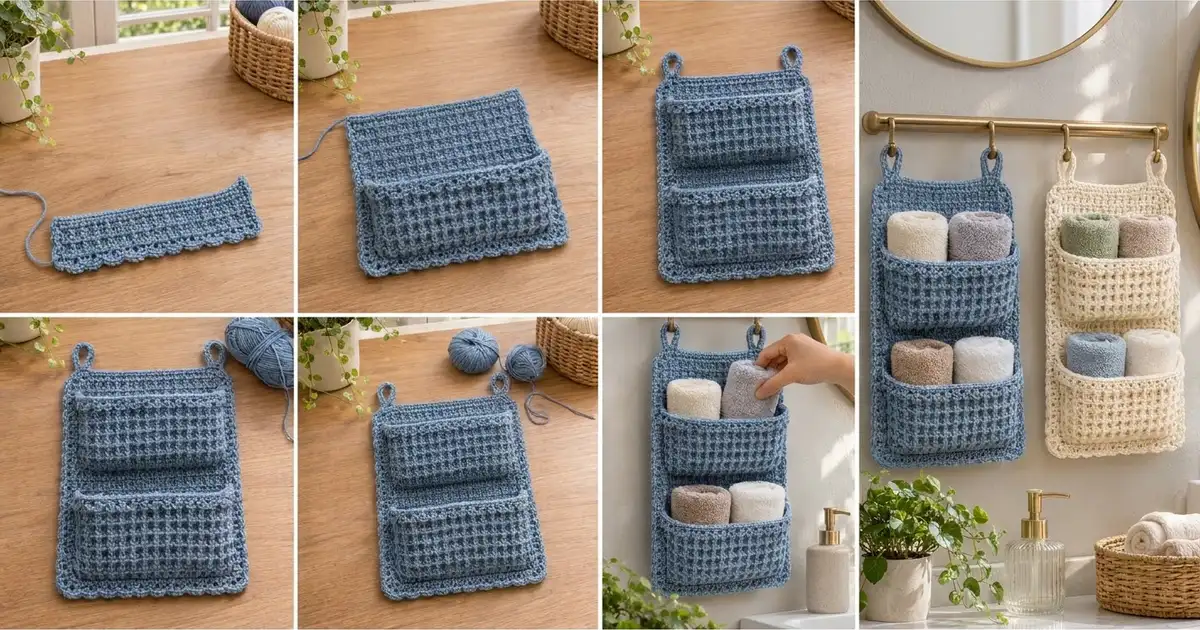
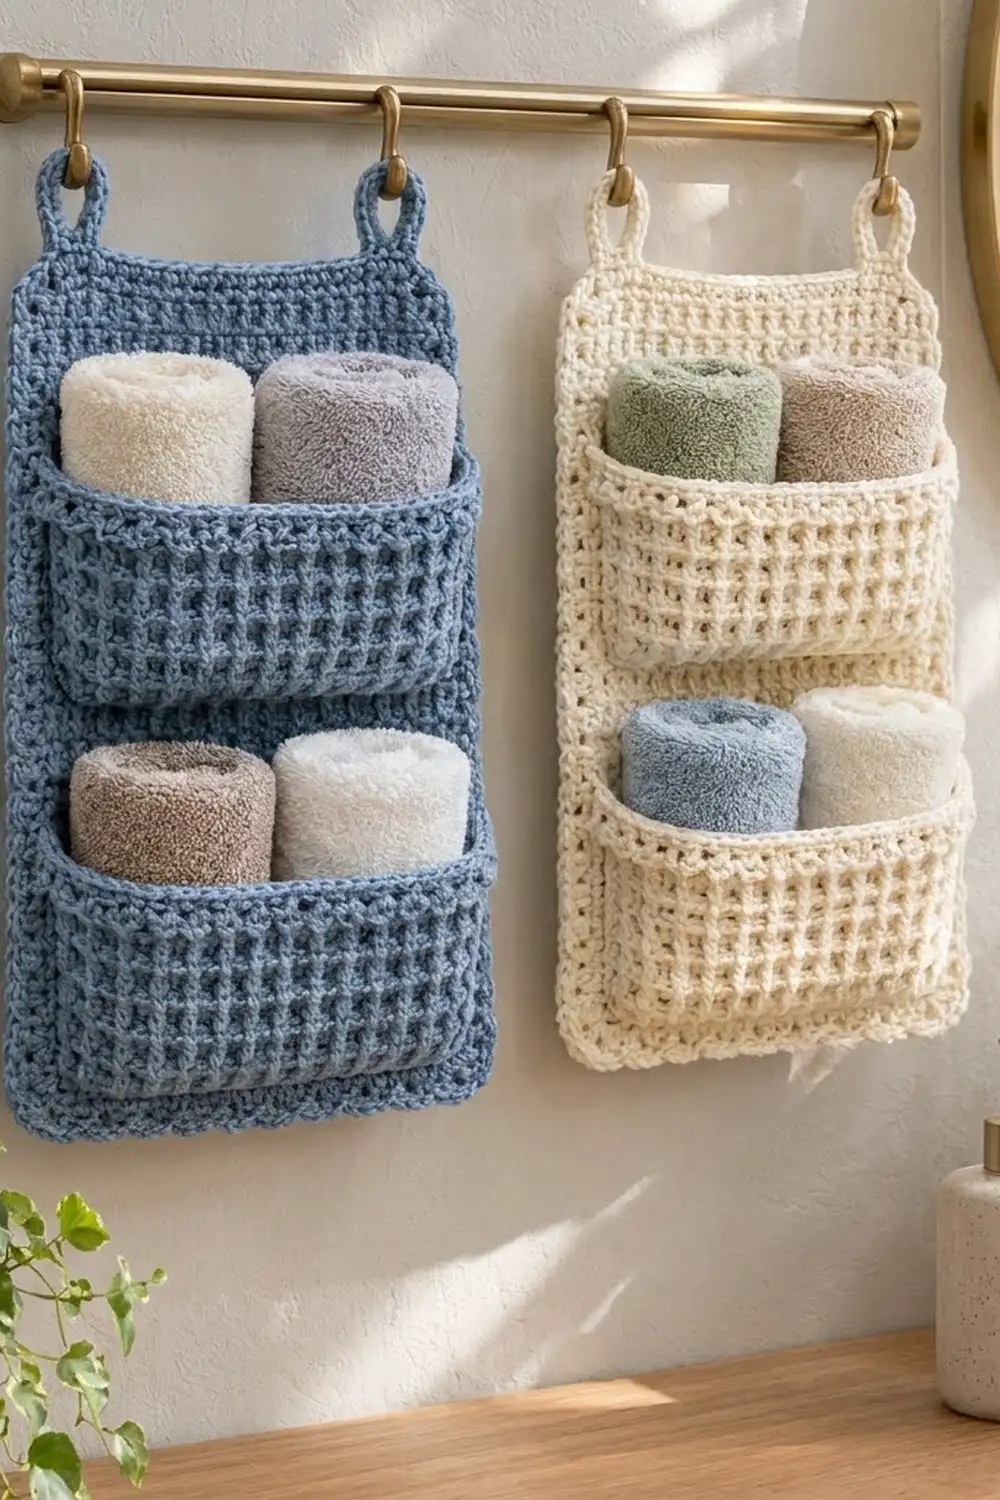
This hanging organizer gives rolled hand towels, washcloths or small supplies a tidy place on the wall. A deep waffle texture covers both the back panel and the two pockets. Small shell scallops trim the pocket tops and the outer edge, and two sturdy loops slip over a towel rail or hooks.
The sample is a soft dusty denim blue in worsted-weight cotton, which suits bathrooms. A creamy natural shade also works well, and the stitch counts stay the same in any color. The style is simple and farmhouse-clean: the texture does the decorating.
This pattern uses US crochet terms. The finished organizer measures about 11.9 in (30.2 cm) wide and 16.3 in (41.3 cm) tall, or about 17.8 in (45.1 cm) including the hanging loops.
Construction is straightforward. You work one flat waffle back panel and two waffle pocket fronts. Each pocket gets a short single crochet wall worked around its sides and bottom. Next you whipstitch the pockets onto the panel, work a two-round scalloped border around the panel, and add the loops last.
Finished Size and Construction
- Finished size: 11.9 in x 16.3 in (30.2 cm x 41.3 cm), or 17.8 in (45.1 cm) tall with loops
- Skill level: Intermediate (front post stitches, edge counts)
- Terminology: US
- Yarn weight: Worsted (#4), cotton
- Hook: 5.0 mm (H-8)
- Number of pieces: 3 (1 back panel, 1 upper pocket, 1 lower pocket)
- Layout: pockets stacked vertically, centered on the panel
- Back panel before border: 10.4 in x 15 in (26.4 cm x 38.1 cm)
- Pocket fronts (body only): 8.8 in (22.4 cm) wide; upper 4.5 in (11.4 cm) tall, lower 5.5 in (14.0 cm) tall
- Pocket depth (wall): 1.3 in (3.2 cm)
- Border depth: 0.75 in (1.9 cm) on the sides and bottom, 0.5 in (1.3 cm) on the top
Materials
Yarn: Use a smooth worsted-weight cotton or cotton blend. Cotton holds the waffle texture crisply, washes well, and doesn’t stretch much under the weight of towels. Avoid very soft, splitty yarns, because post stitches show every split ply.
- Dusty blue (sample color): 300 g, about 510 m
For the cream colorway, swap in the same amount of natural/cream cotton.
Tools:
– 5.0 mm (H-8) crochet hook
– Tapestry needle
– 8 locking stitch markers
– Scissors
– Measuring tape
– Blocking mat and rust-proof pins
– Spray bottle
The yarn amount includes a margin of about 15%, which covers the gauge swatch and any small differences in tension.
Abbreviations (US Terms)
- ch – chain
- sl st – slip stitch
- sc – single crochet
- dc – double crochet
- FPdc – front post double crochet: yarn over, insert hook from front to back to front around the post of the stitch below, then complete as a dc
- sk – skip
- st(s) – stitch(es)
- sp – space
- RS / WS – right side / wrong side
- tch – turning chain
Special stitch: Shell. Work 3 dc in the same stitch.
Turning chain: In waffle rows, ch 3 counts as the first dc. In sc rows, ch 1 does not count as a stitch.
Gauge and Checkpoints
Gauge: 15 sts and 8 rows = 4 in (10.2 cm) in waffle pattern.
Make one pocket front first and use it as your gauge test. It is small and it is also a real piece, so nothing goes to waste.
Checkpoints:
– Upper pocket front after Row 9: 8.8 in x 4.5 in (22.4 cm x 11.4 cm)
– Back panel after Row 9: 10.4 in (26.4 cm) wide and 4.5 in (11.4 cm) tall
– Back panel after Row 30: 10.4 in x 15 in (26.4 cm x 38.1 cm)
– Bordered panel: 11.9 in x 16.3 in (30.2 cm x 41.3 cm)
If your piece is too big, go down to a 4.5 mm hook. If it is too small, go up to a 5.5 mm hook. If only the height is off, check how high you pull up the dc loops. Waffle rows grow quickly when the loops are loose.
Waffle Pattern
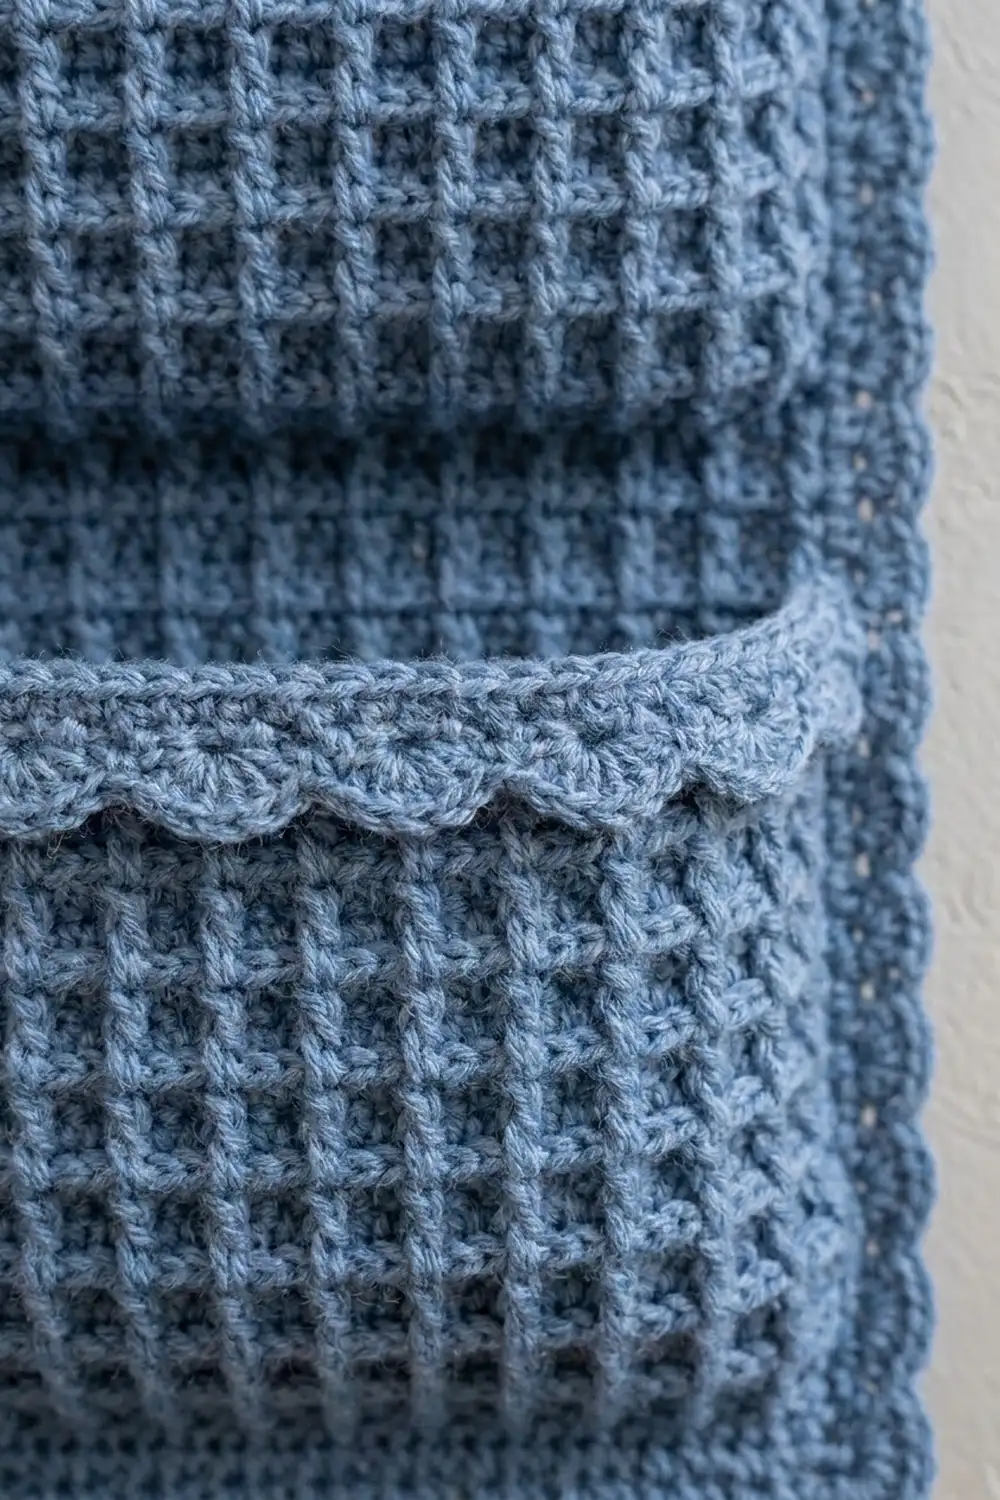
Waffle is worked over a multiple of 3 sts. The rows alternate so that the raised posts form a grid.
Row A: Ch 3 (counts as dc), FPdc around next st, dc in next 2 sts, FPdc around next st; repeat from * to last st, dc in top of tch.
Row B: Ch 3 (counts as dc), dc in next st, FPdc around each of next 2 sts, dc in next st; repeat from * to last st, dc in top of tch.
Every dc in Row B is worked into a FPdc from Row A, and every FPdc wraps a dc. That is what builds the grid. Each row keeps its full stitch count.
Back Panel
Ch 41.
Row 1 (foundation): Dc in 4th ch from hook (the skipped 3 ch count as the first dc), dc in each remaining ch. Turn. (39 sts)
Row 2 (RS): Work Row A. Turn. (39 sts: 13 FPdc, 26 dc including the edges)
Row 3 (WS): Work Row B. Turn. (39 sts: 24 FPdc, 15 dc including the edges)
Rows 4–30: Repeat Rows A and B, working Row A on even rows and Row B on odd rows. You finish with Row 30, a Row A. (39 sts in every row)
Fasten off. The panel measures 10.4 in x 15 in (26.4 cm x 38.1 cm).
Pockets
Upper Pocket Front
Ch 35.
Row 1: Dc in 4th ch from hook and in each remaining ch. Turn. (33 sts)
Rows 2–9: Repeat Row A (even rows) and Row B (odd rows). Row 9 is a Row B on the WS. (33 sts)
The body measures 8.8 in x 4.5 in (22.4 cm x 11.4 cm).
Shell Top Edge
Row 10 (RS): Ch 1, sc in each st across. Turn. (33 sc)
Row 11: Ch 1, sc in first sc, sk 1, Shell in next sc, sk 1, sc in next sc; repeat from * 7 more times. (8 shells, 9 sc)
This works because each repeat uses 4 sts, so 8 repeats + 1 sc = 33. Fasten off. The edge adds 0.75 in (1.9 cm), so the pocket front is 5.25 in (13.3 cm) tall in total.
Upper Pocket Wall
The wall is a band of sc worked in one long U-shape along the left side, bottom and right side of the pocket body. Do not work into the shell edge rows.
Row 1: With RS facing, join yarn at the top of the left side edge, at the end of Row 9. Ch 1. Work 18 sc down the side (2 sc in each of 9 row ends). Then work 33 sc across the bottom, one in each foundation ch. Finish with 18 sc up the right side. Turn. (18 + 33 + 18 = 69 sc)
Rows 2–5: Ch 1, sc in each sc. Turn. (69 sc)
Do not add any extra stitches at the corners. When counts stay the same at a corner, the band folds up 90 degrees and becomes a box wall. Fasten off and leave a 40 in (101.6 cm) tail for sewing. The wall is 1.25 in (3.2 cm) deep.
Lower Pocket
Work the same way as the upper pocket, with these changes:
- Rows 2–11: waffle pattern. Row 11 is a Row B. (33 sts) The body is 8.8 in x 5.5 in (22.4 cm x 14.0 cm).
- Row 12: sc across. (33 sc)
- Row 13: shell row. (8 shells, 9 sc) The total front height is 6.25 in (15.9 cm).
- Wall Row 1: 22 sc down the side (2 per row end x 11 rows), 33 sc across the bottom, 22 sc up the other side. (22 + 33 + 22 = 77 sc)
- Wall Rows 2–5: sc in each sc. (77 sc) Leave a 45 in (114.3 cm) tail.
Make All Pieces
All three pieces use the dusty blue yarn:
- Back panel: 1
- Upper pocket: 1
- Lower pocket: 1
Layout grid (panel rows are counted from the bottom, and panel stitches 1–39 run left to right with RS facing):
Rows 25–30  | open panel (hanging area)
Rows 16–24  | UPPER POCKET, sts 4–36
Rows 14–15  | open panel (lower pocket's shell edge overlaps here)
Rows 3–13   | LOWER POCKET, sts 4–36
Rows 1–2    | open panel
Each pocket covers 33 panel stitches (sts 4–36), so 3 stitches stay open on each side, about 0.8 in (2.0 cm).
Joining
Method: Whipstitch the last row of each pocket wall to the RS of the back panel, using the long tail.
Placing markers: Lay the panel RS up.
- Lower pocket: Mark sts 4 and 36 at the top of Row 2, then mark the post of st 4 and st 36 in Row 13.
- Upper pocket: Mark sts 4 and 36 at the top of Row 15, then mark the posts of st 4 and st 36 in Row 24.
Stitch-to-stitch logic, lower pocket:
- Bottom: Sew the 33 bottom wall sts to the 33 panel sts (sts 4–36) along the top of Row 2, one wall st to one panel st.
- Each side: Sew 22 wall sts along the posts of the column (st 4 on the left, st 36 on the right) through Rows 3–13. That is 2 wall sts per panel row, matching the 2 sc per row end you worked into the pocket.
Stitch-to-stitch logic, upper pocket:
- Bottom: Sew the 33 bottom wall sts to sts 4–36 along the top of Row 15.
- Each side: Sew 18 wall sts along columns 4 and 36 through Rows 16–24, 2 per row.
Tension: Sew firmly, but don’t pull so tight that the panel puckers. Lay the piece flat every 10 stitches to check. The pocket fronts should sit about 1.25 in (3.2 cm) forward of the panel, with straight sides.
Size checkpoint: The panel should still measure 10.4 in x 15 in (26.4 cm x 38.1 cm). If it has drawn in, loosen the side seams.
Border
Border gauge: 4 sc = 1 in (2.5 cm) along the sides, and 1 sc per stitch across the top and bottom.
Round 1 (RS): Join yarn in the first st of Row 30 at the top-right corner. Work all the way around the panel as follows:
- Top: Ch 1, sc in each of 39 sts across. (39 sc)
- First corner: Ch 2.
- Side: Work 2 sc in each of 30 row ends, plus 1 extra sc in the Row 15 end. (60 + 1 = 61 sc)
- Corner: Ch 2.
- Bottom: Work 1 sc in each of 39 foundation ch, plus 1 extra sc in the 13th and 27th ch. (39 + 2 = 41 sc)
- Corner: Ch 2.
- Other side: Work the side the same way. (61 sc)
- Last corner: Ch 2, sl st to the first sc.
(202 sc + 4 ch-2 corner sp)
The per-side counts don’t include the ch-2 corner spaces.
Round 2: Work around again as follows:
- Top: Ch 1, sc in each of 39 sc. (39 sc)
- Top-left corner: 3 sc in the corner sp.
- Side: Sc in first sc, sk 1, Shell in next, sk 1, sc in next; repeat from * 14 more times. (15 shells, 16 sc)
- Bottom-left corner: 5 dc in the corner sp.
- Bottom: Sc in first sc, sk 1, Shell, sk 1, sc; repeat from * 9 more times. (10 shells, 11 sc)
- Bottom-right corner: 5 dc in the corner sp.
- Other side: Work the side repeat as before. (15 shells, 16 sc)
- Top-right corner: 3 sc in the corner sp, sl st to the first sc. Fasten off.
(218 sts total)
Why the math works: Each shell repeat uses 4 sts, so every scalloped side needs 4 x repeats + 1.
- Sides: 61 = 4 x 15 + 1.
- Bottom: 41 = 4 x 10 + 1.
- Top: It stays plain sc, so its 39 sts need no adjusting.
The extra sts in Round 1 are the only adjustment.
Hanging Loops
Number the 39 top sc of Round 2 from left to right.
Left loop: Join yarn in sc 3. Ch 12, then sl st in sc 6. Turn and work 20 sc into the ch-12 loop. Sl st in sc 3 and fasten off.
Right loop: Work the same way between sc 34 and sc 37.
Each loop stands about 1.5 in (3.8 cm) tall.
Final Blocking
- Weave in all ends along seams or the inside of the pocket walls.
- Lightly mist the whole piece with water.
- Pin the panel flat to 11.9 in x 16.3 in (30.2 cm x 41.3 cm).
- Pin out each shell along the sides and bottom.
- Stuff each pocket loosely with a folded towel so the walls dry square at 1.25 in (3.2 cm) deep.
- Leave it to dry completely before unpinning.
Final Quality-Control Checklist
- Panel rows: 39 sts each, 30 rows
- Pocket fronts: 33 sts each, with 8 shells on top
- Pocket walls: 69 sc (upper) and 77 sc (lower)
- Pockets centered on sts 4–36
- Border sides: 15 shells each; bottom: 10 shells
- Loops line up with each other and sit 3 sts in from each corner
- Finished size: 11.9 in x 16.3 in (30.2 cm x 41.3 cm)
Troubleshooting
- Grid looks like ribbing: You probably worked Row A twice in a row. Check that every row alternates.
- Panel edges slant: You missed the tch dc or worked into the first st. Count 39 sts on every row.
- Pocket wall flares: You added stitches at the corners. Keep the count at exactly 69 or 77.
- Side border ruffles: You worked more than 61 sc down the side. Rework at 2 per row end + 1.
- Pocket sags forward: Sew the bottom seam tighter or add a second pass of whipstitch.
- Loops stretch: Work a sl st round around each loop’s outer edge.
Care
Machine wash cool on a gentle cycle in a laundry bag, then reshape and dry flat. Avoid hanging it wet, because damp cotton stretches under its own weight.
Final Notes
The measurements build on each other:
- A gauge of 15 sts and 8 rows per 4 in (10.2 cm) gives a 10.4 in x 15 in (26.4 cm x 38.1 cm) panel.
- The 8.8 in (22.4 cm) pockets sit centered on 33 panel stitches.
- The 1.25 in (3.2 cm) walls give the pockets depth.
- The border brings the finished organizer to 11.9 in x 16.3 in (30.2 cm x 41.3 cm).
If you check your size at each checkpoint, the pockets and border will fit together as written.
Happy crocheting!