

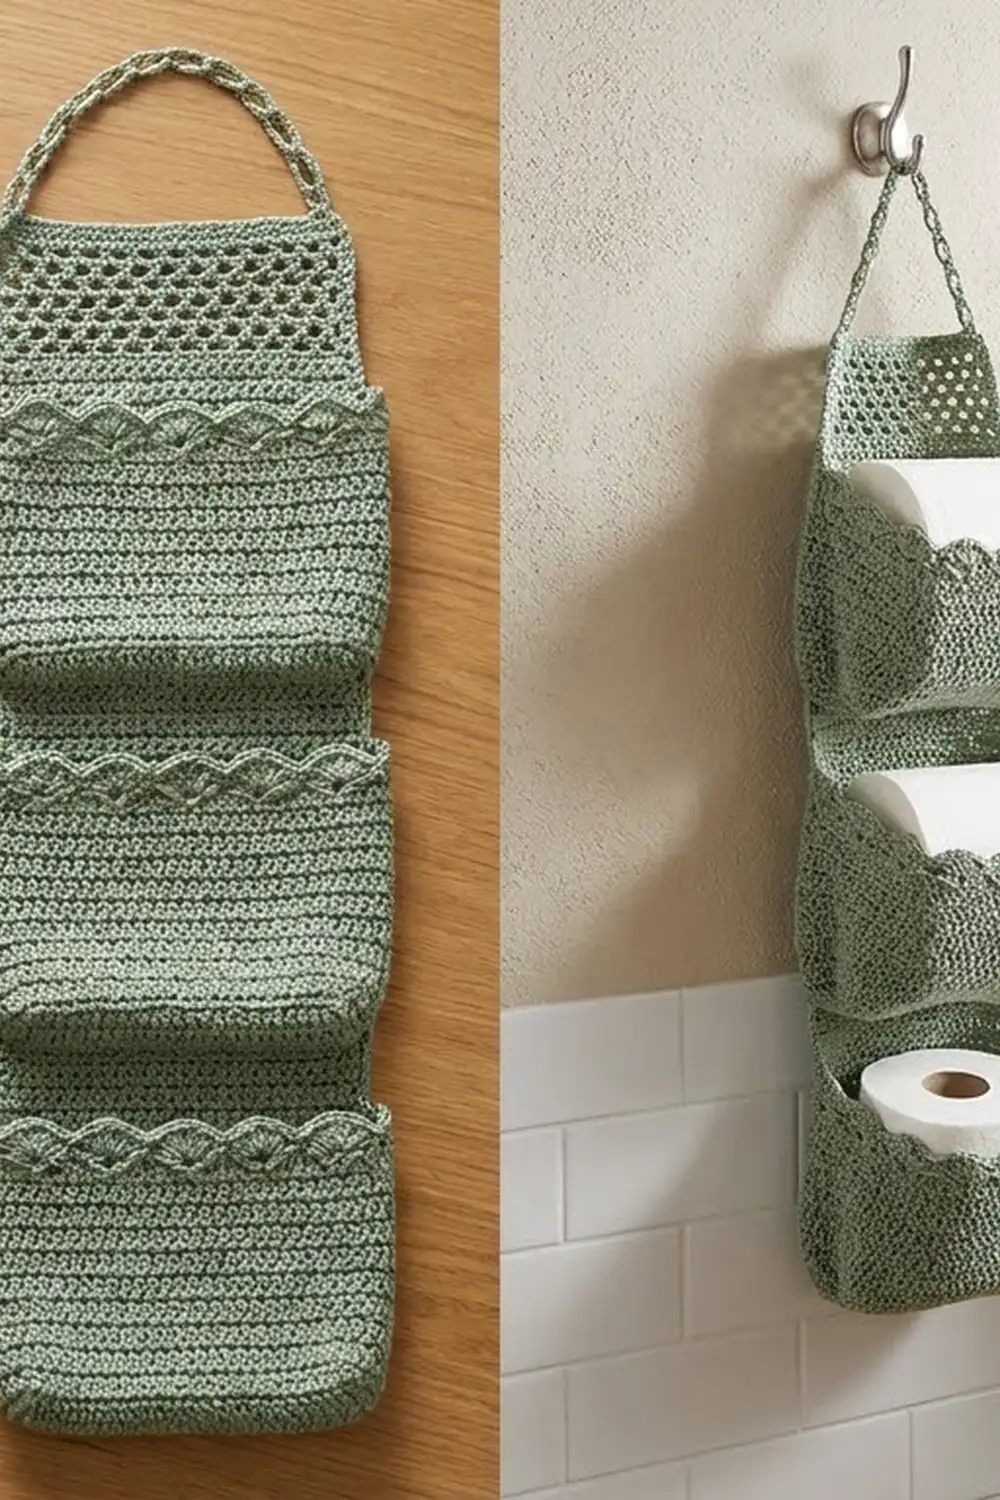
The Sage Scallop Hanging Toilet Paper Holder keeps three spare rolls tidy and within reach, using no shelf space. It is a slim back panel with three flat-backed pockets stacked on it. Each pocket ends in a band of shell lace with a soft scalloped edge.
The sample is worked in one sage green cotton, which looks fresh against white tiles and pale towels. Cream works just as well for a softer, farmhouse look. Every piece is solid single crochet except the lace bands and the open mesh triangle at the top, so the holder is sturdy enough to carry three rolls.
This pattern uses US crochet terms. The finished holder measures about 6.5 in (16.5 cm) wide and 21.5 in (54.6 cm) long to the tip of the triangle, or 23.25 in (59.1 cm) including the hanging loop.
Construction is simple. You crochet one back panel in rows, finish it with a mesh triangle and loop, and add a two-round border. Then you make three pockets in the round, each starting from a rectangular base, and whipstitch their back edges and back walls onto the panel.
Finished Size and Construction
- Finished size: 6.5 in x 21.5 in (16.5 cm x 54.6 cm); 23.25 in (59.1 cm) with the loop
- Skill level: Intermediate
- Terminology: US crochet terms
- Yarn weight: Worsted (#4) cotton
- Hook: 4.0 mm (G-6)
- Number of pieces: 4 (1 back panel, 3 pockets)
- Layout: 1 column with 3 pockets stacked vertically, bases 6 in (15.2 cm) apart
- Pocket size: 5.75 in wide x 4.5 in deep x 2.7 in tall (14.6 cm x 11.4 cm x 6.9 cm)
- Panel size before border: 5.75 in x 20.75 in (14.6 cm x 52.7 cm)
- Border depth: 0.4 in (1.0 cm), 2 rounds
Materials
Yarn: Use a smooth worsted-weight cotton or cotton blend. Cotton holds its shape under the weight of the rolls and copes well with bathroom humidity. Avoid fuzzy or very stretchy yarns, because the pockets will sag.
- Sage green: 170 g (about 260 m)
- Optional second holder in cream: another 170 g (about 260 m)
These amounts include a margin of about 15% for your gauge swatch and seams.
Tools:
– 4.0 mm (G-6) crochet hook
– Tapestry needle
– At least 6 stitch markers
– Scissors
– Tape measure
– Blocking mat, rust-proof pins and a spray bottle
Abbreviations (US Terms)
- ch – chain
- sl st – slip stitch
- sc – single crochet
- hdc – half double crochet
- dc – double crochet
- BLO – back loop only
- sk – skip
- st(s) – stitch(es)
- sp – space
- RS – right side
Special stitch:
– V-st (V-stitch): (dc, ch 1, dc) in the same stitch.
Gauge and Checkpoints
Gauge: 18 sc and 20 rows = 4 in (10.2 cm) in sc worked in rows.
Make one pocket first. It is the best gauge test, because the pocket’s back edge has to match the panel’s width exactly.
Checkpoints:
– Pocket base after Rnd 10: 5.75 in (14.6 cm) along the back edge and about 4.5 in (11.4 cm) deep.
– Pocket walls after Rnd 16: 1.2 in (3.0 cm) tall.
– Pocket walls after Rnd 19: 2.7 in (6.9 cm) tall.
– Panel after Row 30: 6 in (15.2 cm) tall and 5.75 in (14.6 cm) wide.
– Panel after Row 90: 18 in (45.7 cm) tall.
If your base is too big, go down to a 3.75 mm hook. If it’s too small, go up to a 4.5 mm hook. If you change hooks, use the same hook for the panel so the stitch-to-stitch seams still line up.
Pocket (Make 3)
The base is worked in joined rounds around a foundation chain, with no turning. In Rnd 2, mark the center sc of each 3-sc group as a corner stitch. Move each marker up into the new center sc on every round.
Base
Rnd 1: Ch 9. Work 3 sc in the 2nd ch from the hook, sc in the next 6 ch, and 3 sc in the last ch. Rotate the work. Working along the opposite side of the foundation chain, sc in the next 6 ch. Join with a sl st to the first sc. (18 sts) The round is now laid out as an end group of 3, a back side of 6, an end group of 3, and a front side of 6.
Rnd 2: Ch 1. Work 3 sc in the first st, sc in the next st, 3 sc in the next st, sc in the next 6 sts, 3 sc in the next st, sc in the next st, 3 sc in the next st, and sc in the next 6 sts. Join. (26 sts) Place the 4 corner markers.
Rnds 3–10: Ch 1. Sc in each st up to the next marked corner st, then work 3 sc in the corner st. Repeat around and join. Each round adds 8 sts, 2 at each corner. Each round’s own total:
- Rnd 3: 34 sts
- Rnd 4: 42 sts
- Rnd 5: 50 sts
- Rnd 6: 58 sts
- Rnd 7: 66 sts
- Rnd 8: 74 sts
- Rnd 9: 82 sts
- Rnd 10: 90 sts
After Rnd 10, each long side has 26 sts, including its 2 corner sts, and each short side has 21 sts, including its 2 corner sts. Check: 24 + 24 + 19 + 19 + 4 corners = 90. Check the base against the checkpoint now.
Walls
Rnd 11: Ch 1, then sc in BLO of each st around. Join. (90 sts) This turns the walls upward and leaves a ridge of front loops along the base edge, which you will use for the seam.
Rnds 12–16: Ch 1, sc in each st around, and join. (90 sts)
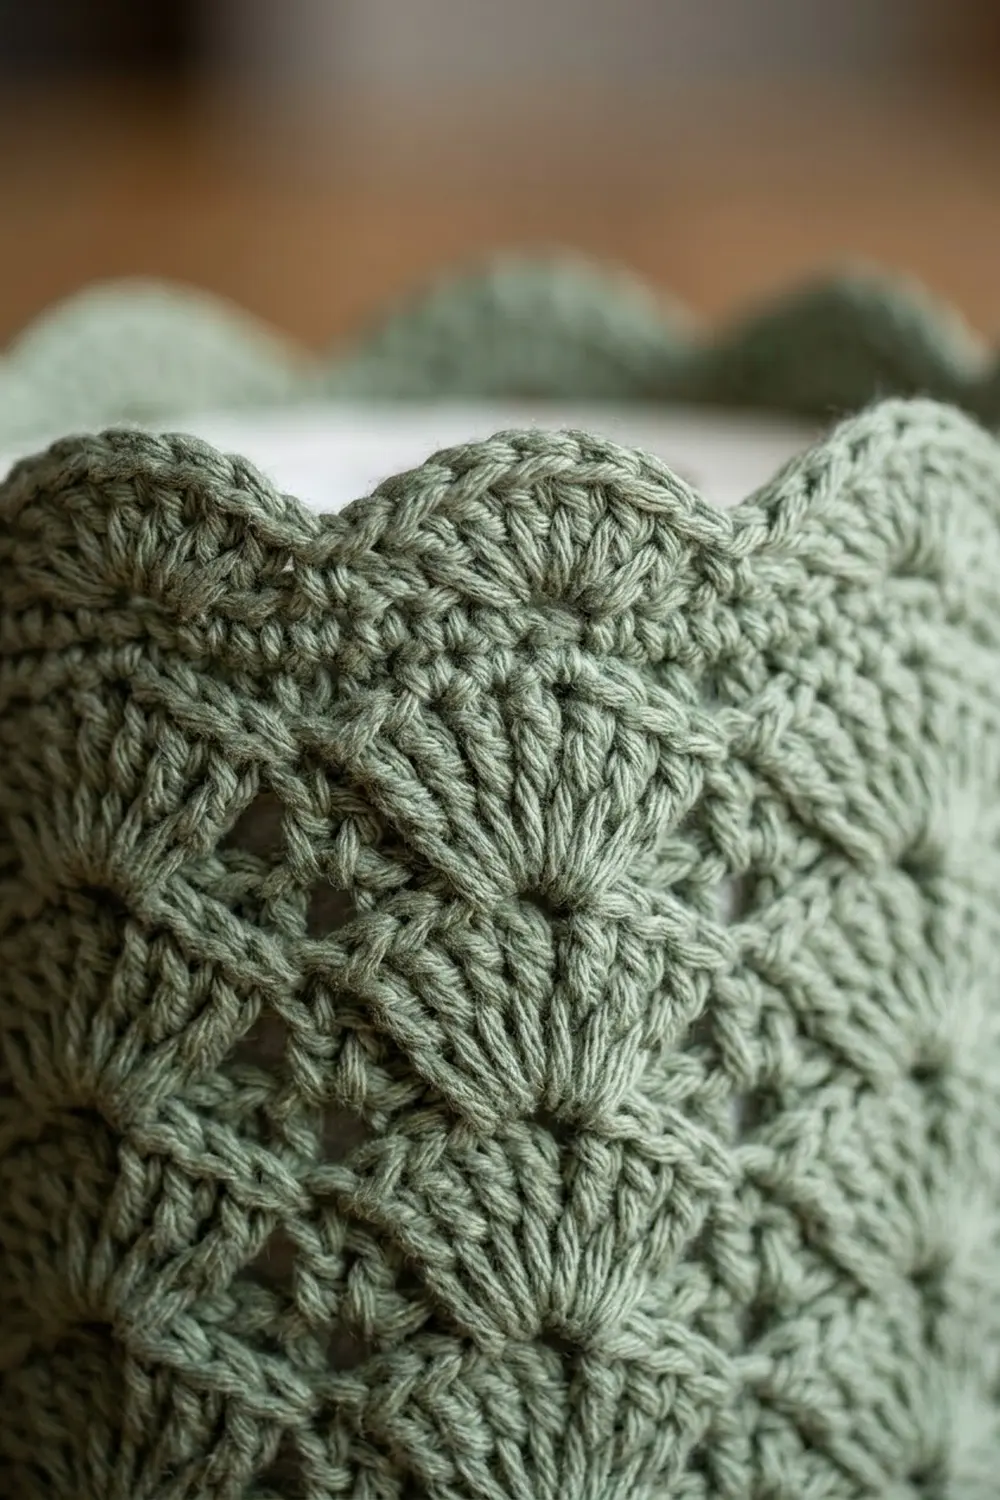
As the walls rise, the front corners round out naturally. They round out more once a roll is inside. The back corners stay crisp so the back can sit flat against the panel.
Lace band
Rnd 17 (V-st round): Ch 4 (counts as dc + ch 1), then dc in the same st as the join. Sk 2 sts, V-st in the next st. Repeat from * 28 more times. Sk the last 2 sts and sl st in the 3rd ch of the beginning ch-4. (30 V-sts)
Rnd 18 (fan round): Sl st into the first ch-1 sp. Ch 1 and sc in the same sp. Work 7 dc in the ch-1 sp of the next V-st, then sc in the ch-1 sp of the next V-st. Repeat from * 13 more times. Work 7 dc in the ch-1 sp of the last V-st and sl st in the first sc. (15 fans of 7 dc + 15 sc = 120 sts)
Rnd 19 (scallop trim): Sc in the next dc, hdc in the next dc, dc in the next dc, (dc, ch 1, dc) in the next dc (the center of the fan), dc in the next dc, hdc in the next dc, sc in the next dc, then sl st in the next sc. Repeat from * around, finishing with the sl st in the sc where the round began.
Count for Rnd 19: 105 sts worked one per existing dc, plus 15 extra dc at the scallop points, makes 120 sts, plus 15 sl sts and 15 ch-1 sps.
Fasten off and weave in the ends.
Back Panel
Row 1: Ch 27. Sc in the 2nd ch from the hook and in each ch across. (26 sts)
Rows 2–90: Ch 1, turn, and sc in each st across. (26 sts)
Place markers on Rows 2, 32 and 62 at the right-hand edge. These rows are where the pocket bases will sit. Check the width and length against the checkpoints at Row 30 and Row 90.
Mesh triangle
Row 1: Ch 1 and turn. Sc in the first st, then ch 5, sk 4 sts, sc in the next st. Repeat from * 4 more times. (5 ch-5 loops; sc in sts 1, 6, 11, 16, 21 and 26)
Row 2: Turn, sl st in each of the next 3 ch, ch 1, and sc in the same loop. Ch 5, sc in the next loop. Repeat from * across. (4 loops)
Rows 3–5: Repeat Row 2. Each row has one loop fewer than the row before: 3 loops, then 2, then 1. Each row starts and ends half a loop further in, which creates the sloped sides of the triangle.
Row 6 (loop): Turn, sl st in each of the next 3 ch, ch 1, and sc in the loop. Ch 20 and sl st in that sc. Work 26 sc around the ch-20 loop, then sl st in the base sc.
Fasten off. The triangle is about 2.75 in (7.0 cm) tall, and the finished loop hangs about 1.75 in (4.4 cm) high.
Make All Pieces
Sage green:
– 1 back panel with mesh triangle and loop
– 3 pockets
Layout (RS facing, bottom pocket bases on panel Rows 2, 32 and 62):
        ( loop )
          /\
         /  \      mesh triangle
        |    |     Rows 63-90: top roll space
        | P3 |     Row 62: pocket 3 base
        |    |
        | P2 |     Row 32: pocket 2 base
        |    |
        | P1 |     Row 2: pocket 1 base
        +----+     border
Border (Back Panel Only)
Work the border before you attach the pockets. It is much easier to do while the panel is still flat.
Border gauge: The panel has 18 sts but 20 rows per 4 in (10.2 cm). Along the sides, work 9 sc for every 10 row ends, so sc in each row end but skip every 10th one. Ninety rows give 81 sc per side, which keeps the edges flat instead of ruffled.
Rnd 1: With RS facing, join yarn in the first st of Row 1, working into the bottom of the foundation chain. Work as follows, then join:
– Bottom edge: 3 sc in the first st, sc in the next 24 sts, 3 sc in the last st. (30 sts) This uses the edge’s own 26 sts, with its 2 end sts as the corners; corners are not added twice.
– First side: 81 sc along the 90 row ends.
– First slope: 4 sc in each mesh row end. (20 sts)
– Apex: 3 sc in the Row 6 base sc, behind the loop. (3 sts)
– Second slope: 4 sc in each mesh row end. (20 sts)
– Second side: 81 sc.
Rnd 1 total: 30 + 81 + 20 + 3 + 20 + 81 = 235 sts.
Rnd 2: Ch 1. Sc in each st around, working 3 sc in the center sc of each bottom corner group and of the apex group. Join and fasten off.
Rnd 2 count: 235 sts worked one per stitch, plus 6 extra (2 at each of 3 points) = 241 sts.
Why the math works: The bottom edge keeps its 26 stitches, so it lines up with the 26-stitch back edge of each pocket. The 9-for-10 ratio on the sides matches the stitch gauge to the row gauge. The 3-sc groups at the two bottom corners and the apex add exactly the 2 stitches each point needs per round. The border adds about 0.4 in (1.0 cm) on every edge, bringing the panel from 5.75 in (14.6 cm) to about 6.5 in (16.5 cm) wide.
Joining
Method: Whipstitch with sage yarn and a tapestry needle, holding the RS of the panel up.
Stitch-to-stitch logic:
1. Lay pocket 1 so its back long side (26 sts, corners included) runs along panel Row 2.
2. Whipstitch each free front loop left by Rnd 11 to the matching stitch of Row 2, one to one, from stitch 1 to stitch 26.
3. Fold the back wall up against the panel. Whipstitch each back corner column (Rnds 11–16, 6 rounds) to the edge column of the panel on that side.
4. Tack the back wall’s lace to the panel at the ch-1 tip of each back scallop.
5. Repeat for pocket 2 on Row 32 and pocket 3 on Row 62.
Tension: Draw each stitch snug but not tight. The seam should lie flat without puckering the panel. Check by pulling the base gently forward: it should stand out level with the panel instead of drooping.
Size checkpoint: After joining, the panel should still measure 21.5 in (54.6 cm) to the tip. Each base should stick out about 4.5 in (11.4 cm), and the bases should sit 6 in (15.2 cm) apart.
Final Blocking
- Mist the whole holder until it is evenly damp, but not soaked.
- Lay it flat with the pockets facing up and pin the panel to 6.5 in x 21.5 in (16.5 cm x 54.6 cm).
- Pin the mesh triangle’s sides straight and open each ch-5 loop.
- Pin each scallop point outward along the pocket rims and open the fans.
- Stuff each pocket lightly with a rolled towel or a spare roll so the walls dry upright.
- Let it dry completely, then unpin.
Final Quality-Control Checklist
- Every pocket ended Rnd 10 with 90 sts and Rnd 19 with 15 even scallops.
- Each pocket’s back edge is seamed one-to-one across all 26 panel stitches.
- The bases sit on panel Rows 2, 32 and 62.
- The border lies flat, with sharp bottom corners and a neat apex.
- The mesh loops are open and even, and the hanging loop is firm.
- All ends are woven in securely.
- A roll slides in and out of each pocket easily.
Troubleshooting
- The base cups or ruffles. A cupped base usually means your tension is tight; go up a hook size. A ruffled base usually means you skipped a corner marker move; check that each round adds exactly 8 sts.
- The pocket back is wider than the panel. Your pocket gauge is looser than your panel gauge. Remake the pocket with a smaller hook.
- The fans look crowded. Count Rnd 17 again. It must have exactly 30 V-sts.
- The pockets droop. Add a second line of whipstitch along the base seam, or use a firmer cotton.
- The sides of the panel ripple. You worked one sc in every row end. Rework the border at 9 sc per 10 rows.
- The hanging loop stretches. Work another round of sl sts around the loop’s 26 sc.
Care
Hand wash or machine wash cool on a gentle cycle, reshape while damp, and dry flat. Avoid hot tumble drying, which can shrink cotton unevenly.
Final Notes
Here is the full measurement chain. A gauge of 18 sc per 4 in (10.2 cm) gives a 26-stitch pocket edge 5.75 in (14.6 cm) wide, which matches the 26-stitch panel exactly. Ninety rows give 18 in (45.7 cm) of panel, plus 2.75 in (7.0 cm) of mesh triangle. A 0.4 in (1.0 cm) border brings the holder to 6.5 in x 21.5 in (16.5 cm x 54.6 cm). If you check gauge on the first pocket, everything after it fits together without guesswork.
Happy crocheting!