
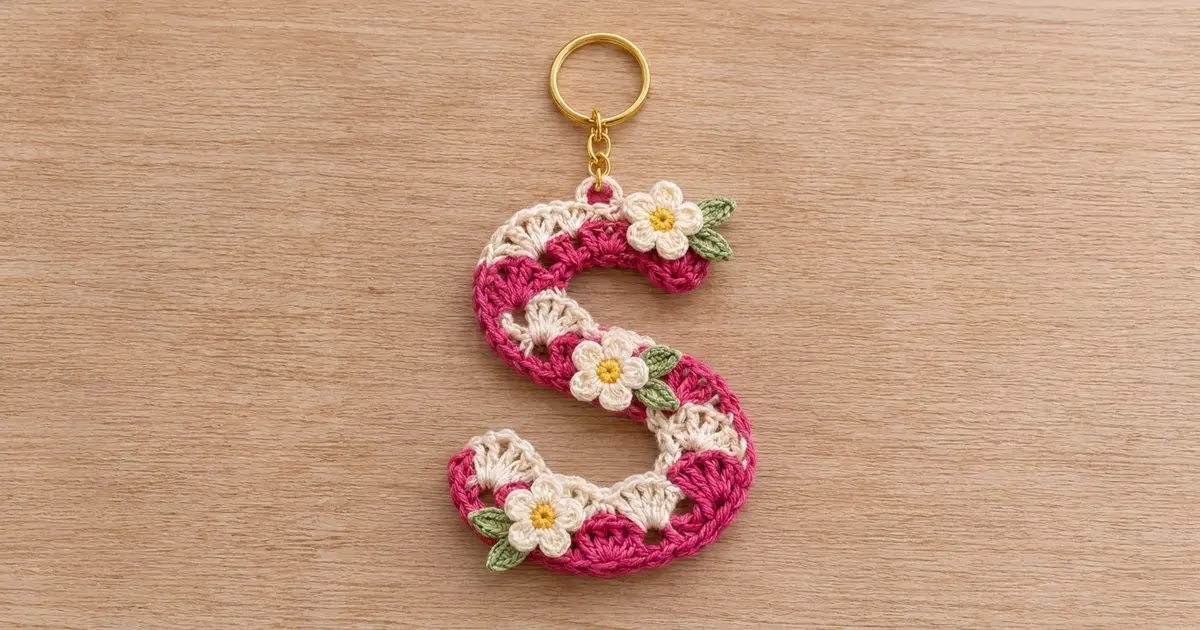
This Blossom Shell Letter S is a small monogram keychain. The letter is one curved strip of pink and cream shells that fit together like puzzle pieces, with tiny eyelets between the fans. A pink single crochet edge gives it a clean outline, and three little cream flowers with yellow centers and green leaves add a spring-garden finish.
The colors are raspberry pink, cream, golden yellow and sage green. It looks bright and handmade, and it’s sturdy enough to clip onto a tote bag, backpack or set of keys. It also makes a quick personalized gift, and you can finish one in an evening.
The pattern uses US crochet terms. The finished letter measures about 3.75 in (9.5 cm) wide and 5 in (12.7 cm) tall, not counting the hardware.
You work one long strip in three rows: a pink single crochet base, a row of pink shells and a row of cream fans. The shell spacing changes along the strip so that it curves naturally into an S. Then you add a pink border all around and a hanging tab, block the letter over a drawn template, and sew on the flowers and leaves.
Finished Size and Construction
- Finished size: 3.75 in (9.5 cm) wide x 5 in (12.7 cm) tall
- Skill level: Easy-intermediate
- Terminology: US crochet terms
- Yarn weight: #2 fine (sport) cotton
- Hook: 2.75 mm (US C-2)
- Number of pieces: 1 letter strip, plus 3 flowers and 6 leaves as appliqués
- Layout: Single letter, no joining
- Strip size before border: 8.8 in (22.4 cm) long x 1 in (2.5 cm) wide
- Border depth: 0.125 in (0.3 cm) per side
- Strip width after border: 1.25 in (3.2 cm)
Materials
Use a smooth mercerized cotton or cotton blend. Cotton holds its shape, blocks crisply and stands up to being handled on a key ring. Avoid fuzzy or very stretchy yarns, because the S depends on firm stitches. Choose a pink with strong contrast against the cream so the interlocking fans stand out.
- Raspberry pink (A): about 6 g / 19 m
- Cream (B): about 4 g / 13 m
- Golden yellow (C): about 1 g / 3 m
- Sage green (D): about 1 g / 3 m
These amounts already include a small safety margin, so leftover yarn works well here.
Tools:
– 2.75 mm (US C-2) crochet hook
– Tapestry needle
– Scissors
– Stitch markers (3)
– 1 in (2.5 cm) gold split key ring
– 1.25 in (3.2 cm) gold chain with 2 small jump rings
– Flat-nose pliers
– Blocking mat, rust-proof pins, paper and pencil for an S template
– Optional: fabric stiffener or diluted craft glue
Abbreviations (US Terms)
- ch – chain
- sl st – slip stitch
- sc – single crochet
- hdc – half double crochet
- dc – double crochet
- sk – skip
- st(s) – stitch(es)
- MR – magic ring
- rep – repeat
Special stitches:
– Shell: 5 dc in the same stitch.
– Small fan: 3 dc in the same stitch.
– Large fan: 7 dc in the same stitch.
Gauge and Checkpoints
Gauge: 24 sc and 26 rows = 4 in (10.2 cm) in sc, which is 6 sc per 1 in (2.5 cm).
This piece is small, so the strip itself works as your test piece. Crochet Row 1 and measure it before you go on.
Checkpoints:
– After Row 1: 53 sc should measure about 8.8 in (22.4 cm) unstretched.
– After Row 3: The strip is about 1 in (2.5 cm) wide at the center of a pink shell.
– After the border: The strip is about 1.25 in (3.2 cm) wide.
– After blocking: The letter is 3.75 in (9.5 cm) wide x 5 in (12.7 cm) tall.
If Row 1 is longer than 9.25 in (23.5 cm), go down to a 2.5 mm hook. If it’s shorter than 8.25 in (21.0 cm), go up to a 3 mm hook. Start again from the chain, because the S proportions rely on the base length.

The Letter Strip
The strip has three shaping sections. Mark them on Row 1 so the shells land in the right places.
- Section A (bottom curve, pink edge on the outside): 4 repeats over 6 sts each
- Section B (diagonal spine): 2 repeats over 6 sts each
- Section C (top curve, cream edge on the outside): 4 repeats over 4 sts each
Row 1 (A)
With A, ch 54.
Sc in 2nd ch from hook and in each ch across. Turn. (53 sc)
Place marker 1 in the 25th sc and marker 2 in the 37th sc. Sts 1–25 belong to Section A, sts 25–37 to Section B and sts 37–53 to Section C. The marked stitches are where the sections meet, so each one is shared by two sections.
Row 2 (A), pink shells
Ch 1, sc in first sc.
Sections A and B: Sk 2 sts, shell in next st, sk 2 sts, sc in next st. Rep from * 6 times in total. The last sc of the 4th repeat lands in marker 1, and the last sc of the 6th repeat lands in marker 2.
Section C: Sk 1 st, shell in next st, sk 1 st, sc in next st. Rep from * 4 times in total. The last sc lands in the final st.
Fasten off A. (10 shells and 11 sc = 61 sts)
Check the base: 1 + (6 x 6) + (4 x 4) = 53 sts used, which matches Row 1. The skipped stitches leave the small eyelets. In Section C the shells sit closer together, so the strip starts to cup toward the cream side.
Color tip: Fasten off each color at the end of its row instead of carrying it. You’ll weave the short tails in along the border later, and the ends stay neat.
Row 3 (B), cream fans
Don’t turn. Go back to the start of Row 2 and join B with a sl st in the first sc.
Ch 3 (counts as dc), 2 dc in same sc to make a half fan.
Next, work along the strip. Each pink shell gets a sc in its center (3rd) dc. Each sc between two shells gets a fan.
- Section A: Sc in center dc of next shell, small fan in next sc. Rep from * 3 times in total.
- Section B: Sc in center dc of next shell, shell in next sc. Rep from * 3 times in total.
- Section C: Sc in center dc of next shell, large fan in next sc. Rep from * 3 times in total.
- End: Sc in center dc of the last shell, 3 dc in last sc.
Fasten off B. (61 sts)
Count check: 3 (half fan) + 10 sc + (3 x 3) + (3 x 5) + (3 x 7) + 3 (end half fan) = 61 sts. Row 3 happens to have the same total as Row 2. The difference is in how the stitches are spread out. In Section A, the small fans keep the cream edge short so it can sit on the inside of the bottom curve. In Section C, the large fans make the cream edge long so it can wrap around the outside of the top curve.
Place marker 3 in the 4th dc of the middle large fan (the second of the three in Section C). This is where the tab will go.
Border
Border gauge: 6 sc per 1 in (2.5 cm) along the edges, about 0.125 in (0.3 cm) deep.
Border Round (A)
The border is worked in one round. Each long side’s count includes its own 3-sc corner groups, and each short end has 4 sc between those corners.
Join A with a sl st in the last dc of Row 3.
- Cream side: 3 sc in this st (corner). Work 1 sc in each of the next 59 sts. Work 3 sc in the 61st st, which is the top of the beginning ch-3. (65 sc)
- First short end: Work 4 sc evenly across the row ends: 2 sc around the ch-3, 1 sc in the Row 2 sc end and 1 sc in the Row 1 sc end. (4 sc)
- Foundation side: Working into the free loops of the foundation chain, 3 sc in the first loop, 1 sc in each of the next 51 loops, 3 sc in the last loop. (57 sc)
- Second short end: Work 4 sc evenly across the row ends as before. (4 sc)
Sl st to the first sc. (130 sc total)
Why the math works: The cream edge has 61 sts and the foundation has 53 loops. With one sc per stitch, the border is exactly as long as the edge underneath it, so it won’t ruffle or pull tight. The extra curve comes from the fan sizes, not from the border. On each side, the two 3-sc corners add 4 sts to the base count: 61 + 4 = 65 and 53 + 4 = 57. Together with 4 sc around each end, the 2 extra sc at each corner turn the stitches around the terminal so it looks rounded. That gives 65 + 4 + 57 + 4 = 130.
Don’t fasten off yet.
Hanging Tab (A)
Sl st along the border to the sc directly above marker 3. Ch 7, sl st in the same sc to form a loop. Work 10 sc into the ch-7 loop and sl st in the base sc. Fasten off.
The tab stands about 0.5 in (1.3 cm) tall.
Flowers and Leaves
Flower (make 3)
Rnd 1 (C): MR, 5 sc in ring, pull the ring closed and sl st to the first sc. Fasten off. (5 sc)
Rnd 2 (B): Join B in any sc. (Ch 2, 2 dc, ch 2, sl st) in the same sc, sl st in next sc. Rep from * 5 times in total. (5 petals)
Fasten off and leave a 6 in (15.2 cm) tail. Each flower is about 0.9 in (2.3 cm) across.
Leaf (make 6)
With D, ch 5. Sc in 2nd ch from hook, hdc in next ch, hdc in next ch, sc in last ch. Ch 1 for the tip.
Working along the other side of the chain: sc in the first loop, hdc in the next loop, hdc in the next loop, sc in the last loop, sl st to the first sc.
Fasten off and leave a 6 in (15.2 cm) tail. Each leaf is about 0.6 in (1.5 cm) long.
Final Blocking
- Draw an S on paper, 3.75 in (9.5 cm) wide and 5 in (12.7 cm) tall, with a stroke 1.25 in (3.2 cm) wide. Pin the paper to your blocking mat.
- Weave in all ends except the tails on the flowers and leaves.
- Dampen the letter lightly with a spray bottle.
- Lay the strip over the template. The Section A end becomes the lower-left terminal with the pink edge along the bottom. Section B runs diagonally up the spine. Section C forms the top curve with the cream edge on the outside and finishes at the upper-right terminal.
- Pin the outer edge of each curve first, then ease the inner edge into place. Use one pin per pink shell.
- Open each eyelet with the tip of a pin, and spread every fan evenly.
- Optional: brush a light coat of fabric stiffener onto the back.
- Leave it pinned until it is completely dry, about 12–24 hours.
- Sew the flowers in place: one at the lower-left terminal, one on the right side of the spine and one at the upper-right terminal. Tuck 2 leaves under each flower and stitch them down through the back.
- With pliers, open a jump ring, hook it through the tab and the chain, and close it. Use the second jump ring to attach the chain to the split ring.
Final Quality-Control Checklist
- Row 1 has 53 sc, and Rows 2 and 3 each have 61 sts.
- The base has 10 pink shells, and every eyelet is open.
- The cream fans go small, then medium, then large along the strip.
- The border has 130 sc and lies flat, with no ruffling.
- Both terminals are smoothly rounded.
- The letter measures 3.75 in (9.5 cm) x 5 in (12.7 cm).
- The tab is centered on the top curve and feels secure.
- The flowers and leaves are stitched through the back, with no loose tails.
- The jump rings are fully closed.
Troubleshooting
The strip stays straight and won’t curve. Check the fan sizes in Row 3. They need to be 3 dc in Section A and 7 dc in Section C.
The letter looks like a backward S. Flip it over. Both sides look nearly the same, so pick whichever side reads correctly as the front.
The border ruffles. You probably added stitches on the long sides. Work exactly 1 sc per stitch between the corners.
The border cups or pulls tight. Your border tension is tighter than the rest of the piece. Loosen your grip, or switch to a 3 mm hook for the border only.
There are gaps at the terminals. Work the sc around the ch-3 rather than into it, and keep each end at exactly 4 sc.
The petals are floppy. Pull the ch-2 snug before working the dc, and block the flowers flat.
The letter sags on the key ring. Add a second coat of stiffener, or sew a felt backing cut 0.125 in (0.3 cm) inside the border.
Care
Hand wash in cool water with mild soap, press out the water in a towel and dry flat. If you used stiffener, reshape and reapply it after washing.

Final Notes
Every measurement depends on the one before it. Row 1 sets the base length at 53 sc and 8.8 in (22.4 cm). The shell and fan sizes then shape the curves, and the strip comes out 1 in (2.5 cm) wide. The 130-sc border brings the stroke to 1.25 in (3.2 cm), and blocking over a template sets the letter at 3.75 in (9.5 cm) x 5 in (12.7 cm). If Row 1 matches, everything after it will come out the right size.
Once you’ve made this S, you can use the same shaping to work out other curved letters.
Happy crocheting!