
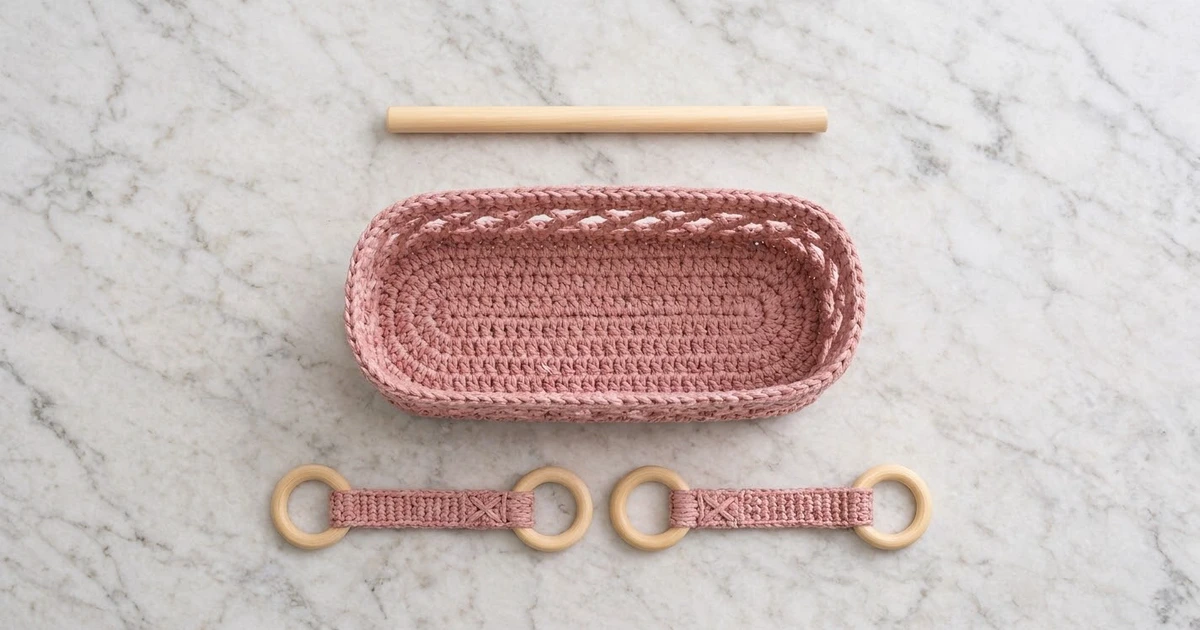
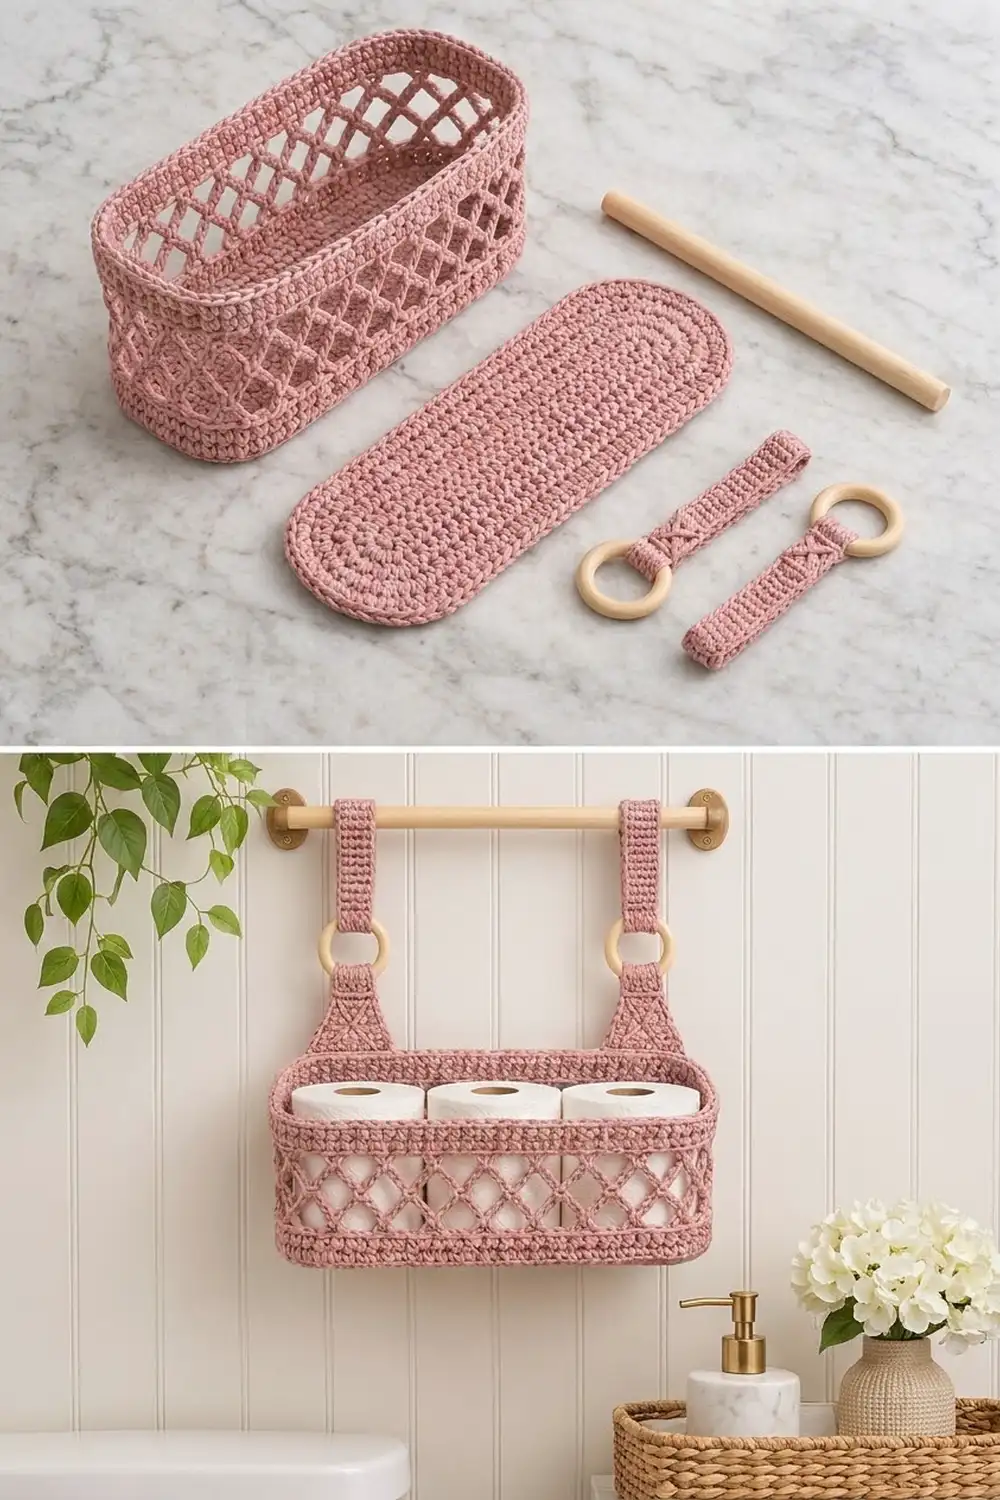
The Rosewater Lattice Hanging Basket is a long oval basket that hangs from a wooden dowel on two straps with wooden rings. It is made in one soft dusty rose. Solid bands of single crochet at the base and rim frame a wide strip of open diamond lattice, so the basket feels light without losing its shape.
The style is simple and a little vintage. It works well in a bathroom for spare toilet rolls, hand towels or small bottles. It also suits a nursery wall or an entryway.
This pattern uses US crochet terms. The finished basket is 12.5 in (31.8 cm) long, 4.5 in (11.4 cm) deep and 5.25 in (13.3 cm) tall. The hanging tabs add about 3 in (7.6 cm) of height above the rim.
You start with a flat oval base worked in rounds. Without breaking the yarn, you work the walls up from the base: solid rounds, then lattice rounds, then a solid rim. Next you work two triangular tabs straight off the back rim. Finally you make two straps, thread everything through the wooden rings and hang the basket on the dowel.
Finished Size and Construction
- Finished basket size: 12.5 in x 4.5 in x 5.25 in (31.8 cm x 11.4 cm x 13.3 cm)
- Skill level: Easy-intermediate
- Terminology: US crochet terms
- Yarn weight: Aran / heavy worsted cotton (#4–#5)
- Hook: 5 mm (H-8)
- Number of pieces: 3 crocheted pieces (1 basket with built-in tabs, 2 straps), plus 2 wooden rings and 1 dowel
- Layout: Basket centered under the dowel, with one tab-ring-strap set near each end of the back wall
- Base size: 12.5 in x 4.5 in (31.8 cm x 11.4 cm)
- Wall height before the rim band: 4 in (10.2 cm)
- Rim band (border) depth: 1.25 in (3.2 cm)
- Strap size: 1.5 in x 8 in (3.8 cm x 20.3 cm) before folding
Materials
Yarn: Use a smooth, firm cotton or cotton blend in aran or heavy worsted weight. Cotton holds its shape when the basket is loaded. A twisted, slightly plied yarn shows the lattice best. Avoid very soft acrylics, because the walls will slump.
- Dusty rose: 150 g / approximately 255 m (279 yd)
This is about two 100 g balls of a cotton with roughly 170 m (186 yd) per 100 g. The quantity includes a margin of about 20 percent for your gauge swatch and small differences in tension.
Tools:
- 5 mm (H-8) crochet hook
- 6–8 stitch markers
- Tapestry needle
- Scissors
- Measuring tape
- 2 wooden rings, 2 in (5.1 cm) outer diameter
- 1 wooden dowel, 0.75 in (1.9 cm) diameter x 18 in (45.7 cm) long
- 2 wall brackets or dowel holders (optional, for mounting)
Abbreviations (US Terms)
- ch – chain
- sc – single crochet
- sc2tog – single crochet 2 together (decrease)
- sl st – slip stitch
- st(s) – stitch(es)
- BLO – back loop only
- sk – skip
- rep – repeat
- rnd(s) – round(s)
- ch-5 loop – the space under a chain of 5
Special stitch – Lattice loop: Work sc in the indicated stitch or loop, then ch 5. The ch-5 loops stack offset round after round, which forms the open diamonds.
Gauge and Checkpoints
Gauge: 14 sc x 16 rnds = 4 in (10.2 cm) in sc worked in the round.
That means each sc is about 0.29 in (0.7 cm) wide and each sc round is 0.25 in (0.6 cm) tall. One lattice round is about 0.75 in (1.9 cm) tall.
Make the base first and treat it as your test piece. If it matches the checkpoints below, the walls, tabs and straps will fit too.
Checkpoints:
- After Rnd 7: Base measures 11.5 in x 3.5 in (29.2 cm x 8.9 cm).
- After Rnd 9: Base measures 12.5 in x 4.5 in (31.8 cm x 11.4 cm).
- After Rnd 13: The solid lower wall is 1 in (2.5 cm) tall.
- After Rnd 17: The lattice section is 3 in (7.6 cm) tall.
- After Rnd 22: The total wall height is 5.25 in (13.3 cm).
If your base is too big, go down half a hook size (4.5 mm) and start again. If it is too small, go up to 5.5 mm. Don’t add or remove rounds to fix size, because the stitch counts set the oval shape.
Basket Base
Start with a foundation chain. Join each round with a sl st to the first sc. Ch 1 at the start of each round; it does not count as a stitch. Place a marker in the first st of every round.
Ch 31.
Rnd 1: Sc in 2nd ch from hook, sc in next 28 ch, 3 sc in last ch. Rotate and work along the underside of the chain: sc in next 28 ch, 2 sc in the same ch as the first sc. Join. (62 sts)
Each end now has 3 sts and each long side has 28 sts. From here on, the long sides always stay at 28 sts and all increases happen at the curved ends.
Rnd 2: 2 sc in next st, sc in next 28, [2 sc in next st] 3 times, sc in next 28, [2 sc in next st] 2 times. Join. (68 sts)
Rnd 3: Sc in next st, 2 sc in next st, sc in next 28, [sc in next st, 2 sc in next st] 3 times, sc in next 28, [sc in next st, 2 sc in next st] 2 times. Join. (74 sts)
Rnds 4–9 follow the same layout. Each round adds one more plain sc before every increase. Here X is the number of plain sc before each increase:
Rnd 4–9: Sc in next X, 2 sc in next st, sc in next 28, [sc in next X, 2 sc in next st] 3 times, sc in next 28, [sc in next X, 2 sc in next st] 2 times. Join.
- Rnd 4: X = 2 (80 sts)
- Rnd 5: X = 3 (86 sts)
- Rnd 6: X = 4 (92 sts)
- Rnd 7: X = 5 (98 sts)
- Rnd 8: X = 6 (104 sts)
- Rnd 9: X = 7 (110 sts)
After Rnd 9, the layout from the start of the round is: 9 sts (end), 28 sts (long side), 27 sts (end), 28 sts (long side), 18 sts (end). Both curved ends have 27 sts (9 + 18 = 27), and 28 + 27 + 28 + 27 = 110.
Check the base measurement now: 12.5 in x 4.5 in (31.8 cm x 11.4 cm). It should lie flat with no ruffling.
Basket Walls
Don’t fasten off.
Rnd 10: Sc in BLO of each st around. Join. (110 sts)
The unused front loops make a crisp ridge, so the walls turn upward.
Rnds 11–13: Sc in each st around. Join. (110 sts)
Checkpoint: the solid lower wall is 1 in (2.5 cm) tall.
Lattice Section
Rnd 14 (Lattice Rnd 1): Ch 1, sc in first st, ch 5, sk 4 sts, sc in next st, ch 5, sk 4 sts; rep from * 20 more times. Join with a sl st to the first sc. (22 sc and 22 ch-5 loops)*
Each repeat uses 5 sts, and 22 x 5 = 110.
Rnd 15 (Lattice Rnd 2): Sl st in next 3 ch to reach the center of the first loop, ch 1, sc in the same loop, ch 5, sc in next ch-5 loop, ch 5; rep from * 20 more times. Join to the first sc. (22 sc and 22 ch-5 loops)*
Rnds 16–17: Repeat Rnd 15. (22 sc and 22 ch-5 loops each round)
Each sc sits in the middle of a loop from the round below, so the loops make diamonds. Checkpoint: the lattice section is 3 in (7.6 cm) tall. Keep your chains even. Tight chains narrow the basket and loose chains make it flare.
Conversion Round
Rnd 18: Ch 1, *sc in the next sc, 4 sc in the next ch-5 loop; rep from * around. Join.
Count: 22 sc worked into existing sc + 88 sc worked into loops (22 loops x 4) = 110 sts
This returns the wall to the same 110 sts as the base, so the rim matches the bottom edge exactly.
Border (Rim Band)
The rim band is the basket’s border. It is worked at the same gauge as the base: 14 sc = 4 in (10.2 cm).
Rnds 19–22: Sc in each st around. Join. (110 sts each round)
On every round, the sts sit as 28 per long side and 27 per curved end. Lay the basket flat after Rnd 22 and place markers to show these four sections: 28 along the back, 27 around one end, 28 along the front and 27 around the other end.
Why the math works: The base finished at 110 sts with 28 + 27 + 28 + 27 per section. Each solid wall round is worked one sc into each st, so nothing changes. The lattice uses 22 repeats of 5 sts, which equals 110. The conversion round puts back exactly 22 + 88 = 110. The rim therefore lies directly above the base with no flare or pull.
Checkpoint: the rim band is 1.25 in (3.2 cm) tall and the total wall is 5.25 in (13.3 cm). Don’t fasten off yet if you want to start the first tab right away. Otherwise fasten off and weave in the end.
Hanging Tabs (make 2, worked off the back rim)
Each tab covers 11 rim sts. Place Tab 1 over the last 3 sts of one curved end plus the first 8 sts of the back long side. Place Tab 2 over the last 8 sts of the back long side plus the first 3 sts of the next curved end. There will be 12 back-wall sts left between the tabs, and the tab centers will be about 6.5 in (16.5 cm) apart.
Join the yarn in the first st of a tab section. Work in rows:
- Row 1: Ch 1, sc in next 11 sts, turn. (11 sts)
- Row 2: Ch 1, sc in each st, turn. (11 sts)
- Row 3: Ch 1, sc2tog, sc in next 7, sc2tog, turn. (9 sts)
- Row 4: Ch 1, sc in each st, turn. (9 sts)
- Row 5: Ch 1, sc2tog, sc in next 5, sc2tog, turn. (7 sts)
- Row 6: Ch 1, sc in each st, turn. (7 sts)
- Row 7: Ch 1, sc2tog, sc in next 3, sc2tog, turn. (5 sts)
- Rows 8–14: Ch 1, sc in each st, turn. (5 sts each row)
Fasten off and leave a 12 in (30.5 cm) tail for sewing. The tab rises about 2.5 in (6.4 cm) as a triangle. The last 4 rows, 1 in (2.5 cm), are the part that folds through the ring.
Straps (make 2)
Ch 6.
- Row 1: Sc in 2nd ch from hook and in each ch across, turn. (5 sts)
- Rows 2–32: Ch 1, sc in each st, turn. (5 sts each row)
Fasten off and leave a 16 in (40.6 cm) tail. Each strap measures 1.5 in x 8 in (3.8 cm x 20.3 cm).
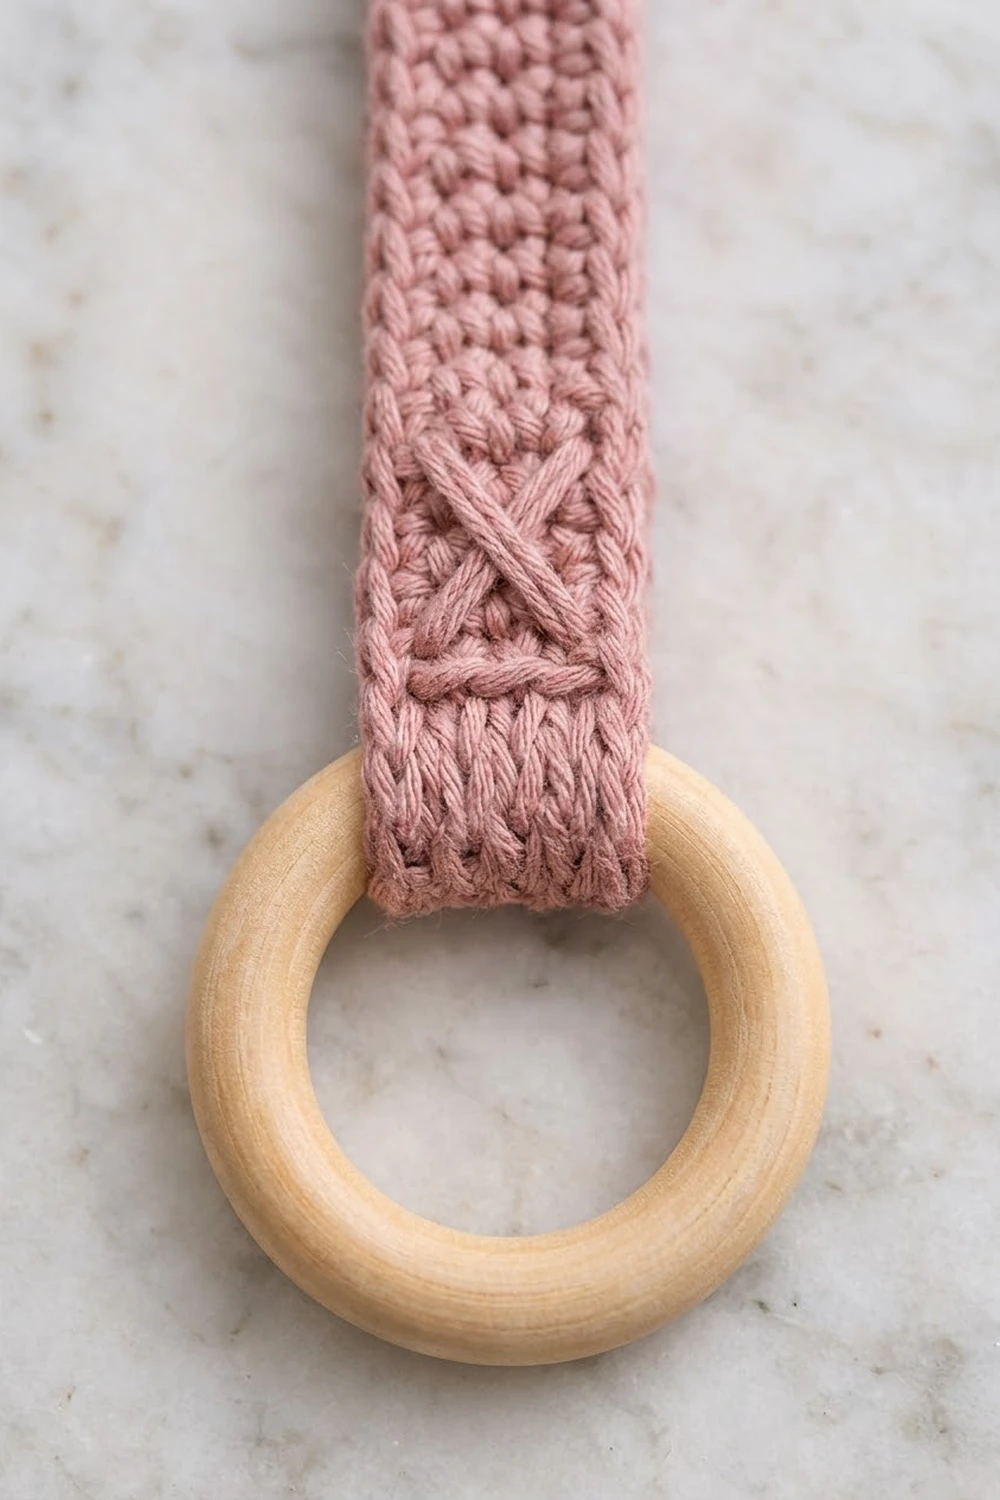
X accent: Thread a 10 in (25.4 cm) length of yarn on the tapestry needle. Count 5 rows up from the Row 1 end of the strap. Stitch one large X over the next 4 rows (Rows 6–9), from corner to corner across all 5 sts. Weave the ends in on the back.
Make All Pieces
Make all pieces in dusty rose:
- 1 basket (base, walls, rim and 2 tabs)
- 2 straps
- 2 wooden rings
- 1 dowel
Text layout, seen from the front as it hangs:
====================  dowel  ====================
      [strap loop]                 [strap loop]
        | strap |                    | strap |
          (O) ring                     (O) ring
         /tab\                        /tab\
   [ ------------- basket rim -------------- ]
   [ ◇◇◇◇◇◇◇◇◇◇ lattice band ◇◇◇◇◇◇◇◇◇◇◇◇◇ ]
   [ ------------- solid band -------------- ]
Joining
Tab to ring: Pass Rows 11–14 of the tab through a wooden ring, from front to back. Fold them down behind the tab so that Row 14 lies over the back of Row 10. Whipstitch the 5 sts of Row 14 to the 5 sts of Row 10, one stitch to one stitch, then sew down both side edges of the fold. The ring now sits snugly in a 1 in (2.5 cm) loop.
Strap to ring: Pass the Row 1 end of the strap through the same ring, from front to back. Fold Rows 1–4 behind the strap, with the X accent facing out. Whipstitch the 5 sts of Row 1 to the 5 sts of Row 5, then close the sides.
Strap to dowel: Wrap the top of the strap over the dowel from front to back. Fold the top 8 rows, 2 in (5.1 cm), down behind the strap. Whipstitch the 5 sts of Row 32 to the 5 sts of Row 24, then sew the side edges. If you want the dowel to stay removable, check that it slides through before you close the second side.
Tension: Make the whipstitches firm but not tight. Pull until the edges just touch, not until they pucker. Sewing too loosely will let the loaded basket stretch the folds open.
Size checkpoint: With both sets joined, the rings should hang level and about 6.5 in (16.5 cm) apart. Each strap should show about 4 in (10.2 cm) between the dowel and the ring.
Final Blocking
- Mist the basket evenly with water or dampen it lightly. Don’t soak cotton.
- Fill the basket firmly with a rolled towel or three toilet rolls so it forms a crisp oval.
- Square the corners where the long sides meet the curved ends.
- Gently pull each lattice diamond open so it looks even.
- Pin the tabs flat against a towel so the triangles are straight and symmetrical.
- Lay the straps flat and pin them to 1.5 in (3.8 cm) wide.
- Let everything dry completely, ideally overnight.
Final Quality-Control Checklist
- Base measures 12.5 in x 4.5 in (31.8 cm x 11.4 cm) and lies flat
- The BLO ridge at Rnd 10 runs clean all the way around
- Each lattice round has 22 loops and the diamonds line up
- Rnd 18 and every rim round have 110 sts
- Walls stand 5.25 in (13.3 cm) tall without leaning
- Both tabs taper evenly from 11 to 5 sts
- Tabs are placed symmetrically, with 12 back-wall sts between them
- Rings are sewn in securely and the folds don’t gap
- Straps are the same length and the basket hangs level
- All ends are woven in on the inside
Troubleshooting
Base ruffles: Your tension is too loose for the increases. Go down half a hook size, or check that each round has exactly 6 increases.
Base cups: Your stitches are too tight. Go up half a hook size.
Walls flare outward: Your lattice chains are loose. Make each ch-5 slightly tighter, or use ch 4 with 3 sc per loop in Rnd 18 (22 + 66 = 88). Then add 1 sc in each sc on Rnd 19 to get back to 110.
Walls pull inward: Your chains are too tight. Loosen them, or go up a hook size for Rnds 14–17 only.
Basket hangs crooked: The straps are uneven. Undo one dowel fold and sew it again so the visible lengths match.
Tabs curl: Block them flat, and add a row of sl st along the tab edges if they still curl.
Care
Hand wash in cool water with mild soap, press out the water and dry the basket flat stuffed with a towel. Don’t tumble dry, because the cotton may shrink.
Final Notes
Every measurement depends on the one before it. A gauge of 14 sc = 4 in (10.2 cm) gives a 110-stitch base of 12.5 in x 4.5 in (31.8 cm x 11.4 cm). Those 110 sts carry up through the solid band, the 22 lattice repeats and the 22 + 88 conversion round to a matching 110-stitch rim, for walls 5.25 in (13.3 cm) tall. Two 11-stitch tabs narrow to 5 sts, the same width as the straps, so the rings join everything neatly to the dowel. Check your base first and the rest will fall into place.
Happy crocheting!