

This hanging holder stores three toilet rolls in a soft lavender column. Three round baskets are sewn one above the other onto a long back panel. The panel tapers to a point at the top, where a narrow tab wraps around a wooden ring, and to a point at the bottom, where a tassel hangs.
Each basket has three rounds of raised bobbles on the lower wall, a band of open mesh windows near the top, and a rolled rim. A cream five-petal flower with a yellow center sits on the front of each basket. The result is calm and cottage-style.
This pattern uses US crochet terms. The finished panel is 4 in (10.2 cm) wide. It hangs about 18.5 in (47.0 cm) from the ring to the bottom point, and about 25 in (63.5 cm) from the top of the ring to the tassel tip. Each basket is 5.25 in (13.3 cm) across and 3 in (7.6 cm) tall.
You work each basket from the base up in joined rounds. Then you make a flat back panel in rows and add a border. Finally, you sew on the baskets and flowers, fold the tab over the ring and tie on the tassel.
Finished Size and Construction
- Finished size: panel 4 in x 20.25 in (10.2 cm x 51.4 cm) flat including tab; hangs about 25 in (63.5 cm) overall
- Skill level: Intermediate
- Terminology: US crochet terms
- Yarn weight: Worsted (#4)
- Hook: 4.5 mm (US 7)
- Number of pieces: 3 baskets, 1 back panel, 3 flowers, 1 tassel, plus 1 wooden ring
- Layout: 3 baskets stacked vertically on 1 panel, 1.5 in (3.8 cm) apart
- Piece size: basket 5.25 in (13.3 cm) diameter x 3 in (7.6 cm) tall
- Panel size before border: 3.5 in x 19.75 in (8.9 cm x 50.2 cm)
- Border depth: 0.25 in (0.6 cm) on every edge
Materials
Choose a smooth worsted cotton or cotton blend. Cotton holds the basket shape and handles bathroom humidity well. Acrylic also works, but the walls will be floppier.
- Lavender (main color): 150 g, about 255 m
- Cream (petals): 10 g, about 17 m
- Yellow (flower centers): 5 g, about 9 m
Tools:
- 4.5 mm (US 7) crochet hook
- Wooden ring, 2.75 in (7.0 cm) outer diameter
- Stitch markers
- Tapestry needle
- Scissors
- Card 4.5 in (11.4 cm) tall, for the tassel
- Rust-proof pins and a blocking mat
All quantities include a margin of about 25% for swatching and seaming.
Abbreviations (US Terms)
- ch – chain
- sl st – slip stitch
- sc – single crochet
- dc – double crochet
- inc – 2 sc in the same stitch
- sc2tog – single crochet 2 together
- BLO – back loop only
- rev sc – reverse single crochet (crab stitch)
- RS / WS – right side / wrong side
- st(s) – stitch(es)
- sp – space
Bobble (bob): *Yarn over, insert hook in st, yarn over and pull up a loop, yarn over and draw through 2 loops. Repeat from * 3 more times in the same st (5 loops on hook), then yarn over and draw through all 5 loops. Each bobble counts as 1 st. Bobbles pop out on the side facing away from you. That is why every bobble round is worked with the WS (the inside of the basket) facing you.
Gauge and Checkpoints
Gauge: 16 sc and 16 rows = 4 in (10.2 cm) in sc rows. That works out to 4 sts and 4 rows per inch.
Make one complete basket first, because it is your real gauge test.
Checkpoints:
- After base Rnd 11: 5.25 in (13.3 cm) across, 66 sts, lying flat
- After Rnd 19: walls 2 in (5.1 cm) tall
- After Rnd 22: walls 3 in (7.6 cm) tall
- Panel after Row 6: 3.5 in (8.9 cm) wide, 1.5 in (3.8 cm) long
- Panel after Row 62: 15.5 in (39.4 cm) long
- Panel after Row 79: 19.75 in (50.2 cm) long
If your base is too big, go down 0.5 mm in hook size. If it is too small or stiff, go up 0.5 mm. A standard roll is about 4.5 in (11.4 cm) across, so this basket leaves about 0.75 in (1.9 cm) of ease. Don’t let the base measure less than 5 in (12.7 cm).
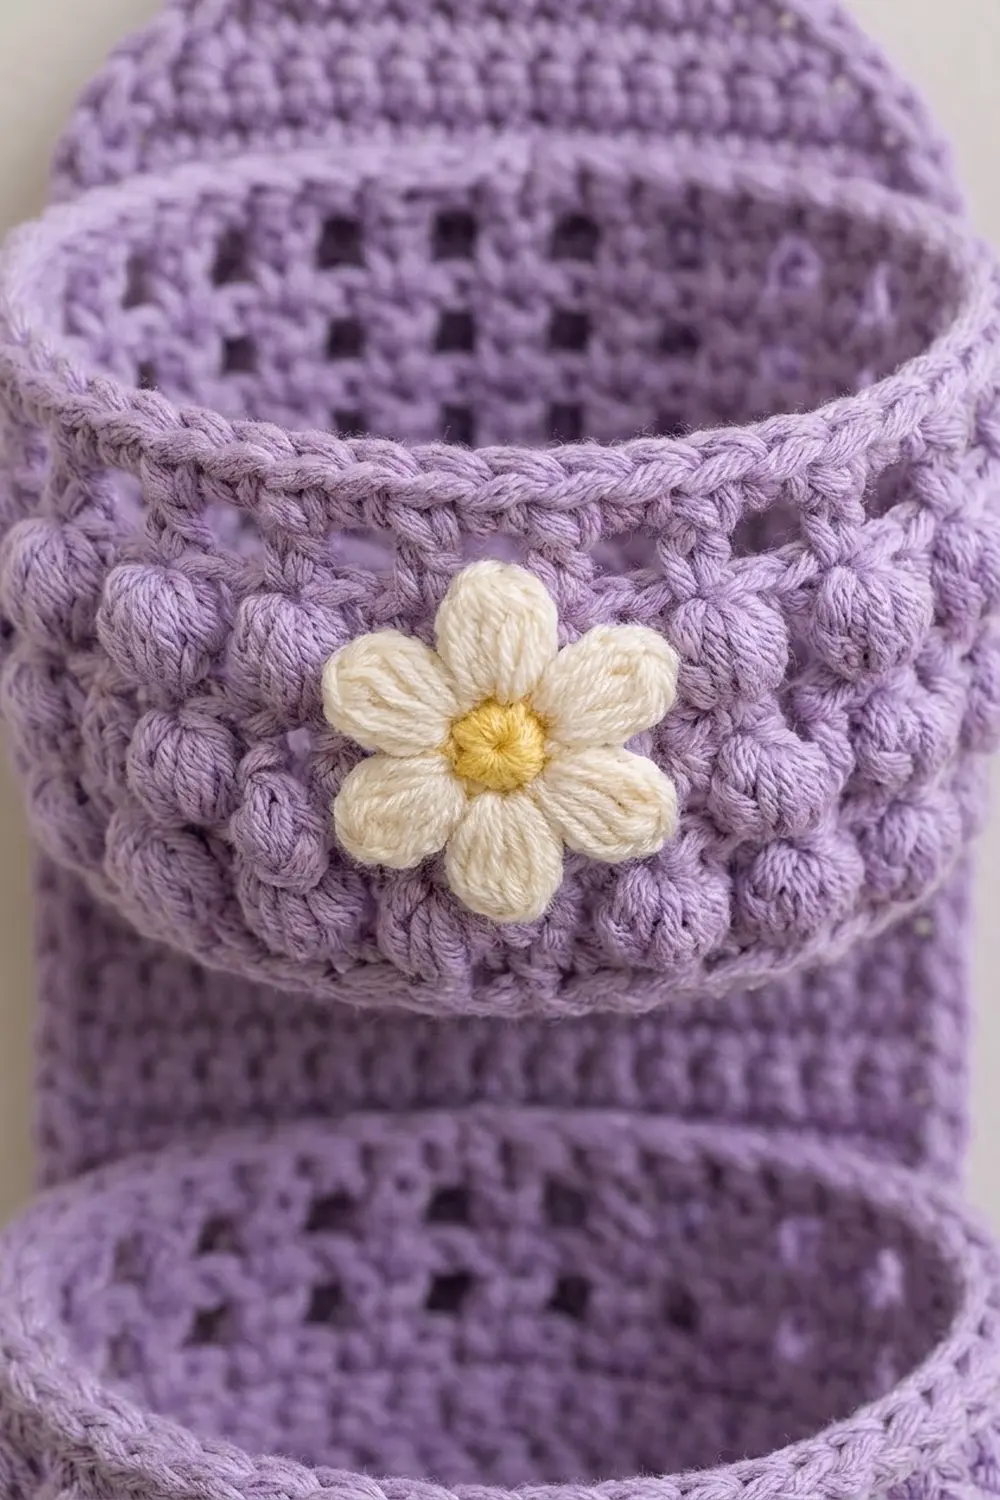
Basket (make 3)
Base
With Lavender, work joined rounds with the RS facing. Don’t turn the base rounds.
Rnd 1: Magic ring, ch 1, 6 sc in ring, sl st to first sc. (6)
Rnd 2: Ch 1, inc in each st around, join. (12)
Rnd 3: Ch 1, (sc, inc) 6 times, join. (18)
Rnd 4: Ch 1, (2 sc, inc) 6 times, join. (24)
Rnd 5: Ch 1, (3 sc, inc) 6 times, join. (30)
Rnd 6: Ch 1, (4 sc, inc) 6 times, join. (36)
Rnd 7: Ch 1, (5 sc, inc) 6 times, join. (42)
Rnd 8: Ch 1, (6 sc, inc) 6 times, join. (48)
Rnd 9: Ch 1, (7 sc, inc) 6 times, join. (54)
Rnd 10: Ch 1, (8 sc, inc) 6 times, join. (60)
Rnd 11: Ch 1, (9 sc, inc) 6 times, join. (66)
Checkpoint: 5.25 in (13.3 cm) across. To keep the base round rather than hexagonal, move the increase to the middle of the repeat on even rounds.
Walls
From here, join every round with a sl st to the first st and then turn, unless the round says otherwise. The count stays at 66.
Rnd 12 (RS): Ch 1, sc in BLO of each st around, join, turn. (66) This makes a crisp fold between the base and the wall.
Rnd 13 (WS): Ch 1, (sc, bob) 33 times, join, turn. (33 sc + 33 bob = 66)
Rnd 14 (RS): Ch 1, sc in each sc and in the top of each bobble, join, turn. (66)
Rnd 15 (WS): Ch 1, (bob, sc) 33 times, join, turn. (66) These bobbles sit between the bobbles of Rnd 13.
Rnd 16 (RS): Repeat Rnd 14. (66)
Rnd 17 (WS): Repeat Rnd 13. (66)
Rnd 18 (RS): Repeat Rnd 14. (66)
Rnd 19 (WS): Ch 1, sc in each st, join, turn. (66)
Checkpoint: the walls are 2 in (5.1 cm) tall, with three staggered rows of bobbles on the outside.
Rnd 20 (RS): Ch 4 (counts as dc + ch 1), skip next st, *dc in next st, ch 1, skip next st; repeat from * 32 more times. Sl st to the 3rd ch of the beginning ch-4. Don’t turn. (33 dc + 33 ch-1 sps = 66)
Rnd 21 (RS): Ch 1, sc in each dc and in each ch-1 sp, join. Don’t turn. (66)
Rnd 22 (RS): Ch 1, rev sc in each st around, join. Fasten off. (66)
Checkpoint: the walls are 3 in (7.6 cm) tall. You should have 33 mesh windows below a rolled rim.
Flower (make 3)
Rnd 1: With Yellow, magic ring, ch 1, 5 sc in ring, sl st to first sc. Fasten off. (5)
Rnd 2: Join Cream in any sc. In each sc around, work (sl st, ch 2, 3 dc, ch 2, sl st). Join and fasten off. (5 petals)
The flower is about 1.5 in (3.8 cm) across. Leave a 10 in (25.4 cm) tail for sewing.
Back Panel (make 1)
With Lavender, work in rows. The ch 1 at the start of a row does not count as a st.
Row 1: Ch 5, sc in 2nd ch from hook and in each ch across, turn. (4)
Rows 2–6: Ch 1, inc in first st, sc across to last st, inc in last st, turn. (Row 2: 6, Row 3: 8, Row 4: 10, Row 5: 12, Row 6: 14)
Checkpoint: 3.5 in (8.9 cm) wide and 1.5 in (3.8 cm) long. This is the bottom point.
Rows 7–62: Ch 1, sc in each st across, turn. (14) That is 56 rows, or 14 in (35.6 cm).
Checkpoint: 15.5 in (39.4 cm) long.
Rows 63–67: Ch 1, sc2tog, sc across to last 2 sts, sc2tog, turn. (Row 63: 12, Row 64: 10, Row 65: 8, Row 66: 6, Row 67: 4)
Rows 68–79: Ch 1, sc in each st across, turn. (4) These 12 rows, 3 in (7.6 cm) long, form the hanging tab.
Checkpoint: 19.75 in (50.2 cm) long. Fasten off.
Make All Pieces
Before assembly, check that you have:
- Lavender: 3 baskets, 1 back panel, 1 tassel (made in the Border section)
- Yellow + Cream: 3 flowers
Layout, top to bottom (rows refer to the panel):
[ wooden ring ]
[ tab           Rows 68–79, folded ]
[ top point     Rows 63–67 ]
[ TOP BASKET    Rows 51–62 ]
[ gap           Rows 45–50 ]
[ MIDDLE BASKET Rows 33–44 ]
[ gap           Rows 27–32 ]
[ BOTTOM BASKET Rows 15–26 ]
[ plain panel   Rows 7–14  ]
[ bottom point  Rows 1–6   ]
[ tassel ]
Each basket zone is 12 rows, or 3 in (7.6 cm), which matches the wall height. Each gap is 6 rows, or 1.5 in (3.8 cm).
Joining
Flowers first. Sew one flower to the front of each basket, centered over the bobble rounds and directly opposite the round joins. That way, the joins end up hidden against the panel.
Method: Whipstitch with Lavender. Each basket is attached with two horizontal seams of 14 sts each.
Stitch-to-stitch logic: The panel is 14 sts wide, so you sew 14 basket sts to 14 panel sts, one to one.
- On the top basket, mark the join of Rnd 22. Count 7 sts to each side of it and mark those sts. This gives 14 rim sts centered at the back.
- Lay the panel RS up and line the rim up with Row 62.
- Whipstitch each marked rim st to its matching st in Row 62.
- Find the unused front loops of Rnd 11 that the BLO round left behind. Mark the 14 loops centered at the back.
- Whipstitch those 14 loops to the 14 sts of Row 51.
- Repeat for the middle basket (rim to Row 44, base to Row 33) and the bottom basket (rim to Row 26, base to Row 15).
Tension: Make each stitch snug but not tight. The 3.5 in (8.9 cm) back section of each basket should lie flat on the panel. If the panel puckers, your seam is too tight. If the basket tips forward, it is too loose.
Size checkpoint: Each basket should measure 3 in (7.6 cm) from base seam to rim seam, with 1.5 in (3.8 cm) gaps between baskets.
Border
Border gauge: Work 1 sc in each st across the ends and 1 sc in each row-end along the sides. The fabric has 4 sts and 4 rows per inch, so 1 sc per row-end lies flat.
Rnd 1: With RS facing, join Lavender in the last st of Row 79.
– Top end: 3 sc in first st, sc in next 2 sts, 3 sc in last st. (4 sts worked 1 each + 4 extra corner sts = 8)
– First long side: 1 sc in each row-end down to Row 1. (79)
– Bottom end, across the foundation chain: 3 sc in first st, sc in next 2 sts, 3 sc in last st. (4 + 4 = 8)
– Second long side: 1 sc in each row-end back up to Row 79. (79)
– Join. Total: 8 + 79 + 8 + 79 = 174.
Rnd 2: Ch 1, sl st in each sc around, join. (174) Fasten off.
Why the math works: The panel has 79 rows, so each long side gets 79 sc. Each end has 4 sts, and its two corners add 2 extra sts each, for a total of 8. Corner sts are counted only once, in the ends. The border adds 1 st to each side, so the width becomes 14 + 2 = 16 sts, or 4 in (10.2 cm). The length becomes 19.75 in (50.2 cm) + 0.5 in (1.3 cm) = 20.25 in (51.4 cm).
Ring: Pass the tab through the ring from front to back. Fold the tab down behind the panel and sew its end flat across Rows 63–67.
Tassel: Wrap Lavender 30 times around the 4.5 in (11.4 cm) card. Tie the loops together at the top with a 12 in (30.5 cm) strand and slide them off the card. Wrap another strand around the bundle 0.5 in (1.3 cm) below the top and knot it. Cut the bottom loops, trim the tassel to 4 in (10.2 cm), and tie it to the bottom point.
Final Blocking
- Lightly mist the whole holder, or steam it without touching the yarn.
- Pin the panel face up to 4 in x 20.25 in (10.2 cm x 51.4 cm).
- Slide a toilet roll or a 5 in (12.7 cm) jar into each basket so it dries round.
- Push each bobble outward with a fingertip.
- Flatten and shape the flower petals.
- Let it dry completely, then remove the pins and forms.
Final Quality-Control Checklist
- Every basket wall round has 66 sts
- Bases measure 5.25 in (13.3 cm), and walls measure 3 in (7.6 cm)
- All bobbles face outward
- Each mesh band has 33 even windows
- Flowers are centered on the front, and joins are hidden at the back
- Panel is 4 in (10.2 cm) wide with a flat 174-st border
- Baskets are level and 1.5 in (3.8 cm) apart
- Ring is secure and the tassel is trimmed evenly
- All tails are woven in
Troubleshooting
Bobbles face inward. A bobble round was worked with the RS facing you. Turn after every wall round from Rnd 12 to Rnd 19.
Base cups or ruffles. If the base cups, your tension is too tight, so go up a hook size. If it ruffles, recount your increases.
Rolls fit too tightly. Add Rnd 11a: (10 sc, inc) 6 times (72 sts). Then work the walls on 72 sts, which gives 36 bobbles per bobble round and 36 mesh windows.
Border ripples. Check that you have exactly 79 sc on each long side.
Baskets tilt forward. Tighten the base seams, or tack each basket to the panel at Rnd 16.
Care
Hand wash in cool water with mild soap, roll in a towel to remove water, and dry flat with a form in each basket. Don’t tumble dry.
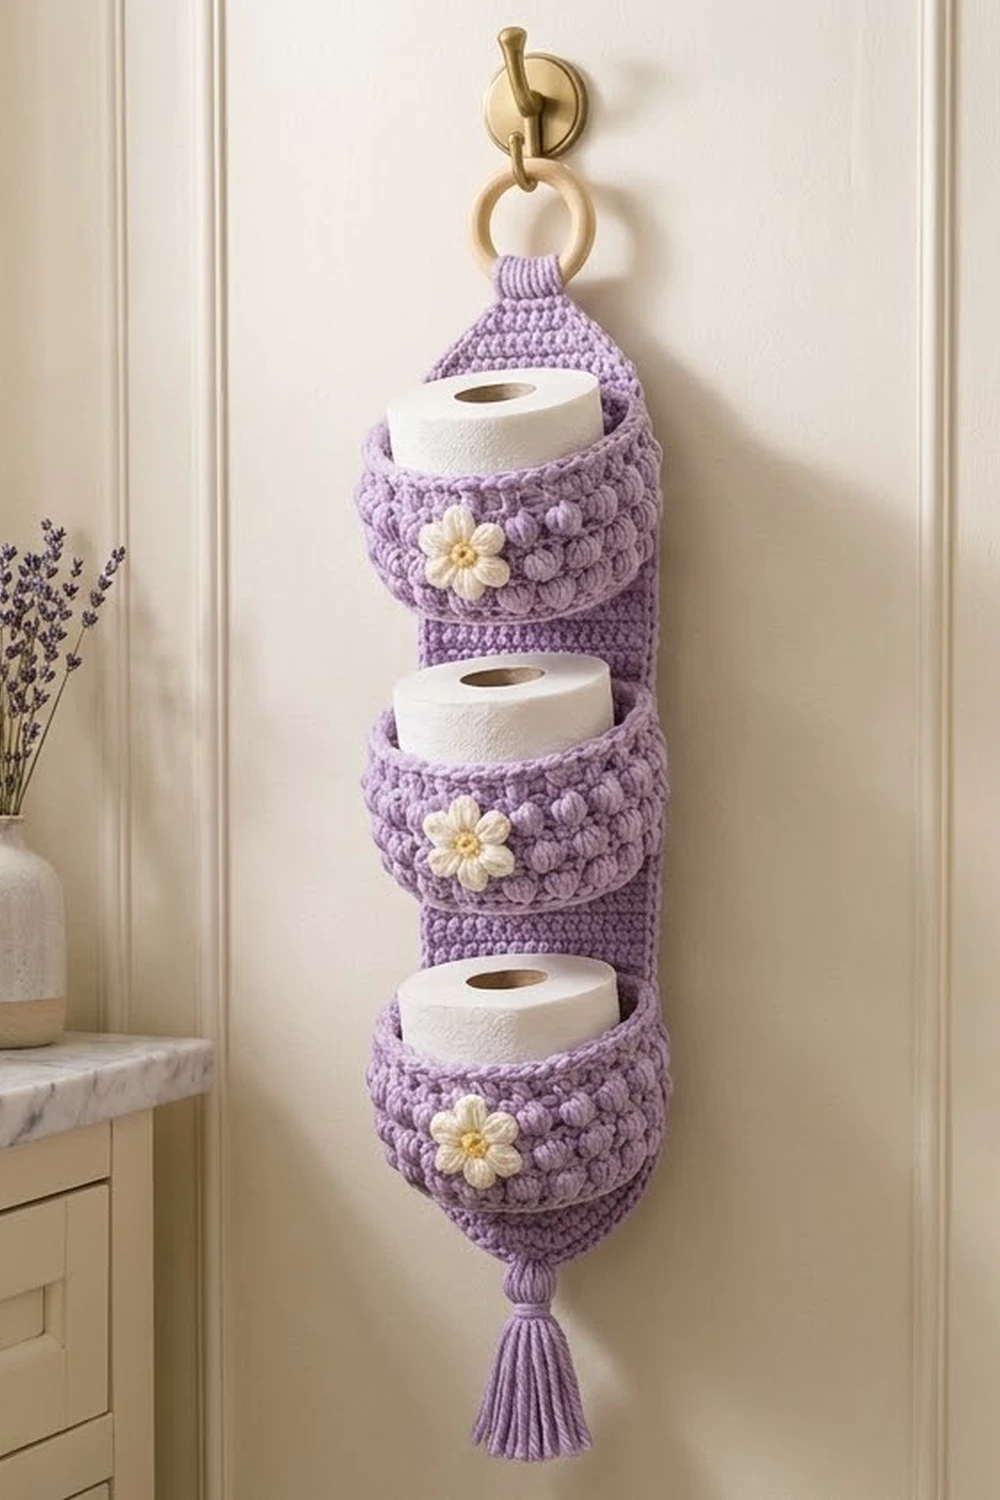
Final Notes
The measurements build on each other. The 16-st gauge gives a 66-st base that is 5.25 in (13.3 cm) across and grows into a basket 3 in (7.6 cm) tall. Each basket fills a 12-row zone on a 14-st panel that measures 3.5 in x 19.75 in (8.9 cm x 50.2 cm). The 174-st border brings the panel to 4 in x 20.25 in (10.2 cm x 51.4 cm). If you check each stage as you go, the holder will hang straight and hold three rolls neatly.
Happy crocheting!