

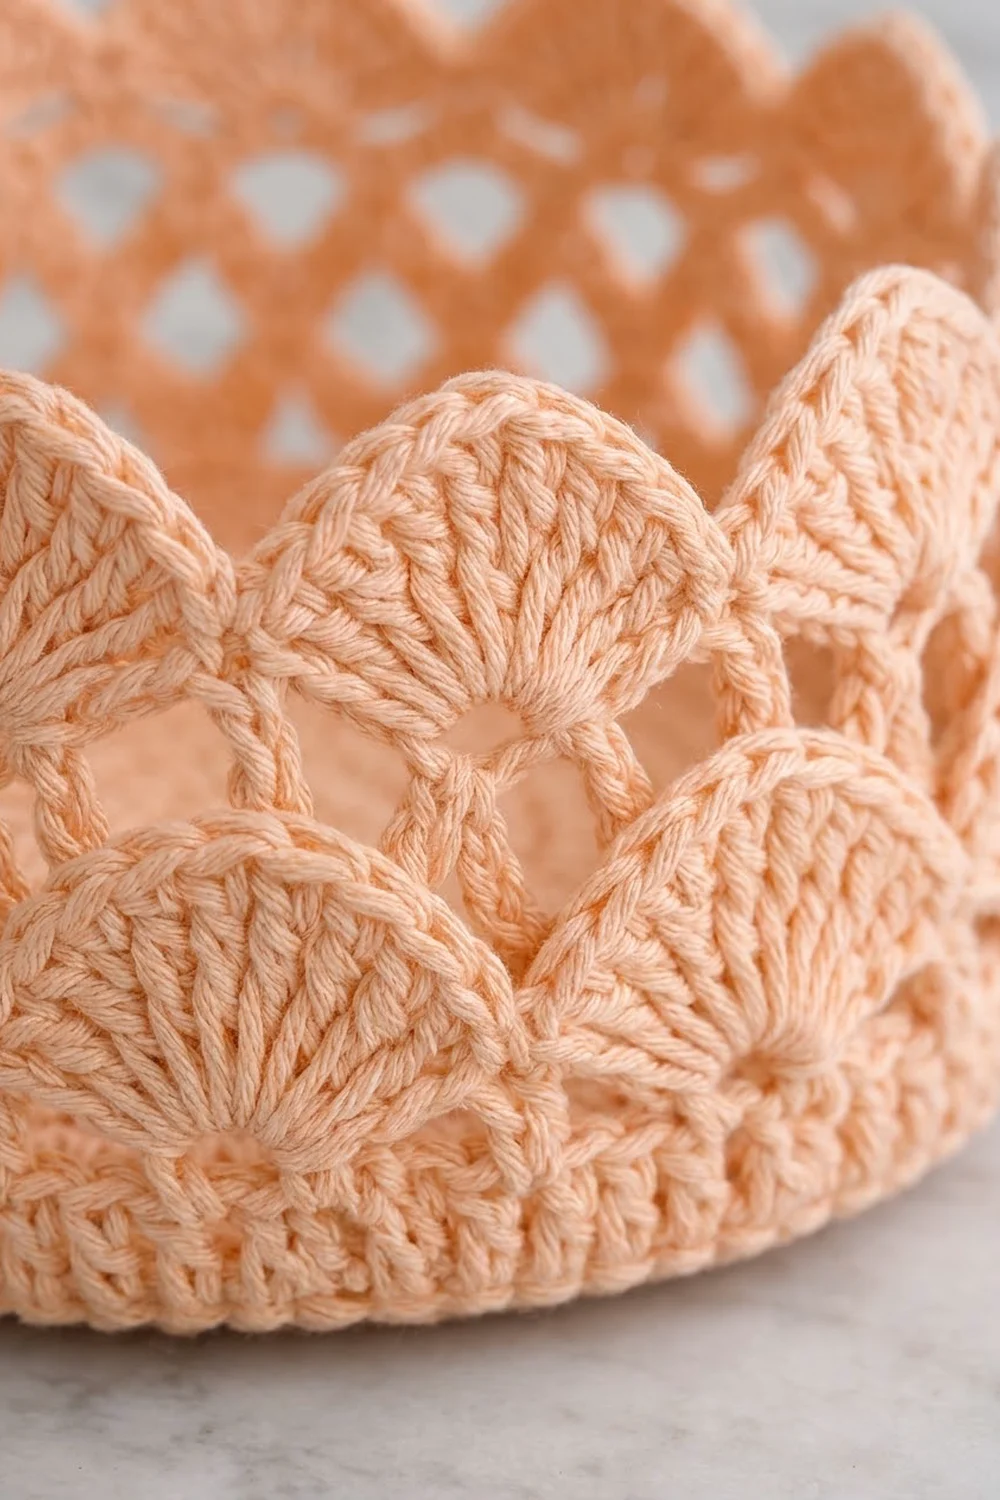
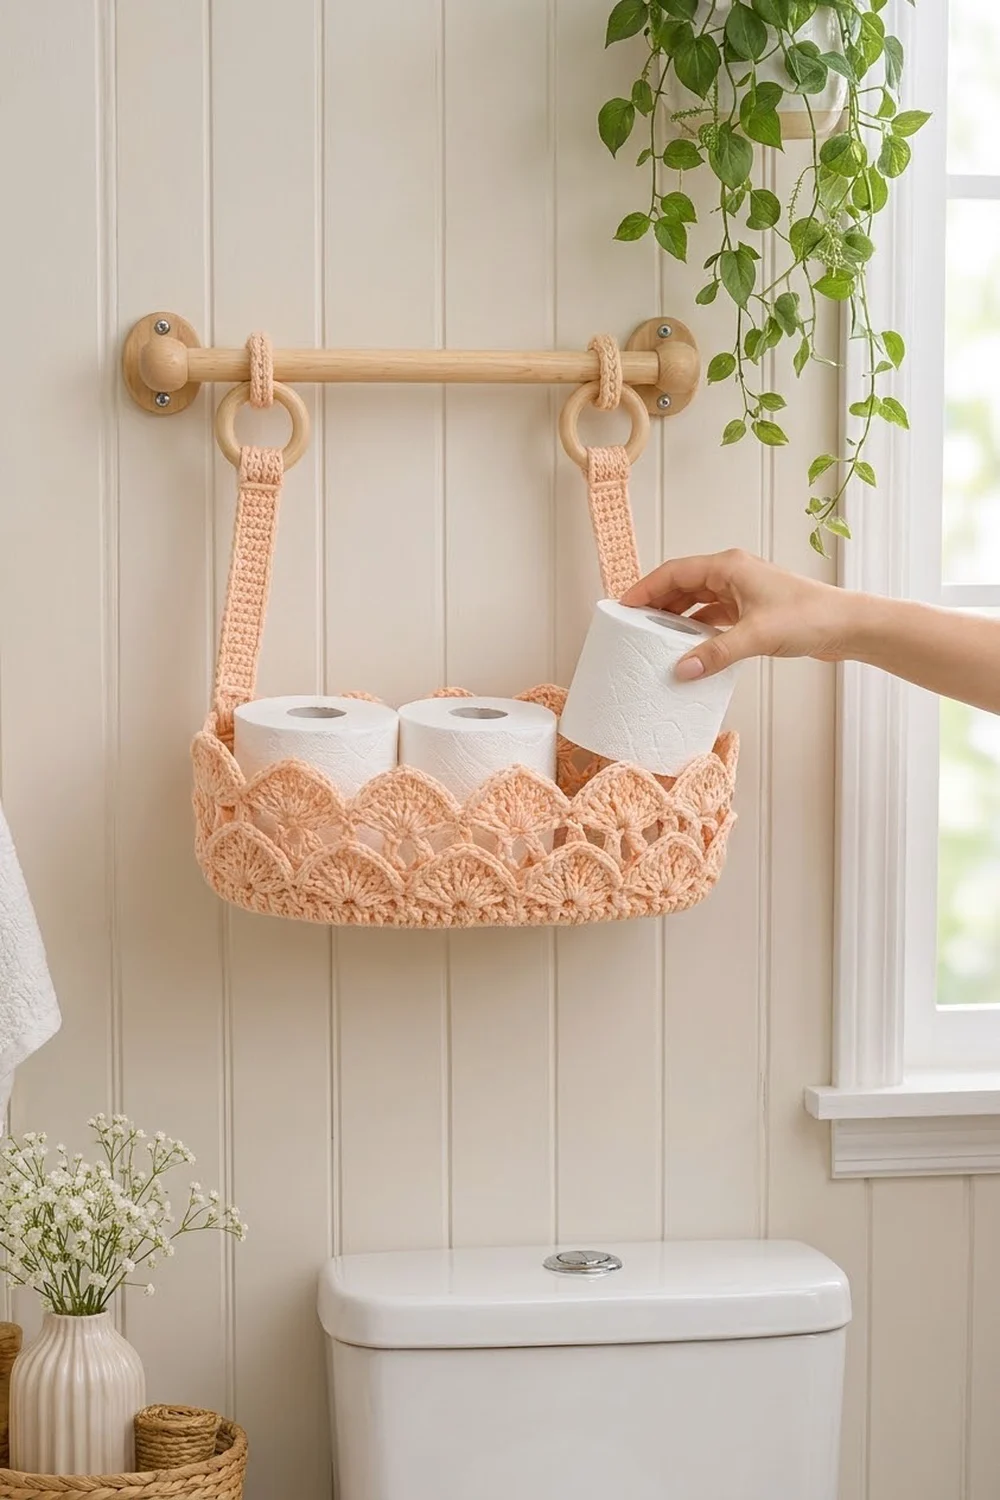
The Peach Lotus Hanging Basket is a round crochet basket that hangs from a wooden rod on two straps with wooden rings. Its walls are built in layers. Two rows of fan scallops sit one over the other like lotus petals, a light diamond lattice runs above them, and pointed fan scallops finish the rim.
The sample is worked in one soft peach worsted-weight cotton, with natural wood rings and a ball-end dowel. The look is calm and a little vintage, so it suits a bathroom, nursery or craft corner. It holds three standard toilet paper rolls, small towels or skeins of yarn.
This pattern uses US crochet terms. The finished basket measures about 11.5 in (29.2 cm) across and 5.25 in (13.3 cm) tall. Each strap is about 10.5 in (26.7 cm) long between rings.
Here is how it’s built. You crochet a flat spiral base, then turn the wall up with a back-loop round. Back-loop rounds on the wall leave free front loops, and the two scallop tiers are worked into those loops later. A chain-loop lattice and a scalloped rim finish the basket. The straps are worked separately and sewn to the rim.
Finished Size and Construction
- Finished size: 11.5 in (29.2 cm) diameter × 5.25 in (13.3 cm) tall
- Skill level: Intermediate
- Terminology: US
- Yarn weight: Worsted (#4) cotton
- Hook: 4.0 mm (G-6)
- Number of pieces: 3 crocheted (1 basket, 2 straps), plus 4 wooden rings and 1 dowel
- Layout: Straps attached at opposite sides of the rim
- Piece size: Basket base 11.5 in (29.2 cm). Strap 1.25 in × 10.5 in (3.2 cm × 26.7 cm)
- Size before border: 11.5 in (29.2 cm) diameter × about 4 in (10.2 cm) tall after Rnd 36
- Border depth: about 1.25 in (3.2 cm), Rnds 37–39
Materials
Yarn: Use a smooth, firm worsted-weight cotton or cotton blend. Cotton holds the basket’s shape and shows the scallop texture clearly. Avoid soft acrylics, because the walls will slump.
- Peach: 250 g, about 475 m (520 yd)
Quantities include a margin of about 15% for gauge differences and swatching.
Tools and hardware:
– 4.0 mm (G-6) crochet hook
– 4 wooden rings, 2 in (5.1 cm) outer diameter
– 1 wooden dowel, 0.75 in (1.9 cm) diameter × 16 in (40.6 cm), with ball ends
– 2 wall brackets and screws for the dowel
– Stitch markers (at least 4)
– Tapestry needle
– Scissors
– Rustproof pins and a bowl or box about 11.5 in (29.2 cm) across for blocking
Abbreviations (US Terms)
- ch: chain
- sl st: slip stitch
- sc: single crochet
- hdc: half double crochet
- dc: double crochet
- inc: 2 sc in the same stitch
- BLO: back loop only
- FL: front loop
- MR: magic ring
- sk: skip
- st(s): stitch(es)
- sp: space
Special stitch, the fan: work 9 dc in the same stitch.
Gauge and Checkpoints
Gauge: 16 sc × 17 rounds = 4 in (10.2 cm) in the base spiral.
Test your gauge on the base first. Work Rnds 1–6 and measure:
- After Rnd 6 (36 sts): 2.9 in (7.4 cm) across
- After Rnd 12 (72 sts): 5.7 in (14.5 cm)
- After Rnd 18 (108 sts): 8.6 in (21.8 cm)
- After Rnd 24 (144 sts): 11.5 in (29.2 cm)
- After Rnd 33: wall about 2.1 in (5.3 cm) tall
- After Rnd 36: wall about 4 in (10.2 cm) tall
- Strap after 20 rows: about 4.7 in (11.9 cm) long
If your base is too big, go down to a 3.75 mm hook. If it’s too small, go up to 4.5 mm. If the base ruffles, your tension is loose. If it cups, your tension is tight or the increases are stacking. Fix this before you start the wall, because every later count depends on exactly 144 stitches.
Basket Base
Work in a continuous spiral and move a marker up to the first stitch of each round.
Rnd 1: 6 sc in MR. (6)
Rnd 2: inc in each st. (12)
Rnd 3: [sc, inc] 6 times. (18)
Rnd 4: [sc in next 2, inc] 6 times. (24)
Rnds 5–24: Each round has 6 × (round number) stitches. Work [sc in next (round number − 2) sts, inc] 6 times. On even-numbered rounds, start with half of the plain sc, work around, and end with the other half. This staggers the increases so the base stays round instead of hexagonal.
- Rnd 6: 36 sts
- Rnd 12: 72 sts
- Rnd 18: 108 sts
- Rnd 24: 144 sts
At the end of Rnd 24, sl st into the next st to smooth the step. The base should lie flat and measure 11.5 in (29.2 cm).
Basket Wall
From here, work in joined rounds. Start each round with ch 1 (this does not count as a stitch) and join with a sl st to the first sc.
Rnd 25 (turning round): sc BLO in each st. (144) The unused front loops make a crisp ridge, and the wall begins to rise.
Rnds 26–28: sc in each st. (144)
Rnd 29: sc BLO in each st. (144) This leaves the FLs of Rnd 28 free for the lower scallop tier.
Rnds 30–32: sc in each st. (144)
Rnd 33: sc BLO in each st. (144) This leaves the FLs of Rnd 32 free for the upper scallop tier.
Checkpoint: the wall is about 2.1 in (5.3 cm) tall.
Lattice
Rnd 34: ch 1, sc in first st, ch 5, sk 3, sc in next st. Repeat from * around, ending with ch 5, sk 3, and a sl st to the first sc. (36 ch-5 loops)
Rnd 35: sl st in the next 3 ch to reach the center of the first loop, ch 1, sc in the same loop. ch 5, sc in next loop. Repeat around, ending with ch 5 and a sl st to the first sc. (36 ch-5 loops)
Rnd 36: Repeat Rnd 35. (36 ch-5 loops)
The loops offset by half a loop each round, which forms the diamond lattice. Checkpoint: the wall is about 4 in (10.2 cm) tall.
Scallop Tiers
Turn the basket upside down so the free front loops face you. Work both tiers the same way.
Lower tier, Round 1: Join yarn in any free FL of Rnd 28. ch 1, sc in the same FL. sk 3 FL, fan in next FL, sk 3 FL, sc in next FL. Repeat around, ending with sk 3 FL and a sl st to the first sc. This gives 18 fans and 18 sc, 180 sts total. (144 FLs ÷ 8 per repeat = 18 repeats.)
Lower tier, Round 2: sl st in sc, sc in next 4 dc, 3 sc in center dc, sc in next 4 dc. Repeat around. This is a conversion round: 180 sts worked one-for-one, plus 2 extra at each of the 18 centers (36 extra), for 216 sts total. Fasten off.
Upper tier: Work Rounds 1–2 into the free FLs of Rnd 32, but join 4 sts to the right of the point directly above your lower-tier join. That way each upper fan sits over a valley of the lower tier. The counts are the same: 180, then 216.
Each scallop hangs down about 0.8 in (2.0 cm) and covers the 4 sc rounds below it. The lower tier reaches the base edge, and the upper tier overlaps the top of the lower tier, so they look like layered petals.
Straps (Make 2)
Row 1: Join yarn around ring 1 and work 5 sc over the ring. (5)
Rows 2–44: ch 1, turn, sc in each st. (5)
Row 45: Hold ring 2 against the top edge. ch 1, turn, and work each sc through the next st and around the ring at the same time. (5) Fasten off and weave in ends.
The strap is 1.25 in (3.2 cm) wide and about 10.5 in (26.7 cm) between rings.
Optional cuff: Wrap the yarn 6 times tightly around the strap just below each ring, then stitch through the wraps to lock them in place.
Make All Pieces
- 1 basket (Peach), with both scallop tiers
- 2 straps (Peach), each with 2 rings
Here is a top view of the layout. Count Rnd 37 stitches clockwise, starting from the first stitch.
          Strap A (sts 143–144, 1–3)
                    |
   9 fans  ←   [ basket rim ]   →  9 fans
                    |
          Strap B (sts 71–75)
Joining (Attaching the Straps)
Attach the straps after the border is finished. Mark two rim valleys exactly 72 sts apart on Rnd 37: st 1 and st 73. Both are sc valleys between fans, so 9 fans fall on each side of the basket.
- Center the lower end of Strap A over the st 1 valley so it covers 5 sts (sts 143–144 and 1–3). Fold it over the rim so the lower ring sits inside the basket against the lattice.
- Whipstitch both strap edges stitch for stitch to Rnds 37–39 on the outside. Then sew the ring through the Rnd 36 loops on the inside.
- Repeat for Strap B at sts 71–75.
Tension: Keep your sewing stitches snug but not puckered. The rim should not dip under the strap.
Checkpoint: Hold the basket up by both top rings. It should hang level, with about 9 in (22.9 cm) of strap visible above the rim.
Border (Rim)
Border gauge: 4 sc per ch-5 loop, which keeps the rim at the same 36 in (91.4 cm) circumference as the wall.
Rnd 37: Join yarn in any ch-5 loop of Rnd 36. ch 1, 4 sc in each loop around, sl st to the first sc. This is a conversion round: 36 loops × 4 sc = 144 sts, plus 0 extra.
Rnd 38: ch 1, sc in first st. sk 3, fan in next st, sk 3, sc in next st. Repeat around, ending with sk 3 and a sl st to the first sc. This gives 18 fans and 18 sc, 180 sts total.
Rnd 39: ch 1. sc in sc, sc in next 2 dc, hdc in next 2 dc, (dc, ch 2, dc) in center dc, hdc in next 2 dc, sc in next 2 dc. Repeat around and sl st to the first sc. This is a conversion round: 180 sts worked one-for-one, plus 1 extra at each center (18 extra), for 198 sts and 18 ch-2 points. Each fan has 11 sts plus its ch-2 point.
Why the math works: 144 is divisible by 4 (the lattice loops) and by 8 (the fans), so all three patterns line up with no partial repeats. The wall, lattice and rim all have the same 144-stitch base, so the basket stays straight-sided instead of flaring or pulling in.
Final Blocking
- Weave in all ends securely, especially at the tier joins.
- Soak the basket and straps in cool water for 10 minutes, then roll them in a towel to remove excess water.
- Set the basket over a bowl or box about 11.5 in (29.2 cm) across, or stuff it firmly with towels.
- Smooth the wall upright. Pin each rim point straight up and each tier scallop flat against the wall.
- Lay the straps flat and pin them to 10.5 in (26.7 cm), keeping the edges straight.
- Let everything dry completely, which takes 24–48 hours. For a stiffer basket, mist it lightly with fabric stiffener before drying.
- Mount the brackets 16 in (40.6 cm) apart or less. Slide the top rings onto the dowel before you set the dowel in the brackets.
Final Quality-Control Checklist
- Base is flat, 11.5 in (29.2 cm) across, with no hexagon corners
- Wall is about 5.25 in (13.3 cm) tall and stands straight
- Each tier has 18 scallops, and the upper tier is offset from the lower one
- Lattice has 36 even loops in every round
- Rim has 18 fans, each with a crisp ch-2 point
- Straps are the same length and are 72 sts apart
- Rings are secure and the basket hangs level
Troubleshooting
- Base ruffles: Use a smaller hook or check that you haven’t added extra increases.
- Base cups: Use a larger hook and make sure the increases are staggered.
- Scallops don’t fit evenly: The wall round is not exactly 144 sts. Count again before you start the tier.
- Lattice sags: Use ch 4 instead of ch 5, keeping the same 36 loops.
- Rim points flop: Tighten the (dc, ch 2, dc) or use stiffener.
- Basket tilts: Re-center a strap so it sits exactly 72 sts from the other.
Care
Hand wash in cool water, reshape while damp and dry flat over a form. Do not tumble dry, because heat distorts cotton scallops.
Final Notes
The measurements build on each other. Gauge of 16 sc = 4 in (10.2 cm) gives a 144-stitch base 11.5 in (29.2 cm) across. Those same 144 stitches carry up a 2.1 in (5.3 cm) solid wall with two tiers of 18 scallops and a lattice of 36 loops. Rnd 37 converts the lattice back to 144 sts, which become 18 rim fans, and two 10.5 in (26.7 cm) straps hang it all from a wooden rod. Check each stage against its checkpoint and the basket will come out right.
Happy crocheting!