

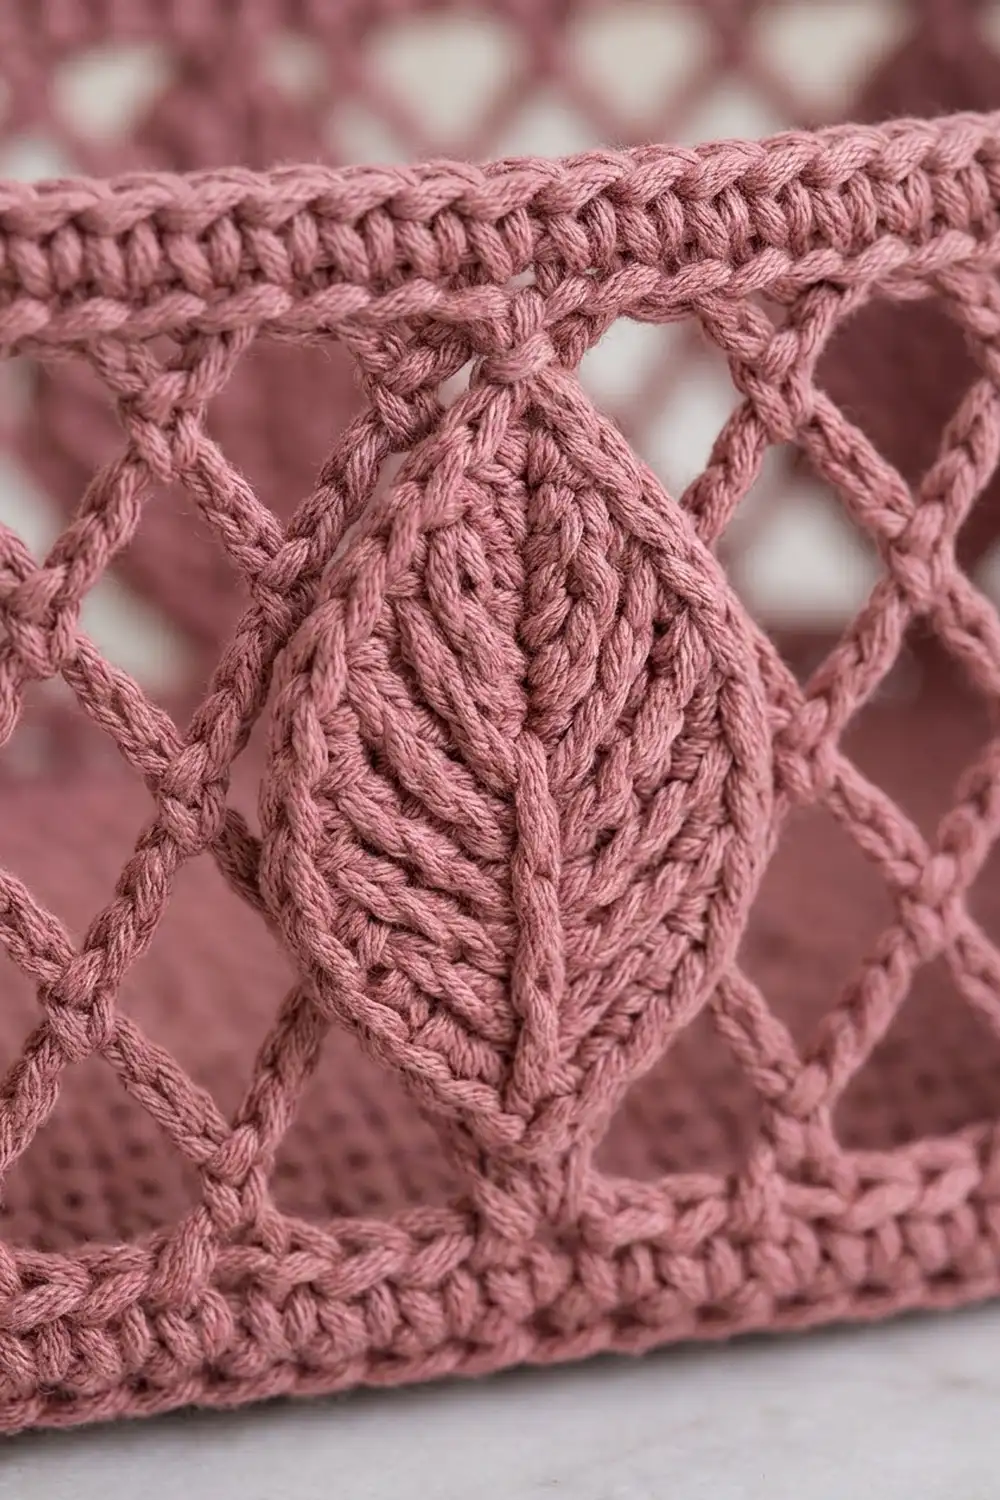
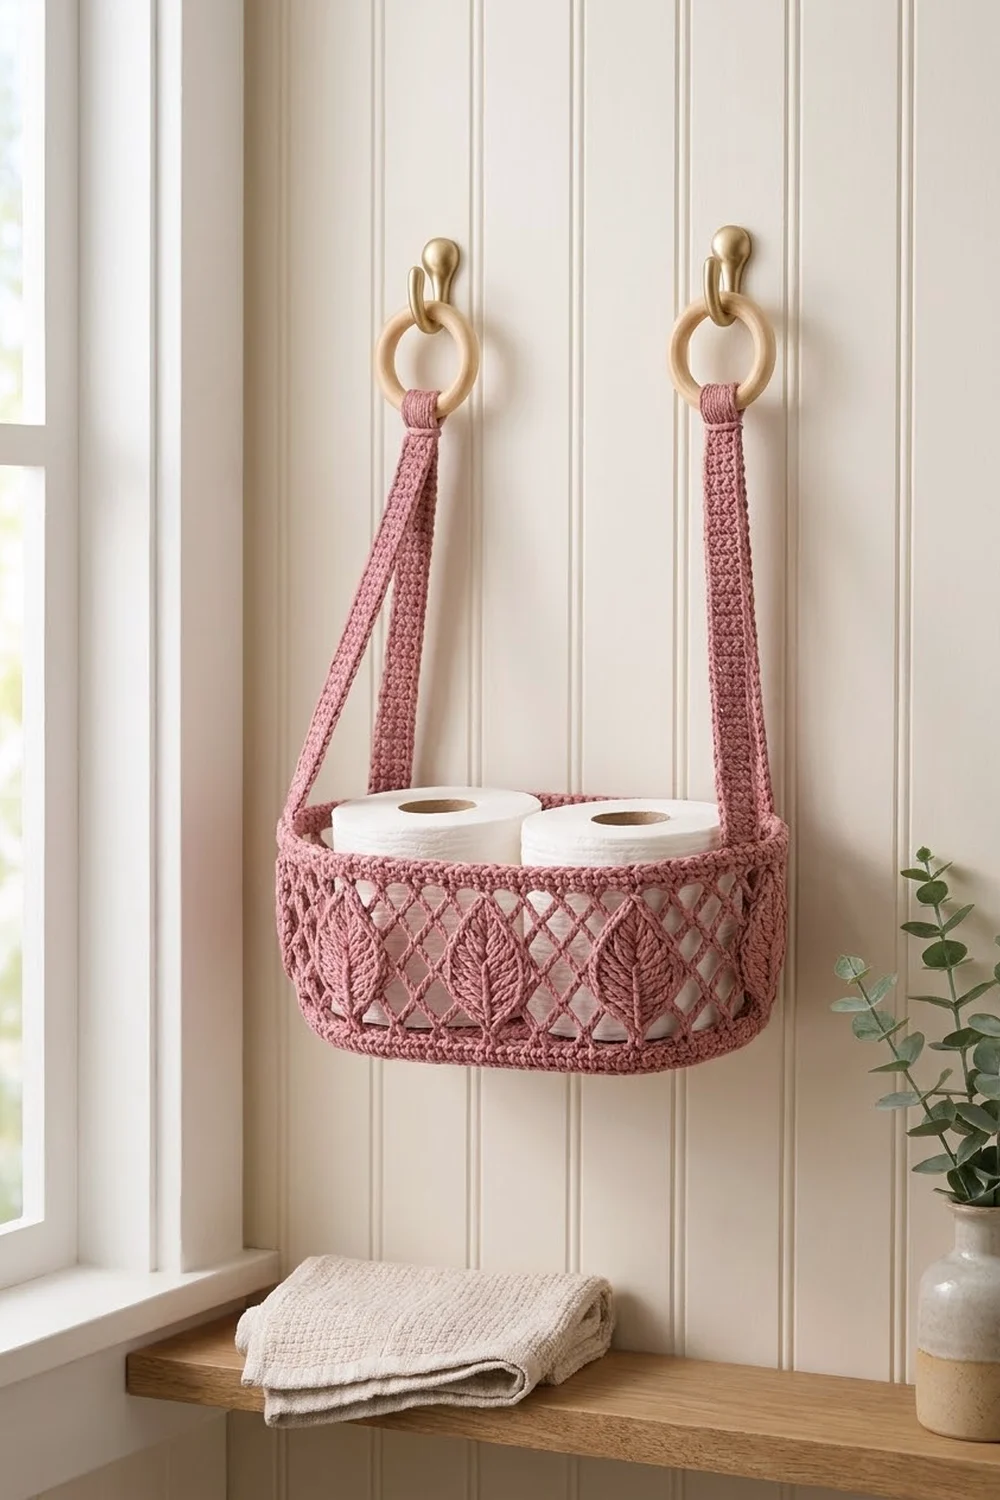
The Rosewood Leaf Hanging Basket is a deep oval basket that hangs from two wooden rings. It is made in one dusty-rose color. A solid base turns up into a short solid band, followed by a diamond lattice with raised leaves, and a firm rolled rim finishes the top. Two flared straps rise from the short ends and loop around the rings.
The style is soft, botanical and practical. The basket holds two toilet paper rolls side by side, and it works just as well for small towels, yarn or nursery items.
This pattern uses US crochet terms. The finished basket measures 10.5 in (26.7 cm) long, 4.25 in (10.8 cm) wide and 4.5 in (11.4 cm) tall. Each strap is 14 in (35.6 cm) long before it is folded around its ring.
How it’s made: You work the oval base in joined rounds from a foundation chain. A back-loop round turns the edge up into the wall. The wall changes from solid single crochet to a chain-5 lattice and back to solid single crochet. You make six leaves and two straps separately and sew them on, and a two-round border finishes the rim.
Finished Size and Construction
- Finished size: 10.5 in x 4.25 in x 4.5 in tall (26.7 cm x 10.8 cm x 11.4 cm)
- Skill level: Intermediate
- Terminology: US crochet terms
- Yarn weight: Worsted (CYC #4) cotton
- Hook: 4.5 mm (US 7)
- Number of pieces: 9 crocheted (1 basket body, 2 straps, 6 leaves), plus 2 purchased rings
- Layout: 3 leaves on each long side and 1 strap centered on each short end
- Piece sizes:
- Base: 10.5 in x 4.25 in (26.7 cm x 10.8 cm)
- Leaf: 2.5 in x 1.25 in (6.4 cm x 3.2 cm)
- Strap: 1.7 in (4.3 cm) wide, flaring to 3.4 in (8.6 cm)
- Wall height before border: 4 in (10.2 cm)
- Border depth: 0.5 in (1.3 cm)
Materials
Choose a smooth, firm worsted-weight cotton. Cotton holds its shape under weight and handles bathroom humidity well. Avoid splitty or very soft yarns, because the lattice needs crisp loops.
- Dusty rose: 200 g, about 310 m (339 yd)
These quantities include a margin of roughly 20%. The basket body uses about 125 g, each strap about 12 g, and all six leaves together about 15 g.
Tools:
- 4.5 mm (US 7) crochet hook
- 2 wooden rings, 2.75 in (7.0 cm) outer diameter
- 4 locking stitch markers
- Tapestry needle and scissors
- Measuring tape
- Rust-proof pins and a spray bottle
Abbreviations (US Terms)
- ch: chain
- sl st: slip stitch
- sc: single crochet
- hdc: half double crochet
- dc: double crochet
- sc2tog: single crochet 2 together
- inc: 2 sc in the same st
- BLO: back loop only
- st(s): stitch(es)
- rnd(s): round(s)
Special stitch: Reverse sc (crab stitch). Work from left to right (right to left if you’re left-handed). Insert the hook into the next st to the right, yarn over, pull up a loop, then yarn over and draw through both loops.
Gauge and Checkpoints
Gauge: 14 sc and 16 rnds = 4 in (10.2 cm), worked in joined rounds.
Lattice gauge: 1 lattice round = 0.625 in (1.6 cm) tall when lightly stretched.
Test the base first, since every later count depends on it. Work Rnds 1–8 and lay the base flat to measure.
Checkpoints:
- After Rnd 1: the oval is about 6.75 in (17.1 cm) long.
- After Rnd 8: the base is 10.5 in x 4.25 in (26.7 cm x 10.8 cm).
- After Rnd 11: the solid wall is 0.75 in (1.9 cm) tall.
- After Rnd 15: the lattice band is 2.5 in (6.4 cm) tall.
- After Rnd 18: the wall is 4 in (10.2 cm) tall.
- After the border: the basket is 4.5 in (11.4 cm) tall.
If the base is too big, switch to a 4 mm (US G-6) hook. If it is too small, switch to a 5 mm (US H-8) hook. A ruffled base means your tension is loose, and a cupped base means it is tight. Fix both by changing the hook, never the stitch counts, because the leaf and strap placement depends on those counts.
Basket Body
Join each round with a sl st to the first sc. The ch 1 at the start of a round does not count as a stitch. Keep the right side facing you.
Base
Foundation: Ch 25.
Rnd 1: 3 sc in 2nd ch from hook, sc in next 22 ch, 3 sc in last ch. Rotate and work along the underside of the chain: sc in next 22 ch. Join. (50 sts: 3 + 22 + 3 + 22)
The round ends right beside the first 3-sc group, so every following round starts at the beginning of an end curve.
Rnd 2: Ch 1, [2 sc in each of next 3 sts, sc in next 22 sts] twice. Join. (56 sts)
Rnd 3: Ch 1, [(sc in next st, inc) 3 times, sc in next 22 sts] twice. Join. (62 sts)
Rnd 4: Ch 1, [(sc in next 2 sts, inc) 3 times, sc in next 22 sts] twice. Join. (68 sts)
Rnd 5: Ch 1, [(sc in next 3 sts, inc) 3 times, sc in next 22 sts] twice. Join. (74 sts)
Rnd 6: Ch 1, [(sc in next 4 sts, inc) 3 times, sc in next 22 sts] twice. Join. (80 sts)
Rnd 7: Ch 1, [(sc in next 5 sts, inc) 3 times, sc in next 22 sts] twice. Join. (86 sts)
Rnd 8: Ch 1, [(sc in next 6 sts, inc) 3 times, sc in next 22 sts] twice. Join. (92 sts)
Each end curve now has 24 sts and each long side has 22 sts (24 + 22 + 24 + 22 = 92). Mark the first and last st of each long side.
Solid Wall
Rnd 9 (turning round): Ch 1, sc in BLO of each st around. Join. (92 sts) The unused front loops form a crisp ridge, and the wall begins to rise.
Rnds 10–11: Ch 1, sc in each st around. Join. (92 sts)
Lattice Band
Rnd 12: Ch 1, sc in first st, ch 5, skip 3 sts, [sc in next st, ch 5, skip 3 sts] 22 times. On the last repeat, work ch 2, dc in first sc instead of ch 5. (23 ch-5 loops) The ch 2 + dc counts as the 23rd loop and leaves your hook at the center of that loop.
Rnds 13–14: Ch 1, sc in the loop formed by the joining dc, [ch 5, sc in next ch-5 loop] 22 times, ch 2, dc in first sc. (23 loops)
Rnd 15: Ch 1, sc in the loop formed by the joining dc, [ch 5, sc in next ch-5 loop] 22 times, ch 5, sl st in first sc. (23 loops)
Each sc lands at the center of a loop from the round below, so the loops stagger into diamonds.
Top Wall
Rnd 16 (conversion round): Ch 1, sc in first sc, 3 sc in next ch-5 loop, [sc in next sc, 3 sc in next ch-5 loop] 22 times. Join. (23 sc worked into sc + 69 sc worked into loops = 92 sts)
Rnds 17–18: Ch 1, sc in each st around. Join. (92 sts)
The wall should now measure 4 in (10.2 cm). Don’t fasten off. Put the live loop on a locking marker for now.
Leaf (make 6)
Foundation: Ch 10.
Side 1: Sc in 2nd ch from hook, hdc in next ch, dc in next 4 ch, hdc in next ch, sc in next ch. (8 sts)
Stem end: 3 sc in last ch. (3 sts)
Side 2: Working along the underside of the chain: sc in next ch, hdc in next ch, dc in next 4 ch, hdc in next ch, sc in next ch. (8 sts)
Tip: Sl st in first sc, ch 2, sl st in 2nd ch from hook to make the point, then sl st in the same first sc. (19 sts plus point)
Veins: Surface sl st along the center chain from stem to tip to make a raised midrib. Then use a tapestry needle to backstitch 3 angled side veins on each half.
Each leaf measures 2.5 in (6.4 cm) by 1.25 in (3.2 cm). Leave a 10 in (25.4 cm) tail for sewing.
Strap (make 2)
Work in rows, starting at the flared end. The ch 1 at the start of a row does not count as a stitch.
Foundation: Ch 13.
Row 1: Sc in 2nd ch from hook and in each ch across. Turn. (12 sts)
Rows 2–3: Ch 1, sc in each st across. Turn. (12 sts)
Row 4: Ch 1, sc2tog, sc in next 8 sts, sc2tog. Turn. (10 sts)
Row 5: Ch 1, sc in each st across. Turn. (10 sts)
Row 6: Ch 1, sc2tog, sc in next 6 sts, sc2tog. Turn. (8 sts)
Row 7: Ch 1, sc in each st across. Turn. (8 sts)
Row 8: Ch 1, sc2tog, sc in next 4 sts, sc2tog. Turn. (6 sts)
The flare (Rows 1–8) is 2 in (5.1 cm) long and 3.4 in (8.6 cm) wide at the bottom edge.
Rows 9–56: Ch 1, sc in each st across. Turn. (6 sts)
Fasten off and leave a 16 in (40.6 cm) tail. The strap measures 14 in (35.6 cm) long and 1.7 in (4.3 cm) wide above the flare.
Make All Pieces
- Basket body: 1, dusty rose
- Leaves: 6, dusty rose
- Straps: 2, dusty rose
- Wooden rings: 2, purchased
Layout (seen from above):
          [Leaf]  [Leaf]  [Leaf]
[Strap] (                        ) [Strap]
          [Leaf]  [Leaf]  [Leaf]
Leaves: Each long side has 22 sts.
– Center the middle leaf between the 11th and 12th sts.
– Center the outer leaves between the 4th and 5th sts and between the 18th and 19th sts.
This leaves 4 sts free at each end of the side, with leaf centers 7 sts, or 2 in (5.1 cm), apart.
Straps: Each end curve has 24 sts. The strap’s 12-st flare covers the middle 12 sts, leaving 6 sts free on each side (6 + 12 + 6 = 24).
Joining
Step 1: Sew on the leaves.
1. Pin each leaf upright on the outside of the wall, tip pointing up. The stem sits on Rnd 11 and the tip reaches Rnd 16, so the leaf covers the 2.5 in (6.4 cm) lattice band.
2. Whipstitch around the leaf edge about every 0.25 in (0.6 cm), catching the sc and chain loops behind it.
3. Sew through the back half of each leaf stitch only, so the leaf stays raised.
Tension: Pull each stitch just snug. Stitches that are too tight pucker the lattice, and loose ones let the tips flop forward.
Step 2: Work the border. Work the Border section below before you attach the straps.
Step 3: Attach the straps.
1. Center a flare over the middle 12 sts of one end curve, on the outside of the wall. Row 8 should be level with the top of Rnd 20, and Row 1 lands 2 in (5.1 cm) lower, in the Rnd 14 lattice.
2. Whipstitch all around the flare, matching stitch to stitch. Each edge row goes to the wall fabric beside it. The 12 sts of Row 1 span 12 wall sts, which is 3 lattice loops, so sew them to those loops.
3. Repeat with the second strap at the opposite end.
Step 4: Add the rings. Pass each strap end through a ring, fold back 2 in (5.1 cm), and whipstitch through both layers on all sides.
Size checkpoint: Hang the basket and measure from the rim to the bottom of each ring. Both should be about 10 in (25.4 cm) and within 0.25 in (0.6 cm) of each other. If they aren’t, unpick one fold and adjust it.
Border
Border gauge: Same as the main fabric, 14 sts = 4 in (10.2 cm). The two border rounds add 0.5 in (1.3 cm) of height.
Pick up the live loop from Rnd 18.
Rnd 19: Ch 1, sc in each st around. Join. (92 sts: 24 + 22 + 24 + 22)
Rnd 20: Ch 1, reverse sc in each st around. Join. (92 sts: 24 + 22 + 24 + 22)
Fasten off and weave in the ends.
Why the math works: The wall rises straight up from the 92-st base, so the rim has the same circumference as Rnd 8. The border is worked 1 st into each st with no increases, and its counts for each section (24 per end curve, 22 per long side) match the base. That means the rim won’t flare or pull in. Reverse sc adds no stitches; it twists each st into a firm cord that stiffens the opening.
Final Blocking
- Weave in all remaining tails.
- Mist the basket lightly until it is damp, not soaked.
- Fill it firmly with a folded towel so the walls stand straight.
- Shape the oval so the long sides are straight and the curves are even.
- Pin the leaves flat and open the lattice diamonds evenly with your fingertips.
- Let everything dry completely, about 24 hours, then remove the pins and filling.
Final Quality-Control Checklist
- The base measures 10.5 in x 4.25 in (26.7 cm x 10.8 cm) and lies flat.
- The basket is 4.5 in (11.4 cm) tall, including the border.
- Each lattice round has 23 loops.
- Rnds 16–20 each have 92 sts.
- Each long side has 3 leaves with centers 2 in (5.1 cm) apart.
- Each strap is centered with 6 free sts on each side.
- Both rings hang at the same height.
Troubleshooting
- Base ruffles: Tension is loose. Go down one hook size.
- Base cups: Tension is tight. Go up one hook size.
- Wall leans outward: Rnd 9 wasn’t worked in the back loops. Rework it in BLO.
- Wrong loop count: Recount Rnd 12. Each repeat skips exactly 3 sts.
- Rim ripples: Recount Rnd 19. It should have exactly 92 sts.
- Basket tilts when hung: Even out the strap folds.
- Leaves curl: Block them flat before sewing.
Care
Hand wash in cool water with mild soap and press out the water in a towel. Reshape over a folded towel to dry, and remove the rings first if you can.
Final Notes
The measurement chain is short and connected:
– The 25-ch foundation and 8 rounds make a 10.5 in x 4.25 in (26.7 cm x 10.8 cm) base with 92 sts.
– Those 92 sts rise into a 4 in (10.2 cm) wall: 0.75 in (1.9 cm) solid, 2.5 in (6.4 cm) of lattice, then 0.75 in (1.9 cm) solid.
– The border adds 0.5 in (1.3 cm), for a total height of 4.5 in (11.4 cm).
– The 12-st strap flares fit the 24-st end curves, and the leaves line up along the 22-st long sides.
Check your base gauge first, and everything after it falls into place.
Happy crocheting!