
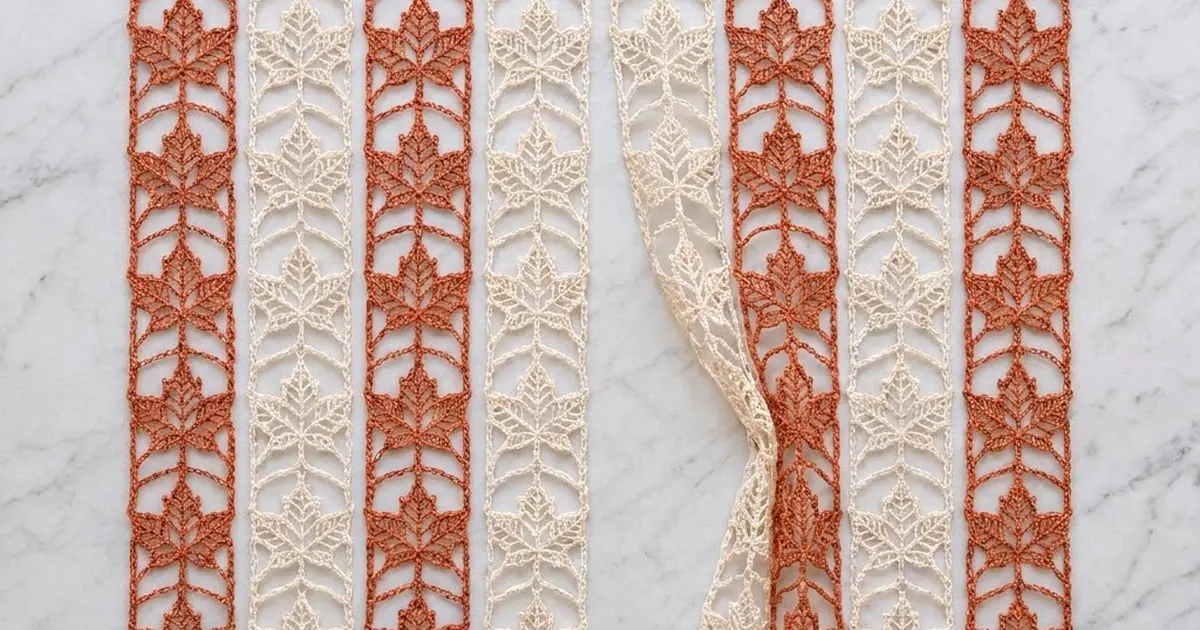
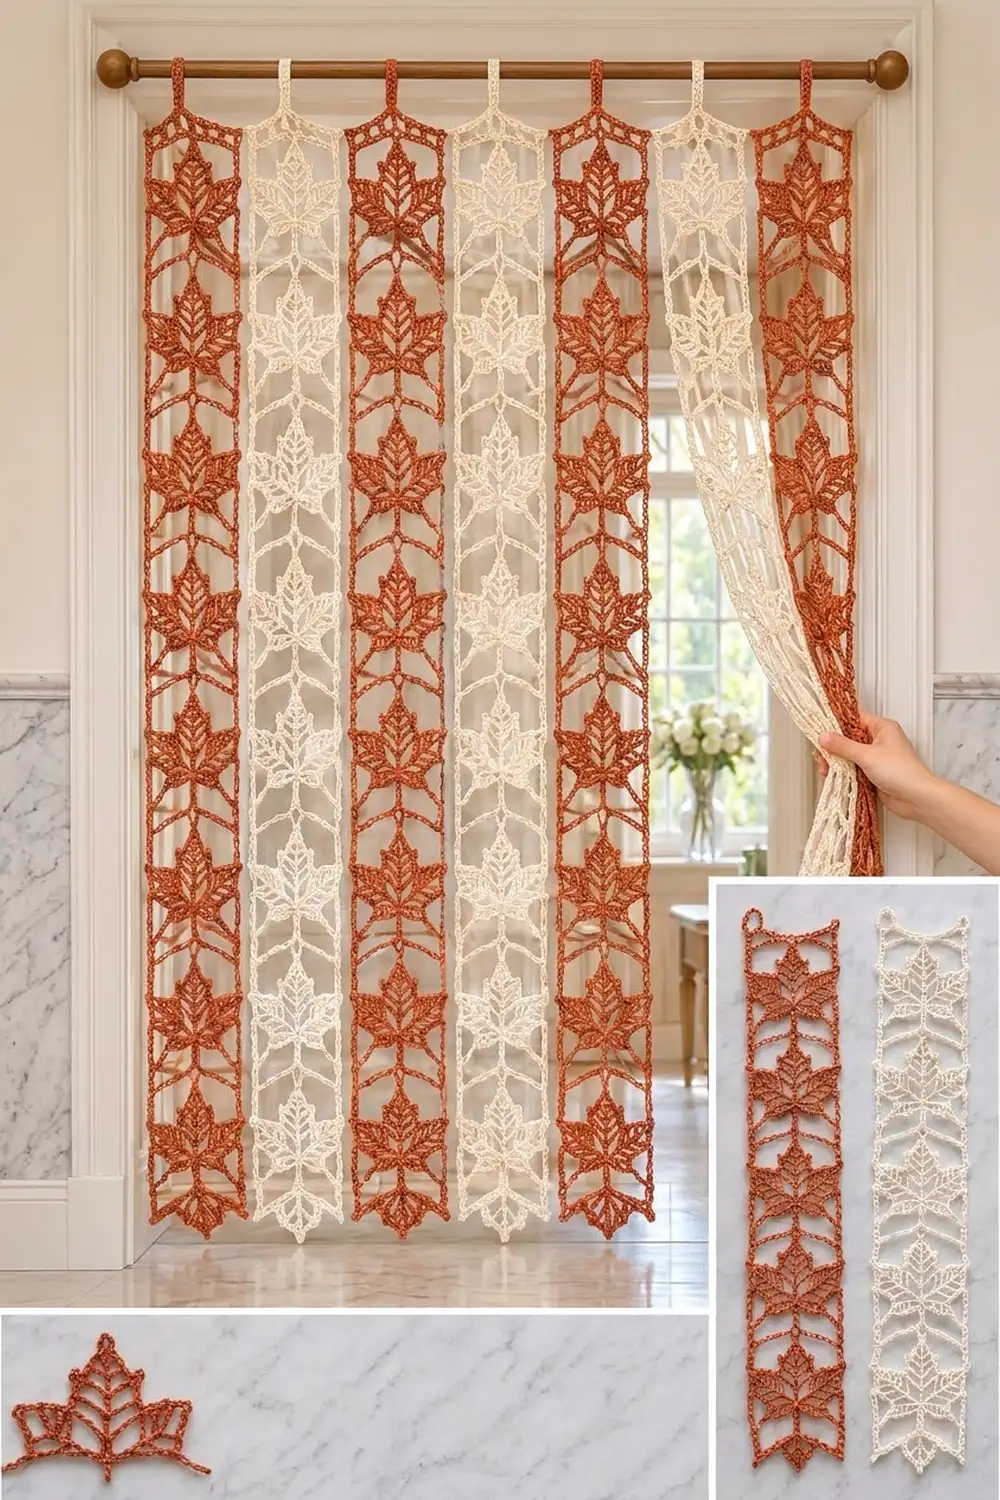
This curtain is made of seven narrow lace strips that hang side by side from one rod. Each strip has a column of openwork maple leaves outlined in solid stitches against airy chain mesh. A solid stem runs from bottom to top.
The sample alternates warm rust and soft cream: four rust strips and three cream strips. The strips are not sewn together, so they move freely, let light through, and can be pushed aside like a bead curtain. The style is autumn-cottage with a clean, graphic edge.
The pattern uses US crochet terms. Each finished strip measures 7 in (17.8 cm) wide by 74 in (188.0 cm) long, not counting the hanging tab. Seven strips spaced 0.5 in (1.3 cm) apart cover a width of 52 in (132.1 cm).
You work each strip in rows from the bottom edge up on a simple filet grid, then edge it with two rounds of single crochet. A short sc tab at the top center folds over the rod.
Finished Size and Construction
- Finished strip size: 7 in x 74 in (17.8 cm x 188.0 cm)
- Skill level: Intermediate (easy stitches, careful chart-reading)
- Terminology: US crochet terms
- Yarn weight: DK / light worsted (weight 3) cotton
- Hook: 4 mm (US G-6)
- Number of pieces: 7 separate strips
- Layout: 7 strips in one row on the rod, alternating rust and cream, not joined
- Strip size before border: 6 in x 73 in (15.2 cm x 185.4 cm)
- Border depth: 0.5 in (1.3 cm) on every side (2 rounds of sc)
- Leaf repeat: 16 rows = 8 in (20.3 cm); 9 leaves per strip
Materials
Choose a smooth mercerized or combed cotton in DK weight, about 125 m per 50 g. Cotton hangs straight, keeps the leaf outline crisp, and does not stretch much under its own weight. Avoid fuzzy or very drapey acrylic, which can blur the mesh and get longer over time.
- Rust (Color A): 350 g, about 875 m (4 strips)
- Cream (Color B): 300 g, about 750 m (3 strips)
Each strip uses about 75 g (about 190 m). The quantities above include a margin for your test piece and small gauge differences.
Tools:
- 4 mm (US G-6) crochet hook
- Tapestry needle
- Stitch markers (at least 4)
- Measuring tape
- Rust-proof pins and a long blocking surface (foam mats or a clean bed)
- Spray bottle
- Curtain rod, up to 1 in (2.5 cm) diameter
Abbreviations (US Terms)
- ch – chain
- sk – skip
- sc – single crochet
- dc – double crochet
- sp – space
- st(s) – stitch(es)
- RS / WS – right side / wrong side
Special stitches (filet cells): Each row is 1 starting dc plus 9 cells of 3 sts, for 28 sts.
- Starting dc: ch 3 at the start of a row (counts as the first dc).
- Mesh (M): ch 2, sk next 2 sts (or the ch-2 sp), dc in next dc.
- Block (B): Over a block: dc in each of next 3 sts. Over a mesh: 2 dc in ch-2 sp, dc in next dc.
Every cell ends with one dc, so the count is always 1 + (9 x 3) = 28 sts, whether a cell is open or solid.
Gauge and Checkpoints
Gauge: 14 sts and 8 rows of filet = 3 in wide x 4 in tall (7.6 cm x 10.2 cm), blocked. One row measures 0.5 in (1.3 cm).
Test one piece first. Instead of a plain swatch, work the Foundation Row plus Rows 1–16 (one full leaf). Block it lightly and measure.
Checkpoints:
- After the Foundation Row: 6 in (15.2 cm) wide.
- After one leaf repeat (17 rows): 8.5 in (21.6 cm) tall.
- After five repeats (81 rows): 40.5 in (102.9 cm) tall.
- After the Top Row (146 rows): 6 in x 73 in (15.2 cm x 185.4 cm).
- After the border: 7 in x 74 in (17.8 cm x 188.0 cm).
If your piece is too big, go down a hook size (3.75 mm). If it is too small, go up a hook size (4.5 mm). Height matters most, because small errors multiply over 146 rows. If your rows are too tall, tighten the starting ch-3 and pull the dc loops snug rather than changing hooks.
Strip Pattern
Make 4 strips in Color A and 3 in Color B. Every chart row is symmetrical, so you read it the same way on RS and WS rows.
Foundation: Ch 30.
Foundation Row: Dc in 4th ch from hook (skipped 3 ch count as first dc) and in each ch across. Turn. (28 sts)
This solid row forms the bottom edge.
Leaf Repeat (Rows 1–16)
Start each row with ch 3 (counts as dc). Then work the 9 cells listed, ending in the top of the turning ch. Turn at the end of every row. Every row = 28 sts (9 cells).
Rows 1–4 (spacer and stem): M, M, M, M, B, M, M, M, M.
The single center block forms the stem between leaves.
Row 5 (leaf base): M, M, M, B, B, B, M, M, M.
Row 6: M, M, B, M, B, M, B, M, M.
Row 7: M, B, M, M, B, M, M, B, M.
Row 8 (lower lobe points): B, M, M, B, B, B, M, M, B.
The outer blocks are the tips of the lower lobes. The blocks beside the stem start the side veins.
Row 9 (notch): M, B, M, M, B, M, M, B, M.
Row 10: M, M, B, M, B, M, B, M, M.
Row 11 (upper lobes): M, B, M, B, B, B, M, B, M.
Row 12 (upper lobe points): B, M, M, M, B, M, M, M, B.
Row 13: M, B, M, M, B, M, M, B, M.
Row 14: M, M, B, M, B, M, B, M, M.
Row 15: M, M, M, B, B, B, M, M, M.
Row 16 (leaf tip): M, M, M, M, B, M, M, M, M.
That completes one leaf. The outline narrows from Row 12 to Row 16 to form the pointed tip, and the stem continues straight into the next spacer.
Work Rows 1–16 a total of 9 times (144 rows, 9 leaves).
Top Row: Ch 3 (counts as dc). Dc in each dc and 2 dc in each ch-2 sp across. (28 sts) Do not fasten off.
Row total: 1 Foundation Row + 144 pattern rows + 1 Top Row = 146 rows. At 0.5 in (1.3 cm) per row, that gives 73 in (185.4 cm).
Size before border: 6 in x 73 in (15.2 cm x 185.4 cm).
To change the length, add or remove whole leaf repeats. Each repeat changes the length by 8 in (20.3 cm).
Make All Pieces
- Color A (rust): 4 strips
- Color B (cream): 3 strips
Weave in the starting tail of each strip before the border. Keep the Top Row’s working loop live, or rejoin at the same corner later.
Layout (front view, left to right, on the rod):
| A | B | A | B | A | B | A |
 S1  S2  S3  S4  S5  S6  S7
Each strip is 7 in (17.8 cm) wide, with 0.5 in (1.3 cm) gaps between strips.
Joining (Hanging the Strips)
The strips are not sewn to each other. Each one hangs from its own tab, so there is no seam where stitches need to match. Each strip only needs to be attached to the rod.
Method: After the border, work a sc tab on the 8 center stitches of each strip’s top edge. Fold the tab to the back and sew it down to make a loop for the rod.
Stitch logic: The tab is centered so the strip hangs straight. Border Round 2 has 36 sts along the top edge, counted from the first sc of one corner group to the last sc of the other. The tab sits on sts 15–22, leaving 14 sts on each side.
Tension advice: Work the tab firmly. A loose tab stretches under the strip’s weight, and that strip will hang lower than the others. Sew the fold with matching yarn, catching only back loops, so the stitching doesn’t show on the front.
Size checkpoint: Hang all seven strips and check that the bottom edges line up within 0.5 in (1.3 cm). If one is longer, re-block it or take one row off its tab.
Border
Border gauge: 4 sc = 1 in (2.5 cm) along the long edges. That is 2 sc per row-end, since each dc row is 0.5 in (1.3 cm) tall. On the short edges, work 1 sc per dc, which follows the body’s own stitch spacing.
Round 1 (trim round): Ch 1 and turn so the RS faces you.
- Along the Top Row: 3 sc in first st (corner), sc in next 26 sts, 3 sc in last st (corner).
- Down the first long side: 2 sc in each of the 146 row-ends (292 sc).
- Along the Foundation Row: 3 sc in first st (corner), sc in next 26 sts, 3 sc in last st (corner).
- Up the second long side: 292 sc in the row-ends.
- Join with sl st to first sc.
Count: 28 + 292 + 28 + 292 = 640 sts worked 1-per-existing-position, plus 8 extra sc at the corners (2 per corner) = 648 sc.
Per side:
- Each short side has 28 sc, including its 2 corner-center sc.
- Each long side has 292 sc between the corner groups.
Round 2: Ch 1, sc in each sc around, working 3 sc in each corner-center sc. Join.
Count: 648 worked 1-per-stitch + 8 corner extras = 656 sc. Fasten off.
Per side: Each short side has 36 sc, including both full 5-st corner groups. Each long side has 292 sc between the corner groups (36 + 36 + 292 + 292 = 656).
Why the math works: Every border sc sits on a matching body stitch or on half a row-end, so the edge neither pulls in nor ruffles. Each corner gets 2 extra sc per round, which is exactly enough to turn a 90-degree corner flat. Each sc round adds 0.25 in (0.6 cm), so the border adds 0.5 in (1.3 cm) per side. Width: 6 + 0.5 + 0.5 = 7 in (17.8 cm). Length: 73 + 0.5 + 0.5 = 74 in (188.0 cm).
Hanging Tab
With RS facing, join yarn in the 15th st of the top edge.
Row 1: Ch 1, sc in same st and in next 7 sts. Turn. (8 sc)
Rows 2–14: Ch 1, sc in each st across. Turn. (8 sc)
The 14-row tab is about 3.5 in (8.9 cm) long. Fasten off, leaving a 12 in (30.5 cm) tail. Fold the tab to the WS and whipstitch its last row to the base of Row 1. This makes a loop that fits a rod up to 1 in (2.5 cm) thick. For a thicker rod, add 2 rows for each extra 0.25 in (0.6 cm) of rod diameter.
Final Blocking
- Weave in all ends along solid blocks or the stem, never across open mesh.
- Lay each strip flat on mats, RS up. Work in sections if your surface is short.
- Pin the four corners first to 7 in x 74 in (17.8 cm x 188.0 cm).
- Pin along both long edges every 4 in (10.2 cm), keeping the edges straight.
- Gently open each mesh cell with your fingers and square up the leaf outlines.
- Mist evenly until damp, not soaked.
- Let the strip dry completely, at least 12 hours.
- Unpin and check the size. Re-block any strip that is more than 0.5 in (1.3 cm) off.
Final Quality-Control Checklist
- Every row has 28 sts and 9 cells.
- Each strip has 9 complete leaves and a continuous center stem.
- Border Round 1 = 648 sc; Round 2 = 656 sc.
- Corners lie flat, with no cupping or flaring.
- Each strip measures 7 in x 74 in (17.8 cm x 188.0 cm).
- Tabs are centered on sts 15–22 and stitched securely.
- Colors alternate A, B, A, B, A, B, A on the rod.
- All bottom edges line up within 0.5 in (1.3 cm).
Troubleshooting
Leaf looks lopsided: You probably read one row off-center. Check the center cell (cell 5): it is a block in every row.
Strip slants sideways: You probably skipped or added a stitch at a row end. Always end in the top of the turning ch-3.
Strip is too long: Tighten your rows, or remove one leaf repeat to shorten it by 8 in (20.3 cm).
Long edges ruffle: You worked more than 2 sc per row-end. Rip back and recount to 292 per side.
Long edges pull in: Your border tension is too tight. Go up a hook size for the border only.
Strip hangs lower than its neighbors: The tab stretched. Remove 1–2 tab rows or re-block.
Care
Hand wash in cool water with mild soap, roll in a towel, and dry flat, pinning to size if needed. Don’t hang wet strips, because the weight of the water will stretch them.

Final Notes
The whole curtain follows one measurement chain. Fourteen sts make 3 in (7.6 cm), so a 28-st row is 6 in (15.2 cm) wide, and each row is 0.5 in (1.3 cm) tall. Sixteen rows make one 8 in (20.3 cm) leaf, and 146 rows make 73 in (185.4 cm). Two sc border rounds bring each strip to 7 in x 74 in (17.8 cm x 188.0 cm). Seven strips with 0.5 in (1.3 cm) gaps fill 52 in (132.1 cm) of rod. Check your gauge on the first leaf, and the rest will fall into place.
Happy crocheting!