

This Blossom Vine set dresses up a plain white wall charger and its USB-C cable with soft pink flowers and a winding green vine. The charger sleeve is a snug pink tube with five raised blossoms on the front. The matching cable cover turns the cord into a long green vine dotted with tiny flowers and leaves.
The palette is three colors: soft pink for the sleeve and petals, olive green for the vine and leaves, and deep burgundy for the embroidered flower centers. The style is cottage-garden sweet, but the construction is simple and practical. It also makes your charger easy to spot in a shared outlet or a busy bag.
This pattern uses US crochet terms. The finished sleeve measures 2.8 in (7.1 cm) wide when flattened and 3.4 in (8.6 cm) tall, with a 5.6 in (14.2 cm) circumference. The cable cover is 30 in (76.2 cm) long.
First, you work the sleeve as a seamless tube in joined rounds and add one border round to each opening. Then you make separate flowers and leaves and sew them on over a surface slip-stitch vine. The cable cover is a narrow strip that you seam lengthwise around the cable itself, so it can be cut away later if needed.
Finished Size and Construction
- Sleeve size: 2.8 in (7.1 cm) wide flat x 3.4 in (8.6 cm) tall
- Sleeve circumference: 5.6 in (14.2 cm), 28 sts
- Size before border: 2.8 in (7.1 cm) x 3 in (7.6 cm)
- Border depth: 0.2 in (0.5 cm) at each opening
- Cable cover: 30 in (76.2 cm) long, strip 0.6 in (1.5 cm) wide before seaming
- Skill level: Easy-intermediate
- Terminology: US
- Yarn weight: DK / light worsted (#3) cotton
- Hook: 3.5 mm (E-4)
- Number of pieces: 36 (1 sleeve, 5 large flowers, 8 large leaves, 1 cable strip, 7 small flowers, 14 small leaves)
- Layout: Flowers in a staggered column on the sleeve front; small flowers spaced evenly along the cable
- Fit: Chargers with a body perimeter of about 5.25-6 in (13.3-15.2 cm)
Materials
Choose a smooth mercerized or matte cotton in DK weight. Cotton holds the petal shapes crisply and does not get fuzzy with handling. Pick a pink light enough that the burgundy centers stand out clearly.
- Pink: 20 g / about 50 m
- Olive green: 15 g / about 38 m
- Burgundy: 3 g / about 8 m
These amounts include a margin of about 20 percent for gauge swatching and sewing tails.
Tools:
- 3.5 mm (E-4) crochet hook
- Tapestry needle
- 4 locking stitch markers
- Scissors
- Measuring tape
- Pins
- Your charger and cable for fitting
Abbreviations (US Terms)
- ch – chain
- sl st – slip stitch
- sc – single crochet
- hdc – half double crochet
- dc – double crochet
- st(s) – stitch(es)
- rnd – round
- rep – repeat
Picot: ch 2, sl st in 2nd ch from hook.
Surface slip stitch: Hold the yarn behind the fabric. Insert the hook from front to back between stitches, pull up a loop, and draw it through the loop on the hook.
Gauge and Checkpoints
Gauge: 20 sc and 20 rnds = 4 in (10.2 cm), which is 5 sts and 5 rnds per inch.
Make the sleeve first, because it is the piece that has to fit. Work Rnds 1-5 and check:
- After Rnd 5: tube height 1 in (2.5 cm), flattened width 2.8 in (7.1 cm)
- After Rnd 10: height 2 in (5.1 cm)
- After Rnd 15: height 3 in (7.6 cm)
- After borders: height 3.4 in (8.6 cm)
After Rnd 5, slip the tube onto your charger. It should slide on with light resistance.
If the tube is too loose, change to a 3.25 mm hook or remove 2 sts from the foundation (26 sts). If it is too tight, change to a 3.75 mm hook or add 2 sts (30 sts). If you change the stitch count, change both border counts to match.
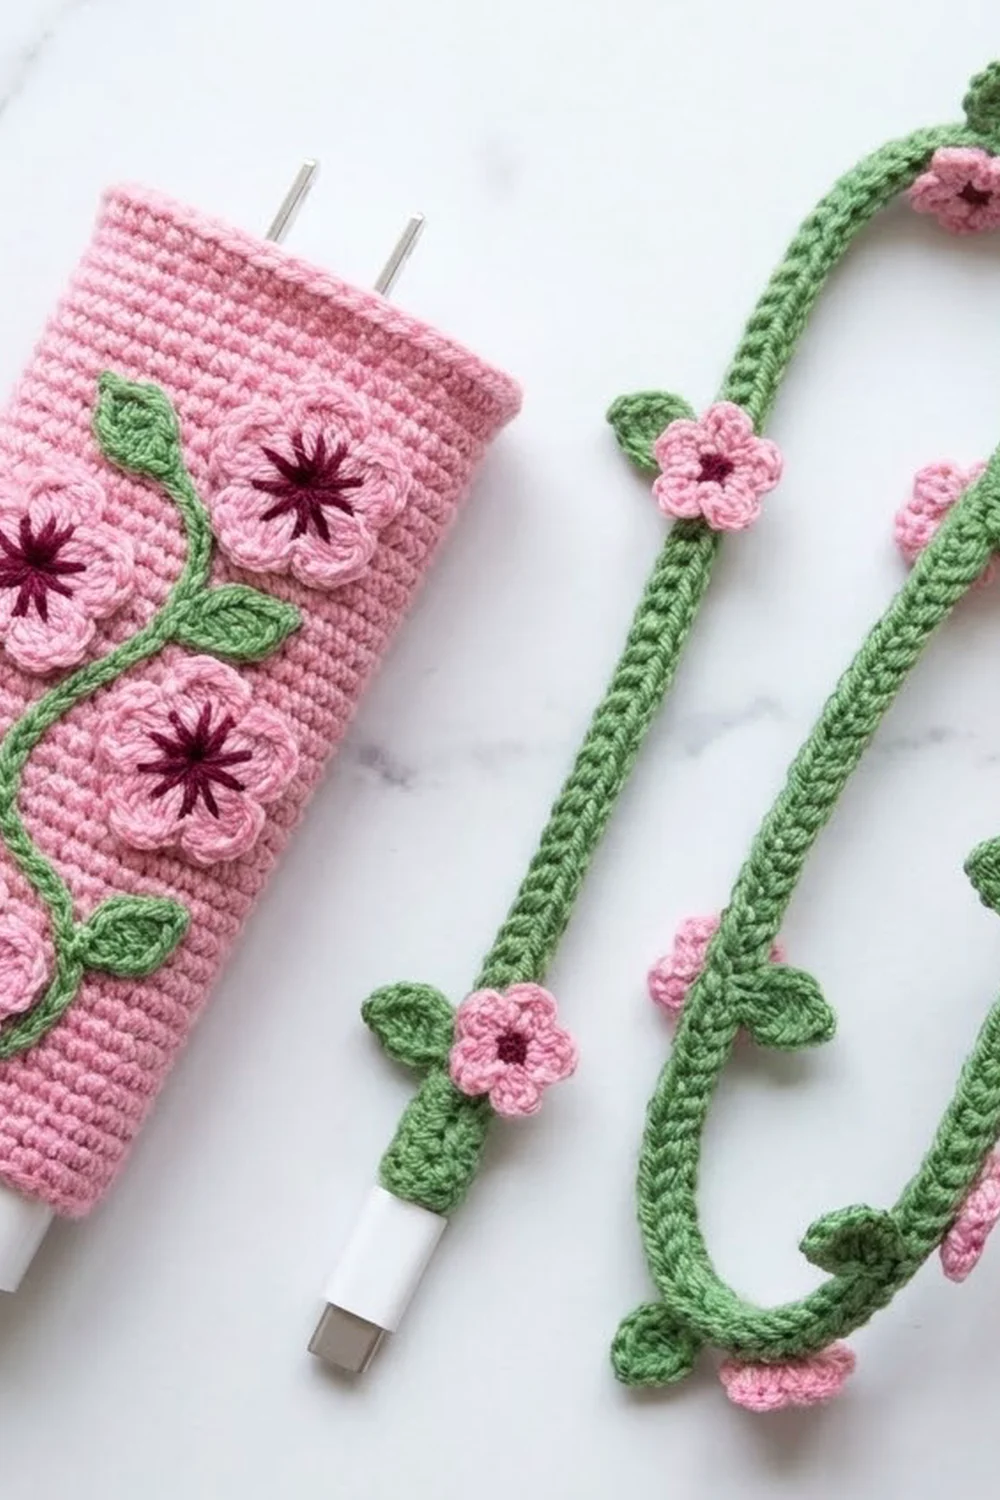
Charger Sleeve
With pink, ch 28. Join with a sl st to the first ch, taking care not to twist the chain.
Rnd 1: Ch 1, sc in each ch around, join with sl st to first sc. (28 sc)
Rnds 2-15: Ch 1, sc in each sc around, join. (28 sc each rnd)
Fasten off after Rnd 15. The tube should measure 3 in (7.6 cm) tall.
Flatten the tube so the joins line up along one side fold. Each flat face now has 14 sts. Mark both ends of the 14 front-face sts with a marker.
Large Flowers (make 5)
With pink, make a magic ring.
Rnd 1: Ch 1, 10 sc in ring, join with sl st to first sc. (10 sc)
Rnd 2: *(Sl st, ch 2, 2 dc) in next sc, (2 dc, ch 2, sl st) in next sc; rep from * 4 more times. (5 petals, 20 dc)
Fasten off, leaving a 10 in (25.4 cm) tail for sewing. Each petal spans 2 sc, and each flower measures about 1 in (2.5 cm) across.
Center: With burgundy, embroider 5 straight stitches from the ring out toward the middle of each petal, each about 0.2 in (0.5 cm) long. Finish with one French knot in the middle.
Large Leaves (make 8)
With green, ch 6.
Round: Sc in 2nd ch from hook, hdc in next ch, dc in next ch, hdc in next ch, (sc, picot, sc) in last ch. Working along the other side of the foundation, hdc in next ch, dc in next ch, hdc in next ch, sc in next ch, join with sl st to first sc. (10 sts plus 1 picot)
Fasten off with an 8 in (20.3 cm) tail. Each leaf is about 1 in (2.5 cm) long with a pointed picot tip.
Cable Cover Strip
With green, ch 151.
Row 1: Sc in 2nd ch from hook and in each ch across, turn. (150 sc)
Rows 2-3: Ch 1, sc in each sc across, turn. (150 sc each row)
Fasten off, leaving a 40 in (101.6 cm) tail for seaming. The strip measures 30 in (76.2 cm) by 0.6 in (1.5 cm).
Checkpoint: After 50 sts of Row 1, the work should measure 10 in (25.4 cm).
Small Flowers (make 7)
With pink, make a magic ring.
Rnd 1: Ch 1, 5 sc in ring, join. (5 sc)
Rnd 2: (Sl st, ch 1, hdc, dc, hdc, ch 1, sl st) in each sc around. (5 petals, 15 sts: 5 hdc, 5 dc, 5 hdc)
Fasten off with an 8 in (20.3 cm) tail. Each flower is about 0.7 in (1.8 cm) across. Add a burgundy center of 5 short straight stitches, each about 0.1 in (0.3 cm) long.
Small Leaves (make 14)
With green, ch 4.
Round: Sc in 2nd ch from hook, hdc in next ch, (dc, picot, dc) in last ch. Working along the other side, hdc in next ch, sc in next ch, join with sl st to first sc. (6 sts plus 1 picot)
Fasten off with a 6 in (15.2 cm) tail. Each leaf is about 0.6 in (1.5 cm) long.
Make All Pieces
Before assembly, check that you have:
- Pink: 1 sleeve, 5 large flowers, 7 small flowers
- Green: 8 large leaves, 14 small leaves, 1 cable strip
- Burgundy: centers embroidered on all 12 flowers
Sleeve front-face layout (14 sts wide x 15 rnds tall; F = flower, L = leaf):
Rnds 11-15:  L  [F1: sts 2-6]  [F2: sts 9-13]  L
Rnds 6-10:   L  [F3: sts 5-9]   L    L
Rnds 1-5:   [F4: sts 1-5]  L  [F5: sts 8-12]  L  L
Each flower covers about 5 sts by 5 rnds. A flower may hang over a side fold by a stitch or two, which gives the full, gathered look.
Joining
Vine on the sleeve: Pin the 5 flowers in place first, then remove them and mark their centers. With green, work a surface slip-stitch vine. Start at st 2 of Rnd 2, curve up between the flower positions, and end at st 13 of Rnd 14. Work about 1 sl st for each rnd or st you cross, about 22 sl sts in total. Add two short branches of 5 sl sts each toward the left edge. Keep the tension loose so the fabric does not pucker.
Flowers and leaves on the sleeve: Sew each flower on with pink. Use small stitches through the back of Rnd 1 and the base of each petal so the petal tips stay raised. Sew each leaf on at its base and center, with the picot tip pointing away from the vine.
Cable cover: Lay the cable along the center of the strip’s wrong side. Fold the long edges around it so Row 3 meets the foundation chain. Whipstitch them together stitch to stitch, sewing each of the 150 Row 3 sts to its matching foundation ch. Pull each stitch just snug enough that the edges meet; if you pull too tight, the cord will twist. The seam creates the twisted texture of the vine.
Cable flowers: Starting 1.5 in (3.8 cm) from one end, sew on a small flower every 4.5 in (11.4 cm): at 1.5, 6, 10.5, 15, 19.5, 24, and 28.5 in (3.8, 15.2, 26.7, 38.1, 49.5, 61.0, and 72.4 cm). Sew one small leaf on each side of every flower, about 0.75 in (1.9 cm) from its center.
Size checkpoint: The sleeve should still be 2.8 in (7.1 cm) wide, and the cover should still be 30 in (76.2 cm) long.
Border
The border uses the body gauge of 5 sts per inch, so each opening matches the tube exactly.
Top border: Join pink to any st of Rnd 15. Ch 1, sc in each st around, join. (28 sts worked 1-per-existing-st + 0 added = 28 sc; 14 sc per flat side)
Bottom border: Join pink to the free loop of any foundation ch. Ch 1, sc in each free loop around, join. (28 loops worked 1-per-existing-st + 0 added = 28 sc; 14 sc per flat side)
Finish each border with an invisible join and weave in the ends.
Why the math works: The tube has 28 sts, or 14 per flat side. Working exactly one sc in each stitch keeps both openings at 5.6 in (14.2 cm) around, so they lie flat without flaring or pulling in. Each border adds 0.2 in (0.5 cm), so 3 in + 0.2 in + 0.2 in = 3.4 in (8.6 cm).
Final Blocking
- Weave in all remaining ends on the inside of the sleeve.
- Cut a piece of cardboard 2.8 in (7.1 cm) wide by 4 in (10.2 cm) tall and slide the sleeve over it.
- Mist lightly with water, or hold a steam iron about 1 in (2.5 cm) above the fabric. Do not press the flowers flat.
- Use your fingers to push each petal outward and point each leaf tip.
- Let it dry completely on the cardboard.
- Run the cable cover through your hand to straighten it. If you used steam, lay it flat to dry.
Final Quality-Control Checklist
- Sleeve is 2.8 in (7.1 cm) wide and 3.4 in (8.6 cm) tall
- Both borders have 28 sc
- All 5 large flowers have 5 petals and a burgundy center
- 8 leaves on the sleeve, picot tips pointing outward
- Vine is continuous and does not pucker the fabric
- Cable seam is closed along all 150 sts
- 7 small flowers spaced 4.5 in (11.4 cm) apart, each with 2 leaves
- Charger and connectors work freely with the covers on
Troubleshooting
Sleeve won’t fit over the charger: Your gauge is tight. Make it again with 30 sts or a larger hook.
Sleeve slides off: Make it again with 26 sts or a 3.25 mm hook.
Petals curl inward: Steam-block them over a fingertip, or loosen your Rnd 2 tension.
Vine puckers the sleeve: Pull it out and work it again with a larger hook.
Cable cover twists: The whipstitch is too tight. Loosen the stitches and let the cord relax overnight.
Cable strip too short: Add more chains and stitches before seaming, or leave more bare cable near each connector.
Care
Hand wash in cool water with mild soap, press the water out in a towel, and dry flat. Take the covers off before washing, and never wash the charger or cable.
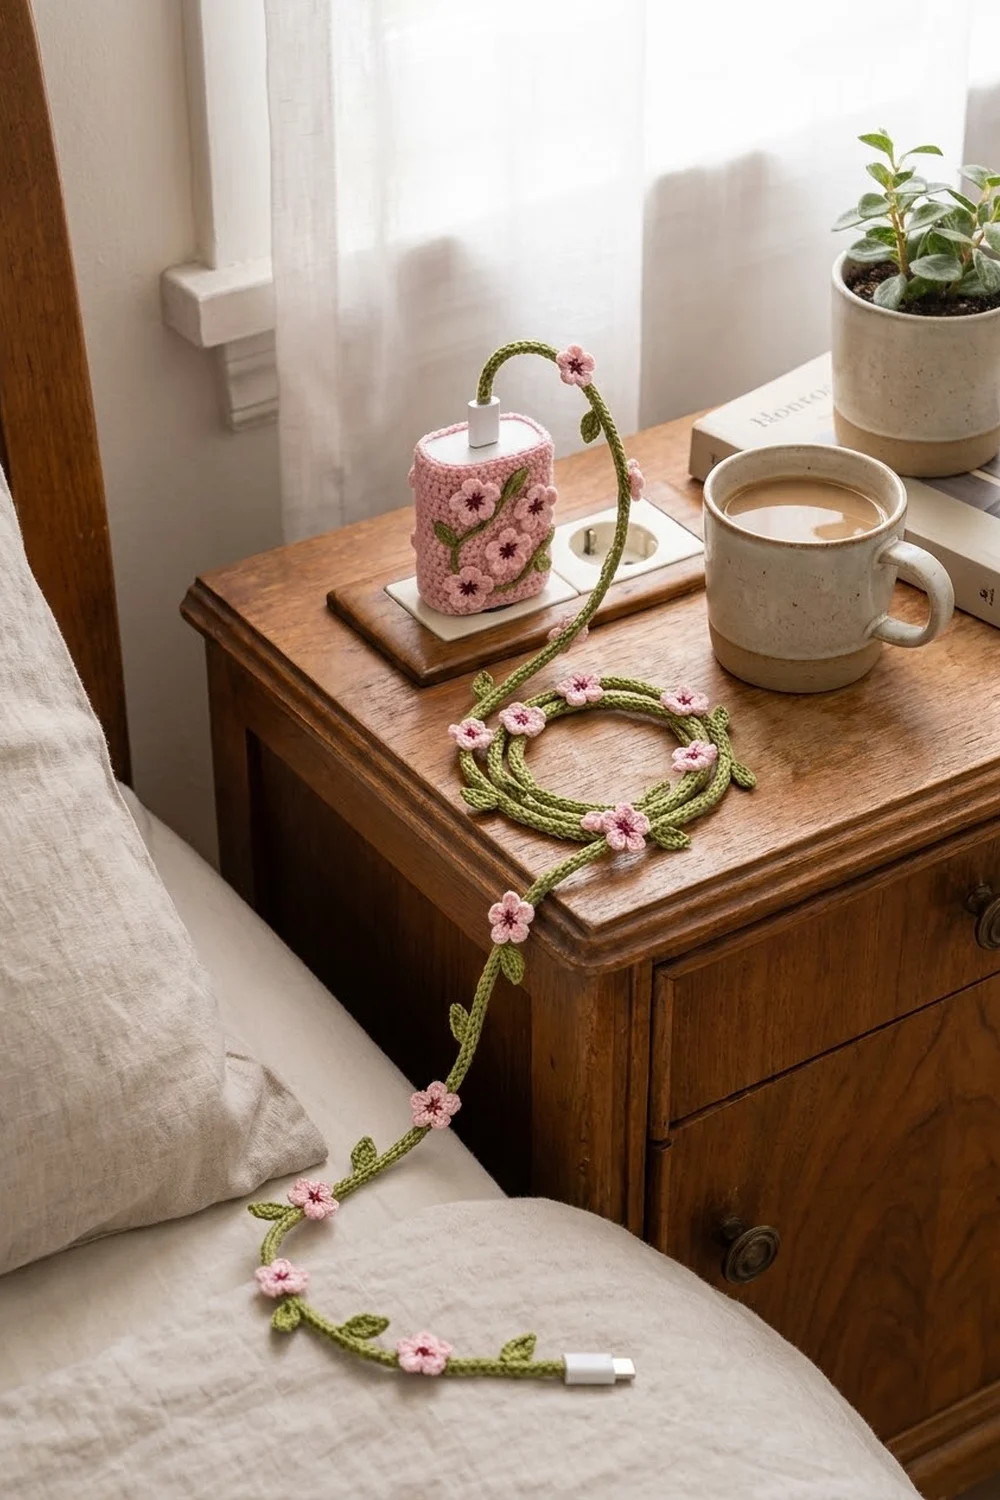
Final Notes
The measurements build in a simple chain. At 5 sts per inch, 28 sts make a 5.6 in (14.2 cm) tube. Fifteen rnds give 3 in (7.6 cm) of height, and two 0.2 in (0.5 cm) borders bring the sleeve to 3.4 in (8.6 cm). The 150-st cable strip measures 30 in (76.2 cm) and is seamed stitch to stitch around the cord. Check your gauge on the sleeve, keep the flowers raised, and your charger will bloom.
Happy crocheting!