

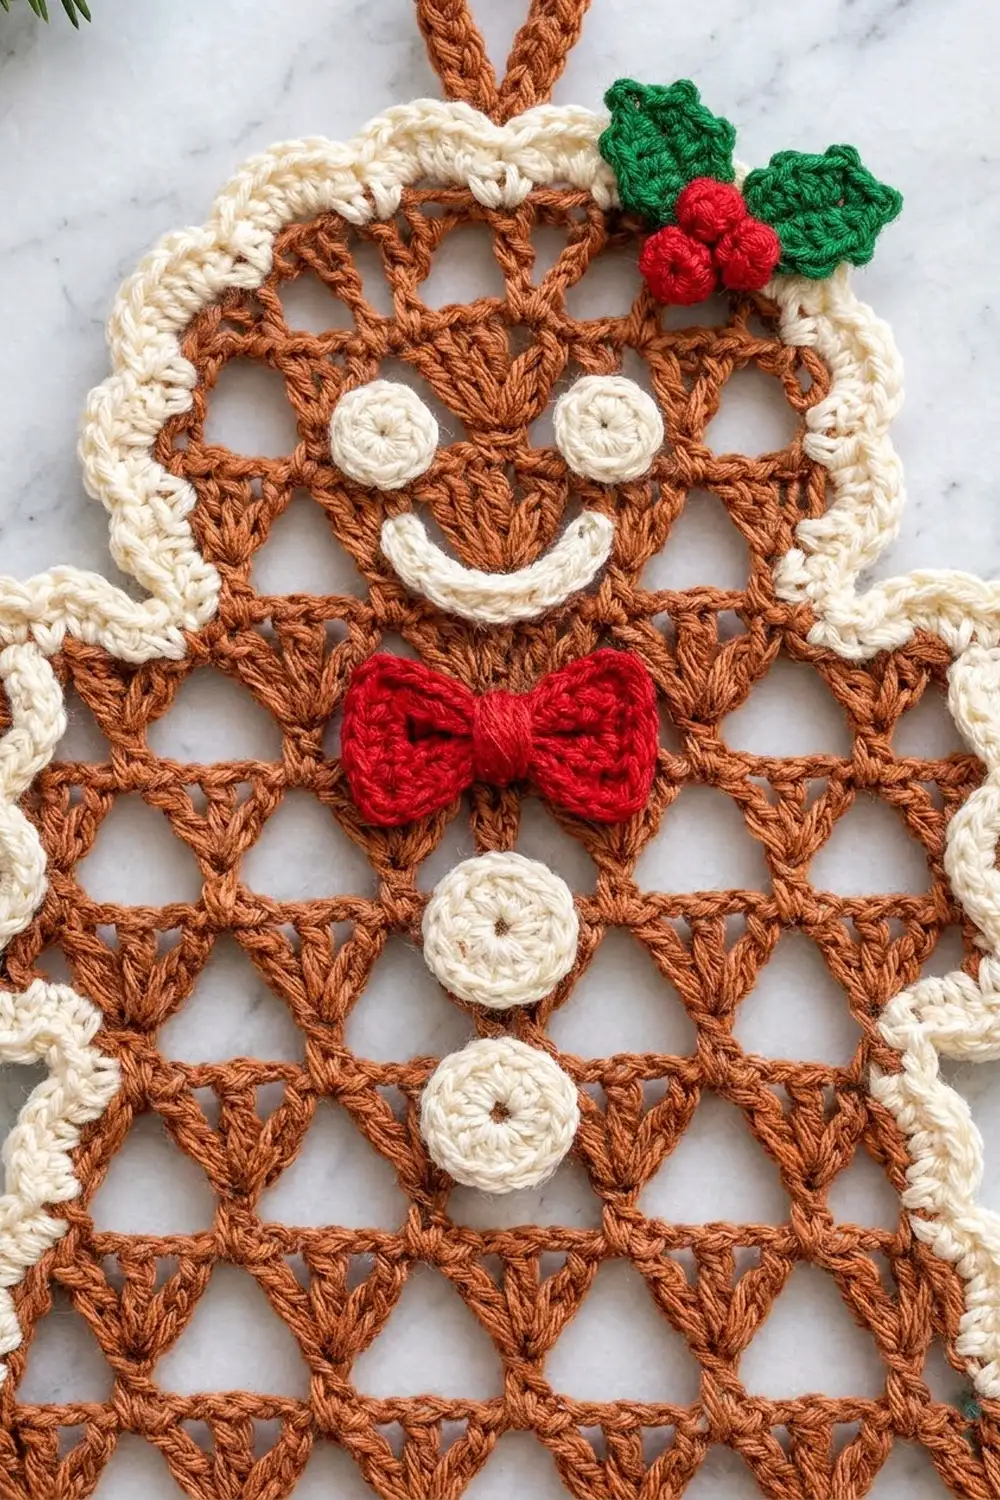
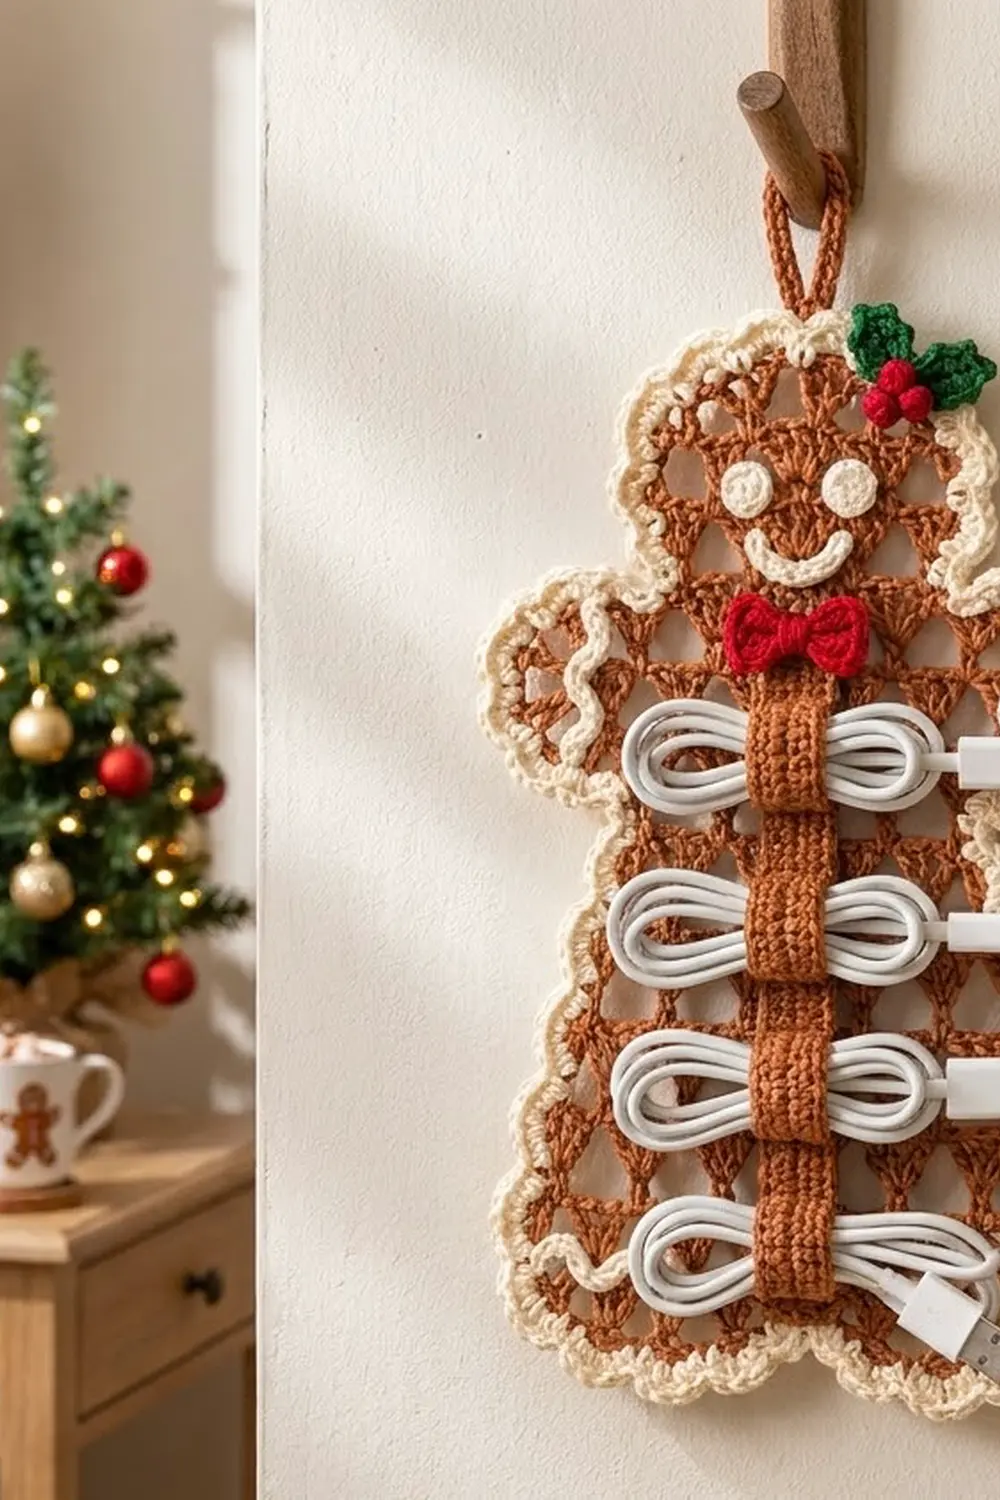
This cheerful gingerbread man is a wall-hanging cable organizer. He has an open, lacy body of stacked fans, a scalloped “icing” edge, and a center strap with four loops for coiled charging cables. Hang him from a peg by his loop to keep a desk tidy through the holidays.
The body is cinnamon brown, and the border and icing details are cream. He has a red bow tie, red berries and green holly leaves. The style is classic cookie-tin: a round head, short arms, stubby legs and wavy icing lines.
All terms are US. The finished size is about 12.25 in wide x 14.75 in tall (31.1 cm x 37.5 cm) including the border, plus a hanging loop about 1.75 in (4.4 cm) tall.
You work the body flat in rows from the legs up, shaping by adding or dropping whole fans. Then you add a two-round cream border, a hanging loop, the appliqués, and finally a strap with four cable bands.
Finished Size and Construction
- Finished size: 12.25 in x 14.75 in (31.1 cm x 37.5 cm), plus loop
- Skill level: Intermediate
- Terminology: US
- Yarn weight: Worsted (#4) cotton or cotton blend
- Hook: 4.5 mm (US 7)
- Number of pieces: One main body, plus sewn-on appliqués and one cable strap (not a multi-motif project)
- Layout: Single gingerbread silhouette, hung vertically
- Body size before border: 11.25 in x 13.75 in (28.6 cm x 34.9 cm)
- Border depth: 0.5 in (1.3 cm) on every edge
Materials
Use a smooth cotton or cotton blend. Cotton keeps the fans crisp and holds its shape on the wall. Yardage assumes about 1.7 m per gram.
- Color A, cinnamon brown: 150 g (255 m) for the body, loop, strap and bands
- Color B, cream: 40 g (68 m) for the border, icing, face and buttons
- Color C, red: 10 g (17 m) for the bow tie and berries
- Color D, green: 5 g (9 m) for the holly leaves
Quantities include a margin of about 15 percent.
Tools: 4.5 mm (US 7) hook, tapestry needle, stitch markers, rust-proof pins, blocking mat, spray bottle, tape measure, scissors.
Abbreviations (US Terms)
- ch: chain
- sl st: slip stitch
- sc: single crochet
- hdc: half double crochet
- dc: double crochet
- st(s): stitch(es)
- MR: magic ring
- rep: repeat
Fan: 5 dc in the same st.
Fan row (multiple of 6 + 1): Ch 1, sc in first st, *skip 2 sts, fan in next st, skip 2 sts, sc in next st; rep from * across. Each 6-st repeat makes one fan.
V row (multiple of 6 + 1): Ch 5 (counts as dc + ch 2), skip 2 dc, sc in center dc of fan, ch 2, skip 2 dc, dc in next sc*, ch 2, skip 2 dc; rep from * across, ending at ** with the last dc in the last sc. The ch-2 spaces open the triangle holes.
On the next fan row, work each sc into a dc, with the last sc going into the 3rd ch of the turning ch-5. Skip the 2 ch and work each fan into an sc, so the fans stack straight up.
Gauge and Checkpoints
- Mesh: 1 fan repeat (6 sts) = 1.25 in (3.2 cm). 1 fan row + 1 V row = 1 in (2.5 cm). 1 sc row = 0.25 in (0.6 cm).
- Solid sc (strap): 4 sc and 4.5 rows = 1 in (2.5 cm)
Make one leg (Rows 1–5) as your test piece. It should measure 3.75 in (9.5 cm) wide x 2.25 in (5.7 cm) tall, and you’ll use it in the project.
Checkpoints (height from the bottom edge):
- After Row 6: 2.5 in (6.4 cm) tall, 8.75 in (22.2 cm) wide
- After Row 16: 7.5 in (19.1 cm)
- After Row 20: 9.5 in (24.1 cm) tall, 11.25 in (28.6 cm) wide
- After Row 22: 10.5 in (26.7 cm)
- After Row 29: 13.75 in (34.9 cm)
If your leg comes out too wide, switch to a 4 mm hook. If it’s too narrow, switch to a 5 mm hook. If only the height is off, adjust how tall you pull up each dc.
Body
Legs (make 2)
With A, ch 20.
Row 1: Sc in 2nd ch from hook and in each ch across, turn. (19 sc)
Row 2: Fan row. (3 fans, 19 sts)
Row 3: V row. (19 sts)
Row 4: Fan row. (19 sts)
Row 5: V row. (19 sts)
Fasten off the first leg. On the second leg, don’t fasten off; just turn.
Joining Row and Lower Body
Row 6: Ch 1. Sc in each dc, sc and ch across leg 2, with the last sc in the 3rd ch of the turning ch (19 sc). Ch 5. Then sc across leg 1 the same way (19 sc), and turn. (38 sc + 5 ch = 43 sts)
Row 7: Fan row. The center fan goes into the 3rd ch of the ch-5 that bridges the legs. (7 fans, 43 sts)
Rows 8–16: Alternate a V row and a fan row, ending with a V row on Row 16. (43 sts in every row)
Arms
With a separate strand of A, ch 6 and fasten off. Set this chain aside.
At the end of Row 16, ch 7 and turn.
Row 17: Sc in 2nd ch from hook, skip 2 ch, fan in next ch, skip 2 ch, sc in first st of Row 16. Work the fan-row pattern across the body (7 fans), ending with sc in the 3rd ch of the turning ch. Continue onto the separate ch-6: skip 2 ch, fan in next ch, skip 2 ch, sc in last ch. Turn. (9 fans, 6 + 43 + 6 = 55 sts)
Rows 18–20: V row, fan row, V row. (55 sts in every row)
Neck
Row 21: Sl st in each of the first 19 sts, ch 1, sc in the same st as the last sl st. *Skip 2, fan in next, skip 2, sc in next; rep from * 2 more times. Turn, leaving the last 18 sts unworked. (3 fans, 19 sts)
Row 22: V row. (19 sts)
Head
With a separate strand of A, make another ch 6 and fasten off. At the end of Row 22, ch 7 and turn.
Row 23: Work as for Row 17: 1 fan on the ch-7, 3 fans across the neck, and 1 fan on the separate chain. (5 fans, 31 sts)
Rows 24–26: V row, fan row, V row. (31 sts in every row)
Row 27: Sl st in each of the first 7 sts, ch 1, sc in the same st. Work 3 fans, ending with sc in the 25th st, and turn. Leave the last 6 sts unworked. (3 fans, 19 sts)
Row 28: V row. (19 sts)
Row 29: Ch 1, sc in each dc, sc and ch across, with the last sc in the 3rd ch of the turning ch. (19 sc)
The head is 6.25 in (15.9 cm) wide and 3.25 in (8.3 cm) tall. Fasten off, then weave in the ends, closing any gaps at the chain joins.
Border
Border gauge: On row ends, work 3 sc per fan row, 2 sc per V row (5 sc per inch of mesh) and 1 sc per sc row. Along the tops of rows and the chain edges, work 1 sc per st or chain loop.
Round 1 (B): Join B in the first sc of Row 29. Ch 1, then sc down one side as follows:
- Ends of Rows 29–27: 6
- Unworked sts at the top of Row 26: 6
- Ends of Rows 26–23: 10
- Underside of the head chain: 6
- Ends of Rows 22–21: 5
- Arm top (top of Row 20): 18
- Ends of Rows 20–17: 10
- Underside of the arm chain: 6
- Ends of Rows 16–1 on the outer edge: 25 + 1 + 10 + 1 = 37
One side total: 104 sc.
Across the bottom:
- Bottom of leg (free loops of the foundation chain): 19
- Inner edge of the leg (Rows 1–5): 11
- Underside of the crotch ch-5: 5
- Inner edge of the second leg: 11
- Bottom of the second leg: 19
Bottom total: 65 sc.
Work up the second side (104 sc) and across the top of Row 29 (19 sc), then sl st to the first sc. Round total: 104 + 65 + 104 + 19 = 292 sc.
The outline has no sharp corners, so there are no corner increases. Keep the stitches snug at the underarms and neck so they don’t flare.
Round 2 (B): Ch 1, sc in first st, *skip 1, fan in next st, skip 1, sc in next st; rep from * around, ending with skip 1. Sl st to the first sc and fasten off. (73 scallops)
Why the math works: Each scallop uses exactly 4 sts, and 292 ÷ 4 = 73 with nothing left over. Each border round adds 0.25 in (0.6 cm), for 0.5 in (1.3 cm) per edge. That makes the piece 11.25 + 1 = 12.25 in (31.1 cm) wide and 13.75 + 1 = 14.75 in (37.5 cm) tall.
Hanging Loop
Join A in the sc at the center top of the head. Ch 16 and sl st in the same st. Turn, work 24 sc into the loop, sl st to the first sc and fasten off. The loop stands about 1.75 in (4.4 cm) tall.
Appliqués
Leave long tails on every piece for sewing.
Eyes (make 2, B): MR, 6 sc, sl st to close. (0.5 in / 1.3 cm)
Smile (B): Ch 10, sl st in the back bump of the 2nd ch from hook and of each ch across. (9 sl sts)
Buttons (make 2, B): MR, 6 sc. Rnd 2: 2 sc in each st, sl st to close. (12 sc, 1 in / 2.5 cm across) With A, add two short stitches on each for buttonholes.
Bow tie (C): Ch 9. Rows 1–4: Sc in each st across, turn. (8 sc per row, 2 in x 1 in / 5.1 cm x 2.5 cm) Wrap the tail tightly around the center 6 times to pinch it into a bow.
Holly leaves (make 2, D): Ch 8. Working along the chain: sl st in 2nd ch from hook, then sc, hdc, dc, hdc, sc, and sl st in the last ch. (7 sts, 1.5 in / 3.8 cm long)
Berries (make 3, C): MR, 5 sc, pull the ring tightly closed, sl st. (0.5 in / 1.3 cm)
Icing lines (B): For the arms (make 2), ch 18 and sl st in the back bump of the 2nd ch from hook and each ch across (17 sl sts, 3.5 in / 8.9 cm). For the legs (make 2), ch 26 and do the same (25 sl sts, 5 in / 12.7 cm).
Placement:
- Eyes: on Row 25, 1.25 in (3.2 cm) apart
- Smile: a U-curve on Rows 23–24
- Bow tie: centered over Rows 21–22
- Buttons: centered on Rows 14 and 11
- Arm icing: a vertical wave 0.75 in (1.9 cm) in from each arm end
- Leg icing: a horizontal wave across each leg at Row 4
- Holly: both leaves and all three berries at the upper right of the head, overlapping the border
Sew through the solid stitches of the fans, not across the holes.
Cable Strap and Bands
Strap (A): Ch 7. Row 1: Sc in 2nd ch from hook and in each ch across. (6 sc) Rows 2–36: Ch 1, sc in each st, turn. (6 sc per row; 1.5 in x 8 in / 3.8 cm x 20.3 cm)
Bands (make 4, A): Ch 6. Row 1: Sc in 2nd ch from hook and in each ch across. (5 sc) Rows 2–16: Ch 1, sc in each st, turn. (5 sc per row; 1.25 in x 3.5 in / 3.2 cm x 8.9 cm)
Assembly:
- Mark band positions on the strap at 0.75 in, 2.75 in, 4.75 in and 6.75 in (1.9 cm, 7.0 cm, 12.1 cm and 17.1 cm) from the top.
- Wrap each band around the strap and seam its short ends together behind the strap. Leave the band slack enough that its front stands about 0.5 in (1.3 cm) away from the strap.
- Center the strap on the body from just under the bow tie down to Row 2, covering the buttons.
- Whipstitch the strap’s long edges and both ends to the mesh, keeping the bands free.
Final Blocking
- Weave in all ends.
- Pin the piece face up to 12.25 in x 14.75 in (31.1 cm x 37.5 cm).
- Pin out each scallop point and open every triangle hole.
- Mist evenly until damp, avoiding heavy soaking of the appliqués.
- Let dry completely, at least 12 hours.
- Unpin and test each band with a coiled cable.
Final Quality-Control Checklist
- The body measures 11.25 in x 13.75 in (28.6 cm x 34.9 cm) before the border.
- Every mesh row count is a multiple of 6 + 1.
- Border Round 1 has 292 sc and Round 2 has 73 scallops.
- The finished size is 12.25 in x 14.75 in (31.1 cm x 37.5 cm).
- The loop is centered and firm.
- The strap is straight and every band opens easily.
- The face, bow tie, holly and icing are all secure.
Troubleshooting
- Fans drift sideways: You missed skipping the 2 ch. Each fan must go into the sc directly above the fan below.
- The body narrows: You didn’t count the turning ch-5 as a stitch. Work the last sc into its 3rd ch.
- The border ruffles: Work Round 1 with a 4 mm hook, keeping the 292 count.
- The border cups: Work Round 1 with a 5 mm hook.
- Bands are too tight for cables: Add 2 rows to each band.
- The piece sags on the wall: Sew the full length of the strap’s edges, not just its ends.
Care
Hand wash in cool water, roll in a towel to remove moisture and dry flat. Re-pin the scallops if they curl.
Final Notes
The whole measurement chain comes back to the fan width. One fan repeat is 1.25 in (3.2 cm), so 9 fans make an arm span of 11.25 in (28.6 cm). Thirteen fan-and-V row pairs plus three sc rows give a height of 13.75 in (34.9 cm). A 292-stitch border round divides into 73 even scallops. Adding 0.5 in (1.3 cm) of border on each edge brings him to 12.25 in x 14.75 in (31.1 cm x 37.5 cm). If your leg matches the gauge, every later number will follow.
Happy crocheting!