

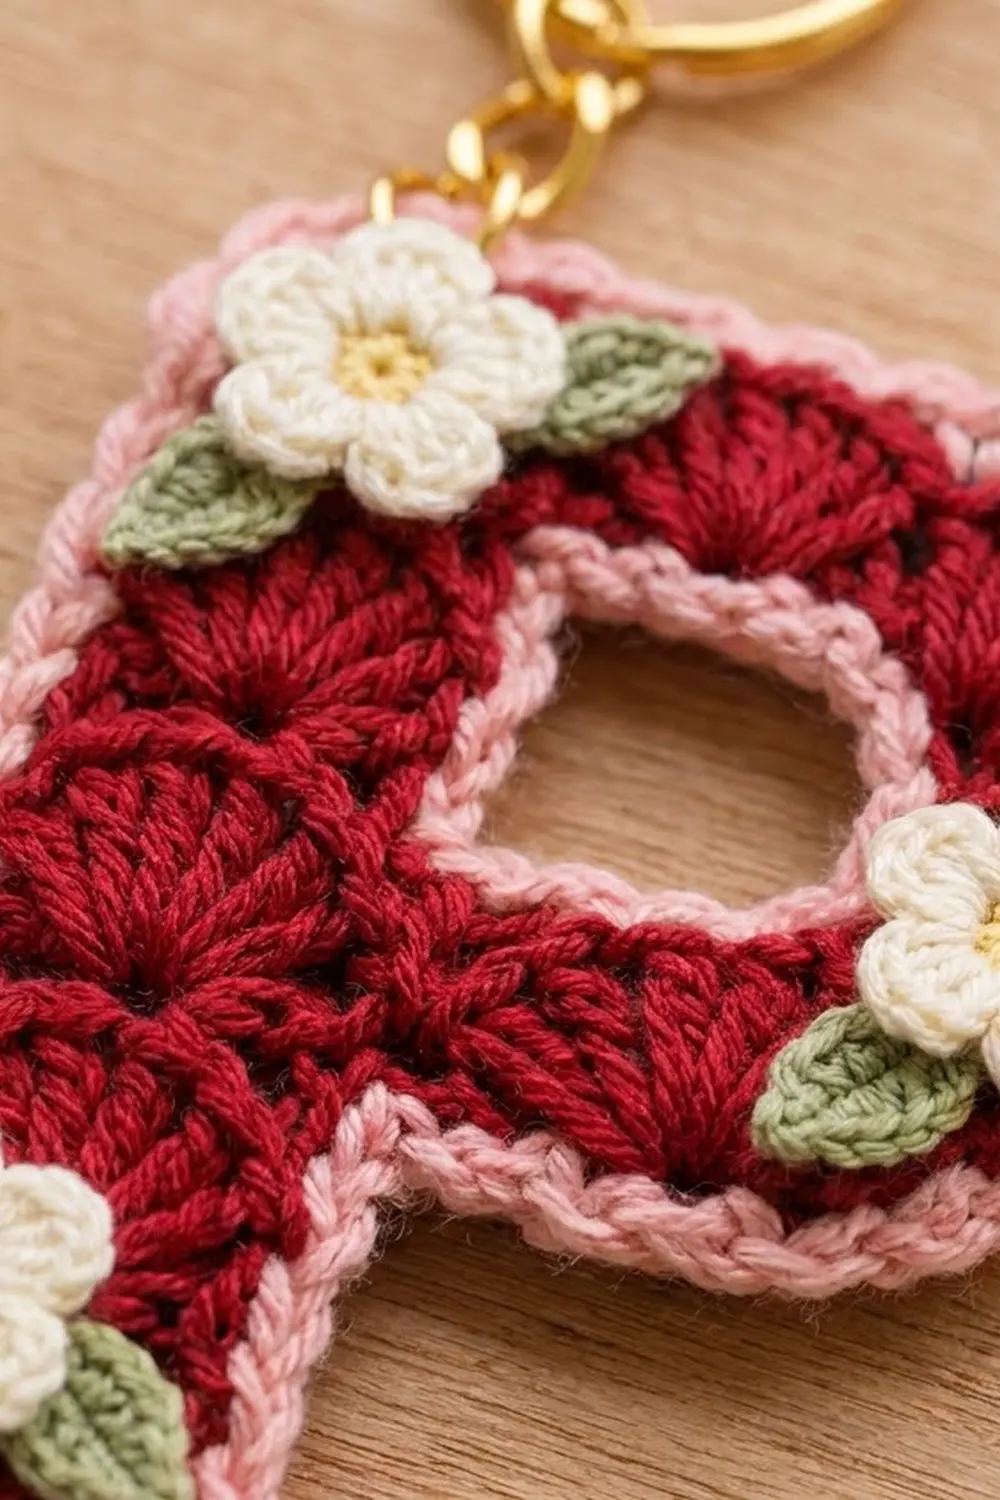
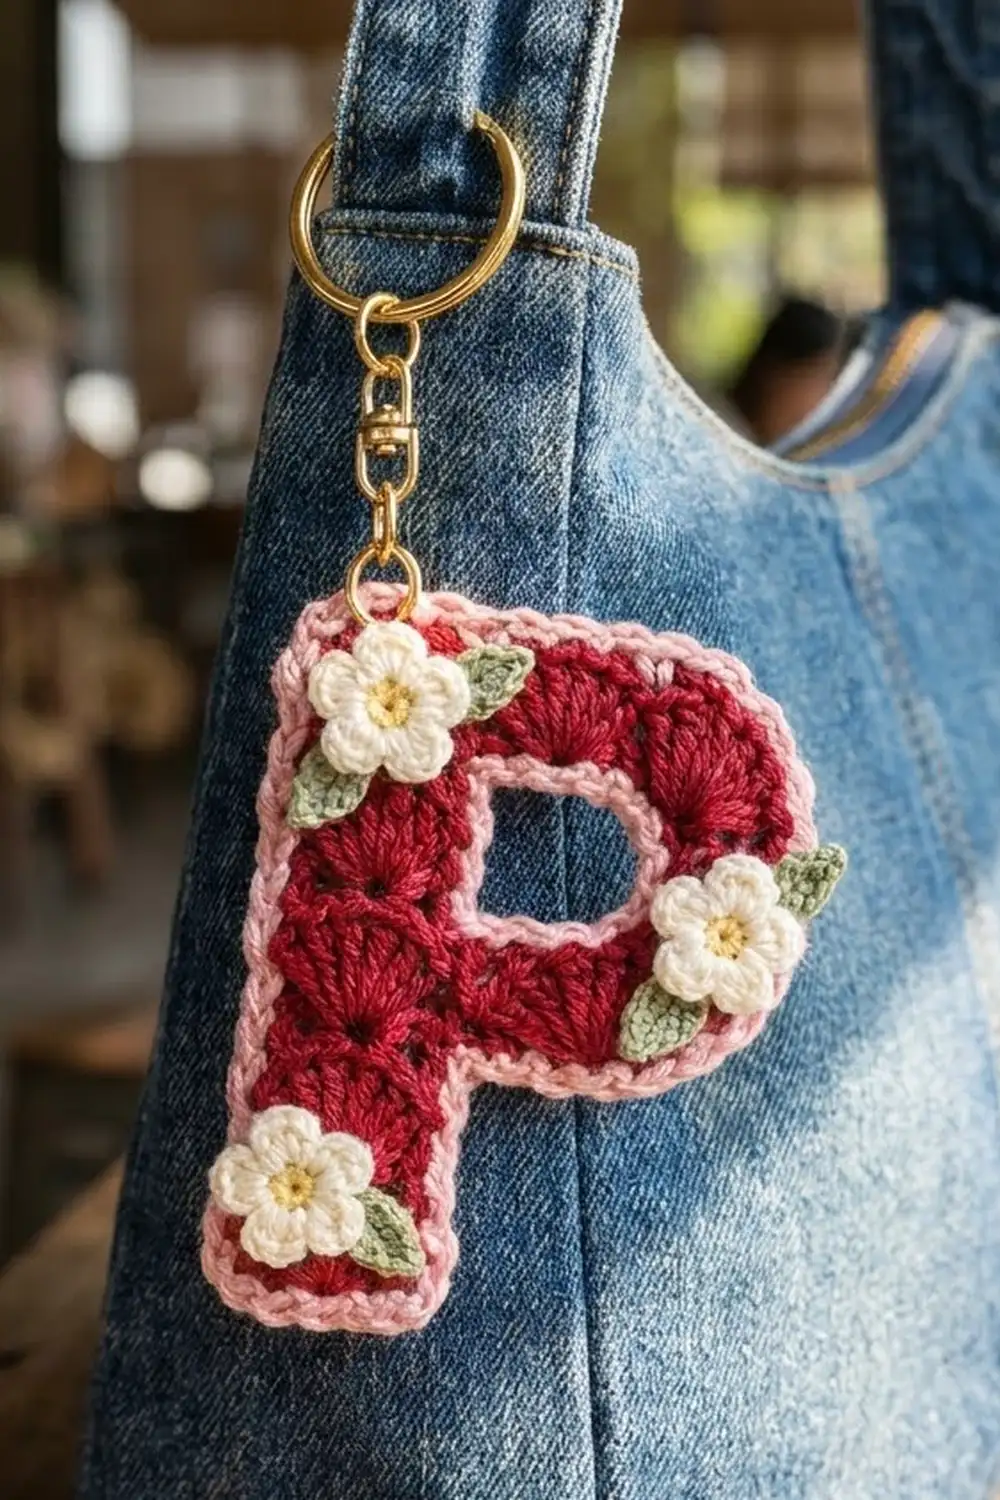
This little letter P is a bag charm with a cottage-garden feel. The body is worked in rows of stacked fan shells in deep cranberry red. Two neat rounds of light pink single crochet frame it, and three tiny cream flowers with sunny yellow centers and sage-green leaves sit on top. A gold chain and split ring turn it into a keychain or zipper pull.
The style is sweet but tidy. The shells line up in clean vertical columns, the pink edge keeps the outline crisp, and the flowers add a touch of dimension without hiding the stitch texture.
This pattern uses US crochet terms. The finished charm measures 2.9 in wide × 3.8 in tall (7.4 × 9.7 cm), including the border.
You make the letter as one flat piece, in rows from the bottom up. The stem comes first. A chain extension then adds the bowl. A short separate section and a bridging chain create the opening. After that you add the border, edge the opening, block, sew on the appliqués and attach the hardware.
Finished Size and Construction
- Finished size: 2.9 in × 3.8 in (7.4 × 9.7 cm)
- Skill level: Easy-Intermediate
- Terminology: US
- Yarn weight: Fine cotton, fingering/category 1
- Hook: 2.25 mm (US B-1)
- Number of pieces: 1 letter body, plus 3 flower and 5 leaf appliqués
- Layout: Single motif. No joining.
- Piece size: Stem 1.3 in (3.3 cm) wide; full bowl rows 2.5 in (6.4 cm) wide
- Size before border: 2.5 in × 3.4 in (6.4 × 8.6 cm)
- Border depth: 0.2 in (0.5 cm) per side, in 2 rounds
Materials
Choose a smooth mercerized cotton in fingering weight, about 4 m per gram. Cotton keeps the shells crisp and holds its shape on a bag that gets handled every day. Avoid fuzzy or very stretchy yarns, because the stacked shells will blur.
- Cranberry red (body): 8 g, 32 m
- Light pink (border and opening edge): 3 g, 12 m
- Cream (petals): 2 g, 8 m
- Yellow (flower centers): 1 g, 4 m
- Sage green (leaves): 1 g, 4 m
Tools
– 2.25 mm (US B-1) crochet hook
– Tapestry needle
– Scissors
– 2 removable stitch markers
– Rust-proof pins and a blocking mat
– Gold split keyring, 1 in (2.5 cm)
– Short gold chain, 1 in (2.5 cm)
– 2 gold jump rings, 0.25 in (0.6 cm)
– 2 pairs of flat-nose pliers
These quantities include a margin of about 25% for swatching, tails and sewing.
Abbreviations (US Terms)
- ch: chain
- sl st: slip stitch
- sc: single crochet
- hdc: half double crochet
- dc: double crochet
- sk: skip
- st(s): stitch(es)
- tch: turning chain
- MR: magic ring
- sc2tog: single crochet 2 together
Special stitches
– Shell: 5 dc in the same stitch.
– Standing sc: Start with a slip knot on the hook, insert the hook into the stitch and complete a sc as usual.
Stacking rule: After Row 2, every shell is worked into the center (3rd) dc of the shell below. Every single dc is worked into the single dc below. This keeps the shells in straight columns.
Gauge and Checkpoints
Work Rows 1–7 first and measure before you add the bowl. That stem section is your gauge swatch.
- Border gauge: 10 sc = 1 in (2.5 cm)
- Row 1 (sc): 13 sts = 1.3 in (3.3 cm) wide, 0.1 in (0.3 cm) tall
- Each shell row: 0.3 in (0.8 cm) tall
- After Row 7: 1.3 in × 1.9 in (3.3 × 4.8 cm)
- After Row 8: 2.5 in (6.4 cm) wide
- After Row 12: 2.5 in × 3.4 in (6.4 × 8.6 cm)
- After Border Round 1: 2.7 in × 3.6 in (6.9 × 9.1 cm)
- After Border Round 2: 2.9 in × 3.8 in (7.4 × 9.7 cm)
Too big? Go down to a 2.0 mm hook.
Too small? Go up to a 2.5 mm hook.
If only the height is off, adjust how tall you pull up your dc loops, not the hook size. Re-check at Row 7 before continuing.
Part 1: Letter Body
Use red throughout. Turn at the end of every row unless told otherwise.
Row 1: Ch 14, sc in 2nd ch from hook and in each ch across. Turn. (13 sc)
Row 2: Ch 3 (counts as dc throughout), sk 2 sc, shell in next sc, sk 2 sc, dc in next sc, sk 2 sc, shell in next sc, sk 2 sc, dc in last sc. Turn. (13 sts: 2 shells + 3 dc)
Rows 3–7: Ch 3, sk 2 dc, shell in center dc of next shell, sk 2 dc, dc in next dc, sk 2 dc, shell in center dc of next shell, sk 2 dc, dc in top of tch. Turn. (13 sts per row)
Checkpoint: the stem should measure 1.3 in × 1.9 in (3.3 × 4.8 cm).
Bowl extension: At the end of Row 7, do not turn. Ch 14. This chain forms the bottom of the bowl.
Row 8 (bowl bottom): Shell in 6th ch from hook. The first 3 ch count as the first dc, and the 4th and 5th ch are skipped. Then:
– Sk 2 ch, dc in next ch, sk 2 ch, shell in next ch, sk last 2 ch.
– Dc in last dc of Row 7. This is the junction stitch.
– Sk 2 dc, shell in center dc, sk 2 dc, dc in next dc, sk 2 dc, shell in center dc, sk 2 dc, dc in top of tch.
Turn. (25 sts: 4 shells + 5 dc)
The four shell columns, from the stem edge, are A, B, C and D. Column C will hold the opening, and Column D is the outer bowl.
Before you continue, place a marker in the single dc between shells C and D. It is the 7th st from the bowl edge.
Row 9 (stem section only): Ch 3, sk 2 dc, shell in center dc of A, sk 2 dc, dc in next dc, sk 2 dc, shell in center dc of B, sk 2 dc, dc in junction dc. Turn. (13 sts)
Row 10 (stem section only): Ch 3, sk 2 dc, shell in center dc of B, sk 2 dc, dc in next dc, sk 2 dc, shell in center dc of A, sk 2 dc, dc in top of tch. Do not turn. (13 sts)
Move a marker into the live loop and set the main yarn aside.
Row 9R (outer bowl section): Join a new length of red with a sl st in the marked dc between C and D. Ch 3, sk 2 dc, shell in center dc of D, sk 2 dc, dc in top of tch at the bowl edge. Turn. (7 sts)
Row 10R: Ch 3, sk 2 dc, shell in center dc, sk 2 dc, dc in top of tch. (7 sts) Fasten off, leaving a 4 in (10.2 cm) tail.
Row 11 (bridging row): Return the main loop to your hook and turn. Ch 3, then:
– Sk 2 dc, shell in center dc of A, sk 2 dc, dc in next dc, sk 2 dc, shell in center dc of B, sk 2 dc.
– Dc in top of tch of Row 10 (the junction).
– Ch 5 to bridge over the opening.
– Dc in last dc of Row 10R.
– Sk 2 dc, shell in center dc of D, sk 2 dc, dc in top of tch.
Turn. (25 sts: 3 shells + 5 dc + 5 ch)
Row 12 (top): Ch 3, then:
– Sk 2 dc, shell in center dc of D, sk 2 dc, dc in next dc.
– Sk 2 ch, shell in next ch (the 3rd ch of the ch-5), sk 2 ch.
– Dc in junction dc.
– Sk 2 dc, shell in center dc of B, sk 2 dc, dc in next dc, sk 2 dc, shell in center dc of A, sk 2 dc, dc in top of tch.
(25 sts: 4 shells + 5 dc) Fasten off.
The opening is 3 rows tall (Rows 9–11) and one shell wide. It measures about 0.5 in × 0.9 in (1.3 × 2.3 cm).
Weave in all tails along the row ends. The shells look almost the same on both sides. Choose the side where the bowl sits on the right as your front.
Part 2: Flowers (Make 3)
Round 1: With yellow, make a MR. Ch 1, 5 sc in ring. Pull the ring closed. Change to cream in the sl st that joins the round to the first sc. (5 sc)
Round 2: Work [sl st, ch 2, 3 dc, ch 2, sl st] in each sc around. Join. (5 petals)
Fasten off, leaving a 10 in (25.4 cm) cream tail for sewing. Each flower measures about 0.75 in (1.9 cm) across.
Part 3: Leaves (Make 5)
With green, ch 6.
– Working in the chain, starting in the 2nd ch from hook: sc, hdc, dc, hdc, sc. (5 sts)
– Ch 1 for the tip, then rotate.
– Working along the other side of the chain: sc, hdc, dc, hdc, sc. (5 sts)
– Sl st in the ch-1 tip.
Fasten off, leaving an 8 in (20.3 cm) tail. Each leaf measures about 0.5 in (1.3 cm) long.
Border
Border gauge: 10 sc = 1 in (2.5 cm). One sc row-end takes 1 sc, and each 0.3 in (0.8 cm) shell row-end takes 3 sc.
Hold the front facing you and work counterclockwise. The square corners are bottom-left, bottom-right and top-left. The rounded corners are the bottom and top corners of the bowl. The inner corner is where the stem meets the underside of the bowl.
Round 1 (pink): Join pink with a standing sc in the 2nd free loop of the foundation chain (bottom edge). Then work around:
| Section | Stitches |
|---|---|
| Bottom edge | 1 standing sc + sc in next 10 loops = 11 sc |
| Bottom-right corner | 3 sc in last loop |
| Right side of stem | 1 sc in Row 1 end, 3 sc in each of the Row 2–6 ends, 2 sc in the Row 7 end, then sc2tog over the Row 7 end and the first free loop of the bowl chain = 19 sts |
| Underside of bowl | Sc in next 10 free loops, 2 sc in last loop = 12 sts |
| Bowl side | 3 sc in each of the Row 8–12 ends = 15 sc |
| Top-right corner | 2 sc in top of tch of Row 12 |
| Top edge | Sc in next 23 sts |
| Top-left corner | 3 sc in last st |
| Left side | 3 sc in each of the Row 12–2 ends, 1 sc in Row 1 end = 34 sc |
| Bottom-left corner | 3 sc in first foundation loop |
Sl st to the first sc. (125 sts)
Sides, with corners: bottom 17, right of stem 19, underside of bowl 12, bowl side 15 + 2, top 23 + 3, left 34.
Round 2 (pink): Ch 1. Sc in each st around, with these changes:
– In the center sc of each of the 3 square corners, work 3 sc (+2 each, +6 total).
– At each of the 2 rounded corners, work 2 sc in each of the 2 corner sts (+2 each, +4 total).
– At the inner corner, sc2tog over the Round 1 sc2tog and the next st (−1).
Sl st to the first sc. (125 + 6 + 4 − 1 = 134 sts) Fasten off.
Opening edge (pink): Join pink with a sl st at any point in the opening. Sl st all the way around the opening, working evenly: 5 sl sts along the shell tops, 2 per row-end on each side (6 per side), and 5 into the free loops of the ch-5. Join. (22 sl sts) Fasten off.
Why the math works: Each shell row is 0.3 in (0.8 cm) tall, and 3 sc at 10 sc per inch also cover 0.3 in (0.8 cm). Each row of 25 sts is 2.5 in (6.4 cm) wide, so 1 sc per st matches it exactly. The corner increases let the border turn outside corners without cupping. The decreases at the inner corner stop it from bunching. Each round adds 0.1 in (0.3 cm) per side, so the 2 rounds add 0.4 in (1.0 cm) to the total width and to the total height.
Final Blocking
- Soak the bordered letter in cool water for 10 minutes. Press out the water in a towel without wringing.
- Pin it face up to 2.9 in × 3.8 in (7.4 × 9.7 cm).
- Pin the stem straight and 1.7 in (4.3 cm) wide across the border.
- Ease the two bowl corners into soft curves.
- Put one pin through the opening to hold it to 0.5 in × 0.9 in (1.3 × 2.3 cm).
- Pin the flowers and leaves flat beside the letter, with their petals and tips open.
- Let everything dry completely.
- Sew the leaves on first, with green tails, using small hidden stitches through the red only:
- 2 leaves at the top-left corner: one pointing down-left, one pointing right.
- 2 leaves on the right edge of the bowl: one pointing up-right, one pointing down-left.
- 1 leaf at the bottom-left, pointing right.
- Sew a flower over the base of each leaf group, so the leaves peek out from under the petals. Stitch through the center and the base of each petal.
- Open a jump ring with the pliers. Pass it through both border rounds at the top center of the stem, add the chain, and close it. Use the second jump ring to join the chain to the split keyring.
Final Quality-Control Checklist
- Rows 1–7 hold 13 sts each, and Rows 8, 11 and 12 hold 25 sts each.
- All shells stack in straight columns.
- The opening is clean, three rows tall and fully edged in pink.
- Border Round 1 = 125 sts, and Round 2 = 134 sts.
- The finished size is 2.9 in × 3.8 in (7.4 × 9.7 cm).
- The flowers sit flat, with their centers firmly stitched.
- The jump rings are fully closed with no gaps.
- All tails are woven in and trimmed.
Troubleshooting
- Shells drift sideways: Work each shell into the center (3rd) dc, not into a space.
- Stem edges wave: Make sure the ch-3 at the start of each row counts as a stitch, and that you finish each row in the top of the tch.
- Bowl is wider than 2.5 in (6.4 cm): Chain the extension more firmly, or redo the chain with the smaller hook.
- Opening is closed or lopsided: Check that Rows 9–10 and Rows 9R–10R were worked separately and the ch-5 has exactly 5 ch.
- Border ruffles: Go down a hook size for the border only.
- Border cups: Check that you made the corner increases in Round 2.
- Flowers curl: Block them separately before sewing.
Care
Hand wash in cool water with mild soap, press dry in a towel and lay flat. Keep the metal hardware dry, which helps prevent tarnish.
Final Notes
The measurement chain is simple. Each row is 1.3 in (3.3 cm) for the stem and 2.5 in (6.4 cm) for the full bowl. One sc row and eleven 0.3 in (0.8 cm) shell rows give 3.4 in (8.6 cm). Two border rounds add 0.4 in (1.0 cm) to the width and the height, for 2.9 in × 3.8 in (7.4 × 9.7 cm). Check your gauge at Row 7, count every row and the border will fit exactly. Happy crocheting!