

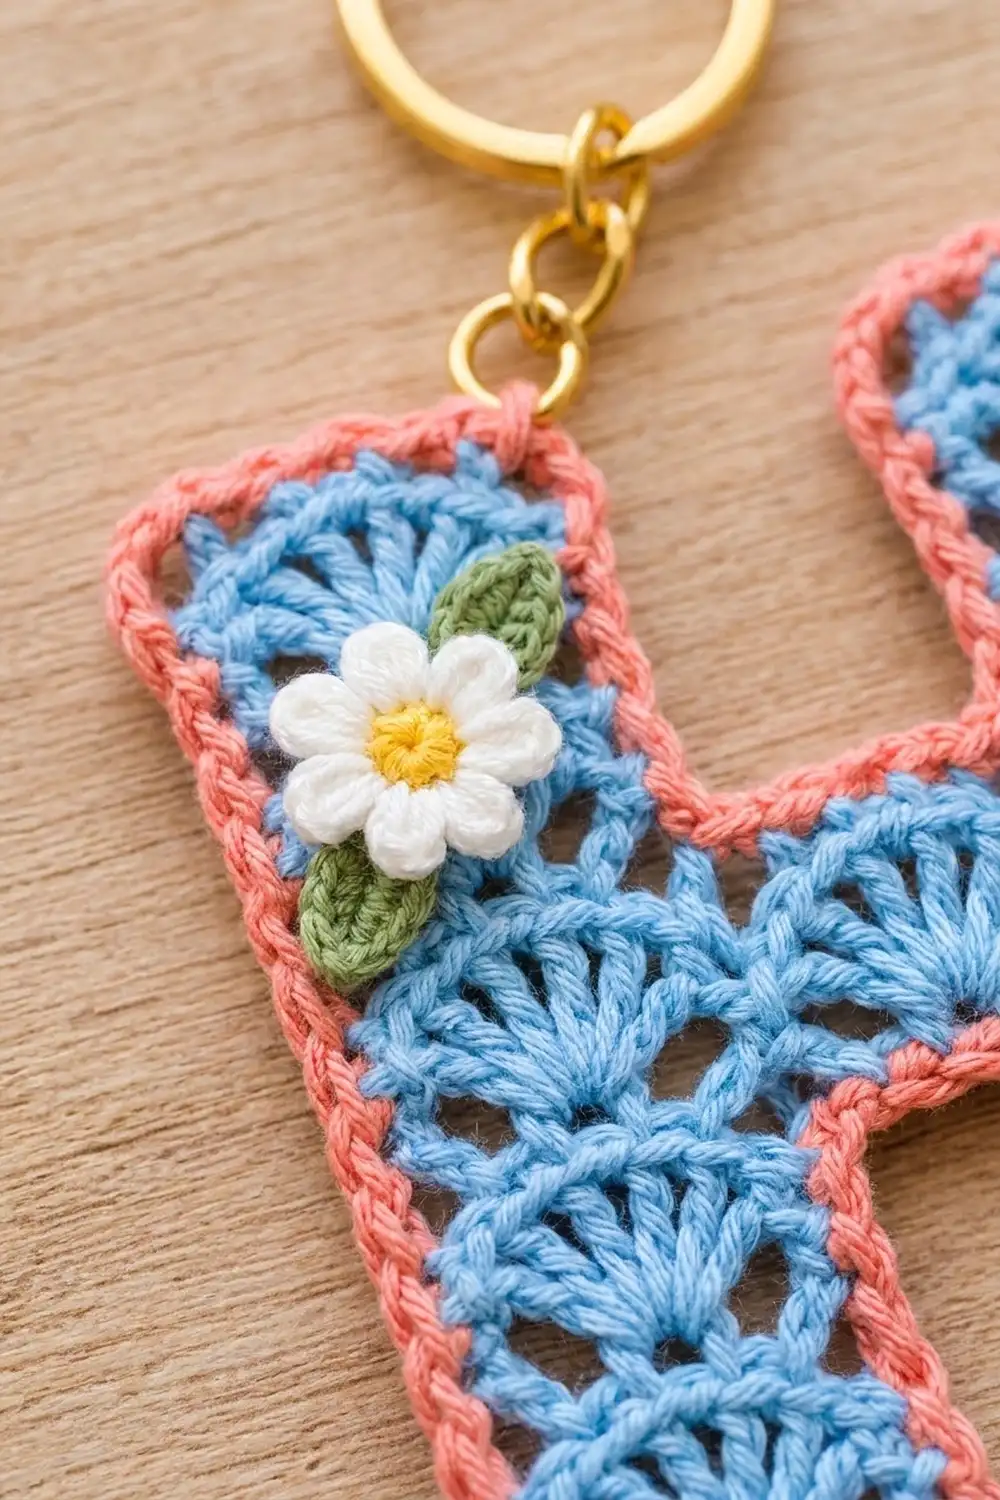
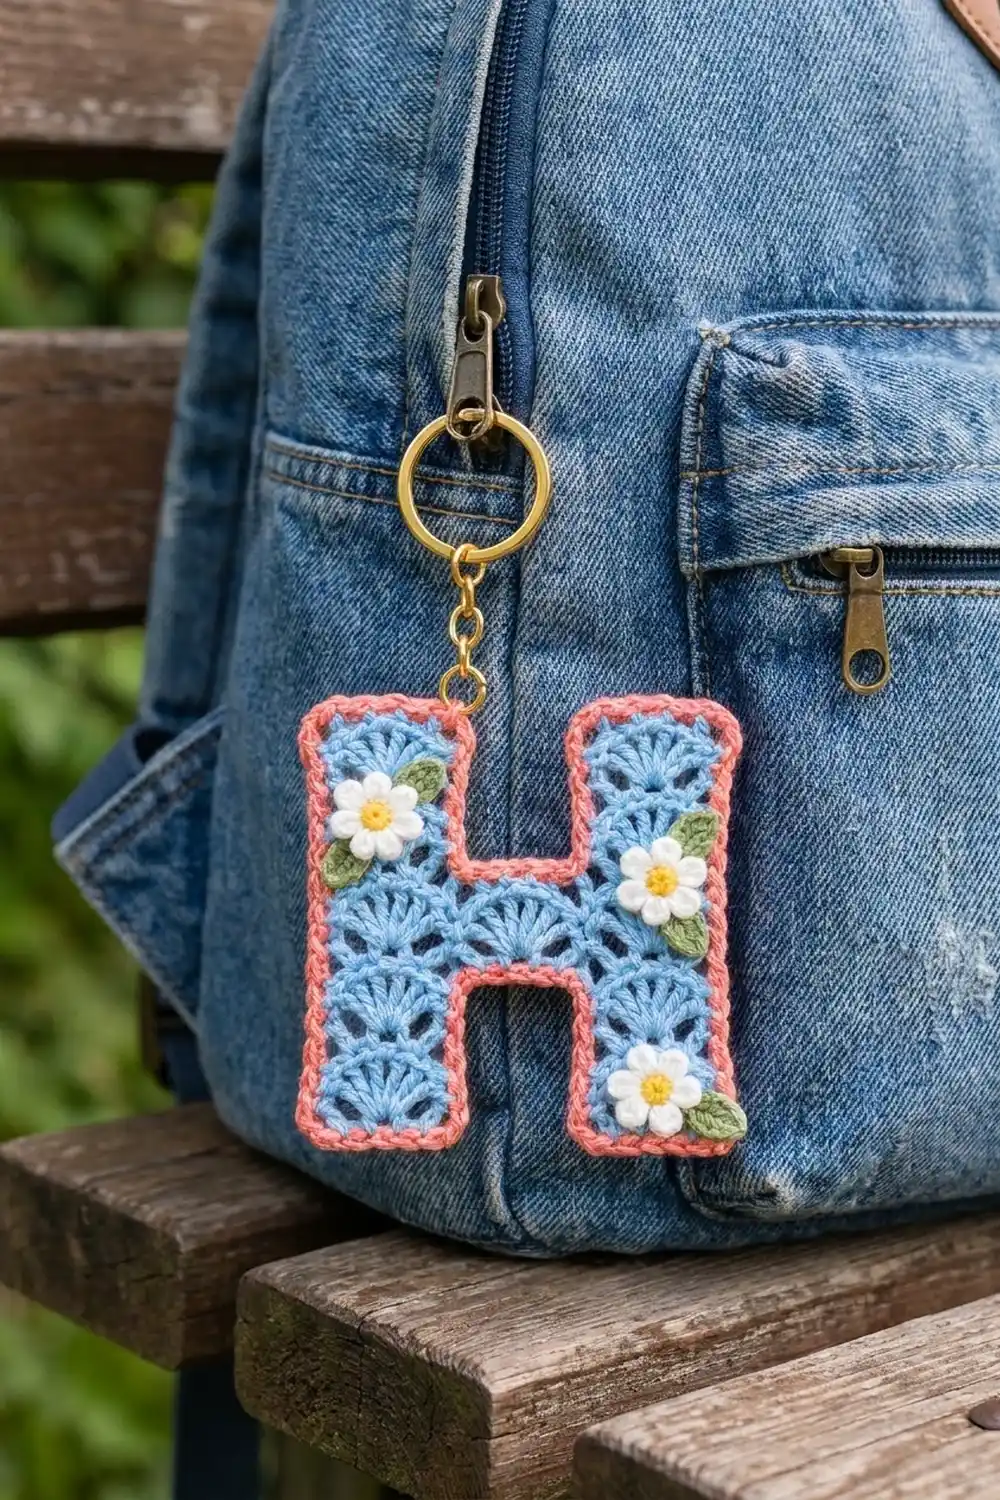
This letter H keychain has stacked shell-stitch fans in soft sky blue, a corded coral edge, and three tiny white daisies with yellow centers and green leaves. A gold split ring and short chain turn it into a bag charm, a keychain, or a small personalized gift.
The style is bright and a little retro. Each leg of the H is a column of five fans, and one more fan sits in the crossbar. The coral edge outlines every corner, including the square inner corners, so the letter stays crisp and easy to read.
This pattern uses US crochet terms. The finished charm is 4.0 in (10.2 cm) wide and 4.2 in (10.7 cm) tall, not counting the keyring.
You’ll work the H flat in rows. First you make the two lower legs separately. Then you join them with a chained crossbar and work three rows across the full width. After that, you split again for the upper legs. Next comes a two-round coral border, then the flowers are sewn on and the ring is attached.
Finished Size and Construction
- Finished size: 4.0 in wide x 4.2 in tall (10.2 x 10.7 cm)
- Skill level: Easy-intermediate
- Terminology: US
- Yarn weight: Sport (2), cotton
- Hook: 2.75 mm (C-2)
- Number of pieces: 1 letter body + 3 flowers + 5 leaves (appliqués)
- Layout: Single letter H. Each leg is 7 stitches wide and the crossbar is 7 stitches wide
- Leg width: about 1.2 in (3.0 cm) before the border, 1.7 in (4.3 cm) after
- Size before border: 3.5 in wide x 3.7 in tall (8.9 x 9.4 cm)
- Border depth: 0.25 in (0.6 cm) on each side
Materials
Use a smooth mercerized cotton or cotton blend in sport weight. Cotton shows the shell texture clearly and holds the letter flat. Avoid fuzzy yarn because it blurs the fans.
- Light blue (body): 10 g, about 30 m
- Coral (border): 4 g, about 12 m
- White (petals): 2 g, about 6 m
- Yellow (flower centers): 1 g, about 3 m
- Green (leaves): 1 g, about 3 m
Tools:
– 2.75 mm (C-2) crochet hook
– Tapestry needle
– Gold split keyring, 1 in (2.5 cm)
– Gold chain, about 0.75 in (1.9 cm) long (3 to 4 links)
– Gold jump ring, 0.25 in (0.6 cm)
– 2 pairs of flat-nose pliers
– Rust-proof pins and a blocking mat
– Scissors
The yarn quantities include a margin for a gauge test and tails.
Abbreviations (US Terms)
- ch: chain
- sl st: slip stitch
- sc: single crochet
- hdc: half double crochet
- dc: double crochet
- sk: skip
- st(s): stitch(es)
- MR: magic ring
- rev sc: reverse single crochet (crab stitch)
- rep: repeat
Special stitches:
- Shell: 7 dc in the same stitch.
- Reverse sc (rev sc): Work from left to right (left-handers work right to left). Insert the hook into the next stitch to the right, yarn over, pull up a loop, then yarn over and pull through both loops. This makes the corded rope edge.
Gauge and Checkpoints
Gauge: 6 sc = 1 in (2.5 cm). One sc row = 0.2 in (0.5 cm). One shell row = 0.5 in (1.3 cm). One shell row plus its leveling row = 0.7 in (1.8 cm).
Test one piece first. Leg A (Rows 1–4) works as your gauge swatch. Make it, then measure before you continue.
Checkpoints:
– After Leg A, Row 1: 7 sc should measure 1.2 in (3.0 cm) wide.
– After Leg A, Row 4: 1.4 in (3.6 cm) tall.
– After Row 7 (crossbar complete): 3.5 in (8.9 cm) wide and 2.3 in (5.8 cm) tall.
– After Row 11: 3.7 in (9.4 cm) tall.
– After the border: 4.0 x 4.2 in (10.2 x 10.7 cm).
If your piece is too big, go down to a 2.5 mm hook. If it’s too small, go up to a 3.0 mm hook. Don’t change the stitch counts, because the border math depends on them.
Letter Body
Use light blue. Each shell row has 9 stitches per 7-stitch segment: sc, 7 dc, sc. Each leveling row brings it back to 7.
Leg A (bottom of left leg)
Row 1: Ch 8. Sc in the 2nd ch from the hook and in each ch across. Turn. (7 sts)
Row 2 (shell row): Ch 1, sc in the first st, sk 2 sts, shell in the next st, sk 2 sts, sc in the last st. Turn. (9 sts: 1 sc + 7 dc + 1 sc)
Row 3 (leveling row): Ch 2 (does not count as a st), dc in the first sc, sk the next dc, sc in each of the next 5 dc, sk the last dc, dc in the last sc. Turn. (7 sts: 1 dc + 5 sc + 1 dc)
The edge dc fill the low corners beside each fan, so the leg stays square.
Row 4: Repeat Row 2. (9 sts) Fasten off.
Check the Row 4 measurement now.
Leg B (bottom of right leg)
Work Rows 1–4 exactly as for Leg A. (9 sts) Don’t fasten off. Turn.
Crossbar Rows
Lay Leg B and Leg A side by side with the same side facing you. Leg B should sit where your working yarn is.
Row 5 (leveling and joining row):
1. Leveling row across Leg B: ch 2, dc in the first sc, sk 1 dc, sc in the next 5 dc, sk 1 dc, dc in the last sc (7 sts).
2. Ch 7 for the crossbar.
3. On Leg A, start in the edge sc nearest the chain: dc in that sc, sk 1 dc, sc in the next 5 dc, sk 1 dc, dc in the last sc (7 sts).
4. Turn.
Total: 21 sts (7 + 7 ch + 7)
Make sure the chain isn’t twisted. It forms the bottom edge of the crossbar.
Row 6 (shell row, 3 segments): Ch 1. Sc in the next st, sk 2 sts, shell in the next st, sk 2 sts, sc in the next st. Rep from * 2 more times. Turn. (27 sts: 3 segments of 9)
In the middle segment, work into the 7 chains. The two sc where segments meet sit next to each other.
Row 7 (leveling row, 3 segments): Ch 2. Dc in the next sc, sk 1 dc, sc in the next 5 dc, sk 1 dc, dc in the next sc. Rep from * 2 more times. Turn. (21 sts: 3 segments of 7)
Checkpoint: 3.5 in (8.9 cm) wide, 2.3 in (5.8 cm) tall.
Upper Left Leg
Work over the first 7 sts of Row 7 only.
Row 8: Ch 1, sc in the first st, sk 2, shell in the next st, sk 2, sc in the 7th st. Turn. (9 sts)
Row 9: Repeat Row 3. (7 sts)
Row 10: Repeat Row 2. (9 sts)
Row 11: Repeat Row 3. (7 sts) Fasten off.
Upper Right Leg
Leave the middle 7 sts of Row 7 unworked. They form the top of the crossbar.
With the same side facing as for Row 8 of the left leg, join light blue in the 15th st of Row 7. That’s the first st of the last segment, next to the unworked crossbar sts. Work Rows 8–11 as for the upper left leg, moving toward the outer edge. (7 sts) Fasten off and weave in all blue ends.
Checkpoint: 3.5 in wide x 3.7 in tall (8.9 x 9.4 cm). Each leg should have 5 stacked fans, and the crossbar should have 1 fan.
Border
Border gauge: Along the row ends, work 1 sc in the end of Row 1 and 2 sc in the end of every other row. Rows 2–11 form 5 shell-plus-leveling pairs, each 0.7 in (1.8 cm) tall. Four sc at 6 sc per in (2.5 cm) covers about 0.67 in (1.7 cm), so the sides lie flat without ruffling or cupping.
Round 1
Use coral. Join with a sl st in the first foundation st at the bottom left corner of the left leg. Ch 1. Work 3 sc in each outer corner. At each inner corner, skip 1 st to square it. Go clockwise:
- Left outer side: 3 sc in the corner st, then up the row ends: 1 sc in Row 1, and 2 sc in each of Rows 2–11 (21 sc).
- Left top: 3 sc in the first st of Row 11, sc in the next 5 sts, 3 sc in the last st.
- Left inner upper side: down the row ends of Rows 11–8, 2 sc each (8 sc).
- Crossbar top: sk the first free st of Row 7, sc in the next 5, sk the last free st (5 sc).
- Right inner upper side: up Rows 8–11 (8 sc).
- Right top: 3 sc in the corner, sc in 5, 3 sc in the corner.
- Right outer side: down the row ends (21 sc).
- Right bottom: 3 sc in the corner, sc in the 5 middle foundation sts, 3 sc in the corner.
- Right inner lower side: up Rows 1–4. That’s 1 sc in Row 1 and 2 sc each in Rows 2–4 (7 sc).
- Crossbar bottom: along the underside of the ch-7, sk the first ch, sc in the next 5, sk the last ch (5 sc).
- Left inner lower side: down Rows 4–1 (7 sc).
- Left bottom: 3 sc in the corner, sc in the 5 middle sts, then 1 sc in the starting corner st to finish its 3-sc corner. That corner already has its first sc from the start of the round.
- Join with a sl st to the first sc.
Round 1 count:
– Outer corners: 8 x 3 = 24
– Top and bottom edges: 4 x 5 = 20
– Outer sides: 2 x 21 = 42
– Inner upper sides: 2 x 8 = 16
– Inner lower sides: 2 x 7 = 14
– Crossbar edges: 2 x 5 = 10
– Total: 126 sc
Why the math works: Each top and bottom edge is 7 sts wide. Five sc plus the 2 corner stitches covers all 7, and each corner stitch gets 3 sc so it can turn 90 degrees. The crossbar edges have 7 sts. Skipping 1 st at each inner corner leaves 5 sc and pulls the corner square instead of rounding it.
Round 2
Ch 1. Rev sc in each st around. (126 rev sc) Join with a sl st and fasten off.
The border adds 0.25 in (0.6 cm) on every side. That brings the piece to 4.0 x 4.2 in (10.2 x 10.7 cm).
Flowers and Leaves
Flower (make 3)
Rnd 1: With yellow, MR, ch 1, 5 sc in the ring. Pull it closed and join with a sl st. Fasten off. (5 sc) The center measures about 0.3 in (0.8 cm).
Rnd 2: With white, join in any sc. (Sl st, ch 2, 2 dc, ch 2, sl st) in the same sc, then move to the next sc. Rep from * 4 more times. (5 petals)
Fasten off and leave a 6 in (15.2 cm) tail for sewing. Each flower measures 0.8 in (2.0 cm) across.
Leaf (make 5)
With green, ch 5.
- Sl st in the 2nd ch from the hook, sc in the next ch, hdc in the next ch, sc in the last ch.
- Ch 1 and rotate the leaf.
- Along the underside of the chain: sc in the next ch, hdc in the next ch, sc in the next ch, sl st in the last ch.
Fasten off and leave a tail. Each leaf measures 0.6 in (1.5 cm) long.
Placement
Use the tails to sew each piece through the blue body only, without catching the coral border.
- Flower 1: On the upper left leg, over the fans of Rows 8–9, near the outer edge. Add one leaf tucked at its upper right and one at its lower left.
- Flower 2: On the right leg at crossbar height (Rows 6–7), on the outer half. Add one leaf at its upper right and one at its lower right.
- Flower 3: At the lower right corner of the right leg (Rows 2–3). Add one leaf pointing out to the right, overlapping the border slightly.
Hardware
- Open the jump ring with two pliers. Twisting the ends sideways keeps the ring round.
- Thread the jump ring through Round 1 of the border at the top of the left leg, at the 3rd sc of the top edge.
- Add the end link of the chain and close the jump ring.
- Thread the split ring onto the other end of the chain.
Final Blocking
- Lightly mist the letter (not the hardware) with water until it’s damp.
- Lay it right side up on the blocking mat.
- Pin the 8 outer corners to 4.0 x 4.2 in (10.2 x 10.7 cm).
- Pin each inner corner square, so the openings are 0.7 in (1.8 cm) wide.
- Gently open each fan with your fingertip so the dc spread evenly.
- Let it dry completely, at least 4 hours.
- Attach the flowers and hardware after blocking if you haven’t already.
Final Quality-Control Checklist
- Each leg has 5 fans and the crossbar has 1.
- Each leveling row has 7 sts per segment.
- Border Round 1 has 126 sc, and Round 2 has 126 rev sc.
- The 8 outer corners are sharp and the 4 inner corners are square.
- The piece measures 4.0 x 4.2 in (10.2 x 10.7 cm).
- The flowers are secure and the petals lie flat.
- The jump ring is fully closed and doesn’t snag the yarn.
- All ends are woven in.
Troubleshooting
- The leg edges dip beside the fans: Make sure you’re using dc, not sc, at both ends of each leveling row.
- The fans buckle: Your dc are too tight. Relax your tension or go up a hook size.
- The crossbar chain twisted: Undo Row 5 back to the chain and chain again.
- The border ruffles: Work 1 sc instead of 2 in the ends of the leveling rows. Keep the corners as written.
- The border cups: Your tension is too tight. Use a hook 0.25 mm larger for Round 1 only.
- The inner corners are rounded: Check that you skipped 1 st at each inner corner.
- The rev sc edge looks flat: Pull up a slightly taller loop before you finish each stitch.
Care
Spot clean with mild soap and cool water, then lay it flat to dry. Keep it away from wet surfaces to protect the hardware finish.
Final Notes
The measurement chain runs like this:
- 7 sts per leg = 1.2 in (3.0 cm).
- Three 7-st segments = 3.5 in (8.9 cm).
- One sc row plus 5 shell-and-leveling pairs = 3.7 in (9.4 cm).
- A 0.25 in (0.6 cm) border on every side brings it to 4.0 x 4.2 in (10.2 x 10.7 cm).
If every checkpoint matches, the border’s 126 stitches will fit without stretching. Happy crocheting!