

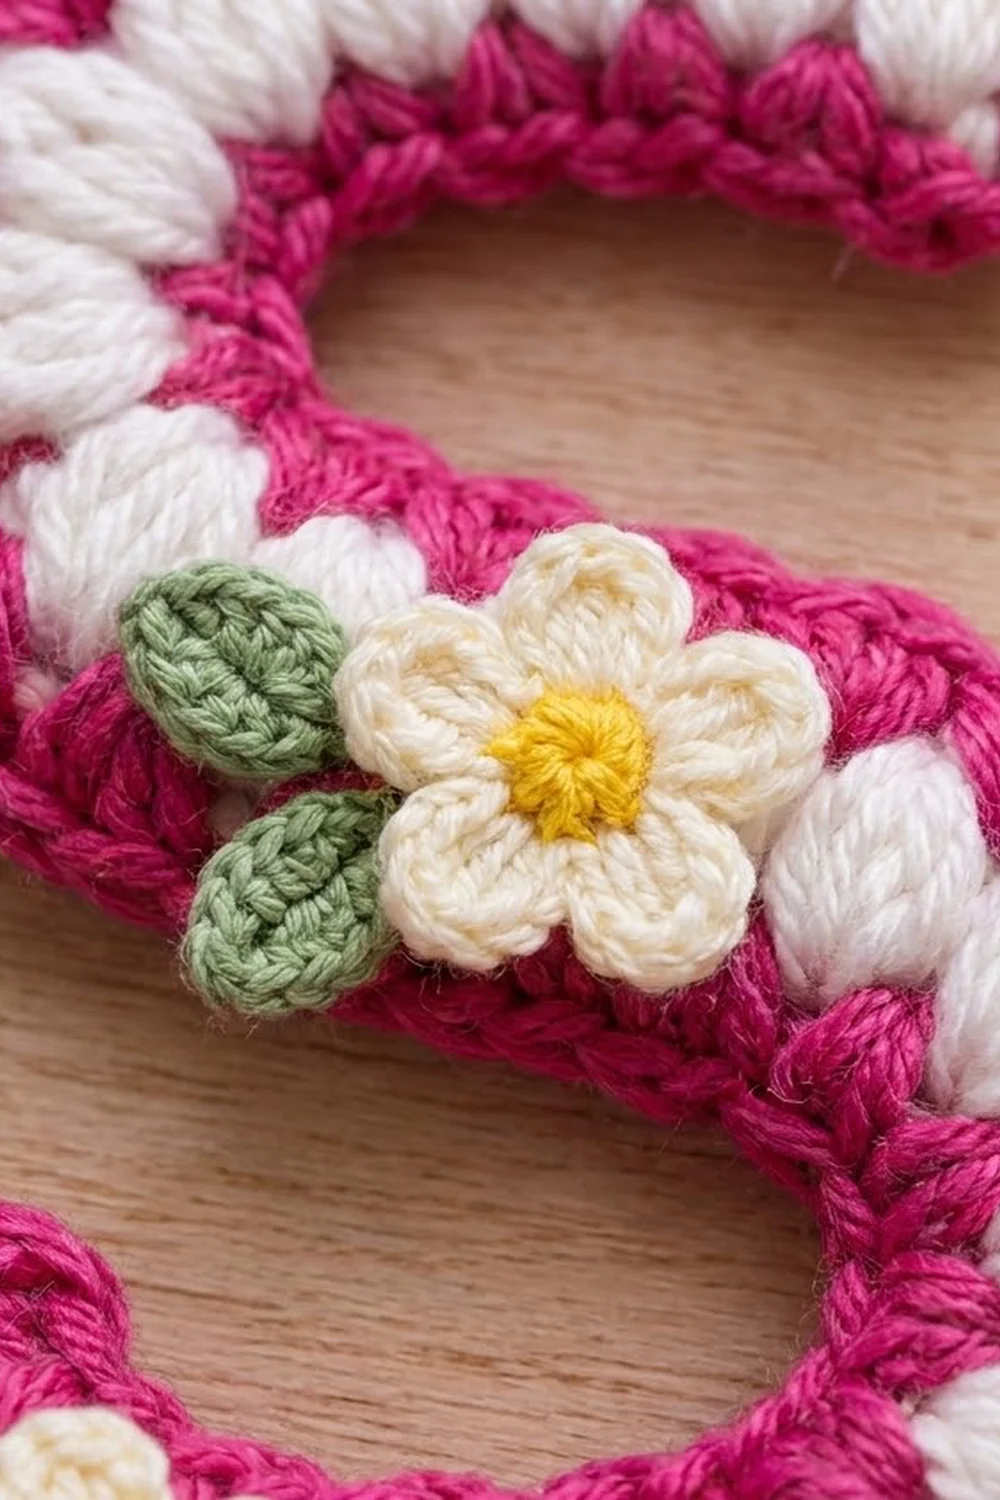
The Petal Script Letter S Keychain is a small, cheerful initial charm made as one flat piece. A bright magenta frame outlines a curved S-shaped strip, and a line of plump white puff stitches runs down the middle of the letter like a string of pearls.
Three tiny cream flowers with yellow centers and small green leaves are sewn onto the front: one near the top tip, one at the upper left of the center curve, and one at the bottom tip. A gold split key ring on a short chain hangs from the top tip, so you can clip the letter onto a bag handle, a zipper pull, or your keys.
This pattern uses US crochet terms. The finished letter measures about 3.75 in (9.5 cm) tall and 2.75 in (7.0 cm) wide, with a strip width of 1 in (2.5 cm). The key ring is not included in these measurements.
You make it in four simple steps. First, crochet one straight strip in three rows: magenta single crochet, white puffs, then magenta single crochet again. Next, work one magenta border round, adding stitches on the outer curves and removing them on the inner curves. That round pulls the strip into an S, and blocking sets the shape. Last, sew on the flowers and attach the key ring.
Finished Size and Construction
- Finished size: 3.75 in (9.5 cm) tall x 2.75 in (7.0 cm) wide
- Skill level: Easy
- Terminology: US crochet terms
- Yarn weight: DK (light, #3) cotton or cotton blend
- Hook: 3.5 mm (E-4)
- Number of pieces: 1 letter piece, plus 3 flower appliqués and 5 leaf appliqués
- Layout: a single S-shaped strip, with the top tip at upper right and the bottom tip at lower left
- Piece size before border: straight strip 7 in (17.8 cm) long x 0.75 in (1.9 cm) wide
- Border depth: 0.125 in (0.3 cm) on each long edge
- Strip after border: 1 in (2.5 cm) wide
Materials
Choose a smooth DK cotton. Cotton shows off the puff stitches clearly, keeps the letter firm, and holds up well on a keychain. Avoid fuzzy or stretchy yarns, because the S shape depends on a firm fabric.
- Magenta (main color): 6 g, about 14 m
- White (puff stitches): 3 g, about 7 m
- Cream (flower petals): 2 g, about 5 m
- Yellow (flower centers): 1 g, about 2 m
- Green (leaves): 1 g, about 2 m
These amounts include extra yarn for a gauge test and weaving in ends.
Tools:
- 3.5 mm (E-4) crochet hook
- Tapestry needle
- Scissors
- 2 stitch markers
- Rust-proof pins and a foam blocking mat
- Spray bottle with water
- 1 in (2.5 cm) gold split key ring with a 1.25 in (3.2 cm) chain and an open jump ring
- Two pairs of flat-nose pliers
- Optional: a paper S template, 3.75 in (9.5 cm) tall, for blocking
Abbreviations (US Terms)
- ch = chain
- sl st = slip stitch
- sc = single crochet
- hdc = half double crochet
- dc = double crochet
- sc2tog = single crochet two together: insert the hook in the next st and pull up a loop, insert in the following st and pull up a loop, then yo and draw through all 3 loops
- sk = skip
- st(s) = stitch(es)
- sp = space
- yo = yarn over
- rep = repeat
- MR = magic ring
Special stitch – puff stitch (puff): (Yo, insert the hook in the st, yo and pull up a loop to about 0.25 in or 0.6 cm) 3 times, then yo and draw through all 7 loops on the hook. Don’t work a closing chain. The ch 1 that follows in the pattern sits between the puffs.
Gauge and Checkpoints
Gauge: 10 sc = 2 in (5.1 cm) with a 3.5 mm hook. The three rows of the strip (sc, puff, sc) together measure 0.75 in (1.9 cm) wide.
Gauge matters most for the length of the strip. If the strip is too long, the S looks stretched and the curves are shallow. If it is too short, the letter looks squat. Row 1 is quick to make and tells you almost everything, so test your gauge on it before going further.
Checkpoints:
- After Row 1: 35 sc measure 7 in (17.8 cm).
- After Row 3: the strip is 7 in (17.8 cm) long x 0.75 in (1.9 cm) wide.
- After Round 4: the strip is 1 in (2.5 cm) wide and already curving into an S.
- After blocking: the letter is 3.75 in (9.5 cm) tall x 2.75 in (7.0 cm) wide.
If Row 1 is too long (over 7.25 in or 18.4 cm), switch to a 3.25 mm hook. If it is too short (under 6.75 in or 17.1 cm), switch to a 3.75 mm hook. Don’t change the stitch counts, because the border shaping depends on exactly 35 stitches.
Main Letter Strip
The end of the foundation chain where your starting tail hangs becomes the top tip of the S. The other end becomes the bottom tip.
Foundation: With magenta, ch 36, leaving a 6 in (15.2 cm) tail.
Row 1 (magenta): Sc in the 2nd ch from the hook and in each ch across. (35 sc)
Row 1 ends at the top tip, next to your starting tail. Work the last sc until 2 loops remain on the hook. Drop magenta, yo with white, and draw through. Cut magenta, leaving a 6 in (15.2 cm) tail.
Row 2 (white): Ch 2 (does not count as a st), turn. Puff in the first sc, *ch 1, sk next sc, puff in next sc; rep from * across, ending with a puff in the last sc. (18 puffs and 17 ch-1 sps = 35 sts)
The puffs go into sc 1, 3, 5, and so on up to sc 35. If your last puff doesn’t land in the last sc, recount Row 1.
Row 2 ends at the bottom tip. Fasten off white, leaving a 6 in (15.2 cm) tail. Join magenta with a sl st in the top of the last puff.
Row 3 (magenta): Ch 1, sc in the same puff, *sc in next ch-1 sp, sc in next puff; rep from * across. (35 sc: 18 in puffs + 17 in ch-1 sps)
Row 3 ends at the top tip. The strip is now straight and has three stripes: magenta, white puffs, and magenta. Don’t fasten off.
Counting from the top tip, place a marker in the 12th sc and another in the 24th sc of Row 3. These markers divide each long edge into three zones: the top curve (sts 1–12), the middle (sts 13–23), and the bottom curve (sts 24–35).
Flowers (make 3)
Round 1 (yellow): Make an MR, ch 1, and work 5 sc in the ring. Pull the ring tight and sl st to the first sc. (5 sc) Fasten off yellow.
Round 2 (cream): Join cream with a sl st in any sc. *(Ch 2, 2 dc, ch 2, sl st) all in the same sc, then sl st in the next sc; rep from * 4 more times, working the last sl st into the joining st. (5 petals)
Fasten off, leaving an 8 in (20.3 cm) tail for sewing. Each flower is about 0.6 in (1.5 cm) across.
Leaves (make 5)
With green, ch 4. Sc in the 2nd ch from the hook, hdc in the next ch, and sl st in the last ch. (3 sts) Fasten off, leaving a 6 in (15.2 cm) tail. Each leaf is about 0.4 in (1.0 cm) long.
Border
Border gauge: On the straight middle section, the border keeps the strip gauge of 5 sc per 1 in (2.5 cm). On the curves, increases and decreases change the length of each edge so the strip bends without ruffling.
Round 4 (magenta): Ch 1 and turn, so you’re working back across the tops of Row 3 from the top tip.
Side A (Row 3 edge, top tip to bottom tip):
- 3 sc in the first st (top tip corner).
- Sts 2–12 (top curve, outer edge): (2 sc in next st, sc in next st) 5 times, 2 sc in next st. (17 sc)
- Sts 13–23 (middle): sc in each of the next 11 sts. (11 sc)
- Sts 24–34 (bottom curve, inner edge): (sc in next st, sc2tog) 3 times, sc in next 2 sts. (8 sc)
- 3 sc in the last st (bottom tip corner).
Side A total: 3 + 17 + 11 + 8 + 3 = 42 sc.
Bottom tip end: Work 1 sc in the row end of Row 2. (1 sc)
Side B (foundation edge, bottom tip back to top tip), worked into the free loops of the foundation chain:
- 3 sc in the first free loop (bottom tip corner).
- Next 11 loops (bottom curve, outer edge): (2 sc in next loop, sc in next loop) 5 times, 2 sc in next loop. (17 sc)
- Next 11 loops (middle): sc in each. (11 sc)
- Next 11 loops (top curve, inner edge): (sc in next loop, sc2tog) 3 times, sc in next 2 loops. (8 sc)
- 3 sc in the last free loop (top tip corner).
Side B total: 3 + 17 + 11 + 8 + 3 = 42 sc.
Top tip end: Work 1 sc in the row end of Row 2. (1 sc) Join with a sl st to the first sc.
Round 4 total: 42 + 1 + 42 + 1 = 86 sc. Fasten off.
Why the math works: Each long edge starts with 35 sts: 1 corner st, 11 top-zone sts, 11 middle sts, 11 bottom-zone sts, and 1 more corner st. Each corner st becomes 3 sc. In the top zone, Side A grows from 11 to 17 sts while Side B shrinks from 11 to 8, so Side A becomes the outside of the curve. In the bottom zone the roles swap, so the strip bends the other way. Two opposite bends make an S. Both sides use the same three shaping blocks, so each side totals 42 and the letter stays balanced.
Checkpoint: The strip is now 1 in (2.5 cm) wide. When you lay it flat, the top and bottom thirds should already curl in opposite directions.
Final Blocking
- Weave in all ends on the letter, flowers, and leaves, except for the sewing tails.
- Draw an S that is 3.75 in (9.5 cm) tall and 2.75 in (7.0 cm) wide. Cover it with clear plastic on your blocking mat.
- Lay the letter on top, right side up, with the top tip at the upper right and the bottom tip curling to the lower left.
- Pin the outer edge of each curve first, with pins every 0.5 in (1.3 cm). Then ease the inner edges into place.
- Use a fingertip to round each puff so the white bumps stand up evenly.
- Mist the letter until it’s damp, not soaked. Let it dry completely, for at least 6 hours.
- Pin and mist the flowers and leaves flat at the same time.
- Sew on the appliqués. Place Flower 1 about 0.5 in (1.3 cm) in from the top tip, with 2 leaves tucked under its right side. Place Flower 2 at the upper left of the center curve, with 2 leaves under its left side. Place Flower 3 at the bottom tip, with 1 leaf under its lower left edge. Sew each leaf down at its base, then stitch each flower through the sl sts between its petals.
- Attach the key ring. Open the jump ring by twisting it sideways with the pliers. Pass it through the top tip corner so it catches 2 rows of fabric, hook on the end link of the chain, and close the jump ring fully.
Final Quality-Control Checklist
- Row 1 has 35 sc and measures 7 in (17.8 cm).
- Row 2 has 18 white puffs, with no magenta showing through.
- Row 3 has 35 sc.
- Round 4 has 86 sc: 42 on each long side and 1 at each end.
- The strip is 1 in (2.5 cm) wide all along.
- The letter measures 3.75 in (9.5 cm) x 2.75 in (7.0 cm).
- Each flower has 5 even petals and a yellow center.
- There are 5 leaves in place: 2, 2, and 1.
- The jump ring is fully closed and passes through 2 rows.
- All ends are woven in.
Troubleshooting
The S looks like a C. Both increase zones probably ended up on the same long edge. Frog Round 4 and check which side each zone is on.
The outer curves ruffle. Rework the border with a hook one size smaller, or use (2 sc in next st, sc in next 2 sts) on both outer zones for a gentler curve.
The inner curves pucker. Blocking usually fixes this. If it doesn’t, replace one sc2tog in each inner zone with 2 sc.
The puffs look flat or uneven. Pull every loop up to the same height before you close the puff.
Magenta shows in the puff row. Change colors on the final yo of the last stitch, not after it.
The key ring pulls at the corner. Move the jump ring one stitch inward so it catches more fabric.
Care
Hand wash in cool water with mild soap. Press out the water with a towel and dry the letter flat in its S shape. Remove the key ring before washing.

Final Notes
The whole letter comes from one measurement chain. At 5 sc per 1 in (2.5 cm), 35 sc make a 7 in (17.8 cm) strip. Three rows make it 0.75 in (1.9 cm) wide, and the border brings it to 1 in (2.5 cm). Shaping zones of 11 stitches turn the strip into two opposite curves, and blocking sets the letter at 3.75 in (9.5 cm) tall x 2.75 in (7.0 cm) wide.
Add the flowers, clip on the key ring, and your initial is ready to travel.
Happy crocheting!