

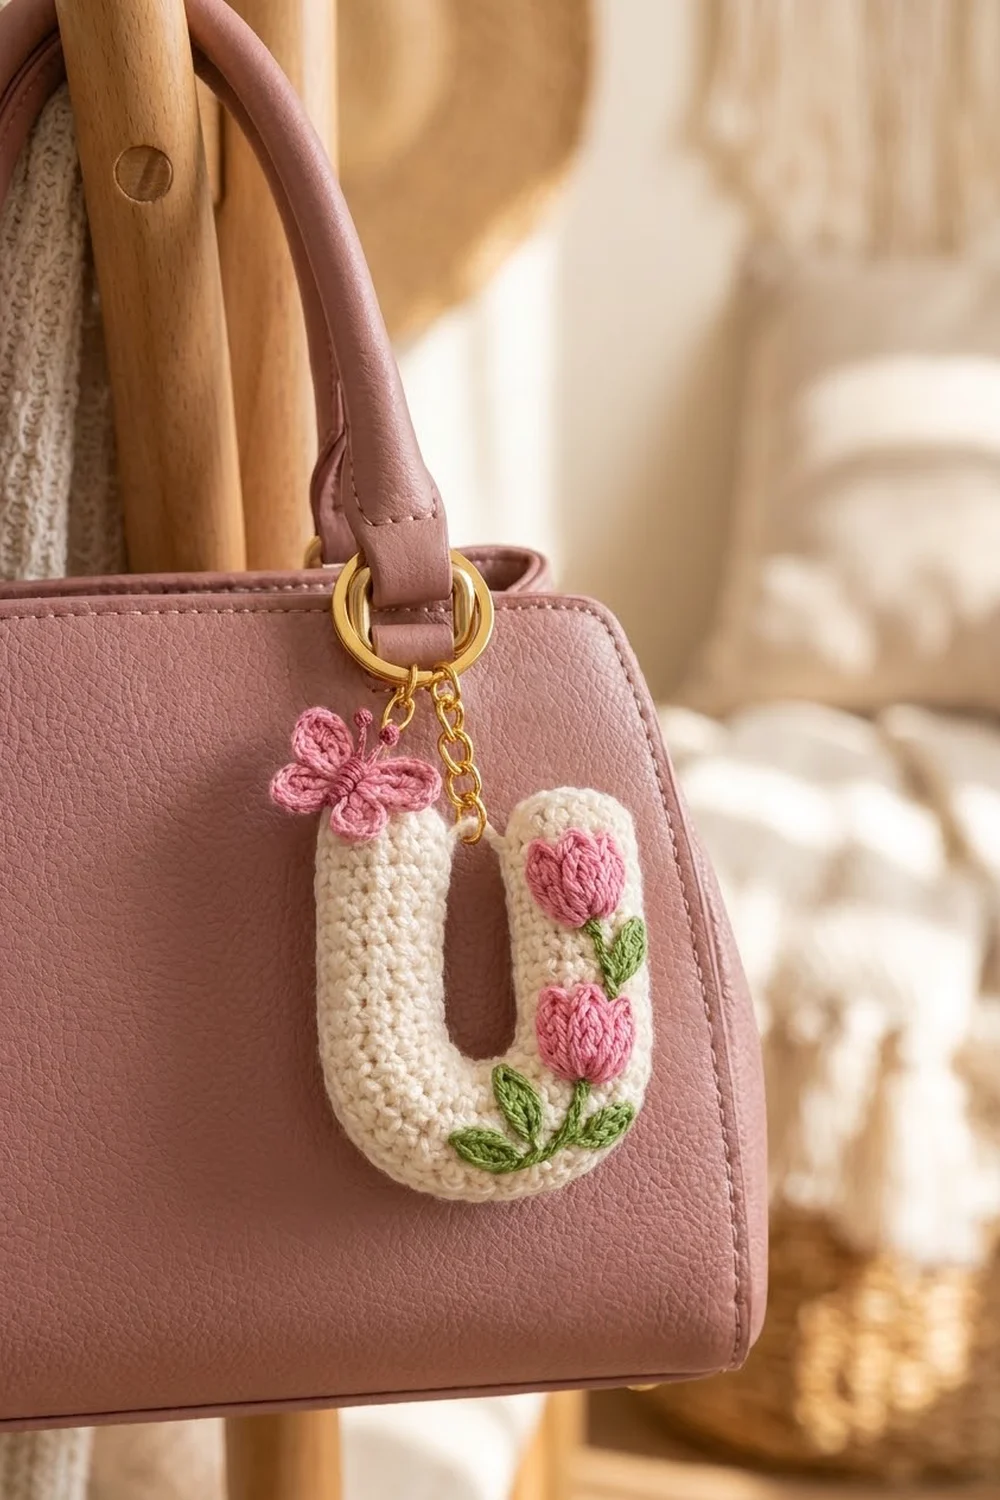
This little letter U keychain is a soft, lightly stuffed initial charm in creamy white. Two pink tulips with green stems and leaves grow up the right arm, and a small pink butterfly hangs at the top of the left arm. Everything clips onto a gold split key ring with a short gold chain, so it fits a handbag strap, a backpack, or your keys.
The colors are simple: cream for the letter, rose pink for the tulips and butterfly, and soft sage green for the leaves and stems. The style is cottage-garden sweet, but the construction stays neat. The letter is one seamless stuffed tube with no side seams and no border.
This pattern uses US crochet terms. The finished letter measures about 3.5 in (8.9 cm) tall and 3 in (7.6 cm) wide. Each arm is about 1 in (2.5 cm) wide and about 0.75 in (1.9 cm) thick.
How it’s made, in short:
1. Start at the top of the left arm with a magic ring and work in continuous rounds.
2. Bend the tube into the U curve with rounds that mix short and tall stitches.
3. Work up the right arm and close the top.
4. Crochet the small appliqués, sew them on, embroider the stems, and add the hardware.
Finished Size and Construction
- Finished size: 3.5 in (8.9 cm) tall x 3 in (7.6 cm) wide (letter only)
- Skill level: Easy-Intermediate
- Terminology: US crochet terms
- Yarn weight: DK (#3), cotton or cotton blend
- Hook: 2.75 mm (US C-2)
- Number of pieces: 1 stuffed letter, plus appliqués: 2 tulips and 4 leaves sewn on, and 1 butterfly clipped on
- Layout: a single letter U. The tulips sit on the right arm and lower curve. The butterfly hangs at the top of the left arm.
- Piece size: arms 1 in (2.5 cm) wide, opening between the arms 1 in (2.5 cm) wide
- Size before border: 3.5 in x 3 in (8.9 cm x 7.6 cm). This is also the final size.
- Border depth: none, 0 in (0 cm). The tube has no edge to border.
Materials
Yarn advice: Use a smooth DK cotton, either mercerized or matte. Cotton holds the letter shape well and shows the stitches clearly. Avoid fuzzy yarns, which blur the small petals.
- Cream (Color A): 10 g, about 24 m, for the letter and the hanging loop
- Rose pink (Color B): 3 g, about 7 m, for the tulips and butterfly
- Sage green (Color C): 3 g, about 7 m, for the leaves and embroidered stems
All quantities include a margin of about 20 percent for swatching and sewing tails.
Tools:
- 2.75 mm (US C-2) crochet hook
- A small handful of polyester fiberfill
- Stitch marker
- Tapestry needle
- 1 gold split key ring, 1 in (2.5 cm) across
- 1 gold chain, 1.25 in (3.2 cm) long
- 3 gold jump rings, 6 mm
- 2 pairs of flat-nose pliers
- Scissors and pins
Abbreviations (US Terms)
- ch: chain
- sl st: slip stitch
- sc: single crochet
- hdc: half double crochet
- dc: double crochet
- tr: treble crochet
- inc: 2 sc in the same stitch
- dec: single crochet 2 together (invisible decrease recommended)
- MR: magic ring
- st(s): stitch(es)
- rnd(s): round(s)
Special technique: graded round. A graded round mixes stitch heights. It runs from sl st on the inner edge up to dc on the outer edge. Because the outer side grows taller than the inner side, the tube bends toward the shorter side. Each sl st counts as 1 stitch.
Gauge and Checkpoints
Gauge: 6 sc and 6.5 rnds = 1 in (2.5 cm), in sc worked in the round with tight amigurumi tension. You can also check it flat: 12 sc x 13 rows = 2 in x 2 in (5.1 cm x 5.1 cm).
Test first: The letter is the only large piece, so the first arm works as your swatch. Work through Rnd 13, then check it.
Checkpoints:
- After Rnd 3: the domed tip measures about 1 in (2.5 cm) across when flattened.
- After Rnd 13: the arm is about 2 in (5.1 cm) long and 3 in (7.6 cm) around. Flattened and unstuffed, it is 1.5 in (3.8 cm) wide.
- After Rnd 27: the tube has turned a half circle, and both arm ends point the same way.
- Finished: 3.5 in (8.9 cm) tall x 3 in (7.6 cm) wide.
Too big? Go down to a 2.5 mm hook. Too small? Go up to a 3.0 mm hook. Don’t change the stitch counts, because that changes the proportions of the curve.
Letter U (make 1, Color A)
Work in continuous rounds. Don’t join the rounds. Move the marker up each round.
Left Arm
Rnd 1: MR, 6 sc in ring. (6 sts)
Rnd 2: Inc in each st around. (12 sts)
Rnd 3: *Sc in next st, inc in next st; repeat from * 5 more times. (18 sts)
Rnds 4–13: Sc in each st around. (18 sts per round, 10 rounds)
Check: the arm is about 2 in (5.1 cm) long. Stuff the domed tip lightly.
Set the inner edge:
1. Flatten the tube.
2. The marker should sit exactly on one side fold. That fold becomes the inner edge, the side that faces the opening of the U.
3. If the marker sits on the front face instead, sc in 1 to 4 more sts until the last stitch reaches the fold. These extra sts don’t change the stitch count or the round numbers.
4. Move the marker to the last st made.
Bottom Curve
Rnds 14–27 (graded rounds): Sl st in next 2 sts, sc in next 3 sts, hdc in next 2 sts, dc in next 4 sts, hdc in next 2 sts, sc in next 3 sts, sl st in next 2 sts. (18 sts per round, 14 rounds)
Count check: 2 + 3 + 2 + 4 + 2 + 3 + 2 = 18.
– The 4 dc (sts 8–11) sit on the outer fold.
– The 4 sl sts (the last 2 of one round plus the first 2 of the next) sit on the inner fold.
Work the sl sts loosely enough that you can find them on the next round. Add stuffing every 3 to 4 rounds so the bend sets evenly.
Check after Rnd 27:
– The tube has bent 180 degrees.
– The gap between the arms is about 1 in (2.5 cm).
– The outer curve is about 3 in (7.6 cm) across.
If the turn falls short, add 2 graded rounds. If it bends past parallel, remove 2.
Right Arm
Rnds 28–38: Sc in each st around. (18 sts per round, 11 rounds)
Stuff the right arm, then press it gently front to back so it matches the left arm.
Rnd 39: *Sc in next st, dec; repeat from * 5 more times. (12 sts)
Rnd 40: Dec 6 times. (6 sts)
Fasten off, leaving a 6 in (15.2 cm) tail. Weave the tail through the front loops of the last 6 sts, pull it closed, and hide the end inside the letter.
Hanging loop:
1. Thread 8 in (20.3 cm) of Color A onto the needle.
2. At the top of the right arm, take a stitch under the fabric about 0.25 in (0.6 cm) wide, leaving a loop about 0.25 in (0.6 cm) tall.
3. Add 2 more strands through the same spot.
4. Cover the strands with blanket stitch, secure the end, and bury it in the stuffing.
Tulip (make 2, Color B)
Foundation: Ch 4.
Row 1: Sc in 2nd ch from hook and in next 2 ch. Turn. (3 sts)
Row 2: Ch 1, inc in first st, sc in next st, inc in last st. Turn. (5 sts)
Row 3 (petals): (Hdc, dc) in first st, sl st in next st, (dc, tr, dc) in next st, sl st in next st, (dc, hdc) in last st. (9 sts: 2 + 1 + 3 + 1 + 2)
This row makes three petal points: a taller center petal between two side petals. The sl sts pinch in the gaps between them.
Fasten off, leaving a 10 in (25.4 cm) tail for sewing. Each tulip is about 0.85 in (2.2 cm) wide and 0.6 in (1.5 cm) tall.
Leaf (make 4, Color C)
Foundation: Ch 5.
Side 1: Sl st in 2nd ch from hook, sc in next ch, hdc in next ch, sc in last ch. (4 sts)
Side 2: Ch 1. Turn the piece and work along the other side of the foundation chain: sc in first ch, hdc in next ch, sc in next ch, sl st in last ch. (4 sts)
Tip: Sl st into the tip. (8 sts total, plus the ch-1)
Fasten off, leaving an 8 in (20.3 cm) tail. Each leaf is about 0.7 in (1.8 cm) long, with a pointed tip.
Butterfly (make 1, Color B)
Make a MR, then work all four wings into the ring:
- Upper wing: ch 3, 4 dc, ch 3, sl st in ring.
- Lower wing: ch 2, 3 hdc, ch 2, sl st in ring.
- Lower wing: ch 2, 3 hdc, ch 2, sl st in ring.
- Upper wing: ch 3, 4 dc, ch 3, sl st in ring.
That’s 14 working sts (4 + 3 + 3 + 4) plus the chains. Pull the ring fully closed.
Body: Wrap the yarn tail tightly 4 times around the center, between the upper and lower wings. Knot it at the back.
Antennae:
1. Thread a 4 in (10.2 cm) strand of Color B under the top of the body wraps, so both ends point up.
2. Tie an overhand knot on each end, about 0.25 in (0.6 cm) from the body.
3. Trim just above the knots.
The butterfly measures about 1.1 in (2.8 cm) wide x 0.9 in (2.3 cm) tall.
Border and Edge Finish
The letter is a closed tube, so it has no edge to border. Border depth is 0 in (0 cm), and the finished size stays 3.5 in x 3 in (8.9 cm x 7.6 cm).
The appliqués need no border either. Their last rows already form the edges: Row 3 of each tulip (9 sts) makes the petal edge, and the 8 sts of each leaf form its outline.
Why the math works: The size comes only from the round counts and the gauge. Nothing is added at the edges.
– Arms: 13 rounds at 6.5 rnds per in = 2 in (5.1 cm).
– Height: the curve adds an outer radius of 1.5 in (3.8 cm), so 2 + 1.5 = 3.5 in (8.9 cm).
– Width: 1 in arm + 1 in opening + 1 in arm = 3 in (7.6 cm).
Assembly
- Upper tulip: Pin it to the front of the right arm, about 0.25 in (0.6 cm) below the top, with the petals pointing up. Whipstitch around its edge through the front layer only.
- Lower tulip: Pin it to the right arm, just above where the curve begins. Sew it on the same way.
- Stems: Embroider them with Color C in backstitch. The upper stem runs down about 0.75 in (1.9 cm). The lower stem runs about 1.25 in (3.2 cm) and curves gently left along the bottom of the U.
- Leaves: Tack 1 leaf to the right of the upper stem. Tack 1 leaf to the right of the lower stem and 2 leaves to its left on the curve. Tack each leaf at both its base and its tip.
- Hardware:
- Join the hanging loop to the bottom link of the chain with a jump ring.
- Join the top of the chain to the key ring with a second jump ring.
- Sew the third jump ring to the back of the butterfly’s body, then hook it onto the key ring. The butterfly will hang beside the top of the left arm.
Final Blocking
- Mist the letter lightly with water until it’s damp, not wet.
- Lay it flat and press the arms gently to about 0.75 in (1.9 cm) thick.
- Pin the arms parallel, with a 1 in (2.5 cm) gap between them.
- Pin the tulip petals and butterfly wings open on a foam board.
- Let everything dry completely.
- Confirm the letter measures 3.5 in x 3 in (8.9 cm x 7.6 cm).
Final Quality-Control Checklist
- [ ] Letter measures 3.5 in (8.9 cm) x 3 in (7.6 cm)
- [ ] Both arms are the same length and 1 in (2.5 cm) wide
- [ ] Arms are parallel, with a 1 in (2.5 cm) gap
- [ ] 18 sts in every round from Rnd 3 through Rnd 38
- [ ] Stuffing is even and doesn’t show through the stitches
- [ ] Both tulips show three distinct petal points
- [ ] All 4 leaves are tacked at the base and the tip
- [ ] Stems are smooth and continuous
- [ ] All jump rings are fully closed
- [ ] All tails are hidden inside the letter
Troubleshooting
- Curve won’t bend enough: Keep the sl sts snug, or add 2 graded rounds.
- Curve twists sideways: The marker drifted off the inner fold. Re-center it before Rnd 14.
- Stuffing shows through: Go down a hook size and crochet more tightly.
- Arms are different lengths: Recount the rounds. Rnds 4–13 and Rnds 28–38 must match the counts above.
- Tulip petals blur together: Pull the sl sts between the petal groups snug.
- Butterfly curls: Pin it flat, steam it lightly, and let it dry.
Care
Spot clean with mild soap and cool water, then reshape the letter and let it air dry flat. Don’t machine wash it, because that can damage the hardware and the stuffing.
Final Notes
Here is how the measurements fit together:
– A gauge of 6 sc and 6.5 rnds per in gives an 18-st tube 3 in (7.6 cm) around.
– Each arm is 13 rounds, or 2 in (5.1 cm) long.
– The 14 graded rounds make a half-circle curve with a 1.5 in (3.8 cm) outer radius.
– Together they make a letter 3.5 in (8.9 cm) tall and 3 in (7.6 cm) wide.
Check your size at each checkpoint, then add the tulips, leaves, and butterfly and clip the letter to your favorite bag.
Happy crocheting!