

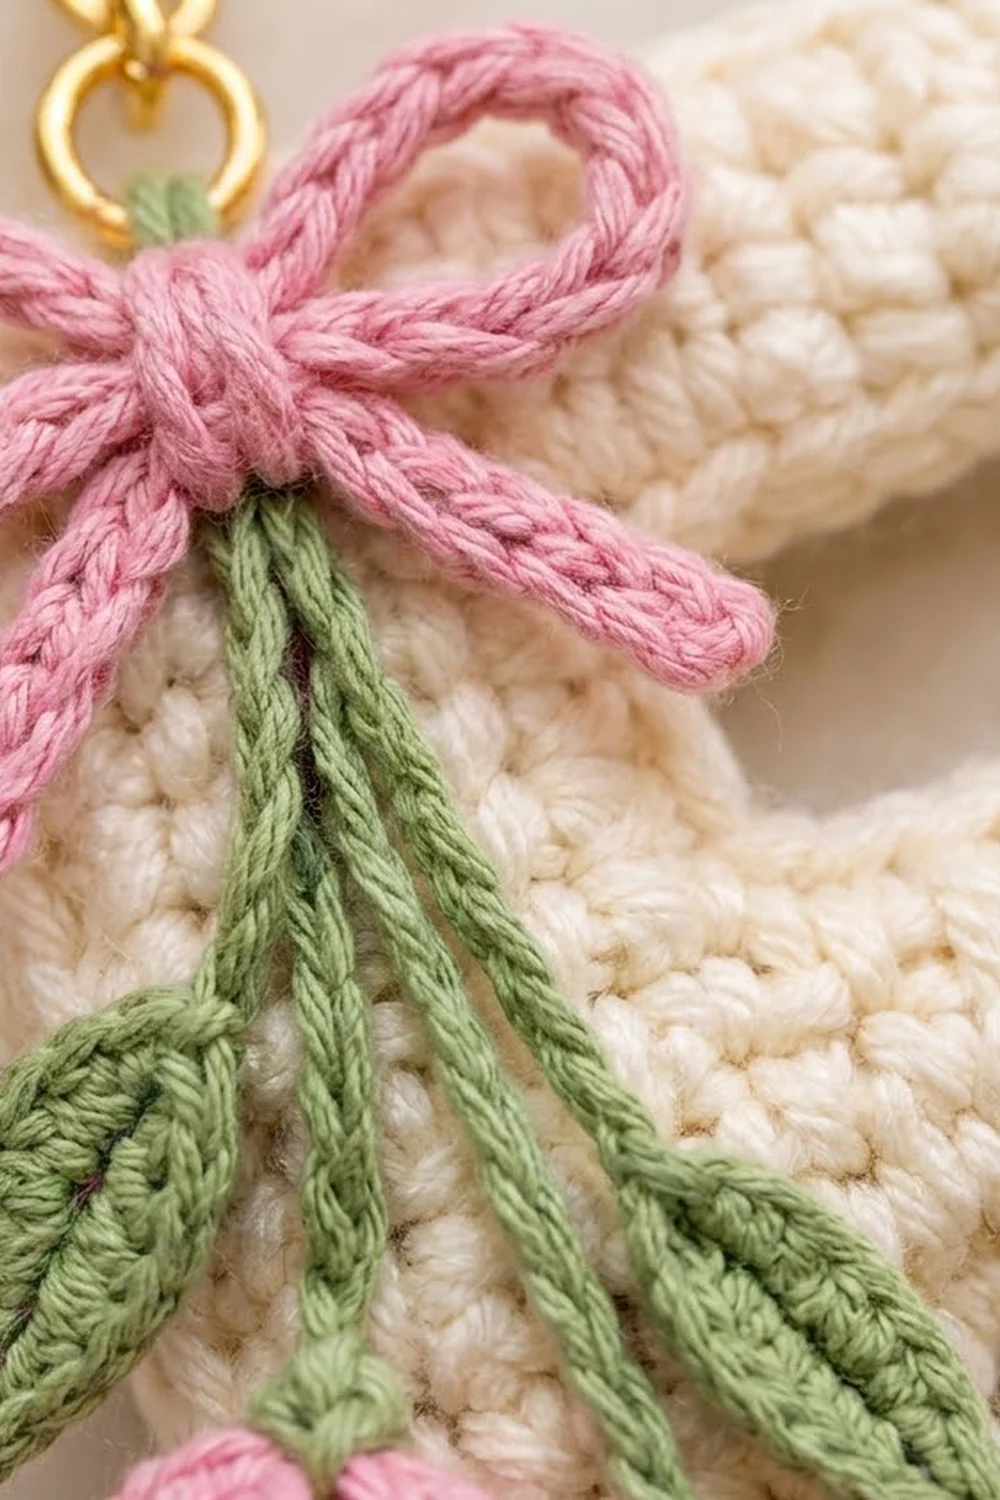
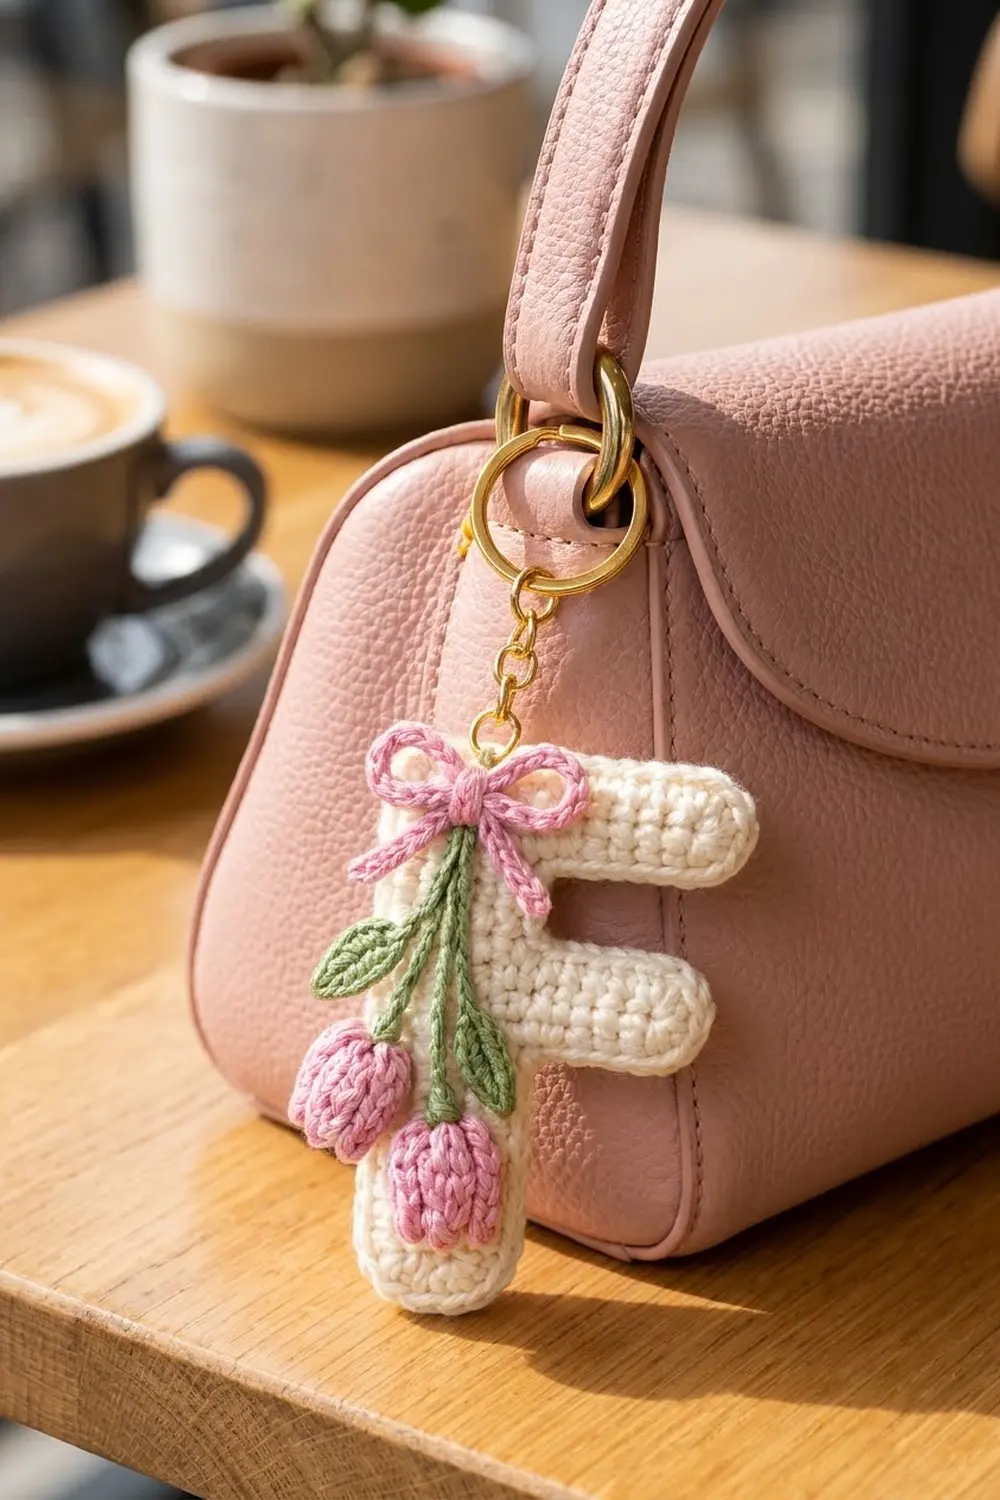
This little keychain is a padded capital “F” in soft cream cotton. A pink ribbon bow sits on the top corner, with two green stems, two pointed leaves and a pair of ridged pink tulip buds hanging from it. It looks sweet and vintage, and it’s sturdy enough for a handbag strap or a set of keys.
The palette is cream, blush pink and sage green, all in smooth DK-weight cotton. The cotton gives crisp stitch definition and holds its shape. The style is cottagecore: the letter is clean and graphic, and the flowers add a soft, romantic touch.
This pattern uses US crochet terms. The finished letter measures 2.8 in (7.1 cm) wide by 3.7 in (9.4 cm) tall, not counting the hardware.
You crochet two identical flat F shapes in rows and stack them. Then you join them with a round of single crochet, stuffing lightly before you close the gap, and add a slip-stitch rim. The bow, stems, leaves and tulips are made separately and sewn to the front. Finally you add a jump ring, a chain and a split ring.
Finished Size and Construction
- Finished size: 2.8 in (7.1 cm) wide × 3.7 in (9.4 cm) tall
- Skill level: Easy / advanced beginner
- Terminology: US
- Yarn weight: DK (#3 light), cotton
- Hook: 3.5 mm (E-4)
- Number of pieces: 1 finished letter (2 layers joined), plus 7 small appliqué parts
- Layout: Single padded letter. The appliqués go on the upper-left front.
- Piece size (each layer): 2.6 in (6.6 cm) × 3.5 in (8.9 cm)
- Size before border: 2.6 in (6.6 cm) × 3.5 in (8.9 cm)
- Border depth: about 0.1 in (0.3 cm) on each side
Materials
Use a smooth mercerized or matte cotton in DK weight, about 115 m per 50 g. Cotton makes firm, well-defined stitches that won’t fuzz on a keychain. Avoid acrylic blends that stretch, because the letter can lose its crisp outline.
- Cream (letter): 14 g / 32 m
- Pink (bow and tulips): 5 g / 11 m
- Green (stems and leaves): 3 g / 7 m
These quantities include a margin for the gauge test and the sewing tails.
Tools and notions:
– 3.5 mm (E-4) crochet hook
– Tapestry needle
– Small amount of polyester fiberfill
– 1 gold split keyring, 1 in (2.5 cm)
– 1 gold jump ring, 0.3 in (0.8 cm)
– Short gold chain, 1.5 in (3.8 cm)
– 2 pairs of flat-nose pliers
– Scissors and locking stitch markers
– Pins
Abbreviations (US Terms)
- ch – chain
- sl st – slip stitch
- sc – single crochet
- hdc – half double crochet
- dc – double crochet
- FPdc – front post double crochet
- MR – magic ring
- st(s) – stitch(es)
- rnd – round
Special stitch – FPdc: Yarn over and insert the hook from front to back to front around the post of the stitch below. Yarn over and pull up a loop, then (yarn over, pull through 2 loops) twice. Skip the stitch behind the FPdc.
Slip-stitch cord: Chain the number given. Sl st into the back bump of the 2nd ch from the hook and of each ch across. This gives a round, rope-like cord with 1 sl st fewer than the chain count.
Gauge and Checkpoints
Gauge: 5 sc and 6 rows = 1 in (2.5 cm) in sc rows with a 3.5 mm hook. On slip-stitch cord, 8 sl st = 1 in (2.5 cm).
Make one complete letter layer first and use it as your gauge test. Check it at these points:
- After Row 8 (stem only): 1 in (2.5 cm) wide × about 1.3 in (3.3 cm) tall
- After Row 13 (with middle arm): 2.2 in (5.6 cm) wide × about 2.2 in (5.6 cm) tall
- After Row 21 (complete layer): 2.6 in (6.6 cm) wide × 3.5 in (8.9 cm) tall
Too big? Go down to a 3.25 mm (D-3) hook.
Too small? Go up to a 3.75 mm (F-5) hook.
Height matters most. The letter should be about 1.35 times taller than it is wide so it reads as an F and not a square.
Letter Layer (Make 2, Cream)
Work in sc rows. Ch 1 at the start of each row does not count as a stitch. Each row ends with “turn.”
Foundation: Ch 6.
Row 1: Sc in the 2nd ch from the hook and in each ch across, turn. (5 sc)
Rows 2–8: Ch 1, sc in each st across, turn. (5 sc)
At the end of Row 8, don’t turn yet. Ch 7 for the middle arm, then turn.
Row 9: Sc in the 2nd ch from the hook and in the next 5 ch (6 sc), then sc in each of the 5 stem sts, turn. (11 sc)
Rows 10–13: Ch 1, sc in each st across, turn. (11 sc)
Row 13 ends at the stem side.
Row 14: Ch 1, sc in the first 5 sts, turn. Leave the remaining 6 sts unworked. (5 sc)
Rows 15–16: Ch 1, sc in each st across, turn. (5 sc)
At the end of Row 16, ch 9 for the top bar, then turn.
Row 17: Sc in the 2nd ch from the hook and in the next 7 ch (8 sc), then sc in each of the 5 stem sts, turn. (13 sc)
Rows 18–21: Ch 1, sc in each st across, turn. (13 sc)
Fasten off the first layer and weave in the tail. On the second layer, fasten off with a 40 in (101.6 cm) tail. You’ll use this tail for the joining round.
Edge stitch count (per layer, before joining):
| Edge | Stitches or row-ends |
|---|---|
| Bottom of stem | 5 |
| Left side | 21 |
| Top of top bar | 13 |
| Top bar end | 5 |
| Underside of top bar | 8 |
| Stem between arms | 3 |
| Top of middle arm | 6 |
| Middle arm end | 5 |
| Underside of middle arm | 6 |
| Stem below middle arm | 8 |
| Total | 80 |
Stack the two layers with both reading as a correct “F” from the front. Line up the edges and pin.
Tulip Buds (Make 2, Pink)
Each bud is worked in the round from the base up, with continuous spiral rounds. Mark the first stitch of each round.
Rnd 1: 6 sc in the MR. (6 sc)
Rnd 2: 2 sc in each st around. (12 sc)
Rnds 3–5: Sc in the next st, FPdc around the next st of the previous round, repeat 6 times. (12 sts)
The FPdc columns stack up to form the vertical ridges.
Stuff very lightly.
Rnd 6 (petal tips): (Sl st, ch 2, dc, ch 2, sl st) all in the next st, sl st in the next 3 sts, repeat 3 times. (3 petal points over 12 sts)
Fasten off with a 10 in (25.4 cm) tail.
Each bud measures about 0.8 in (2.0 cm) tall and 0.6 in (1.5 cm) wide.
Leaves (Make 2, Green)
Foundation: Ch 7.
- Sc in the 2nd ch from the hook, hdc in the next ch, dc in the next 2 ch, hdc in the next ch, and work 3 sc in the last ch.
- Working along the opposite side of the foundation: hdc in the next ch, dc in the next 2 ch, hdc in the next ch, sc in the last ch.
- Sl st to the first sc.
Total: 13 sts (5 on each side + 3 at the tip). The foundation chain forms the center vein line. Each leaf measures about 0.9 in (2.3 cm) long.
Fasten off with an 8 in (20.3 cm) tail.
Stems (Green)
- Stem A (long): Ch 17 and make a slip-stitch cord. (16 sl st, 2 in / 5.1 cm)
- Stem B (short): Ch 13 and make a slip-stitch cord. (12 sl st, 1.5 in / 3.8 cm)
Leave 8 in (20.3 cm) tails on both stems.
Bow (Pink)
Cord: Ch 41 and make a slip-stitch cord. (40 sl st, 5 in / 12.7 cm)
Tie the cord in a bow with two loops about 0.5 in (1.3 cm) long. The tied bow should measure about 1.2 in (3.0 cm) across. Tighten the knot and take a few stitches through it with the tail so it can’t loosen. Trim the cord ends to about 0.5 in (1.3 cm) and stitch them down so they don’t fray.
Border
The border has two rounds: a joining round through both layers, then a slip-stitch rim.
Border gauge: 1 sc into each stitch or row-end. At the 7 outer corners, work 3 sc into the corner stitch. Don’t add stitches at the 3 inner corners.
Rnd 1 (joining): With cream, working through both layers at once, join at the top-left corner and work clockwise as you look at the front:
- Top of top bar: 3 sc in the first st, sc in the next 11, 3 sc in the last st. (17)
- Top bar end: 1 sc in each row-end. (5)
- Underside of top bar: 3 sc in the first loop, sc in the next 7. (10)
- Stem between arms: 1 sc in each row-end. (3)
- Top of middle arm: sc in the next 5, 3 sc in the last st. (8)
- Middle arm end: 1 sc in each row-end. (5)
- Underside of middle arm: 3 sc in the first loop, sc in the next 5. (8)
- Stem below middle arm: 1 sc in each row-end. (8)
- Bottom of stem: 3 sc in the first loop, sc in the next 3, 3 sc in the last loop. (9)
- Left side: 1 sc in each row-end. (21)
Stop with about 10 sts left to work. Stuff lightly and evenly, pushing small tufts into the arms with the hook handle. Finish the round and sl st to the first sc. (94 sc)
Rnd 2 (rim): Sl st loosely in each st around. (94 sl st) Fasten off and hide the tail inside the stuffing.
Why the math works:
– The 80 edge stitches match the table above exactly, one sc each.
– The 7 outer corners each add 2 stitches (3 sc worked into 1 stitch), so 80 + 14 = 94.
– On the side edges, 1 sc per row-end gives 6 sc per inch, slightly more than the 5 sc per inch of the stitch edges. That small excess lets the rim curve over the stuffing and makes the soft, rounded edge, without ruffling.
– Inner corners need no increases because they naturally pull inward.
Assembly
- Pin the bow to the top-left corner so the knot sits on the stem, about 0.3 in (0.8 cm) below the top edge. Let one loop overlap the top bar.
- Tuck the top ends of Stem A and Stem B under the bow knot and sew them in place.
- Let the stems angle slightly left and down along the stem of the F. Tack them down every 0.4 in (1.0 cm) with matching green yarn.
- Sew one leaf to the left side of the stems about 0.6 in (1.5 cm) below the bow, so it overhangs the left edge of the letter. Sew the second leaf to the right side, about 1 in (2.5 cm) below the bow.
- Push the end of Stem B into the petal opening of one bud and close the top with a few stitches. Repeat with Stem A and the second bud. Tack each bud to the letter at its upper half so the rounded base hangs freely below the stem edge.
- Open the jump ring with two pliers. Pass it through Rnd 1 at the top-left corner, behind the bow. Thread on one end of the chain and close the ring. Attach the split ring to the other end of the chain.
Final Blocking
- Lightly mist the letter with water. Don’t soak it, or the stuffing will hold moisture.
- Pinch the corners and arm ends into soft curves with your fingers.
- Pin the letter face up on a foam board, checking that it measures 2.8 in (7.1 cm) × 3.7 in (9.4 cm).
- Lay the leaves flat and pin their tips into a point.
- Hang the tulips over the board edge, or prop them so they stay rounded.
- Let everything dry completely, then remove the pins.
Final Quality-Control Checklist
- [ ] The letter reads as an F from the front, with the middle arm shorter than the top bar.
- [ ] The finished size is 2.8 in (7.1 cm) × 3.7 in (9.4 cm).
- [ ] The joining round has 94 sc and the rim has 94 sl st.
- [ ] The stuffing is even, with no lumps or empty corners.
- [ ] The bow knot is stitched so it can’t untie.
- [ ] Stems, leaves and buds are secure and can’t snag on a tug.
- [ ] The jump ring is fully closed with no gap.
- [ ] All tails are hidden inside the letter.
Troubleshooting
- The letter looks square: Your row gauge is too short. Check that you have 6 rows per inch, or add one row each to Rows 2–8 and Rows 18–21 on both layers.
- The edges ruffle: Work Rnd 1 with a 3.25 mm (D-3) hook along the row-end edges only.
- Gaps at the inner corners: Pull the yarn snug when you work the first stitch after each inner corner.
- The tulip ridges are flat: Make sure you work the FPdc around the post, not into the top of the stitch.
- The bow droops: Sew both loops down at their outer tips.
- Stuffing shows through: Use a smaller hook for both layers, or stuff less.
Care
Spot clean with a damp cloth and mild soap, then let it air dry flat. Don’t put it in the machine, because the metal hardware and stuffing can be damaged.
Final Notes
Here is the measurement chain to keep things on track:
- Gauge is 5 sc and 6 rows = 1 in (2.5 cm).
- Each layer is 13 sts wide and 21 rows tall, so it measures 2.6 in (6.6 cm) × 3.5 in (8.9 cm).
- The 80 edge stitches plus 14 corner stitches give 94 in the joining round.
- The two border rounds add about 0.1 in (0.3 cm) on each side, for a finished size of 2.8 in (7.1 cm) × 3.7 in (9.4 cm).
Once you know the method, you can chart any initial the same way. This one makes a lovely small gift.
Happy crocheting!