

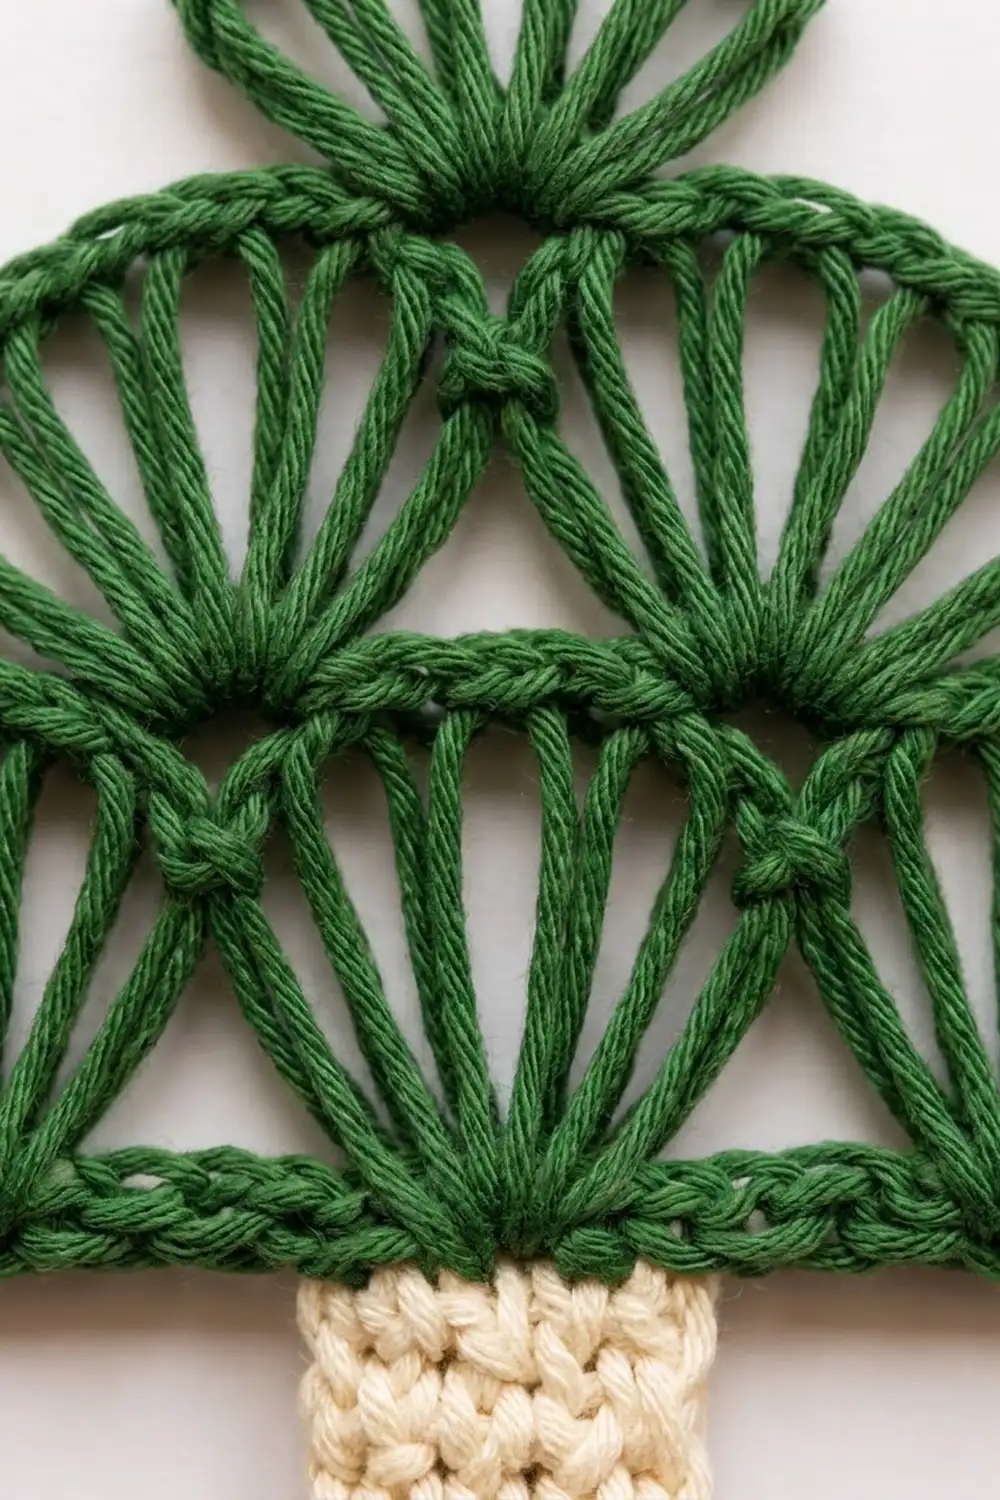
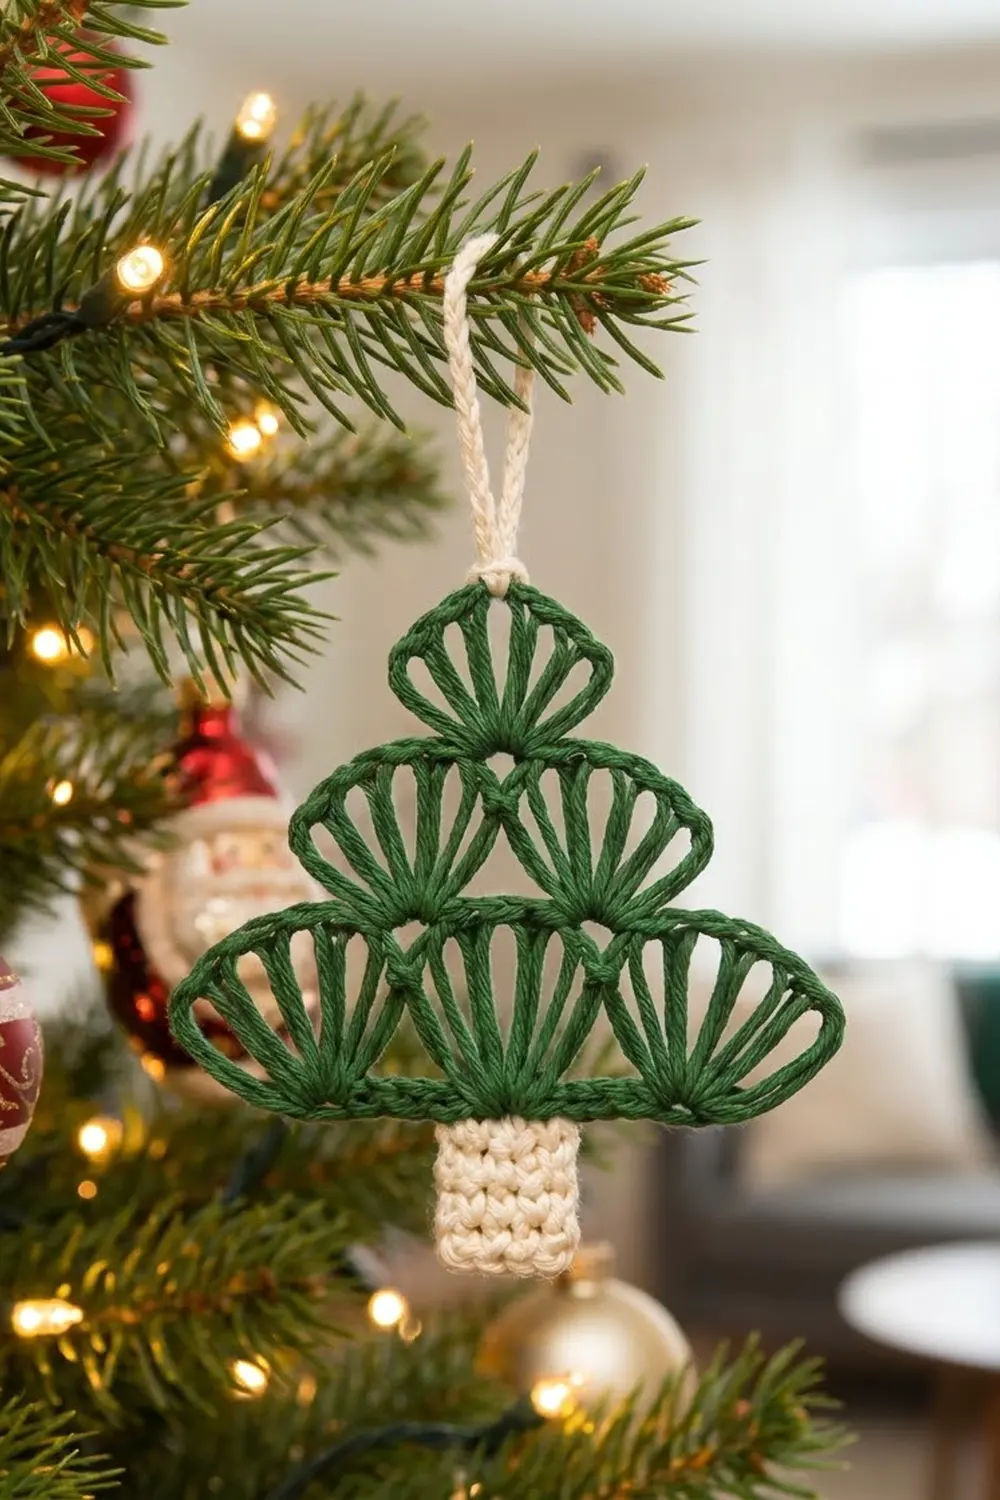
This little tree ornament is built from open shell fans. Three fans make the bottom tier, two sit in the dips above them, and one fan forms the top, so the outline reads as a Christmas tree. Each fan has long treble spokes with small gaps between them, edged with a smooth curve of single crochet. A tight cream trunk and a cream hanging loop finish it off.
The colors are classic and quiet: deep forest green for the tree and warm cream for the trunk and loop. The style is rustic and simple. It looks great on a real tree, tied to a gift, or hung in a window.
The pattern uses US crochet terms. The finished ornament is about 5 in (12.7 cm) wide and 4.8 in (12.2 cm) tall from the trunk to the top fan. The loop adds about 2.5 in (6.4 cm), for a total hanging height of about 7.3 in (18.5 cm).
Construction is simple. You work the tree flat in rows from the bottom up, starting with a single crochet base row. Fan rows and outline rows alternate, and each tier has one fewer fan than the tier below. Then you work the trunk in cream directly into the underside of the base chain and chain the loop from the top fan. There’s nothing to sew.
Finished Size and Construction
- Finished size: about 5 in (12.7 cm) wide x 4.8 in (12.2 cm) tall, plus a 2.5 in (6.4 cm) loop
- Skill level: Easy / advanced beginner
- Terminology: US crochet terms
- Yarn weight: Worsted (#4), cotton or cotton blend
- Hook: 4.0 mm (US G-6)
- Number of pieces: 1 (the trunk and loop are worked directly onto the tree)
- Layout: 3 tiers of shell fans (3 + 2 + 1)
- Piece size: tree section 5 in (12.7 cm) wide x 3.5 in (8.9 cm) tall; trunk 1.25 in (3.2 cm) wide x 1.3 in (3.3 cm) tall
- Size before outline: after Row 2, about 4.75 in (12.1 cm) wide x 1.25 in (3.2 cm) tall
- Border depth: the single crochet outline on each fan adds about 0.2 in (0.5 cm)
Materials
Use a smooth, tightly twisted worsted cotton. It gives the fans clear spokes and lets them block flat. Acrylic works too, but the fans will curl more and need firmer blocking. Avoid fuzzy or brushed yarns, which blur the gaps between spokes.
- Color A, forest green: about 12 g / 24 m (26 yd)
- Color B, cream: about 4 g / 8 m (9 yd)
These amounts include a margin of about 20% for your gauge swatch and weaving in ends.
Tools:
– 4.0 mm (US G-6) crochet hook
– Tapestry needle
– Scissors
– Stitch markers (2–3)
– Blocking mat and rust-proof pins
– Spray bottle with water
– Ruler or tape measure
Abbreviations (US Terms)
- ch – chain
- sl st – slip stitch
- sc – single crochet
- tr – treble crochet
- sp – space
- st(s) – stitch(es)
- sk – skip
Special stitch – Fan: In the stitch indicated, work [tr, ch 1] 6 times, then tr. That’s 7 tr and 6 ch-1 sps, all in one stitch.
Gauge and Checkpoints
Gauge: 16 sc and 18 rows = 4 in (10.2 cm) with a 4.0 mm hook. Tension matters less here than for a garment, but it controls how the fans fit together. If your fans are too wide, they crowd and ripple. If they’re too narrow, you’ll see gaps between tiers.
Test first: Work Rows 1–3 as a test piece. Measure it before you go on. If it matches, keep going on the same piece.
Checkpoints:
– After Row 1: 4.75 in (12.1 cm) wide
– After Row 2: each fan about 1.75 in (4.4 cm) across the tips; the 3 fans should just touch
– After Row 3: 5 in (12.7 cm) wide x 1.5 in (3.8 cm) tall
– After Row 5: 2.5 in (6.4 cm) tall
– After Row 7: 3.5 in (8.9 cm) tall
– After the trunk: 4.8 in (12.2 cm) total height
If your piece is too big: go down to a 3.75 mm (US F-5) hook, or work your trebles a little more snugly. If it’s too small, or the fans cup: go up to a 4.5 mm (US 7) hook.
Tree Pattern
Base Row
With Color A, ch 20.
Row 1: Sc in the 2nd ch from the hook and in each ch across. Turn. (19 sc)
This row is the straight, braided-looking line at the bottom of the tree. Keep the chain loose so the free loops are easy to reach later when you work the trunk.
Tier 1: Three Fans
Row 2: Ch 1. Sc in the first sc. Sk 2 sc, Fan in the next sc, sk 2 sc, sc in the next sc. Repeat from * 2 more times. Turn.
(3 Fans and 4 anchor sc: 4 sc + 21 tr + 18 ch-1 sps)
Check the math: 1 sc + 3 x (2 skipped + 1 Fan st + 2 skipped + 1 sc) = 1 + 18 = 19 sts used. Every stitch of Row 1 is accounted for.
Lay the work flat. Each fan should open into a half circle, with all 7 spokes coming from one base point.
Row 3 (outline row): Ch 1. Sc in the first sc. Sc in the first tr of the next Fan, [2 sc in the next ch-1 sp, sc in the next tr] 6 times, sc in the next anchor sc. Repeat from * 2 more times. Turn.
Count for this conversion row: (4 sc + 21 tr) = 25 sts worked 1 per existing stitch, + (18 ch-1 sps x 2 extra sc) = 36. 25 + 36 = 61 sc.
Each fan now has 19 outline sc around its curve, with one anchor sc between fans. Mark these positions:
– Stitch 1: end anchor
– Sts 2–20: Fan 1 outline (center = st 11)
– St 21: valley between Fan 1 and Fan 2
– Sts 22–40: Fan 2 outline (center = st 31)
– St 41: valley between Fan 2 and Fan 3
– Sts 42–60: Fan 3 outline (center = st 51)
– St 61: end anchor
Put stitch markers in sts 11, 21, 31, 41, and 51. That makes the next row very easy.
Tier 2: Two Fans
Row 4: Sl st in the first 10 sts. Ch 1, sc in the next st (st 11, the center of the first fan). Sk 9 sts, Fan in the next st (the valley st), sk 9 sts, sc in the next st (the center of the next fan). Repeat from * once more. Leave the remaining 10 sts unworked. Turn.
(2 Fans and 3 anchor sc: 3 sc + 14 tr + 12 ch-1 sps)
Check the math: 1 + 2 x (9 + 1 + 9 + 1) = 41 sts, from st 11 to st 51. The new fans sit right in the dips between the bottom fans, and the anchor sc sit on the tips of the fans below.
Row 5 (outline row): Ch 1. Sc in the first sc. Sc in the first tr of the next Fan, [2 sc in the next ch-1 sp, sc in the next tr] 6 times, sc in the next anchor sc. Repeat from * once more. Turn.
Count: (3 sc + 14 tr) = 17 sts worked 1 per existing stitch, + (12 ch-1 sps x 2 extra sc) = 24. 17 + 24 = 41 sc.
Positions: st 1 is an anchor, sts 2–20 are Fan A (center st 11), st 21 is the valley, sts 22–40 are Fan B (center st 31), and st 41 is an anchor. Mark sts 11, 21, and 31.
Tier 3: Top Fan
Row 6: Sl st in the first 10 sts. Ch 1, sc in the next st (st 11). Sk 9 sts, Fan in the next st (st 21), sk 9 sts, sc in the next st (st 31). Turn.
(1 Fan and 2 anchor sc: 2 sc + 7 tr + 6 ch-1 sps)
Row 7 (outline row): Ch 1. Sc in the first sc. Sc in the first tr, [2 sc in the next ch-1 sp, sc in the next tr] 6 times, sc in the last sc. Fasten off, leaving a 6 in (15.2 cm) tail.
Count: (2 sc + 7 tr) = 9 sts worked 1 per existing stitch, + (6 ch-1 sps x 2 extra sc) = 12. 9 + 12 = 21 sc.
The top fan’s center stitch is st 11 of this row. Mark it for the loop.
Trunk
Turn the tree upside down so the free loops of the foundation chain face you. The foundation has 19 chain loops. The center one is loop 10, so the trunk uses loops 8 through 12.
Row 1: Join Color B with a sl st in free loop 8. Ch 1. Sc in the same loop and in the next 4 loops. Turn. (5 sc)
Rows 2–6: Ch 1. Sc in each sc across. Turn. (5 sc)
Fasten off after Row 6, leaving an 8 in (20.3 cm) tail. The trunk measures about 1.25 in (3.2 cm) wide x 1.3 in (3.3 cm) tall. It hangs straight down from the center of the base row, as in the photo.
Border: Fan Outlines and Hanging Loop
This ornament doesn’t need a separate border round. The edging is the three built-in outline rows (Rows 3, 5, and 7), which give every fan its smooth, solid edge. Here’s the math behind them.
Border gauge: each fan’s curve takes 19 sc. That’s 7 sc in the treble tops plus 12 sc in the six ch-1 sps. Seven trebles fanned into one stitch form a half circle. Its outer curve is about 2.4 in (6.1 cm) long, and 19 sc at 16 sc per 4 in (10.2 cm) is 4.75 in (12.1 cm). That’s more than the curve itself, but the sc sit at an angle around the curve and also pull the spokes slightly toward each other. The result is a firm, flat edge with no ruffles.
Counts per tier:
– Tier 1 (Row 3): 3 fans x 19 sc = 57, + 4 anchor sc = 61 sc
– Tier 2 (Row 5): 2 fans x 19 sc = 38, + 3 anchor sc = 41 sc
– Tier 3 (Row 7): 1 fan x 19 sc = 19, + 2 anchor sc = 21 sc
Why the math works: each tier’s count is (fans x 20) + 1. That puts every fan center at st 11 + 20n and every valley at st 21 + 20n. In each fan row, (9 skipped + 1 Fan + 9 skipped + 1 sc) uses exactly 20 sts. That’s why every new fan lands precisely in a valley and every anchor lands on a fan tip.
Hanging loop: With Color B, join with a sl st in st 11 of Row 7, the center top of the highest fan. Ch 25. Sl st in the same st. Fasten off. The chain folds into a loop about 2.5 in (6.4 cm) tall. If you want the thicker, braided look in the photo, hold Color B doubled and use a 5.0 mm (US H-8) hook just for the loop.
Final Blocking
- Weave in all ends. Run each tail through the outline sc of the same color so it can’t be seen through the open fans.
- Mist the ornament with water until it’s damp but not dripping.
- Lay it face up on the blocking mat.
- Pin the base row straight, measuring 4.75 in (12.1 cm) from end to end.
- Pin out the bottom of each fan curve so the spokes fan out evenly. The bottom tier should measure 5 in (12.7 cm) across.
- Pin the top fan so the tree is 3.5 in (8.9 cm) tall from the base row to the top of the outline.
- Pin the trunk into a neat rectangle, 1.25 in (3.2 cm) wide x 1.3 in (3.3 cm) tall.
- Lay the loop straight above the top fan.
- Leave it to dry completely, at least 6 hours, before unpinning.
For extra stiffness, brush on a light coat of diluted fabric stiffener before step 8.
Final Quality-Control Checklist
- Row 1 has 19 sc and lies straight.
- Every fan has exactly 7 tr coming from one base point.
- The outline rows have 61, 41, and 21 sc.
- Each tier-2 fan sits centered in a valley of tier 1, and the top fan sits centered in the valley of tier 2.
- The trunk is 5 sc wide, centered under foundation loop 10.
- The loop is attached at the exact center of the top fan.
- The tree is about 5 in (12.7 cm) wide and 4.8 in (12.2 cm) tall without the loop.
- All ends are woven in and none show through the gaps between spokes.
Troubleshooting
Fans ruffle or cup: Your trebles are too short or your ch-1 sps are too tight. Go up a hook size, or work ch 2 instead of ch 1 between trebles. Then work 3 sc in each sp in the outline rows, which makes 25 sc per fan. Keep the count the same on every fan.
Fans overlap heavily: The trebles are too long. Go down a hook size, or pull each loop up only to the height of the hook.
Next tier is off-center: Check that you skipped exactly 9 sts on each side of the Fan stitch. Recount the outline row and move your markers if needed.
Outline row pulls the fan inward: Work the 2 sc in each sp more loosely. Don’t skip the sc in the treble tops.
Trunk leans to one side: Count the foundation loops again from both ends. Loop 8 should have exactly 7 loops to its right.
Sl sts at the start of Rows 4 and 6 show: Work them loosely through the back loops only, so they sink into the outline.
Care
Hand wash in cool water with mild soap and lay flat to dry, pinning it back to shape if needed. Store it flat or hang it by its loop so the fans don’t get crushed.
Final Notes
The size of this ornament comes from one simple chain of measurements. A 19-sc base row at 16 sc per 4 in (10.2 cm) gives 4.75 in (12.1 cm). Three 7-treble fans spread that to 5 in (12.7 cm). The outline rows of 61, 41, and 21 sc follow the (fans x 20) + 1 rule, so each smaller tier lines up exactly in the valleys below. With the tree at 3.5 in (8.9 cm) and the trunk at 1.3 in (3.3 cm), you get a 4.8 in (12.2 cm) ornament. The 2.5 in (6.4 cm) loop brings the hanging height to 7.3 in (18.5 cm). Get the base row right, count each outline row, and the tree will line up.
Happy crocheting!