

The Snowbloom Tree is a small, flat Christmas ornament made from six flower motifs joined into a tree shape. Each motif has a cream six-petal flower inside a cranberry-red scalloped frame. Joined together, the scallops give the tree a soft, lacy outline, and the small gaps between the motifs let the light through when it hangs on a branch.
The color scheme is simple: deep red for the frames and cream for the flowers, trunk, and hanging loop. The look is traditional and Scandinavian-inspired, and it suits a natural tree, a gift tag, or a window hanging.
This pattern uses US crochet terms. The finished ornament measures about 6 in (15.2 cm) wide and 6.25 in (15.9 cm) tall, not counting the hanging loop. With the loop it is about 7.75 in (19.7 cm) tall.
To make it, you work one complete motif first, then add the other five with a join-as-you-go method on their last round. This gives you one connected piece with no sewing. Then you work a short cream trunk from the bottom center motif and add a covered hanging loop at the top.
Finished Size and Construction
- Finished size: 6 in (15.2 cm) wide × 6.25 in (15.9 cm) tall; 7.75 in (19.7 cm) tall with the loop
- Skill level: Easy+ (you should be comfortable with clusters and working in rounds)
- Terminology: US
- Yarn weight: Sport (#2), cotton or cotton blend
- Hook: 2.75 mm (C-2)
- Number of pieces: 6 flower motifs joined as you go, plus a trunk and a loop worked directly onto them
- Layout: triangle of rows with 3, 2, and 1 motifs (bottom to top)
- Motif size: 2 in (5.1 cm) from lobe tip to opposite lobe tip
- Size before border: 6 in (15.2 cm) × 5.25 in (13.3 cm) for the joined triangle
- Border depth: no separate border is added. The scalloped red Round 4 is the finished edge, about 0.25 in (0.6 cm) deep.
Materials
Use a smooth, mercerized cotton in sport weight. Cotton gives crisp petals and clear scallops, and it blocks flat. Pick a cream that is clearly lighter than your red, so the flowers stand out.
- Color A, Cranberry Red: 25 g, about 75 m
- Color B, Cream: 15 g, about 45 m
Tools:
– 2.75 mm (C-2) crochet hook
– Tapestry needle
– Scissors
– Stitch markers (2–3)
– Ruler or tape measure
– Blocking mat and rust-proof pins
– Spray bottle with water
These quantities include a margin of about 20% for gauge differences and a test motif.
Abbreviations (US Terms)
- ch – chain
- sl st – slip stitch
- sc – single crochet
- hdc – half double crochet
- dc – double crochet
- sp – space
- st(s) – stitch(es)
- rep – repeat
- RS / WS – right side / wrong side
Special stitches:
- Petal cluster (pc): *Yarn over, insert hook in the stitch, yarn over and pull up a loop, yarn over and pull through 2 loops; rep from * 2 more times in the same stitch (4 loops on hook). Yarn over and pull through all 4 loops.
- Beginning petal cluster (beg pc): Ch 2. *Yarn over, insert hook in the same stitch, yarn over and pull up a loop, yarn over and pull through 2 loops; rep from * once more (3 loops on hook). Yarn over and pull through all 3 loops.
- Standing sc: With a slip knot on your hook, insert the hook in the stated stitch or space and work a sc as normal.
- Drop-loop join: Remove your hook from the working loop. Insert the hook from front to back through the center dc of the matching lobe on the finished motif. Pick up the dropped loop and pull it through. This joins the motifs without adding a stitch.
Gauge and Checkpoints
Gauge matters because six motifs add up. A difference of 0.125 in (0.3 cm) per motif becomes 0.375 in (1 cm) across the bottom row of the tree.
Make one complete test motif before you start. Check it at each stage, measuring flat and unstretched:
- After Round 1: 0.5 in (1.3 cm) across
- After Round 2: 1.25 in (3.2 cm) across, measured from petal tip to opposite petal tip
- After Round 3: 1.5 in (3.8 cm) across
- After Round 4: 2 in (5.1 cm) across, measured from lobe tip to opposite lobe tip
If your motif is too big (2.25 in / 5.7 cm or more), change to a 2.5 mm hook.
If your motif is too small (1.75 in / 4.4 cm or less), change to a 3.0 mm hook.
If Round 4 ruffles, your scallops are too tight compared to Round 3, so loosen up on the dc. If it cups, tighten your hdc slightly. A good test motif can become Motif A of your tree.
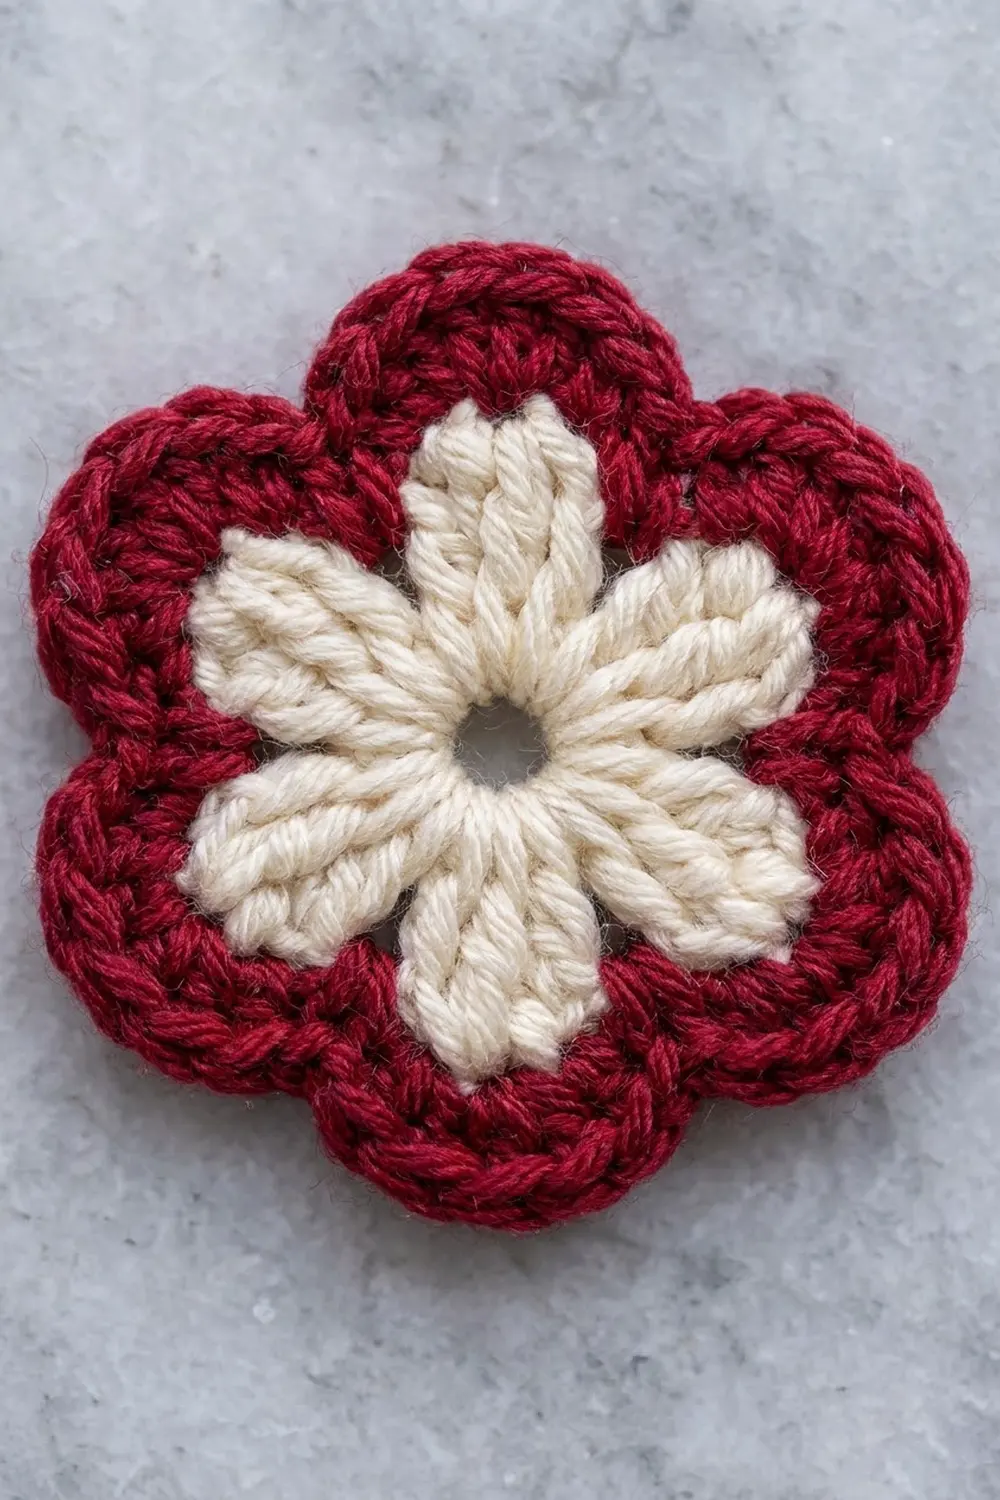
Flower Motif (Make 6)
Rounds 1–2: Cream Flower
With Color B (Cream):
Round 1: Ch 4 and sl st to the first ch to form a ring. Ch 1, then work 12 sc into the ring. Join with a sl st to the first sc. (12 sc)
Work over the ring snugly but don’t close it. The small open hole in the center is part of the design.
Round 2: Beg pc in the same st as the join, ch 2, skip the next sc. Pc in the next sc, ch 2, skip the next sc; rep from * 4 more times. Join with a sl st to the top of the beg pc. (6 petal clusters and 6 ch-2 sps)*
Fasten off Color B and weave in the end on the WS.
Rounds 3–4: Red Frame and Scallops
Round 3: Join Color A (Red) with a standing sc in any ch-2 sp, then work 2 more sc in the same sp. Sc in the top of the next pc, 3 sc in the next ch-2 sp; rep from * 4 more times. Sc in the top of the last pc and join with a sl st to the first sc. (24 sc: 6 groups of 3 sc in the spaces, plus 6 sc on top of the clusters)*
Each 4-stitch section now has a cluster-top sc, which becomes the lobe tip, and a middle sc in the space, which becomes the valley.
Round 4 (scallop round, first motif only): Sl st in the next sc, which is the middle sc of the first 3-sc group. This sl st is the first valley. Hdc in the next sc, 3 dc in the next sc (the cluster-top sc), hdc in the next sc, sl st in the next sc (the valley). Rep from * 5 more times, ending the last rep at . Join with a sl st to the first sl st. (36 sts: 6 sl st, 12 hdc, 18 dc, which makes 6 lobes of 5 sts each, with a sl st between each lobe)*
Fasten off and weave in the ends. Each lobe sits directly behind one petal, so the red frame follows the flower shape.
Stitch check: 6 lobes × (1 hdc + 3 dc + 1 hdc) = 30 sts, plus 6 valley sl sts = 36 sts. The center dc of each lobe is the lobe tip. All joins are made there.
Lobe Positions
Lay a motif RS up with two lobes pointing straight out to the left and right. Use clock positions for the lobes: 3 (right), 1 (upper right), 11 (upper left), 9 (left), 7 (lower left), and 5 (lower right). There is a valley at 12 o’clock and another at 6 o’clock.
Make All Pieces and Join As You Go
Every motif uses the same Rounds 1–3. Motif A uses the plain Round 4 above. Motifs B–F use the joining Round 4 below.
Color totals: 6 cream flowers (Rounds 1–2) and 6 red frames (Rounds 3–4).
Layout:
        [ F ]
     [ D ] [ E ]
  [ A ] [ B ] [ C ]
Join table (lobe on new motif → lobe on finished motif):
| New motif | Joins |
|---|---|
| A | none |
| B | 9 → A’s 3 |
| C | 9 → B’s 3 |
| D | 7 → A’s 1; 5 → B’s 11 |
| E | 9 → D’s 3; 7 → B’s 1; 5 → C’s 11 |
| F | 7 → D’s 1; 5 → E’s 11 |
That makes 9 joins in total, which is 18 joined lobes and 18 free lobes.
Joining
Joining Round 4: Start exactly like the plain Round 4, with a sl st into the first valley. The joining lobes always come next in your round and in the order given in the table. Hold the new motif and the finished motif RS up, side by side.
Joining lobe: Hdc in the next sc, 2 dc in the cluster-top sc, then do a drop-loop join into the center dc of the matching lobe on the finished motif. Then work 1 more dc in the same cluster-top sc, hdc in the next sc, and sl st in the next sc (valley).
The stitch count does not change. The joined lobe still has hdc, 3 dc, and hdc, and the drop-loop join adds no stitch. Each joined motif still has 36 sts.
When the joining lobes are done, work the rest of the lobes as plain lobes, then join to the first sl st as before.
Stitch-to-stitch logic: Each join connects one lobe-tip dc to one lobe-tip dc. Neighbors in the same row join at their 3 and 9 o’clock tips. Diagonal neighbors join at their 1/7 or 11/5 tips. Because every tip is 60 degrees from the next one, the motifs fall into a triangle grid, and you get a small triangular opening between every group of three.
Tension: Pull the dropped loop up to the height of your dc before you continue. If it is too tight, the lobes pucker toward each other. If it is too loose, a gap opens. Don’t twist the finished motif: both pieces stay RS up.
Size checkpoints:
– After A–B–C: the bottom row is 6 in (15.2 cm) wide, which is 3 motifs × 2 in (5.1 cm).
– After all six: the triangle is 6 in (15.2 cm) wide × 5.25 in (13.3 cm) tall.
Border: Outer Edge, Trunk, and Hanging Loop
Outer edge (no added round)
The scalloped Round 4 is the finished border. An extra round would hide the scallops and fill in the outline, so none is worked.
Edge gauge: one lobe is 5 sts plus a valley sl st, which is 6 sts over about 1 in (2.5 cm) of edge.
Free stitches per side of the triangle:
– Bottom: A’s 7 and 5, B’s 7 and 5, C’s 7 and 5 = 6 lobes × 6 sts = 36 sts
– Left: A’s 9 and 11, D’s 9 and 11, F’s 9 and 11 = 6 lobes × 6 sts = 36 sts
– Right: C’s 3 and 1, E’s 3 and 1, F’s 3 and 1 = 6 lobes × 6 sts = 36 sts
Why the math works: Each side runs along 3 motifs, and each motif shows 2 free lobes on that side. So every side is 3 × 2 = 6 lobes. The 3 sides add up to 18 free lobes, which matches the 18 lobes left over after 9 joins (36 total lobes − 18 joined). No stitches are added at the seams, so all three sides are the same and the tree stays symmetrical.
Trunk
Hold the tree RS up. Find Motif B’s bottom valley at 6 o’clock, between its 7 and 5 lobes. You’ll work into 5 stitches: the last dc and the hdc of the 7 lobe, the valley sl st, and the hdc and first dc of the 5 lobe.
Row 1: Join Color B with a standing sc in the first of these 5 sts, then sc in each of the next 4 sts. Turn. (5 sc)
Row 2: Ch 2 (does not count as a stitch), dc in each st across. Turn. (5 dc)
Row 3: Ch 2 (does not count as a stitch), dc in each st across. Turn. (5 dc)
Row 4: Ch 1, sc in each st across. (5 sc)
Fasten off. The trunk measures about 0.75 in (1.9 cm) wide × 1 in (2.5 cm) tall. That gives an overall height of 5.25 in + 1 in = 6.25 in (15.9 cm).
Hanging Loop
Join Color B with a sl st in Motif F’s top valley at 12 o’clock. Ch 20, then sl st in the same valley st. Ch 1, work 26 sc into the ch-20 loop, and join with a sl st to the base. (26 sc)
Fasten off. The loop hangs about 1.5 in (3.8 cm) above the tree. Covering the chain with sc makes it firm and keeps it from twisting.
Final Blocking
- Weave in all remaining ends on the WS. Run each end through its own color only.
- Pin the tree RS up on a blocking mat.
- Pin the bottom edge straight, to 6 in (15.2 cm).
- Pin the top valley so the triangle is 5.25 in (13.3 cm) tall, then pin the left and right sides straight.
- Put one pin in the tip of every free lobe so the scallops are rounded and even.
- Open each triangular gap gently with a pin tip.
- Pin the trunk square, and lay the loop straight up.
- Mist the piece until it is damp, not soaked, and let it dry completely before you unpin it.
Final Quality-Control Checklist
- [ ] Every motif has 6 cream petals and an open center hole
- [ ] Every motif has 36 sts in Round 4
- [ ] There are 9 joins, all made at lobe-tip dc
- [ ] Each side has 6 free lobes (36 sts)
- [ ] The width is 6 in (15.2 cm) and the triangle is 5.25 in (13.3 cm) tall
- [ ] The trunk is 5 sts wide and centered under Motif B
- [ ] The loop is centered on Motif F’s top valley
- [ ] There are no loose ends and no red showing through the cream
Troubleshooting
Center hole closed up: You pulled the Round 1 ring too tight. Work over the ch-4 ring loosely next time.
Petals lean or twist: Make sure all 3 partial dc in each cluster go into the same stitch.
Round 4 ruffles: Use a hook one size smaller for Round 4 only, or tighten your dc.
Motifs overlap at a join: You joined into the wrong dc. Join only into the center dc of the 3.
Tree leans: Check your joins against the join table. A join in the wrong clock position will skew the grid.
Trunk off-center: Count 2 stitches each side of the valley sl st before you join the yarn.
Care
Hand wash in cool water with a mild soap, press out the water in a towel, and dry flat, reshaping the lobes. Store flat or hanging so the loop doesn’t crease.
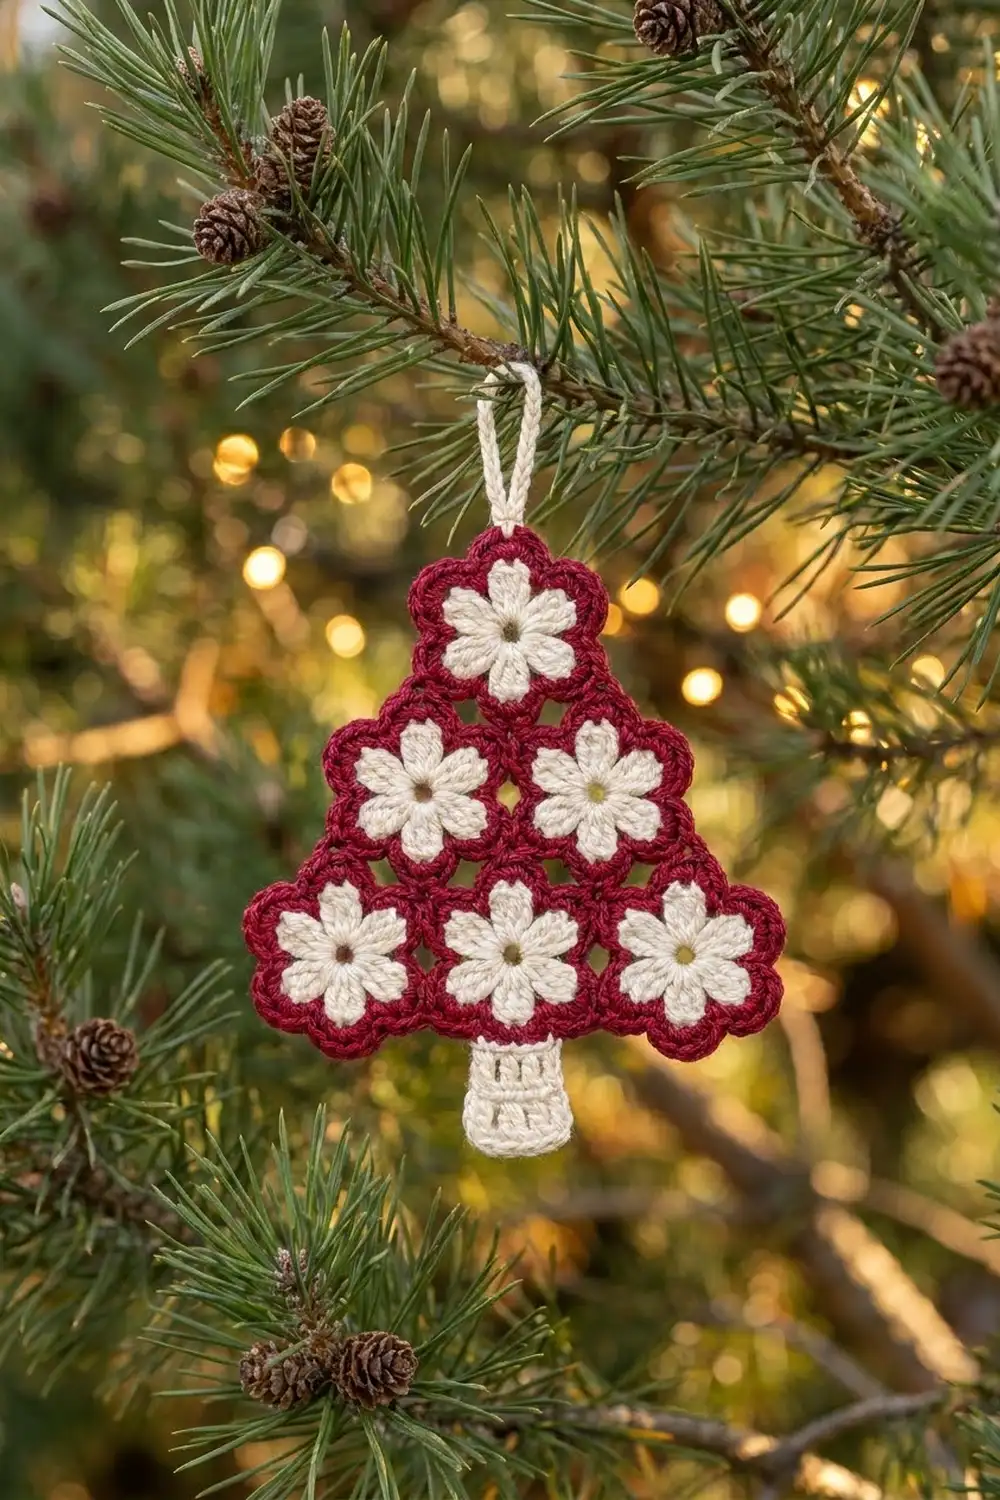
Final Notes
Here is how the measurements build: a 0.5 in (1.3 cm) ring grows to a 1.25 in (3.2 cm) flower, then a 1.5 in (3.8 cm) framed flower, then a 2 in (5.1 cm) scalloped motif. Three motifs across give the 6 in (15.2 cm) base, and the three rows make a 5.25 in (13.3 cm) triangle. The 1 in (2.5 cm) trunk brings it to 6.25 in (15.9 cm), and the 1.5 in (3.8 cm) loop to 7.75 in (19.7 cm). If your first motif is the right size, the rest of the tree will be too.
Happy crocheting!