

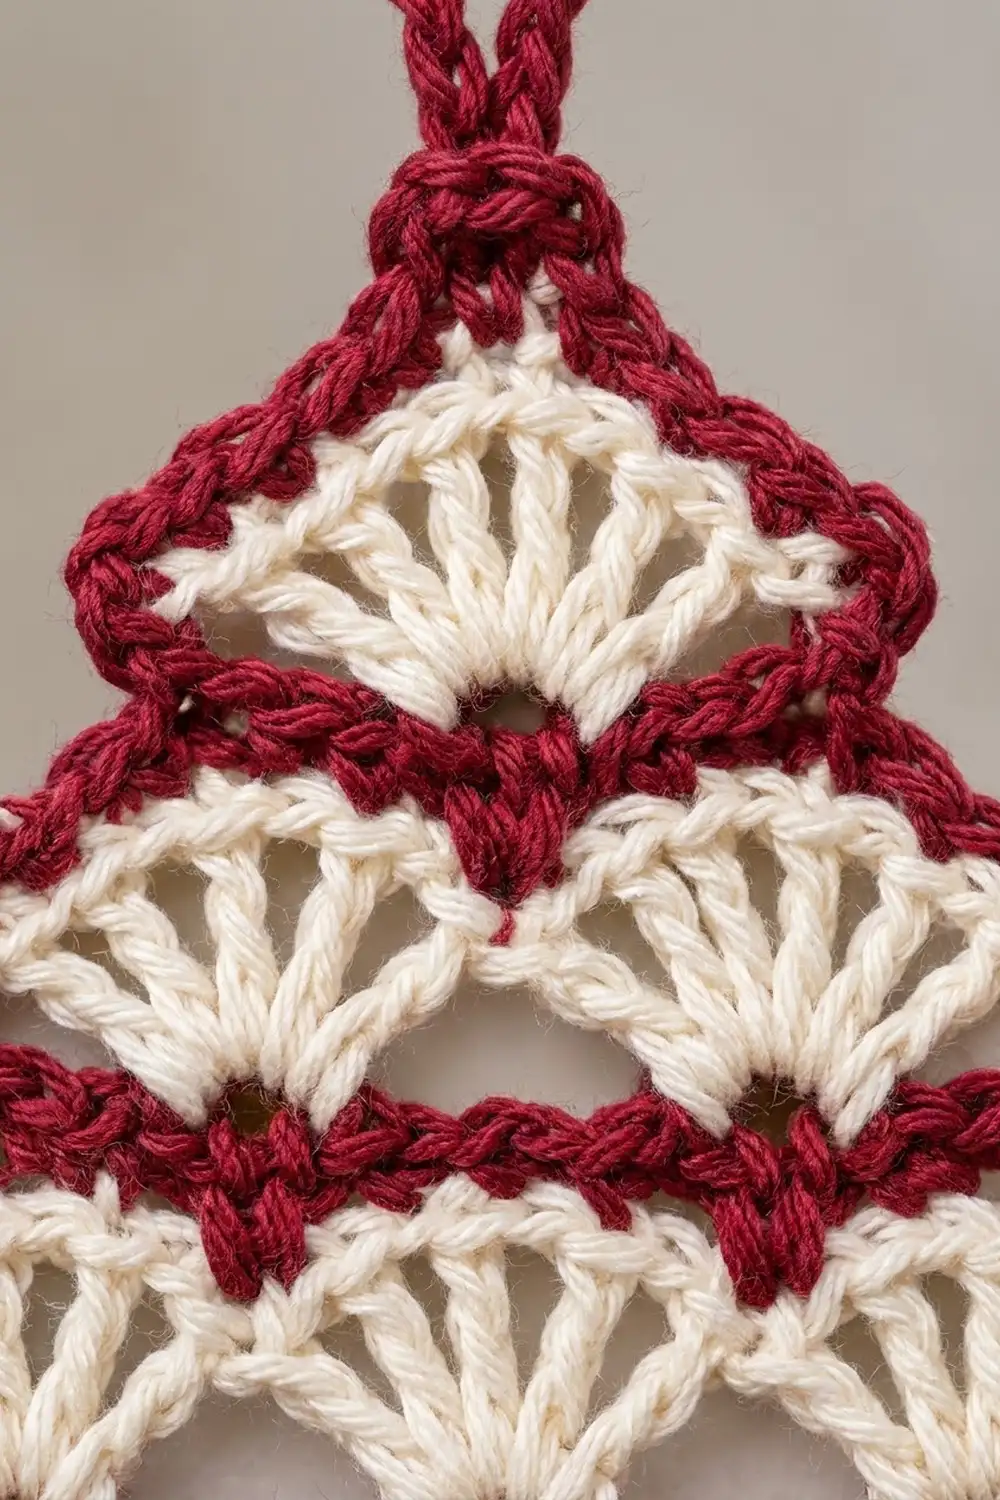
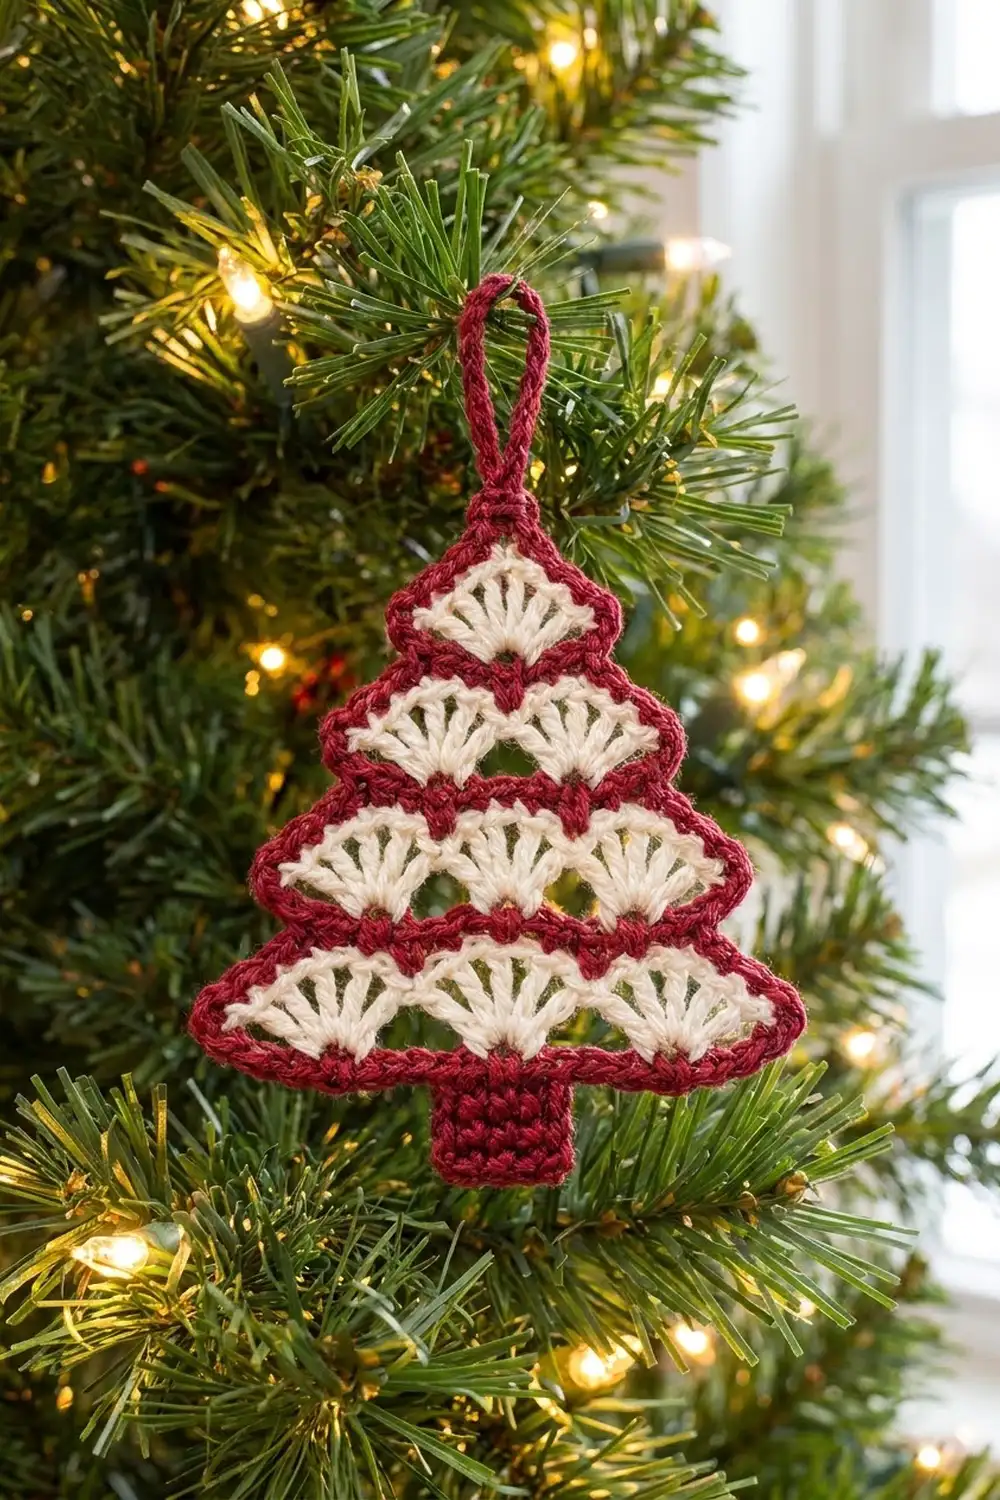
The Peppermint Fan Tree is a small, lacy ornament with a candy-cane look. Four tiers of cream fan shells stack into a triangle, and thin cranberry-red bands separate the tiers. A red border outlines the whole tree, a solid red trunk anchors the bottom and a twisted red loop at the top lets it hang.
The style is classic and cozy. It suits a traditional red-and-white tree, gift toppers or a window garland. The open fans let tree lights glow through, and the red outline keeps the shape crisp from across the room.
This pattern uses US crochet terms. The finished tree body measures about 4.9 in (12.4 cm) wide and 4 in (10.2 cm) tall. With the trunk, the ornament is about 4.75 in (12.1 cm) tall, and the hanging loop adds about 1.5 in (3.8 cm) more.
Construction is simple. You work the body flat in rows from the bottom up, switching colors every row: red base, cream fans, red band, and so on. Each tier has one fewer fan than the tier below. One red border round outlines the whole tree. Then you make a small trunk square and a slip-stitch loop and sew them on.
Finished Size and Construction
- Finished size: body 4.9 in (12.4 cm) wide × 4 in (10.2 cm) tall; 4.75 in (12.1 cm) tall with trunk; loop adds 1.5 in (3.8 cm)
- Skill level: Easy (advanced beginner)
- Terminology: US crochet terms
- Yarn weight: DK (#3, light), cotton or cotton blend
- Hook: 3.5 mm (E-4)
- Number of pieces: 1 ornament, made from a tree body, a trunk square and a hanging loop
- Layout: single standalone ornament (no joining of motifs)
- Body size before border: 4.5 in (11.4 cm) wide × 3.6 in (9.1 cm) tall
- Border depth: 0.2 in (0.5 cm) on each edge
- Trunk: 1.1 in (2.8 cm) wide × 1 in (2.5 cm) tall
Materials
Yarn: Use a smooth DK cotton or cotton-acrylic blend. Cotton shows the fan stitches clearly and blocks flat. Avoid fuzzy or very splitty yarn, because it blurs the fan shapes.
- Color A, cranberry red: 10 g (about 23 m)
- Color B, cream: 6 g (about 14 m)
These quantities include a margin of about 25% for your gauge swatch and yarn tails.
Tools:
– 3.5 mm (E-4) crochet hook
– Tapestry needle
– Scissors
– Rustproof pins and a foam blocking mat
– Spray bottle or steam iron
Abbreviations (US Terms)
- ch – chain
- sc – single crochet
- dc – double crochet
- sl st – slip stitch
- sk – skip
- st(s) – stitch(es)
- sp – space
- RS – right side
- rep – repeat
Special stitches:
- Shell: 7 dc in the same stitch. The fan’s base sits on that stitch, and the fan opens upward.
- Standing sc: With the new color’s slip knot on your hook, insert the hook into the stitch indicated, yarn over, pull up a loop, then yarn over and pull through both loops.
Gauge and Checkpoints
Gauge: 11 sc and 12 sc rows = 2 in (5.1 cm) with a 3.5 mm hook. One fan tier, meaning a cream shell row plus a red band row, is 0.85 in (2.2 cm) tall.
Make one complete body before you start a batch of ornaments. It is a small piece, so it is the best gauge test you can do.
Checkpoints:
– After Row 1: 25 sc = 4.5 in (11.4 cm) wide, 0.2 in (0.5 cm) tall
– After Row 3: 1.05 in (2.7 cm) tall
– After Row 5: 1.9 in (4.8 cm) tall; the 3-fan tier is about 3.4 in (8.6 cm) wide
– After Row 7: 2.75 in (7.0 cm) tall; the 2-fan tier is about 2.3 in (5.8 cm) wide
– After Row 9: 3.6 in (9.1 cm) tall; the top fan is about 1.2 in (3.0 cm) wide
– After the border: 4.9 in (12.4 cm) × 4 in (10.2 cm)
If your piece is too big, go down to a 3.25 mm (D-3) hook. If it is too small, go up to a 3.75 mm (F-5) hook. Don’t change the stitch counts. The tier structure depends on them.
Tree Body
Work every row with the RS facing. Fasten off at the end of each row and join the next color at the right edge. This keeps the color bands clean and all fans facing the same way. Leave 4 in (10.2 cm) tails.
How the tiers line up: Each red band row has a “group” of 8 stitches over every shell:
ch 2, sc in 3 center dc, ch 2, sc in the next sc
In every group, the middle of the 3 sc is the center sc. The sc where two groups meet is a junction sc. In the next cream row, shells go into the inner junction sc and single crochets go into the center sc. That puts each new fan above the gap between two fans in the tier below.
Row 1 (A, red): Ch 26. Sc in the 2nd ch from the hook and in each ch across. Fasten off. (25 sc)
Row 2 (B, cream): Standing sc in the first st. Then repeat 4 times: [sk 2 sts, shell in next st, sk 2 sts, sc in next st]. Fasten off.
(4 shells + 5 sc = 33 sts)
Shells sit in sts 4, 10, 16 and 22; sc sit in sts 1, 7, 13, 19 and 25.
Row 3 (A, red): Standing sc in the first sc. Then repeat 4 times: [ch 2, sk 2 dc, sc in next 3 dc, ch 2, sk 2 dc, sc in next sc]. Fasten off.
(1 + 4 × 8 = 33 sts)
The center sc are sts 5, 13, 21 and 29. The inner junction sc are sts 9, 17 and 25.
Row 4 (B, cream): Skip the first 4 sts. Standing sc in st 5, the first center sc. Then repeat 3 times: [shell in the next junction sc, sc in the next center sc]. Fasten off.
(3 shells + 4 sc = 25 sts)
Four stitches of Row 3 stay uncovered at each end. These form the stepped “ledges” of the tree.
Row 5 (A, red): Standing sc in the first sc. Then repeat 3 times: [ch 2, sk 2 dc, sc in next 3 dc, ch 2, sk 2 dc, sc in next sc]. Fasten off.
(1 + 3 × 8 = 25 sts)
Row 6 (B, cream): Skip the first 4 sts. Standing sc in st 5. Then repeat 2 times: [shell in the next junction sc, sc in the next center sc]. Fasten off.
(2 shells + 3 sc = 17 sts)
Row 7 (A, red): Standing sc in the first sc. Then repeat 2 times: [ch 2, sk 2 dc, sc in next 3 dc, ch 2, sk 2 dc, sc in next sc]. Fasten off.
(1 + 2 × 8 = 17 sts)
Row 8 (B, cream): Skip the first 4 sts. Standing sc in st 5. Shell in st 9, sc in st 13. Fasten off.
(1 shell + 2 sc = 9 sts)
Row 9 (A, red): Standing sc in the first sc, ch 2, sk 2 dc, sc in the next 3 dc, ch 2, sk 2 dc, sc in the last sc. Fasten off.
(9 sts)
Weave in all the cream tails now, along the backs of the red rows. Leave the red tails for the border to cover where possible.
Border
Border gauge: One sc round adds 0.2 in (0.5 cm) to every edge. Work at the same tension as the body. A tight border will cup the fans.
Rnd 1 (A, red): With the RS facing, join with a standing sc in the first foundation ch at the bottom left corner. Work around the tree as follows.
Bottom edge (29 sc): Work 2 more sc in the same first ch, for 3 sc in the corner. Sc in each of the next 23 foundation chs, then 3 sc in the last ch.
That is 25 sts worked once each, plus 2 extra sc at each corner: 25 + 4 = 29.
Right side, going up (30 sc):
– Tiers 4, 3 and 2, 9 sc each:
– 3 sc evenly up the side of the cream row
– 3 sc in the last st of the red band row (outer corner)
– sc in each of the next 3 uncovered ledge sts (ch, ch, sc)
– Tier 1, 3 sc: 3 sc evenly up the side of Row 8
That gives 3 × 9 + 3 = 30.
Top (14 sc plus a ch-2 tip): Along Row 9, work 3 sc in the first st, sc in the next 3 sts, (sc, ch 2, sc) in the center st, sc in the next 3 sts, then 3 sc in the last st.
That is 9 sts worked once each, plus 2 extra sc at each corner and 1 extra sc at the tip: 9 + 2 + 2 + 1 = 14.
Left side, going down (30 sc): Mirror the right side.
– Tier 1: 3 sc evenly down the side of Row 8.
– Tiers 2, 3 and 4, 9 sc each:
– sc in each of the 3 uncovered ledge sts
– 3 sc in the first st of the red band row
– 3 sc evenly down the side of the cream row
Sl st to the first sc. Fasten off.
(29 + 30 + 14 + 30 = 103 sc, plus one ch-2 tip)
Why the math works: Each red band row overhangs the cream row above it by exactly 4 sts at each end: the corner stitch and 3 ledge stitches. The border puts 3 sc in the corner to turn it and 1 sc in each ledge stitch. The 3 sc up each cream edge match the height of one dc row at this gauge, so the sides lie flat. The extra tip stitch and ch-2 give the tree its small peak.
Trunk
Row 1 (A, red): Ch 7. Sc in the 2nd ch from the hook and in each ch across. (6 sc)
Rows 2–6: Ch 1, turn, sc in each st across. (6 sc)
Fasten off, leaving a 10 in (25.4 cm) tail for sewing. The square is 1.1 in (2.8 cm) wide × 1 in (2.5 cm) tall.
Attach: Center the trunk under the bottom edge, behind the tree. Overlap the top 0.25 in (0.6 cm) of the trunk behind the bottom border, leaving 0.75 in (1.9 cm) visible. Whipstitch the overlap to the back of the border, and keep the stitches invisible from the front.
Hanging Loop
Row 1 (A, red): Ch 21. Sl st in the back bump of the 2nd ch from the hook and in each ch across. (20 sl st)
Fasten off, leaving an 8 in (20.3 cm) tail. The strip is about 3.3 in (8.4 cm) long.
Attach: Fold the strip in half. Sew both ends to the back of the ch-2 tip so that the loop stands about 1.5 in (3.8 cm) above the peak.
Final Blocking
- Weave in any remaining ends along same-color stitches.
- Lightly mist the ornament with water, or hover a steam iron 1 in (2.5 cm) above it. Don’t press.
- Pin it RS up on a mat to 4.9 in (12.4 cm) wide at the base and 4 in (10.2 cm) tall from the base to the tip.
- Open each fan with your fingertips so the 7 dc spread evenly.
- Pin each outer ledge corner so the stepped silhouette is sharp. Pin the tip upward.
- Pin the trunk square with its sides straight and parallel.
- Let it dry completely, about 2–4 hours.
- For a stiffer ornament, brush on a light fabric stiffener while it is pinned, then let it dry overnight.
Final Quality-Control Checklist
- Tiers hold 4, 3, 2 and 1 fans, from bottom to top.
- Each fan sits centered above the gap between the two fans below it.
- Every fan has exactly 7 dc and opens evenly.
- The red bands have the 8-stitch groups shown, with no missing ch-2 spaces.
- The border count is 29 + 30 + 14 + 30 = 103 sc, plus the ch-2 tip.
- The ledge steps match on the left and right sides.
- The body is 4.9 in (12.4 cm) × 4 in (10.2 cm).
- The trunk is centered, with 0.75 in (1.9 cm) showing.
- The loop is centered on the tip and the ornament hangs straight.
- No ends show on the RS.
Troubleshooting
The fans ruffle or overlap. Your dc are too loose or your sc too tight. Go down a hook size for the cream rows only.
The fans look thin and gappy. Make sure all 7 dc go into one stitch, not spread over two.
The upper fans are off-center. You probably started the cream row at the wrong stitch. Always skip exactly 4 sts and start in the 5th, which is the center sc.
The border ripples on the sides. You added sc up the cream edges. Keep exactly 3 per edge.
The border cups the tree. Your border tension is too tight. Redo it with a hook 0.25 mm larger.
The ornament hangs crooked. Re-center the loop on the ch-2 tip and sew both ends at the same depth.
The tip is blunt. Pin the ch-2 tip firmly upward while blocking.
Care
Hand wash in cool water with mild soap, roll it in a towel and dry it flat, pinned to shape. Store it flat so the tiers and loop keep their shape.
Final Notes
Everything in this ornament follows one measurement chain:
- A gauge of 11 sc = 2 in (5.1 cm) gives a 25-stitch base of 4.5 in (11.4 cm).
- Four fan tiers at 0.85 in (2.2 cm) each build a body 3.6 in (9.1 cm) tall.
- The ledge pattern of 4 uncovered stitches at each end steps each tier in evenly.
- One 103-stitch border adds 0.2 in (0.5 cm) all around, for a body of 4.9 in (12.4 cm) × 4 in (10.2 cm).
- The trunk brings the total height to 4.75 in (12.1 cm), and the loop finishes it off.
If your first ornament matches the checkpoints, every one after it will match too, so you can fill a whole tree with identical peppermint fans.
Happy crocheting!