

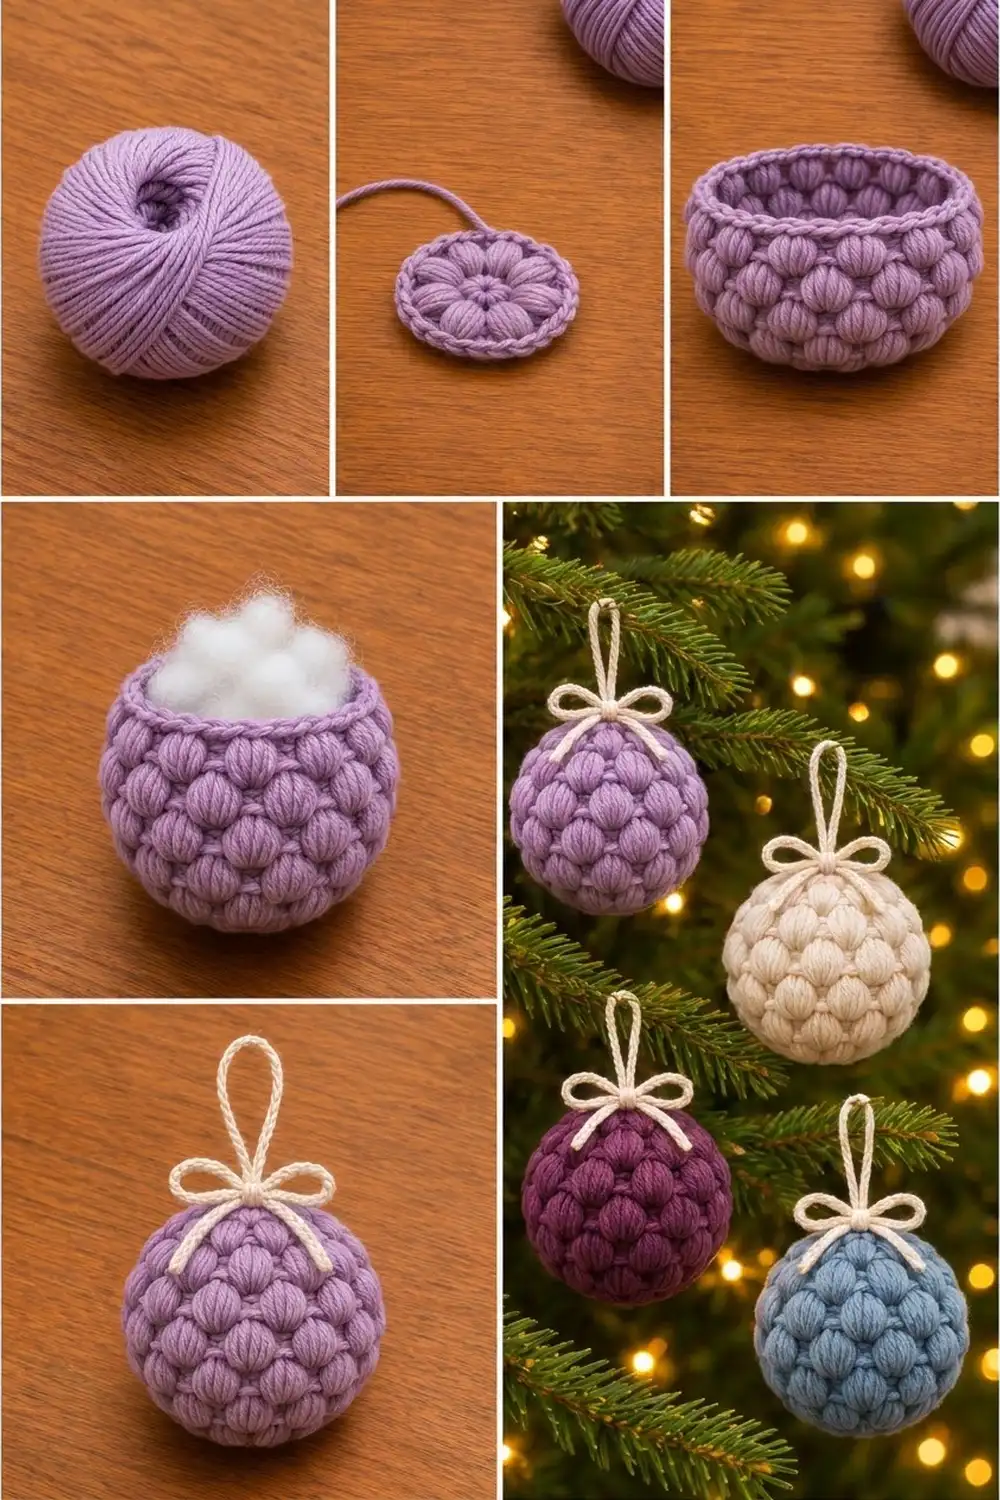
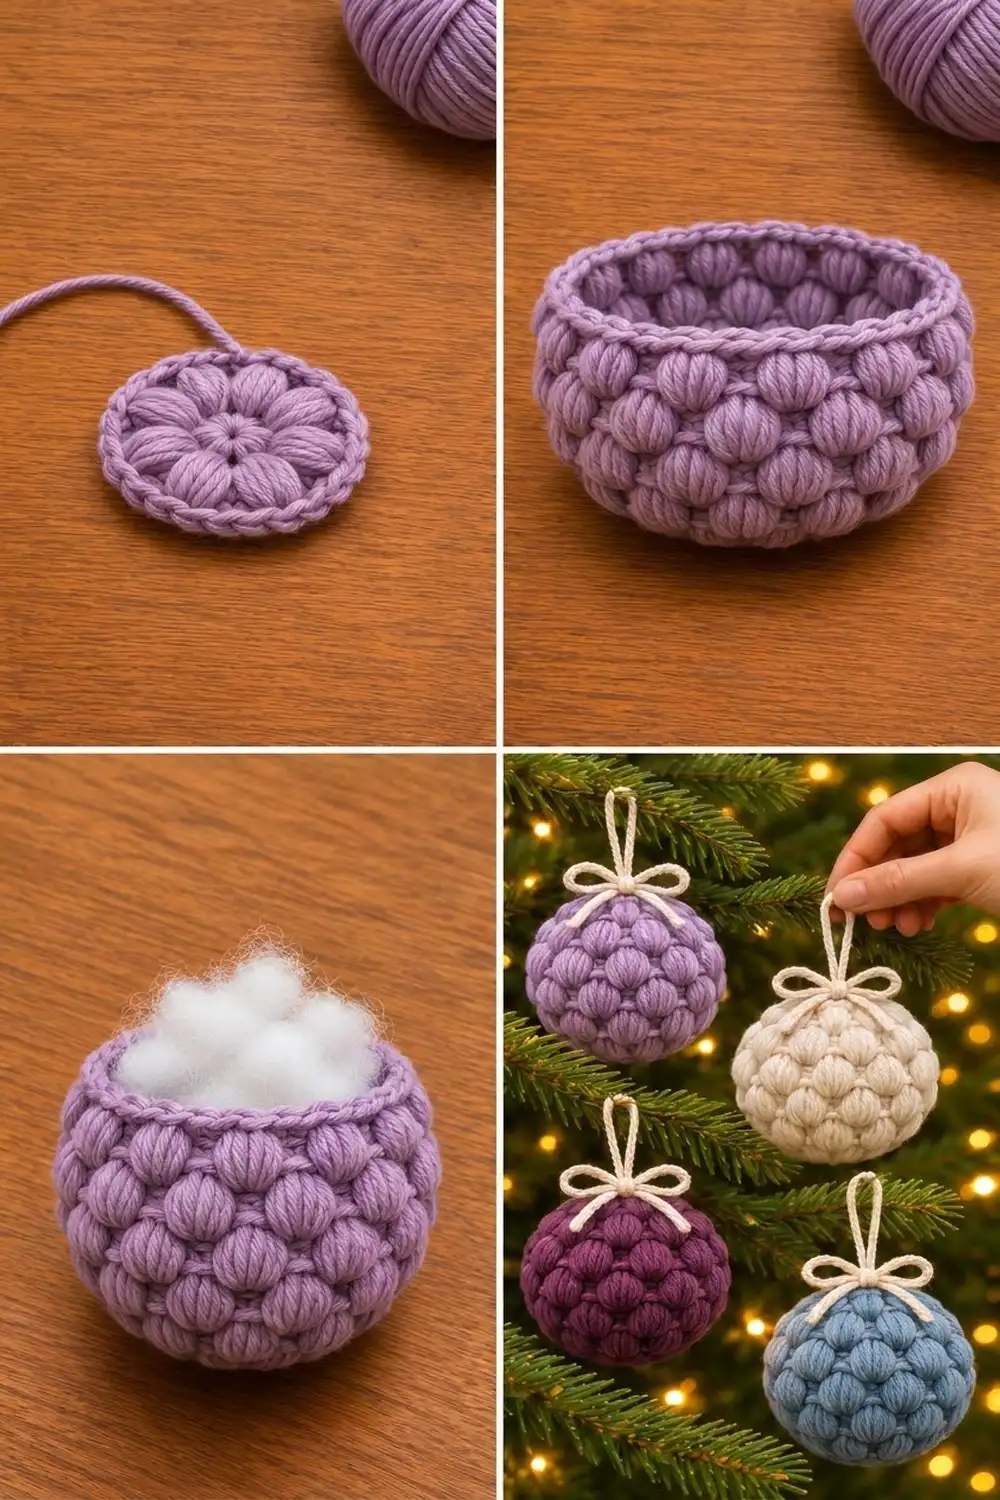
The Lavender Puff Bauble is a round, stuffed Christmas ornament covered in plump puff stitches. The puffs are offset from row to row, so the surface looks like a tight cluster of berries. A cream cord forms the hanging loop, and a small bow is tied where the loop meets the ball.
The sample is soft lavender with a cream loop and bow. The pattern also works well in cream, deep plum or dusty blue, and a set in mixed colors looks lovely on a tree. All the texture comes from the stitches, so each bauble uses only one main color.
The pattern uses US crochet terms. The finished, stuffed bauble is about 3.5 in (8.9 cm) across, and the hanging loop rises about 2.25 in (5.7 cm) above the top.
The ball is one piece, worked in joined rounds from the bottom up:
- Start with a six-puff flower in a magic ring and edge it with single crochet.
- Build the sides by alternating puff rounds and single crochet rounds. All increases and decreases happen in the single crochet rounds.
- Stuff the ball near the top and close it with three single crochet rounds.
- Make two short slip-stitch cords for the loop and the bow.
Finished Size and Construction
- Finished size: about 3.5 in (8.9 cm) across, stuffed
- Circumference at the widest round: about 11 in (27.9 cm)
- Skill level: Easy–Intermediate (you should be comfortable with puff stitches)
- Terminology: US
- Yarn weight: Worsted (#4)
- Hook: 5 mm (US H-8)
- Number of pieces: 1 ball, plus 2 cream cords for the loop and bow
- Layout: a single 3D ball; no motifs to assemble
- Base size (Rounds 1–2): 1.75 in (4.4 cm) across
- Size before the closing rounds (after Round 15): an open cup about 3.5 in (8.9 cm) across at its widest
- Closing (“border”) depth: Rounds 16–18, about 0.75 in (1.9 cm) of single crochet that curves over the top
Materials
Choose a smooth worsted-weight yarn so the puffs look full and defined. Cotton or a cotton blend gives crisp puffs like the sample. Acrylic is softer and slightly fuzzier. Avoid splitty yarn, because each puff pulls up seven loops.
- Main color (lavender): 25 g, about 45 m (49 yd)
- Contrast color (cream), for the loop and bow: 5 g, about 9 m (10 yd)
These amounts include a margin of roughly 20%. For a set of four baubles in four colors, get one skein of each main color and one skein of cream.
Tools:
- 5 mm (US H-8) crochet hook
- Polyester fiberfill, about 10 g
- Stitch marker
- Tapestry needle
- Scissors
- Measuring tape
Abbreviations (US Terms)
- ch – chain
- sl st – slip stitch
- sc – single crochet
- sc2tog – single crochet 2 together
- sk – skip
- sp – space
- st(s) – stitch(es)
- MR – magic ring
- yo – yarn over
Special stitch – Puff: (Yo, insert hook in st or sp, yo and pull up a loop about 0.5 in / 1.3 cm tall) 3 times, so you have 7 loops on the hook. Yo and pull through all 7 loops. The puff counts as 1 st. It has no closing chain. The ch 1 that follows it in the pattern is a separate st.
Staggered puff round: Sl st in next sc, ch 2, puff in same sc, ch 1, sk next sc. Puff in next sc, ch 1, sk next sc; repeat from * around. The last st you skip is the first sc of the round. Join with a sl st to the top of the first puff. Starting one stitch over offsets the puffs from those two rounds below.
Gauge and Checkpoints
Gauge matters less here than for a garment, but it controls the finished size and how well the fabric hides the stuffing. Make the base first and measure it before going on.
- Base gauge: Rounds 1–2 = 1.75 in (4.4 cm) across, laid flat.
- After Round 7: the circumference is about 11 in (27.9 cm), and the piece has turned up into a shallow bowl.
- After Round 11: the cup stands about 2 in (5.1 cm) tall with straight sides.
- After Round 15: the opening has started to pull in, and the cup is about 3.5 in (8.9 cm) across at its widest.
- Finished: about 3.5 in (8.9 cm) across, stuffed.
The base can be up to 0.25 in (0.6 cm) off. If it is larger than 2 in (5.1 cm), switch to a 4.5 mm hook. If it is smaller than 1.5 in (3.8 cm), switch to a 5.5 mm hook. If the base ruffles, your puffs are too tall, so pull up shorter loops. If it cups before Round 3, your sc are too tight.
Pattern: Bauble Body
Work in joined rounds with the right side facing you. Do not turn. The ch 1 or ch 2 at the start of a round does not count as a st. Join each round with a sl st to the first st (the first sc or the top of the first puff).
Tips for neat puffs: Keep all three loops of each puff the same height before closing it. Hold the closed puff with your thumb while you make the ch 1, so it doesn’t lean. After each sc round, gently push every puff outward from the inside.
Base
Round 1: Make a MR. Ch 2, (puff in ring, ch 1) 6 times. Pull the ring closed and join. (6 puffs + 6 ch-1 sps = 12 sts)
Round 2 (conversion round): Ch 1, 2 sc in each puff and 2 sc in each ch-1 sp around. Join. (12 sts worked 1 per st + 12 extra = 24 sc)
The base is now a flat disk: a six-petal puff flower with a neat sc edge. Check the 1.75 in (4.4 cm) gauge here.
Sides
Round 3: Ch 2, puff in first sc, ch 1, sk next sc, (puff in next sc, ch 1, sk next sc) 11 times. Join. (12 puffs + 12 ch-1 = 24 sts)
Round 4 (increase round): Ch 1, (sc in next puff, sc in next ch-1 sp, sc in next puff, 2 sc in next ch-1 sp) 6 times. Join. (24 sts worked 1 per st + 6 extra = 30 sc)
Round 5: Work a staggered puff round with 15 repeats in total. (15 puffs + 15 ch-1 = 30 sts)
Round 6 (increase round): Ch 1, (sc in each of next 4 sts, 2 sc in next st) 6 times. Work into puffs and ch-1 sps alike. Join. (30 sts worked 1 per st + 6 extra = 36 sc)
Round 7: Work a staggered puff round with 18 repeats. (18 puffs + 18 ch-1 = 36 sts)
Check the circumference now. It should be about 11 in (27.9 cm).
Round 8: Ch 1, sc in each puff and each ch-1 sp around. Join. (36 sc)
Round 9: Work a staggered puff round with 18 repeats. (18 puffs + 18 ch-1 = 36 sts)
Round 10: Repeat Round 8. (36 sc)
Round 11: Repeat Round 9. (18 puffs + 18 ch-1 = 36 sts)
Rounds 7–11 form the widest band of the ball. The cup should stand about 2 in (5.1 cm) tall.
Round 12 (decrease round): Ch 1, (sc in each of next 4 sts, sc2tog) 6 times. Join. (36 sts worked into → 30 sc)
Round 13: Work a staggered puff round with 15 repeats. (15 puffs + 15 ch-1 = 30 sts)
Round 14 (decrease round): Ch 1, (sc in each of next 3 sts, sc2tog) 6 times. Join. (30 sts worked into → 24 sc)
This round gives the cup a firm sc rim. Start stuffing now. Add fiberfill in small pieces and push it out toward the puffs so the base rounds out.
Round 15: Work a staggered puff round with 12 repeats. (12 puffs + 12 ch-1 = 24 sts)
This is the last puff round. Don’t fasten off; the closing rounds are in the border section below.
Pattern: Hanging Loop and Bow (Cream)
Make both cords the same way: chain, then work sl sts back along the chain. This gives a firm, round cord that doesn’t stretch.
Loop cord: With cream, leave a 6 in (15.2 cm) tail. Ch 36. Sl st in the back bump of the 2nd ch from the hook and in each ch across. (35 sl sts) Fasten off, leaving another 6 in (15.2 cm) tail. The cord is about 6 in (15.2 cm) long.
Bow cord: With cream, ch 51. Sl st in the back bump of the 2nd ch from the hook and in each ch across. (50 sl sts) Fasten off and weave in both ends. The cord is about 9 in (22.9 cm) long.
Border: Closing Rounds 16–18
On this bauble, the “border” is the three sc rounds that curve over the top and close the ball. Each round has 6 equal sections with one decrease per section, so the top stays round instead of coming to a point.
Border gauge: Each sc round adds about 0.25 in (0.6 cm), so the three rounds add about 0.75 in (1.9 cm) in total.
Round 16: Ch 1, (sc in each of next 2 sts, sc2tog) 6 times. Join. (24 sts worked into → 18 sc; 3 sc per section)
Add more stuffing now. The ball should feel firm, but the puffs shouldn’t spread far enough apart to show the white fiberfill.
Round 17: Ch 1, (sc in next st, sc2tog) 6 times. Join. (18 sts worked into → 12 sc; 2 sc per section)
Push one last small tuft of stuffing through the opening.
Round 18: Ch 1, sc2tog 6 times. Join. (12 sts worked into → 6 sc; 1 sc per section)
Fasten off, leaving an 8 in (20.3 cm) tail. Thread the tail through the front loop of all 6 sts, pull tight and secure.
Why the math works: Round 15 has 24 sts, which splits into 6 sections of 4. Each closing round removes exactly 1 st per section, so the sections go 4 → 3 → 2 → 1. That mirrors the base, where Round 2 doubled 12 sts to 24. The top and bottom therefore curve the same way and both ends of the ball are equally round.
Attach the loop: Fold the loop cord in half. With a tapestry needle, pull both cream tails down through the center of the top, about 0.25 in (0.6 cm) apart, and out through the center of the base. Adjust them until the loop stands 2.25 in (5.7 cm) above the ball. Tie the tails together under the puff flower at the base, knot twice and bury the ends inside the ball.
Tie the bow: Wrap the bow cord once around both sides of the loop, right where they meet the ball. Tie a bow with two loops about 1 in (2.5 cm) each. The bow is about 2.75 in (7.0 cm) wide. Trim the tails evenly. Add a dab of fabric glue to the knot if you like.
Final Blocking
Puff fabric doesn’t need wet blocking. Shape the ball instead.
- Roll the stuffed ball firmly between your palms for about a minute to even out the stuffing.
- Find any flat spots and push stuffing toward them through the stitches with the blunt end of the hook.
- Hold a steam iron 1–2 in (2.5–5.1 cm) above the ball and steam lightly. Don’t let the iron touch the yarn, especially acrylic.
- While the yarn is still warm, gently pinch each puff so it stands round and plump.
- Let the ball cool and dry completely on a towel, about 30 minutes.
- Measure across the middle. It should be about 3.5 in (8.9 cm).
Final Quality-Control Checklist
- The base has 6 puffs around a tight center with no hole.
- Round 7 measured about 11 in (27.9 cm) around.
- Each row of puffs is offset from the one below; no puff sits directly above another.
- Puff counts per puff round: 6, 12, 15, 18, 18, 18, 15, 12.
- No white stuffing shows between the puffs.
- The top closes into a small, round point with no gap.
- The loop stands 2.25 in (5.7 cm) tall and is centered.
- The bow is tied tightly at the base of the loop and sits level.
- All ends are buried inside the ball.
Troubleshooting
The puffs look thin or flat. Pull up taller loops, about 0.5 in (1.3 cm), and keep all three the same height.
Stuffing shows through. Use a hook 0.5 mm smaller, or use fiberfill in a color close to the yarn.
The ball is egg-shaped. You probably left out or added a round. There should be 8 puff rounds in total; check them against the puff counts in the checklist.
The stitch count is wrong after a puff round. Check that you skipped one sc after each ch 1, and that the last skip landed on the first sc of the round.
The top comes to a point. Rounds 16–18 must keep 6 even sections. Don’t offset the decreases in the closing rounds.
The loop leans. Bring the two tails through stitches directly across from each other at the center.
Care
Spot clean with a damp cloth and mild soap, then reshape and dry flat. Store wrapped in tissue paper so the puffs don’t get crushed.
Final Notes
The bauble’s size comes from a short chain of measurements:
- The base should measure 1.75 in (4.4 cm) across.
- That base sets Round 7, which should measure 11 in (27.9 cm) around.
- The 36-stitch middle band keeps the ball 3.5 in (8.9 cm) across.
- The six-section decreases close the top evenly.
If each checkpoint matches, the finished ornament will match too. Make one in lavender, then try cream, plum and dusty blue for a matching set.
Happy crocheting!