

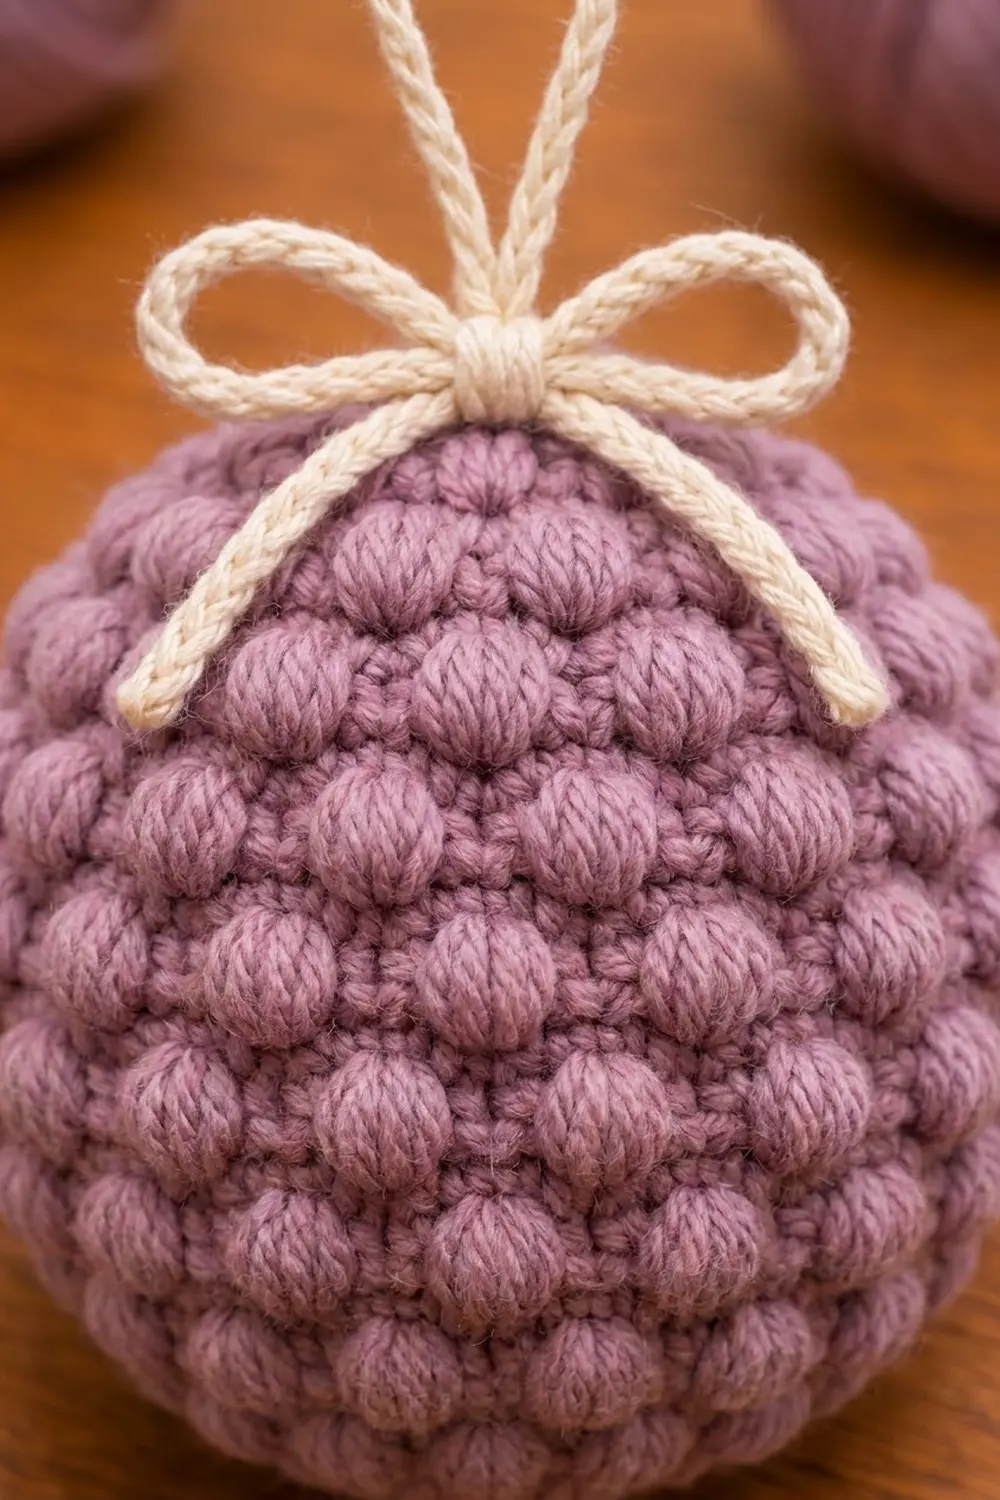
The Sugarplum Puff Ball is a small, round Christmas ornament covered in soft puff stitches. Staggered rows of puffs sit on a firm single crochet background, so the surface looks like a cluster of berries. A cream crocheted cord makes the hanging loop and a small bow at the top.
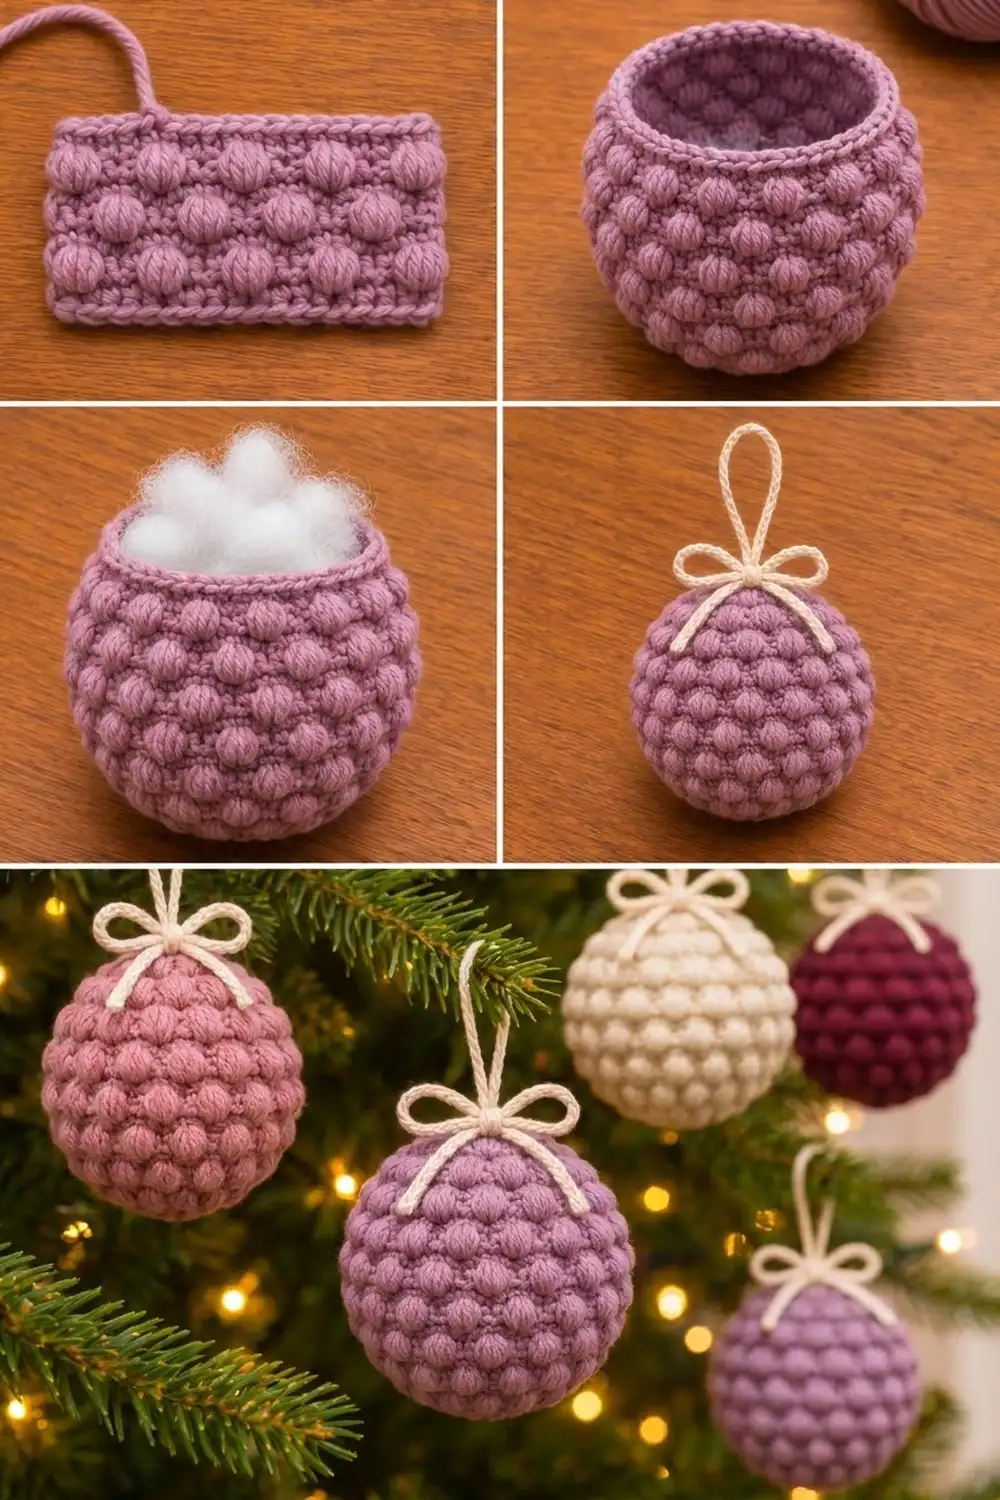
The sample uses dusty mauve with a cream hanger. It’s a good way to use up yarn scraps, and it looks just as good in rose pink, cream, burgundy or lavender. Make one in each color for a matching set on the tree.
This pattern uses US crochet terms. The finished ball is about 3.5 in (8.9 cm) across and about 3.75 in (9.5 cm) tall. Including the hanging loop, it measures about 6.5 in (16.5 cm) from the bottom to the top of the loop.
You’ll crochet it as one seamless piece in continuous rounds. You start at the bottom with a magic ring and increase to 48 stitches, adding the first puffs as you go. Then you work even through the puff rounds, decrease, stuff and close the top. The hanger is two short slip-stitched cords.
Finished Size and Construction
- Finished size: 3.5 in (8.9 cm) diameter, 3.75 in (9.5 cm) tall
- Skill level: Easy-Intermediate
- Terminology: US crochet terms
- Yarn weight: Worsted (medium #4)
- Hook: 4.0 mm (US G-6)
- Number of pieces: 1 ball (plus 2 small hanger cords)
- Layout: one piece, worked in continuous spiral rounds
- Piece size: 48 stitches around at the widest point
- Size before border (hanger): 3.5 in (8.9 cm) diameter ball
- Border depth: the hanging loop stands 2.75 in (7.0 cm) above the top
Materials
Choose a smooth, plied worsted yarn so the puffs look clear and rounded. Acrylic or a wool-acrylic blend works well and holds its shape. Avoid fuzzy or splitty yarns, because they hide the puff texture. Medium and dark shades show the puffs best. If you use cream for the ball, use a slightly firmer hand so the stuffing doesn’t show through.
- Main color (mauve): 25 g, about 50 m (55 yd)
- Hanger color (cream): 5 g, about 10 m (11 yd)
- Polyester fiberfill: about 10 g
These amounts include a small margin, so you won’t run short.
Tools:
- 4.0 mm (US G-6) crochet hook
- Stitch marker
- Tapestry needle
- Scissors
- Ruler or tape measure
Abbreviations (US Terms)
- MR – magic ring
- ch – chain
- sl st – slip stitch
- sc – single crochet
- inc – 2 sc in the same stitch
- dec – single crochet 2 together. An invisible decrease is recommended: insert into the front loops only of the next 2 sts, yo, pull through both front loops, yo, pull through 2 loops.
- st(s) – stitch(es)
- rnd – round
- rep – repeat
- yo – yarn over
Special stitch – Puff: (Yo, insert hook in the indicated st, yo, pull up a loop to about 0.5 in / 1.3 cm tall) 4 times, giving 9 loops on the hook. Yo and pull through all 9 loops, then ch 1 to lock. The ch-1 does not count as a stitch. In the next round, work into the top of the puff and skip the locking chain.
Gauge and Checkpoints
Gauge: 18 sc and 20 rnds = 4 in (10.2 cm), worked firmly. Exact gauge isn’t critical for an ornament, but tight stitches stop the stuffing from showing through.
Test piece: work Rnds 1–5 first. Laid flat, the disc should measure about 2.1 in (5.3 cm) across.
Checkpoints:
- After Rnd 5: flat disc of 2.1 in (5.3 cm), 30 sts.
- After Rnd 8: a shallow bowl, 48 sts.
- After Rnd 18: an open cup about 3 in (7.6 cm) tall. Pressed flat, it measures about 5.5 in (14.0 cm) wide.
- Finished and stuffed: 3.5 in (8.9 cm) diameter.
If your disc is too big, or you can see gaps between stitches, use a 3.5 mm hook. If it’s too small and the fabric feels stiff, use a 4.5 mm hook. Pull every puff loop to the same height so all the puffs match in size.
Pattern: Ornament Ball
Work in continuous rounds. Don’t join with a slip stitch and don’t turn. Put the marker in the first stitch of each round and move it up as you go. The right side faces you the whole time, and the puffs pop out on the outside.
Before you start, practice a few puffs on a short sc swatch. Hold the loops loosely on the hook so the last yarn over slides through all 9 loops easily. Then pull the locking chain snug.
Bottom (Rounds 1–5)
Rnd 1: With mauve, 6 sc in MR. (6 sts)
Rnd 2: Inc in each st around. (12 sts)
Rnd 3: Sc 1, inc; rep from * 6 times. (18 sts)
Rnd 4: Sc 2, inc; rep from * 6 times. (24 sts)
Rnd 5: Sc 3, inc; rep from * 6 times. (30 sts)
Checkpoint: the disc measures 2.1 in (5.3 cm).
Lower Curve With First Puffs (Rounds 6–9)
Rnd 6 (puffs and increases): Puff in next st, sc 3, inc; rep from * 6 times. Each repeat works into 5 sts and makes 6. (36 sts: 6 puffs + 30 sc)
Rnd 7: Sc 5, inc; rep from * 6 times. (42 sts)
Rnd 8 (puffs and increases): Sc 2, puff in next st, sc 3, inc; rep from * 6 times. Each repeat works into 7 sts and makes 8. (48 sts: 6 puffs + 42 sc)
Rnd 9: Sc in each st around. (48 sts)
The puffs in Rnds 6 and 8 don’t line up, so the staggered pattern starts on the bottom curve.
Puff Body (Rounds 10–18)
Here you alternate two puff rounds, A and B, with a plain sc round between them. Both use a 4-stitch repeat. Round B moves the puffs over by 2 sts, so each puff sits exactly between the two puffs below it.
Rnd 10 (Puff Round A): Puff in next st, sc 3; rep from * 12 times. (48 sts: 12 puffs + 36 sc)
Rnd 11: Sc in each st around. (48 sts)
Rnd 12 (Puff Round B): Sc 2, puff in next st, sc 3; rep from * 11 times, puff in next st, sc 1. Count check: 2 + (11 × 4) + 1 + 1 = 48. (48 sts: 12 puffs + 36 sc)
Rnd 13: Sc in each st around. (48 sts)
Rnd 14: Repeat Rnd 10 (Puff Round A). (48 sts, 12 puffs)
Rnd 15: Sc in each st around. (48 sts)
Rnd 16: Repeat Rnd 12 (Puff Round B). (48 sts, 12 puffs)
Rnd 17: Sc in each st around. (48 sts)
Rnd 18: Repeat Rnd 10 (Puff Round A). (48 sts, 12 puffs)
Checkpoint: the open cup is about 3 in (7.6 cm) tall and about 5.5 in (14.0 cm) wide pressed flat.
Upper Curve and Closing (Rounds 19–25)
Rnd 19: Sc 6, dec; rep from * 6 times. (42 sts)
Rnd 20 (puffs and decreases): Sc 2, puff in next st, sc 2, dec; rep from * 6 times. Each repeat works into 7 sts and makes 6. (36 sts: 6 puffs + 30 sc)
Rnd 21: Sc 4, dec; rep from * 6 times. (30 sts)
Stuff the ball firmly now. Push the fiberfill outward so the puffs sit round and even.
Rnd 22: Sc 3, dec; rep from * 6 times. (24 sts)
Rnd 23: Sc 2, dec; rep from * 6 times. (18 sts)
Rnd 24: Sc 1, dec; rep from * 6 times. (12 sts)
Add more stuffing through the small opening if needed.
Rnd 25: Dec 6 times. (6 sts)
Fasten off, leaving an 8 in (20.3 cm) tail. Thread the tail through the front loop of each of the 6 remaining sts and pull tight to close. Don’t weave it in yet.
Puff total: 8 puff rounds (Rnds 6, 8, 10, 12, 14, 16, 18, 20). That’s 6 + 6 + (5 × 12) + 6 = 78 puffs.
Border: Hanging Loop and Bow
For this ornament, the “border” is the cream hanger at the top. It’s made of two cords: one for the loop and one for the bow.
Border gauge: 9 ch = 2 in (5.1 cm), which is 4.5 ch per inch. Slip-stitching back along the chain keeps the cord about the same length and makes it firm and round.
Hanging loop cord: With cream, ch 28. Sl st in the back bump of the 2nd ch from the hook and in each ch across. (27 sl sts) Fasten off, leaving a 6 in (15.2 cm) tail at each end.
Bow cord: With cream, ch 45. Sl st in the back bump of the 2nd ch from the hook and in each ch across. (44 sl sts) Fasten off and weave in both ends.
Attaching:
- Fold the loop cord in half. Hold both ends together over the closed top of the ball.
- Thread one cord tail onto the tapestry needle. Sew the cord ends down through the center of Rnd 25, out through Rnd 22, and back up. Do this three times with each tail.
- Use the mauve closing tail to stitch over the cord ends once more. Then pull all the tails through the ball and trim them flush.
- Tie the bow cord around the base of the loop with a single knot. Tie a bow with two loops about 1 in (2.5 cm) tall and tails about 1.25 in (3.2 cm) long, resting on the upper puffs.
Why the math works: 28 ch ÷ 4.5 ch per inch = 6.2 in (15.7 cm) of cord. Folded, that’s 3.1 in (7.9 cm) per side. About 0.35 in (0.9 cm) is anchored into the top, which leaves a 2.75 in (7.0 cm) visible loop. The 45-ch bow cord is 10 in (25.4 cm) long. About 3.5 in (8.9 cm) wraps around the loop base and goes into the knot. Each bow loop takes 2 in (5.1 cm) and each tail takes 1.25 in (3.2 cm). Total: 3.5 + 4 + 2.5 = 10 in.
Final Blocking
- Roll the stuffed ball between your palms for about 30 seconds to spread the fiberfill evenly.
- Gently pinch each puff from the sides so it stands up round.
- Lightly mist the ball with water, or hold a steam iron 2 in (5.1 cm) above it. Never let the iron touch the yarn, especially acrylic.
- Shape the ball by hand to 3.5 in (8.9 cm) across. Rest it on a small cup or ring to dry so it doesn’t flatten on one side.
- Lightly mist the bow and arrange its loops and tails. Hang the loop over a pencil so it dries straight.
- Let the ornament dry completely before hanging it.
Final Quality-Control Checklist
- The ball measures 3.5 in (8.9 cm) across and 3.75 in (9.5 cm) tall.
- There are 8 puff rounds, with 78 puffs in total.
- Body puffs are evenly staggered, and none are stacked directly on top of each other.
- No stuffing shows between stitches.
- The bottom and top centers are fully closed, with no holes.
- The hanging loop stands 2.75 in (7.0 cm) tall and is firmly anchored.
- The bow is centered, and its tails rest evenly on the top puffs.
- All ends are hidden inside the ball.
Troubleshooting
Puffs sink inward: Make sure the right side faces out. Work into the top of each puff, not into the locking ch-1. Firmer stuffing also pushes the puffs out.
Puffs are different sizes: Pull every loop up to the same 0.5 in (1.3 cm) height before closing the puff.
Stitch count is off: Count after every round. The most common mistake is working into the locking ch-1, which adds a stitch.
Puffs line up in columns: Check that you started Round B with sc 2 and ended with sc 1.
Ball looks oval or pointed: Make sure Rnds 19–25 decrease evenly, and spread the stuffing out from the center.
Gaps between stitches: Use a smaller hook, or switch to invisible decreases.
Loop leans to one side: Anchor both cord ends through the exact center of Rnd 25.
Care
Spot clean with mild soap and cool water, squeeze gently, and reshape while damp. Store in a box with room around it so the puffs and bow don’t get crushed.
Final Notes
Each stage has a measurement you can check. The 2.1 in (5.3 cm) disc at Rnd 5 confirms your gauge. At Rnd 18, the 48-stitch cup is about 3 in (7.6 cm) tall and 5.5 in (14.0 cm) wide pressed flat. Stuffed and closed, it becomes a 3.5 in (8.9 cm) ball. The 28-chain cord adds a 2.75 in (7.0 cm) loop, for a total hanging height of 6.5 in (16.5 cm). After the first one, try rose pink, cream, burgundy and lavender for a full set.
Happy crocheting!