

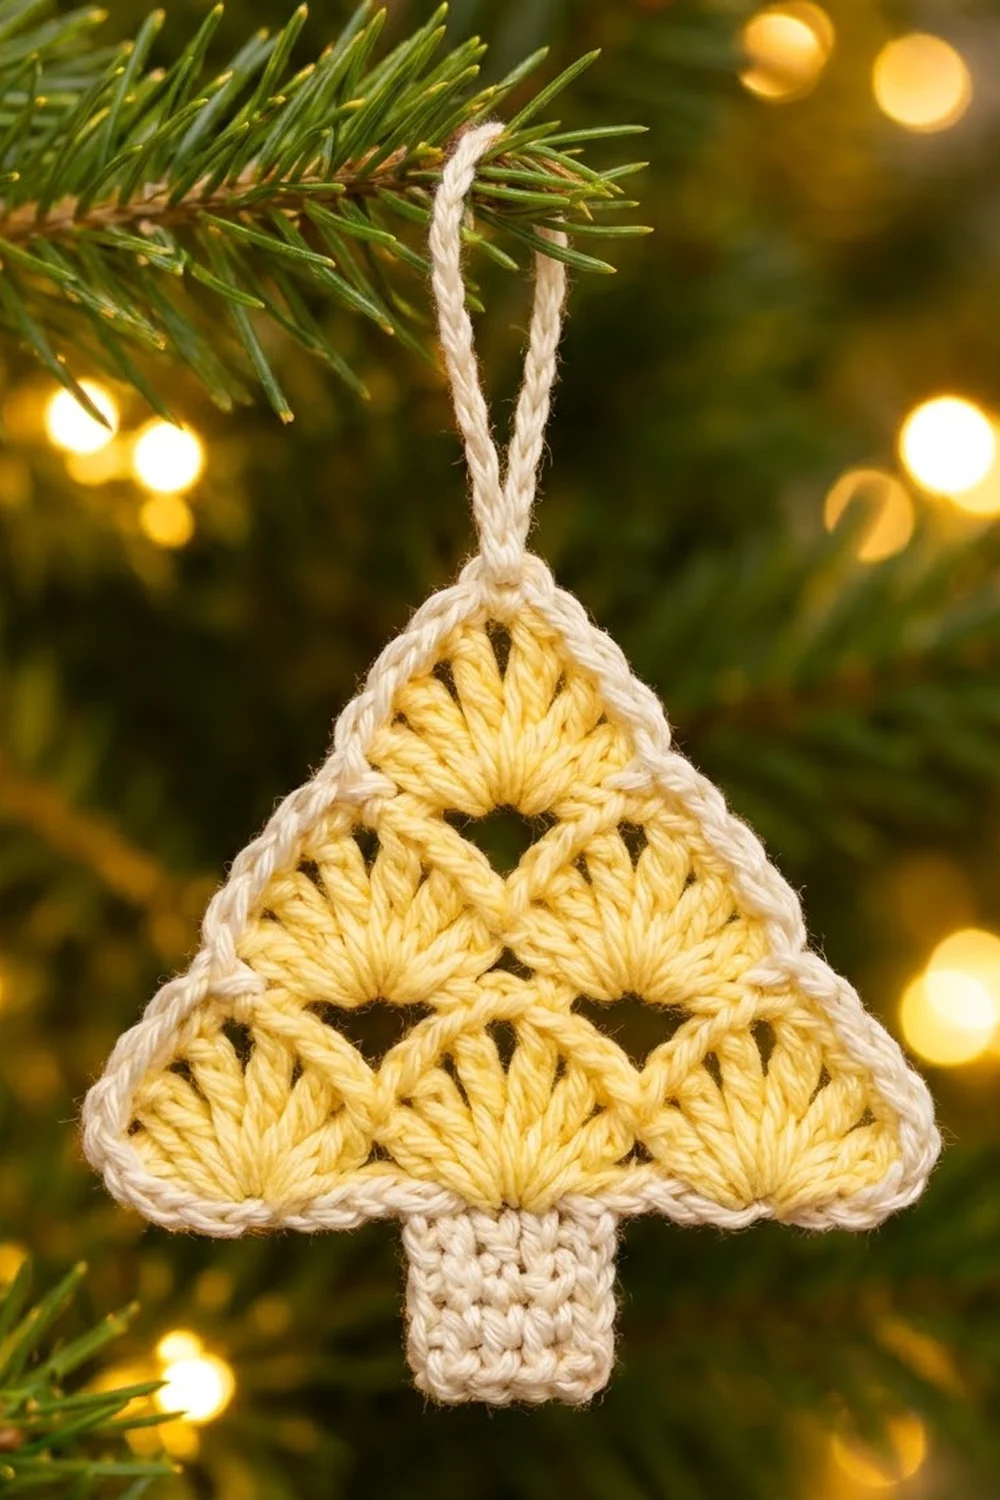
The Golden Fan Tree is a small, flat Christmas tree ornament made from six soft fan shells stacked into a triangle. A cream edging frames the shells, a short cream trunk hangs from the bottom, and a long cream loop at the top makes it ready to hang.
The colors are simple: pale butter yellow for the tree body and warm cream for the border, trunk and loop. Small open triangles form between the shells, so light comes through the ornament when it hangs on a lit tree. It looks Scandinavian-simple and works well in multiples.
This pattern uses US crochet terms. The bordered triangle measures 4.25 in (10.8 cm) wide by 3.75 in (9.5 cm) tall. With the trunk, the ornament is 5 in (12.7 cm) tall, or about 7.5 in (19.1 cm) including the hanging loop.
You work the tree bottom-up in three turned rows of shells, with one fewer shell in each row. Then you add a two-round cream border, a single-crochet trunk worked straight off the border, and a chain hanging loop. Everything is one piece, so there is no sewing.
Finished Size and Construction
- Finished size (tree, bordered): 4.25 in (10.8 cm) wide × 3.75 in (9.5 cm) tall
- Total height with trunk: 5 in (12.7 cm)
- Height including loop: about 7.5 in (19.1 cm)
- Skill level: Easy / advanced beginner
- Terminology: US
- Yarn weight: DK (light worsted, #3)
- Hook: 3.5 mm (E-4)
- Number of pieces: 1
- Layout: One triangle of 6 shells in tiers of 3–2–1
- Size before border: 3.75 in (9.5 cm) wide × 3.25 in (8.3 cm) tall
- Border depth: 0.25 in (0.6 cm) per side
- Trunk: 1 in (2.5 cm) wide × 1.25 in (3.2 cm) tall
Materials
Yarn: Use a smooth DK cotton or cotton blend. Cotton shows the fan “ribs” clearly and blocks to a crisp triangle. Acrylic works too, but the shells may look puffier and the open triangles less defined.
- Color A – Pale Butter Yellow: 6 g, about 15 m (16 yd)
- Color B – Cream/Ivory: 5 g, about 12 m (13 yd)
These quantities include a margin for a gauge swatch and weaving in ends. One ornament uses very little yarn, so leftovers are ideal.
Tools:
– 3.5 mm (E-4) crochet hook
– Tapestry needle
– Scissors
– Stitch markers (2)
– Blocking mat and rust-proof pins
– Spray bottle with water
Abbreviations (US Terms)
- ch – chain
- sl st – slip stitch
- sc – single crochet
- dc – double crochet
- sk – skip
- st(s) – stitch(es)
- RS – right side
Special stitch – Shell: Work 7 dc into the same stitch. The 4th dc of a shell is its center dc.
Standing sc: With a slip knot already on the hook, insert the hook into the stitch and complete a sc as usual.
Gauge and Checkpoints
Gauge:
– 20 sc and 26 rows = 4 in (10.2 cm) in Color B
– 1 shell repeat (sc to sc, over 6 foundation chains) = 1.25 in (3.2 cm) wide in Color A
Make the tree triangle first, before you buy or wind extra yarn. It is a quick, reliable gauge test.
Checkpoints:
– After Row 1: the strip of 3 shells measures 3.75 in (9.5 cm) wide and about 1 in (2.5 cm) tall.
– After Row 2: the piece is about 2 in (5.1 cm) tall at the center.
– After Row 3: the unbordered triangle is 3.25 in (8.3 cm) tall at the top point and still 3.75 in (9.5 cm) wide.
– After the border: 4.25 in (10.8 cm) wide × 3.75 in (9.5 cm) tall.
– After the trunk: 5 in (12.7 cm) total height.
If your piece is too big: go down to a 3.25 mm (D-3) hook, or chain more tightly. If it is too small: go up to a 3.75 mm (F-5) hook. Shell width is the measurement that matters most. If Row 1 is within 0.125 in (0.3 cm) of the target, carry on.
Tree Body (Color A)
Work in turned rows. Each row sits on the one below and has one fewer shell, so the triangle narrows as you go.
Foundation: With Color A, ch 20.
Row 1 (RS): Sc in 2nd ch from hook. Sk 2 ch, shell in next ch, sk 2 ch, sc in next ch. Repeat from * 2 more times. Turn.
Count: 3 shells and 4 sc = 25 sts (19 foundation chains used).
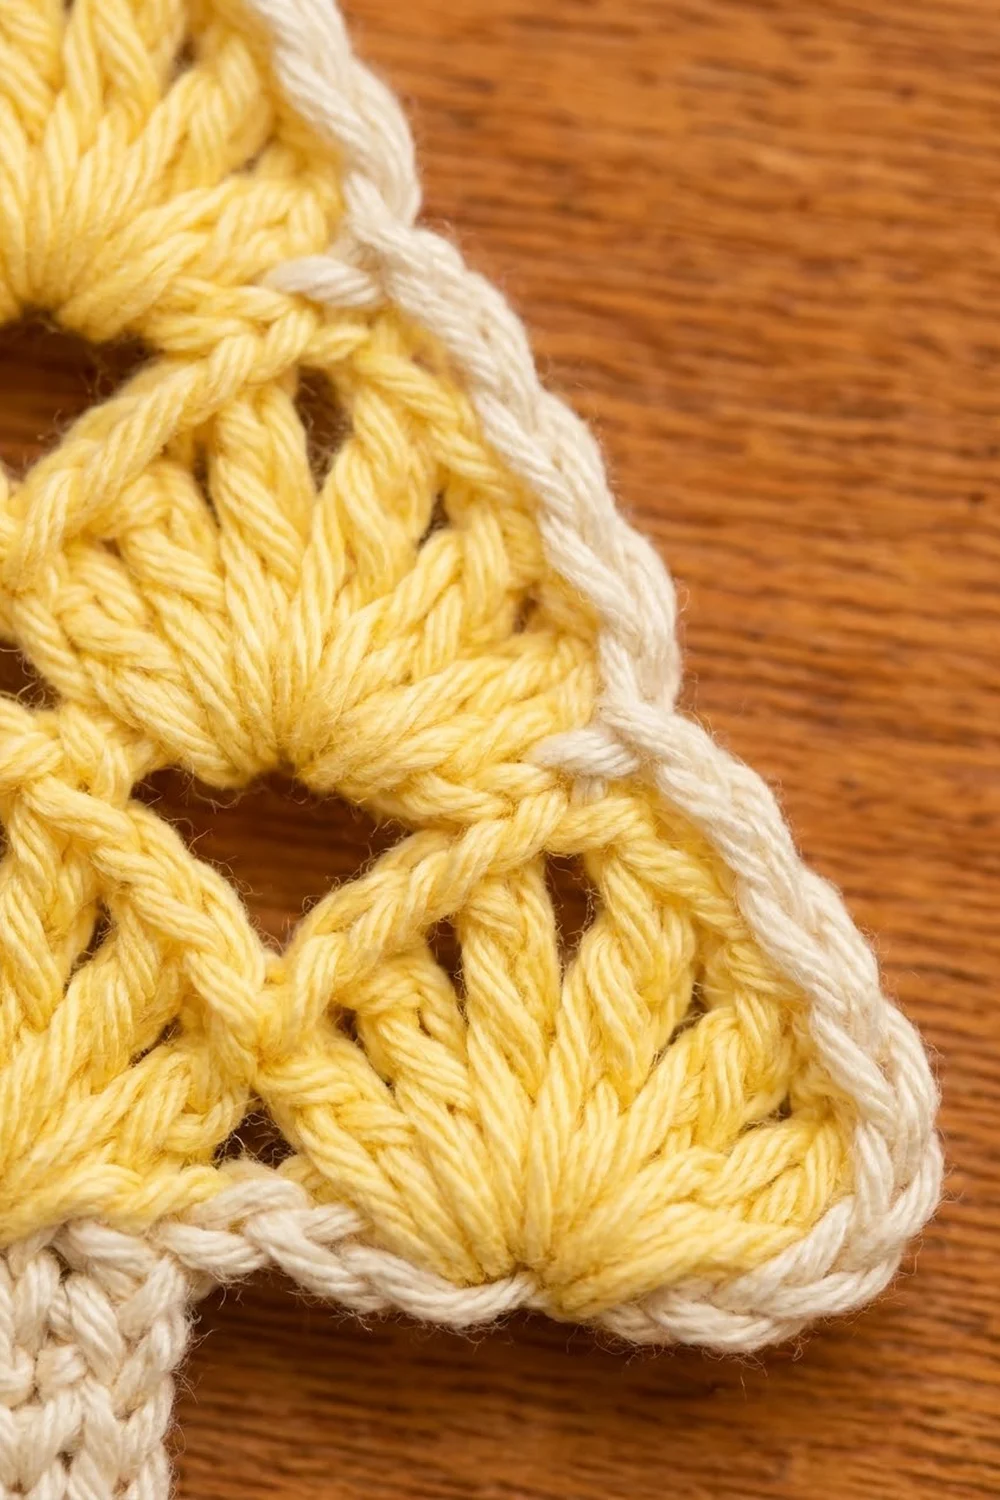
The sc at each end sits on the first and last foundation chain. The 2 inner sc form “valleys” between the shells. Each fan opens upward from its base chain.
Row 2: Sl st in each of the first 5 sts (the end sc plus dc 1–4), so you finish in the center dc of the first shell. Ch 1 (does not count as a st). Sc in the same center dc. Sk 3 dc, shell in next sc, sk 3 dc, sc in next dc (center dc of the next shell). Repeat from * once more. Leave the remaining 3 dc and the end sc unworked. Turn.
Count: 2 shells and 3 sc = 17 sts.
Each new shell starts in a valley sc of Row 1. The fan lifts away from the upper dc of the two lower shells on either side, which leaves a small open triangle at the base of each Row 2 shell. These are the windows you see in the finished tree.
Row 3: Sl st in each of the first 5 sts, finishing in the center dc of the first shell. Ch 1, sc in the same center dc. Sk 3 dc, shell in next sc, sk 3 dc, sc in next dc (center dc of the second shell). Leave the remaining sts unworked.
Count: 1 shell and 2 sc = 9 sts.
Fasten off Color A and weave in the ends. The tree now has 6 shells in tiers of 3–2–1. Check that it is 3.75 in (9.5 cm) wide and 3.25 in (8.3 cm) tall at the top point.
Border (Color B)
Border gauge: The edging uses about 5 sc per 1 in (2.5 cm) along a straight edge, matching the Color B gauge. The border adds 0.25 in (0.6 cm) on every side.
Corner definition: Each corner is worked as 3 sc in one stitch. The middle sc of that group is the corner stitch. The two outer sc of the group belong to the sides next to it. In the per-side counts below, “including corners” means both corner stitches at the ends of that side are counted.
Round 1: With RS facing and the foundation edge at the bottom, join Color B with a standing sc in the free loop of the first foundation ch at the bottom-right corner (the ch holding the Row 1 end sc). Work 2 more sc in the same ch to finish the bottom-right corner.
- Bottom edge: Sc in the free loop of each of the next 17 foundation ch. Work 3 sc in the last foundation ch (bottom-left corner).
- Left side, going up: Sc in the top of the Row 1 end sc. Sc in each of the 3 exposed dc of the Row 1 shell. Sc in the Row 2 end sc. Sc in each of the 3 exposed dc of the Row 2 shell. Sc in the Row 3 end sc. Sc in dc 1–3 of the top shell. (12 sc)
- Top corner: 3 sc in the center dc of the top shell.
- Right side, going down: Sc in dc 5–7 of the top shell. Sc in the Row 3 end sc. Sc in each of the 3 exposed dc of the Row 2 shell. Sc in the Row 2 end sc. Sc in each of the 3 exposed dc of the Row 1 shell. Sc in the top of the Row 1 end sc. (12 sc)
Sl st to the first sc to join.
Count: 50 sc.
Per side, including corners: bottom = 21 (2 corner sc + 17 + 2 flanking sc), left side = 16, right side = 16. Check: 21 + 16 + 16 − 3 shared corners = 50. ✓
Round 2 (rope edge): Ch 1. Sl st loosely in each sc around, with 1 sl st in each corner st. Join with a sl st to the first sl st.
Count: 50 sl st. The per-side counts stay at 21 / 16 / 16, including corners.
Do not fasten off yet if you like fewer ends: you can sl st along the back of the bottom edge to the trunk position instead. Otherwise, fasten off.
Why the math works: Each side of the tree steps up in three equal stages: 3 exposed dc plus 1 end sc per row, for 3 rows, giving 12 sc. Both sides are worked the same way, so the triangle stays symmetrical. The bottom uses every foundation chain exactly once. The 3-sc corners give just enough extra stitches to turn each point without cupping. Round 2 adds no stitches, so it firms up the edge and gives the cream rope look without stretching the size.
Trunk (Color B)
Count along the bottom edge from the bottom-left corner stitch as st 1. The bottom edge has 21 sts including corners, so st 11 is the exact center.
Row 1: With the tree upside down and RS facing, join Color B with a standing sc in st 9 of the bottom edge. Insert the hook under both loops of the Round 2 sl st. Sc in each of the next 4 sts (sts 10–13). Turn.
Count: 5 sc. That leaves 8 sts on each side of the trunk (8 + 5 + 8 = 21). ✓
Rows 2–8: Ch 1 (does not count as a st), sc in each st across. Turn.
Count: 5 sc per row.
Fasten off and weave in the ends. The trunk is 1 in (2.5 cm) wide and 1.25 in (3.2 cm) long. The ornament is now 5 in (12.7 cm) tall.
Hanging Loop (Color B)
Step 1: Join Color B with a sl st in the top corner sl st of Round 2.
Step 2: Ch 50.
Step 3: Sl st in the same top corner st to close the loop.
Step 4: Turn the loop slightly so the back bumps face you. Sl st in the back bump of each of the 50 ch around the loop, then sl st in the top corner st again.
Fasten off and weave in the ends into the border, not the yellow shells, so nothing shows through. The doubled sl st loop stands about 2.5 in (6.4 cm) tall and keeps its round shape when hung.
Final Blocking
- Weave in all remaining ends. Bury them in stitches of the same color.
- Lay the ornament RS up on a blocking mat.
- Spray it evenly until it is damp but not dripping.
- Pin the three corners first: the bottom corners 4.25 in (10.8 cm) apart, and the top point 3.75 in (9.5 cm) above the bottom edge, centered.
- Add a pin at the middle of each side and ease the stepped edges into straight lines.
- Gently open each fan with your fingertips so the ribs spread evenly. Push a pin tip into each open triangle to define its shape.
- Pin the trunk straight and square at 1 in (2.5 cm) wide × 1.25 in (3.2 cm) long.
- Lay the loop flat in a neat oval above the point.
- Leave it to dry completely, usually 4–6 hours, before unpinning.
For a stiffer ornament, brush on a light coat of diluted fabric stiffener before step 4.
Final Quality-Control Checklist
- 6 shells in tiers of 3–2–1, each with exactly 7 dc
- Each shell opens upward from a single base stitch
- 3 small open triangles at the bases of the upper shells
- Border Round 1 has 50 sc: 21 on the bottom, 16 on each side (including corners)
- Border Round 2 has 50 sl st and lies flat without puckering
- Trunk is 5 sts wide, 8 rows tall, with 8 border sts on each side
- Bordered triangle is 4.25 in (10.8 cm) × 3.75 in (9.5 cm)
- Total height is 5 in (12.7 cm) without the loop
- Loop is centered on the top point and about 2.5 in (6.4 cm) tall
- All ends are hidden in matching colors
Troubleshooting
The bottom row is too wide or waves. Your foundation chain is too loose. Redo it with a smaller hook, or chain with the working hook pulled snug.
The shells look crowded and cup upward. Make sure you skip exactly 2 ch on each side of every shell in Row 1, and 3 dc on each side in Rows 2–3.
I have no open triangles. The upper shell must go into the valley sc, not into a dc of a lower shell. Recheck your placement in Row 2.
The border ruffles. Your sc are too tall or too loose. Count each side against 21 / 16 / 16, and try a hook 0.25 mm smaller for the border only.
The border pulls the edges inward. Round 2 sl sts are too tight. Work them with a looser tension, or use a hook 0.5 mm larger for that round only.
The trunk is off-center. Recount the bottom edge from the bottom-left corner stitch. The trunk must start in st 9 and end in st 13.
The tree tilts when it hangs. The loop is not on the true top corner st. Remove it and rejoin in the middle sl st of the top corner.
Care
Hand wash in cool water with mild soap, press out the water in a towel, and dry flat, re-pinning the corners if needed. Store flat or hung, away from direct sunlight, so the pale yellow does not fade.
Final Notes
The measurements build on each other. A shell repeat of 1.25 in (3.2 cm) gives a 3.75 in (9.5 cm) Row 1. Three tiers of shells reach 3.25 in (8.3 cm) at the top point. The 0.25 in (0.6 cm) border brings the tree to 4.25 in (10.8 cm) × 3.75 in (9.5 cm). The 1.25 in (3.2 cm) trunk makes the ornament 5 in (12.7 cm) tall, and the loop brings it to about 7.5 in (19.1 cm).
If you check your measurements at each checkpoint, the finished ornament will match these sizes. Make a few in different yellows and creams and hang them together for a soft, glowing tree.
Happy crocheting!