

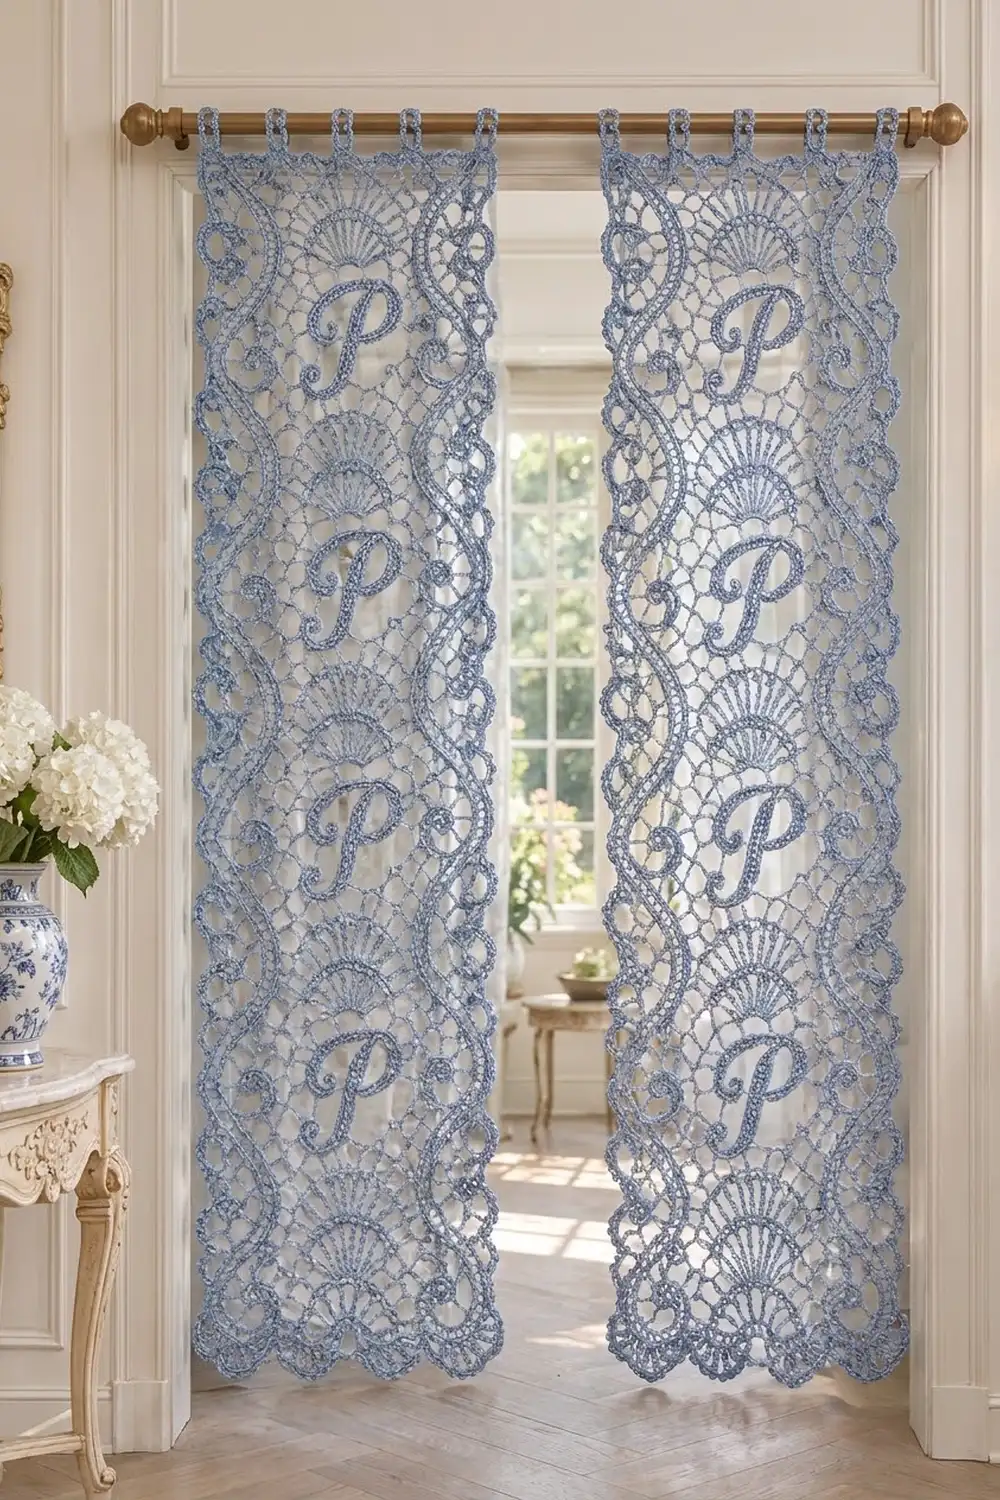
These lace curtain panels are worked in one soft periwinkle blue. Each long panel has wavy scroll bands along both sides, open net down the middle, and four raised script “P” monograms. A dome-shaped fan sits above each monogram, and one more fan sits at the bottom.
The look is vintage lace, but the stitches are mostly simple filet-style units: open meshes, solid blocks, and “spoke” blocks that make the radiating fans. Small chain rings sit in the curves of the side waves like little curls. A scalloped edge finishes the bottom, and four tab loops at the top hang the panel from a rod.
This pattern uses US crochet terms. Each finished panel measures 17″ x 53.75″ (43.2 x 136.5 cm), plus 2″ (5.1 cm) tab loops. You make two panels for a pair.
Each panel is worked top-down in rows as one piece, 85 stitches wide. The monograms are separate corded appliqués that you sew on. Then the border adds picot side edges, bottom scallops, and the tabs.
Finished Size and Construction
- Finished size (one panel): 17″ x 53.75″ (43.2 x 136.5 cm), plus 2″ (5.1 cm) tabs
- Skill level: Intermediate
- Terminology: US
- Yarn weight: Sport (#2 fine) mercerized cotton
- Hook: 3.5 mm (E-4)
- Number of pieces: 10 (2 panels + 8 “P” appliqués)
- Layout: 2 panels hung side by side, not joined to each other; each panel has 5 fans and 4 monograms stacked vertically
- Piece size: panel body 16″ x 52″ (40.6 x 132.1 cm); P appliqué about 4″ x 6″ (10.2 x 15.2 cm)
- Size before border: 16″ x 52″ (40.6 x 132.1 cm)
- Border depth: sides 0.5″ (1.3 cm), top 0.25″ (0.6 cm), bottom 1.5″ (3.8 cm)
Materials
Choose a smooth, mercerized sport-weight cotton. It gives crisp stitch definition, blocks well, and holds its shape in sunlight better than soft or fuzzy yarns.
- Periwinkle blue: 350 g (1,050 m) total
- Each panel with border and tabs: about 145 g (435 m)
- Each P appliqué: about 2 g (6 m)
These quantities include a margin of about 14%. Buy all your yarn from one dye lot.
Tools:
– 3.5 mm (E-4) crochet hook
– Tapestry needle
– Stitch markers
– Rust-proof pins
– Blocking mats, or a clean sheet over carpet, at least 56″ (142.2 cm) long
– Measuring tape
– Scissors
– Scrap paper for a P placement template
Abbreviations (US Terms)
- ch – chain
- sl st – slip stitch
- sc – single crochet
- hdc – half double crochet
- dc – double crochet
- BLO – back loop only
- sk – skip
- st(s) – stitch(es)
- sp – space
- rep – repeat
- RS / WS – right side / wrong side
Special stitches (each unit is 3 sts wide and follows a dc):
- OM (open mesh): ch 2, sk 2 sts, dc in next st.
- SB (solid block): dc in each of next 3 sts.
- SpK (spoke block): dc in next st, ch 1, sk next st, dc in next st.
- RM (ring mesh): ch 1, ch 10, sl st in 10th ch from hook (ring made), ch 1, sk 2 sts, dc in next st. The ring is not counted. Push it to the RS.
- Picot: ch 3, sl st in 3rd ch from hook.
Every panel row starts with ch 3, which counts as the first dc. Then you work 28 units, so each row has 1 + (28 x 3) = 85 sts.
Gauge and Checkpoints
Filet gauge: 7 units and 8 rows = 4″ (10.2 cm). Each unit is about 0.57″ (1.4 cm) wide and each row is 0.5″ (1.3 cm) tall.
Sc gauge: 20 sc = 4″ (10.2 cm).
Test one piece first. Ch 24 and dc in the 4th ch from hook and in each ch across (22 sts). Work 7 rows of OM, 7 units per row. Block the swatch before you measure. It should measure 4″ x 4″ (10.2 x 10.2 cm). Then make one P appliqué and check that its cord measures 15″ (38.1 cm).
Checkpoints (unblocked, laid flat):
– After Row 1: width 16″ (40.6 cm)
– After Row 25: length 12.5″ (31.8 cm)
– After Row 49: 24.5″ (62.2 cm)
– After Row 73: 36.5″ (92.7 cm)
– After Row 97: 48.5″ (123.2 cm)
– After Row 104: 52″ (132.1 cm)
If your work is too big, go down 0.25 mm in hook size. If it is too small, go up 0.25 mm. If only the length is off, check your dc height. Pull each loop up to the same height, and don’t stretch the turning chains.
Panel (Make 2)
The panel is worked from the top edge down. The pattern is symmetrical, so every row reads the same from either end.
Row 1 (RS): Ch 87. Dc in 4th ch from hook and in each ch across. Turn. (85 sts; the skipped ch-3 counts as the first dc.)
Rows 2–25: Work Pattern Rows 1–24 once.
Pattern Rows (24-row repeat)
Each row: ch 3, turn. Work the units listed below. The last dc of each row goes into the top of the turning ch. Every row = 85 sts.
Wave positions: the side bands step inward one unit every 3 rows and then back out again. This forms the S-curve scrolls.
Fan rows (dome shape: narrow at top, widening down):
- Row 1: OM, 2 SB, 10 OM, 2 SpK, 10 OM, 2 SB, OM.
- Row 2: OM, 2 SB, OM, RM, 7 OM, 4 SpK, 7 OM, RM, OM, 2 SB, OM.
- Row 3: OM, 2 SB, 8 OM, 6 SpK, 8 OM, 2 SB, OM.
- Row 4: 2 OM, 2 SB, 6 OM, 8 SpK, 6 OM, 2 SB, 2 OM.
- Row 5: 2 OM, 2 SB, 5 OM, 10 SpK, 5 OM, 2 SB, 2 OM.
- Row 6 (fan base): 2 OM, 2 SB, 5 OM, 10 SB, 5 OM, 2 SB, 2 OM.
Net rows (monogram field):
- Rows 7–9: 3 OM, 2 SB, 18 OM, 2 SB, 3 OM.
- Rows 10–12: 4 OM, 2 SB, 16 OM, 2 SB, 4 OM.
- Row 13: 5 OM, 2 SB, 14 OM, 2 SB, 5 OM.
- Row 14: 2 OM, RM, 2 OM, 2 SB, 14 OM, 2 SB, 2 OM, RM, 2 OM.
- Row 15: Rep Row 13.
- Rows 16–18: Rep Rows 10–12.
- Rows 19–21: Rep Rows 7–9.
- Rows 22–24: 2 OM, 2 SB, 20 OM, 2 SB, 2 OM.
Every row adds up to 28 units. For example, Row 4 is 2 + 2 + 6 + 8 + 6 + 2 + 2 = 28.
The rings on Row 2 sit inside the wave’s inward curve. The rings on Row 14 sit in the outer bay, where the band has moved farthest in. Pattern Rows 2 and 14 always fall on RS panel rows, so the rings land on the same side every time.
Finishing the Panel
Rows 26–97: Work Pattern Rows 1–24 three more times (4 repeats total).
Rows 98–103: Work Pattern Rows 1–6 (the fifth fan).
Row 104: Ch 3, dc in each st across. (85 sts.) Fasten off.
The panel body should measure 16″ x 52″ (40.6 x 132.1 cm).
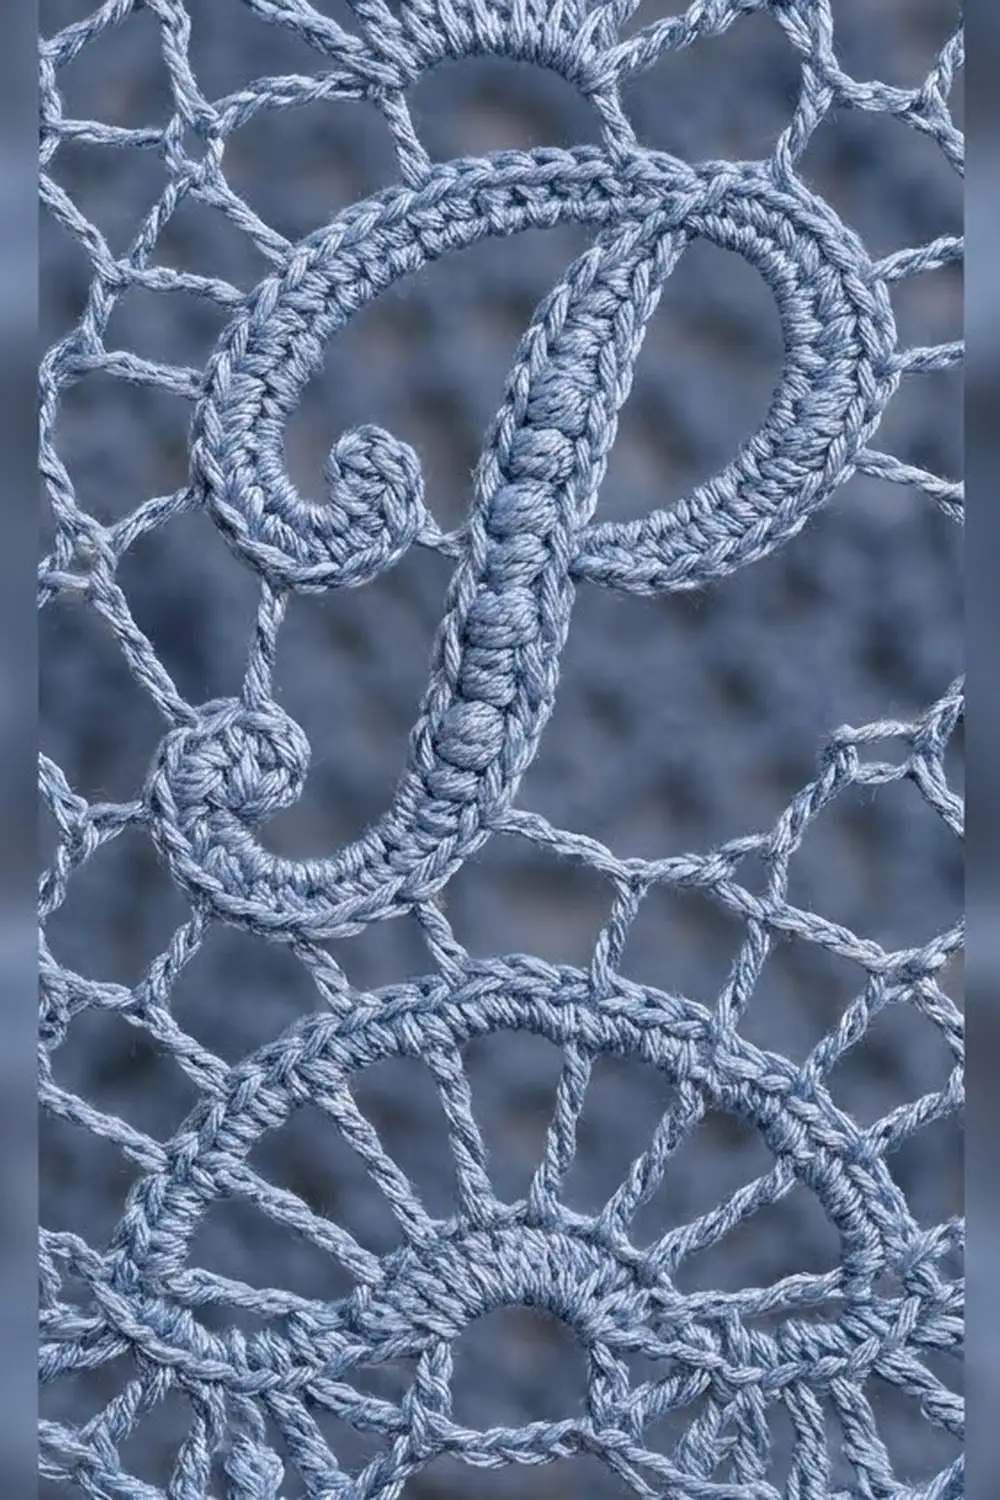
P Appliqué (Make 8)
Row 1: Ch 76. Sc in 2nd ch from hook and in each ch across. Turn. (75 sc.)
Row 2: Ch 1, sl st in BLO of each sc across. (75 sl sts.) Fasten off, leaving a 24″ (61.0 cm) tail.
The sl st row makes the stitched center line. The cord is about 15″ (38.1 cm) long and 0.3″ (0.8 cm) wide.
Shaping the P: Count from the starting end of the cord.
– Sc 1–10 form a small flourish that curls up and to the left at the foot. This is about 2″ (5.1 cm) of cord.
– Sc 11–40 form a gently slanted stem about 6″ (15.2 cm) tall.
– Sc 41–75 loop over the top and around to the right. This 7″ (17.8 cm) section forms the bowl, which tucks back across the stem at mid-height.
Draw this shape on scrap paper at 4″ x 6″ (10.2 x 15.2 cm). Pin each cord to the template so all 8 letters match.
Make All Pieces
- Panels: 2, periwinkle blue
- P appliqués: 8, periwinkle blue (4 per panel)
  PANEL A          PANEL B
 [T] [T] [T] [T]  [T] [T] [T] [T]
     FAN              FAN
      P                P
     FAN              FAN
      P                P
     FAN              FAN
      P                P
     FAN              FAN
      P                P
     FAN              FAN
  ~scallops~       ~scallops~
Joining
The two panels are not sewn to each other. They hang side by side on the rod. Joining here means sewing the monograms onto the panels.
Placement: Each P is centered in its repeat’s net rows 7–24. That area is 18 rows, or 9″ (22.9 cm) tall. Center the letter over the line between units 14 and 15. This leaves about 1.5″ (3.8 cm) of clear net above and below the 6″ (15.2 cm) letter.
The narrowest part of the field is 14 units, or 8″ (20.3 cm), so the 4″ (10.2 cm) letter has room on both sides.
Method: Lay the panel flat with the RS up and pin the P in place. Using the tail, whipstitch along both long edges of the cord. Catch the back bar of every second sc and pass through the dc post or chain directly underneath. Where the cord crosses an open space, take a stitch on each side of the space. Never pull the stitch across the space.
Tension: Each stitch should snug the cord down without dimpling the net. If the mesh puckers, loosen the last stitches before you go on. Weave in ends along the cord’s WS.
Size checkpoint: After all 4 letters are sewn on, the panel must still lie flat at 16″ x 52″ (40.6 x 132.1 cm).
Border
Border gauge: 20 sc = 4″ (10.2 cm). Along the sides, work 5 sc into every 2 row ends: 104 rows ÷ 2 x 5 = 260 sc, or 5 sc per inch (2.5 cm).
Rnd 1: With RS facing, join yarn at the top right corner.
– Top edge: work into the foundation chain, 1 sc in each of the 85 chs. (85 sc)
– Ch 1 for the corner.
– Left side: 260 sc. (260 sc)
– Ch 1 for the corner.
– Bottom edge: 1 sc in each of the 85 sts. (85 sc)
– Ch 1 for the corner.
– Right side: 260 sc. (260 sc)
– Ch 1 for the corner, then sl st to the first sc.
(690 sc + 4 corner ch-1 sps.) The side counts include their corner sts. The ch-1 corners are not counted.
Rnd 2:
– Top: ch 1, sl st in each of the 85 sc.
– Sl st in the corner sp.
– Left side: sc in next 4 sc, picot. Rep 65 times. (260 sc, 65 picots)
– Sc in the corner sp.
– Bottom: sc in the first sc, ch 5, sk next 5 sc, sc in next sc. Rep 14 times. (14 ch-5 loops)
– Sc in the corner sp.
– Right side: work as for the left side. (260 sc, 65 picots)
– Sl st in the last corner sp and join. Fasten off.
Rnd 3 (bottom only): Join yarn at the first bottom sc. In each ch-5 loop, work (sc, hdc, 3 dc, picot, 3 dc, hdc, sc). Then sl st in the next sc. (14 scallops of 10 sts each, plus 14 picots.) Fasten off.
Tabs: On the top edge, number the 85 sts from right to left. The tabs go over sts 1–7, 27–33, 53–59, and 79–85. For each tab:
– Sl st in the first st of the tab.
– Ch 24, sk 5 sts, sl st in the 7th st.
– Turn. Work 34 sc into the loop.
– Sl st in the tab’s first st. Fasten off.
Each tab stands about 2″ (5.1 cm) tall and fits a rod up to 1″ (2.5 cm) in diameter.
Why the math works:
– Bottom: 85 = 1 + (14 x 6), so the 14 loops end exactly at the corner.
– Sides: 260 = 65 x 4, so the picots are evenly spaced.
– Top: 4 tabs x 7 sts + 3 gaps x 19 sts = 85, so the outer tabs sit flush with the corners.
– Final width: 16″ + 0.5″ + 0.5″ = 17″ (43.2 cm).
– Final length: 52″ + 0.25″ + 1.5″ = 53.75″ (136.5 cm).
Final Blocking
- Soak the panel in cool water with a little wool wash for 15 minutes.
- Press out the water. Roll the panel in towels and press again. Don’t wring it.
- Lay it RS up and pin the four corners at 17″ x 53.75″ (43.2 x 136.5 cm).
- Pin the sides straight every 4″ (10.2 cm), lining the picots up on the edge.
- Pin each bottom scallop at its picot so the curve is even.
- Smooth each fan so the spokes radiate cleanly. Open each ring into a round curl.
- Flatten the P appliqués with your fingertips.
- Let it dry completely, at least 24 hours, before you unpin.
Final Quality-Control Checklist
- [ ] Every row has 85 sts (28 units).
- [ ] 5 fans and 4 monograms per panel, evenly spaced.
- [ ] Side waves are mirrored and step evenly every 3 rows.
- [ ] All rings sit on the RS.
- [ ] All 8 P appliqués are the same shape and size.
- [ ] Each side has 260 sc and 65 picots; the bottom has 14 scallops.
- [ ] Tabs are centered over sts 1–7, 27–33, 53–59, and 79–85.
- [ ] Both panels block to 17″ x 53.75″ (43.2 x 136.5 cm).
- [ ] All ends are woven in securely.
Troubleshooting
- Panel narrows or flares: Recount the units. A missed or extra unit shifts the whole wave.
- Panel too long: Your dc rows are tall. Shorten your loops or go down a hook size.
- Fans look like triangles: Keep the ch-1 in each SpK loose so the spokes fan open. Then block them into a curve.
- Wave looks jagged: Block the bands firmly. Make sure each SB is exactly 3 dc.
- Side border ruffles or pulls in: Keep 260 sc per side, but spread them more evenly. Check that every 5 sc measure 1″ (2.5 cm).
- P puckers the net: Snip the sewing and restitch with looser tension.
- Tabs too tight for your rod: Lengthen the ch-24 to ch-28 and work 40 sc into the loop.
Care
Hand wash cool and dry flat. Re-pin the scallops if needed. Hang the panels out of strong, direct afternoon sun to limit fading.
Final Notes
The measurement chain is simple:
– 7 units = 4″ (10.2 cm), so 28 units = 16″ (40.6 cm).
– 8 rows = 4″ (10.2 cm), so 104 rows = 52″ (132.1 cm).
– The border adds 0.5″ (1.3 cm) to each side, 0.25″ (0.6 cm) at the top, and 1.5″ (3.8 cm) at the bottom, for a finished panel of 17″ x 53.75″ (43.2 x 136.5 cm).
To make a longer panel, add another 24-row repeat and one more P. Each repeat adds 12″ (30.5 cm) and 60 sc per side, and keeps every border count working.
Happy crocheting!