

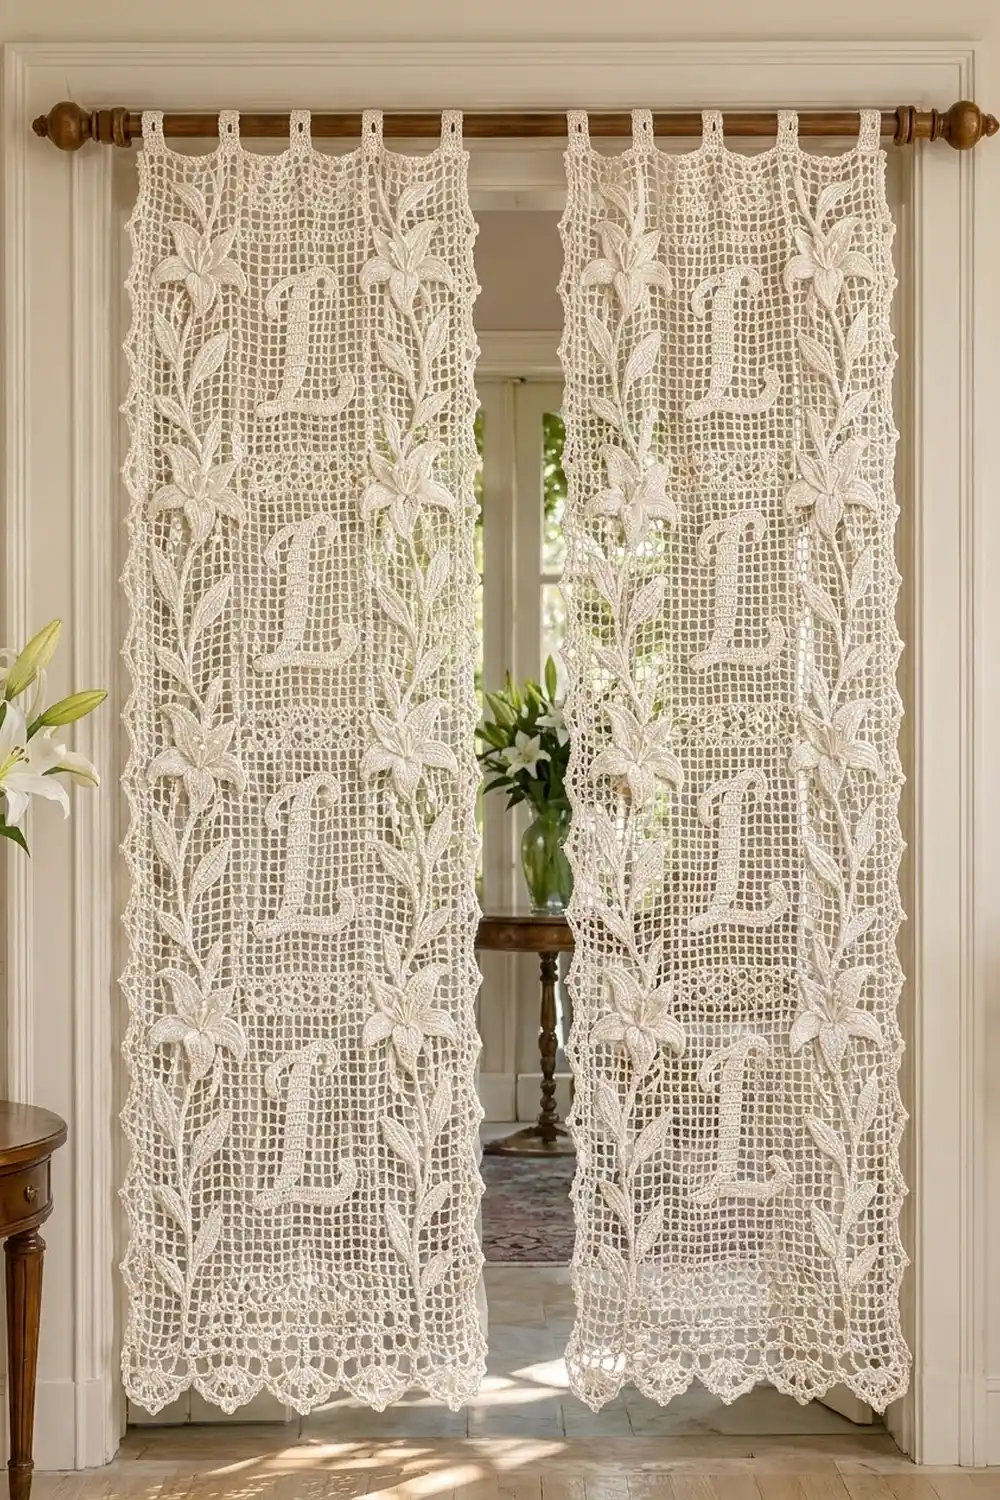
This curtain is a pair of ivory filet panels. Each panel has four monogram “L” letters stacked down the center, with climbing lily vines along both sides. The open mesh lets light through, while the raised lilies and leaves give the lace depth.
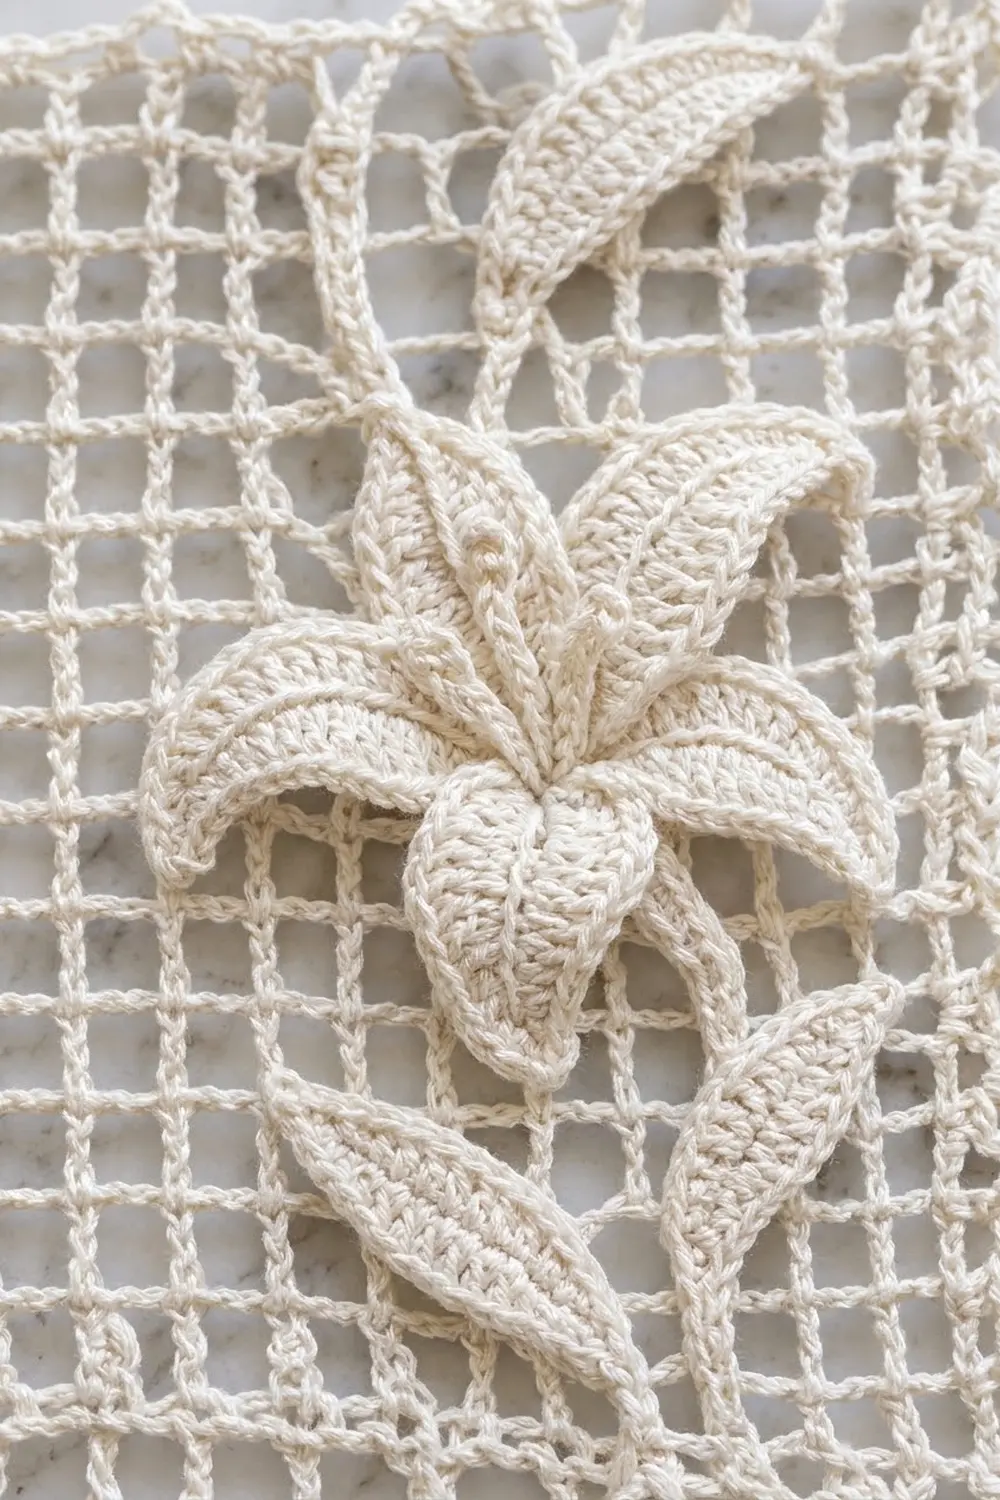
Everything is worked in one natural ivory cotton, so the texture does the decorating. Solid filet blocks form the letters and the dotted divider rows. The lilies and leaves are crocheted separately and sewn on so they stand up from the mesh.
This pattern uses US terms. Each finished panel measures 20.5 in (52.1 cm) wide by 54 in (137.2 cm) long, or 56 in (142.2 cm) including the tabs.
Each panel is worked from the bottom up in filet rows. You then add the surface vines, sew on the appliqués, work the border and add the tabs. You’ll make two identical panels. They hang side by side and are never joined.
Finished Size and Construction
- Finished size (each panel): 20.5 in x 54 in (52.1 cm x 137.2 cm); 56 in (142.2 cm) with tabs
- Skill level: Intermediate
- Terminology: US
- Yarn weight: Sport (2) mercerized cotton
- Hook: 3.0 mm
- Number of pieces: 2 panels, plus 16 lilies (96 petals, 16 centers) and 48 leaves
- Layout: 2 panels side by side on one rod
- Panel size before border: 20 in x 52 in (50.8 cm x 132.1 cm), which is 40 meshes x 104 rows
- Border depth: 0.25 in (0.6 cm) on the top and sides; 1.75 in (4.4 cm) at the bottom
Materials
Choose a smooth mercerized cotton in sport weight. It gives crisp filet blocks and holds its shape after washing. Avoid fuzzy blends, because they blur the monograms.
- Ivory: 1,200 g (about 4,080 m) total, which is 600 g (about 2,040 m) per panel
These amounts include a margin of about 10% for swatching and appliqué tails.
Tools:
– 3.0 mm crochet hook
– Tapestry needle
– Locking stitch markers (about 20)
– Rust-proof pins
– A blocking surface at least 22 in x 56 in (55.9 cm x 142.2 cm)
– Spray bottle
– Measuring tape
Abbreviations (US Terms)
- ch: chain
- sl st: slip stitch
- sc: single crochet
- hdc: half double crochet
- dc: double crochet
- tr: treble crochet
- sp: space
- st(s): stitch(es)
- RS / WS: right side / wrong side
Special stitches:
– Open mesh: ch 2, skip 2, dc in the next dc.
– Block: 2 dc in the ch-2 sp (or dc in each of the next 2 dc), then dc in the next dc.
– Picot: ch 3, sl st in the 3rd ch from the hook.
Each mesh is 3 stitches wide. A row of 40 meshes always has 121 stitches: 41 dc posts plus 40 two-stitch fillings.
Gauge and Checkpoints
Filet gauge: 10 meshes x 10 rows = 5 in (12.7 cm) square. Each mesh is 0.5 in (1.3 cm).
Sc gauge: 24 sc x 26 rows = 4 in (10.2 cm).
Make a test swatch first:
1. Ch 39.
2. Dc in the 4th ch from the hook and in each ch across. (37 sts, which is 12 blocks)
3. Work 11 rows of open mesh.
4. Measure the center 10 x 10 meshes.
Also make one leaf and one petal as a test. The leaf should be 2 in (5.1 cm) long and the petal 2.3 in (5.8 cm) long.
Panel checkpoints:
– Row 1: 20 in (50.8 cm) wide
– Row 27: 13.5 in (34.3 cm) tall
– Row 52: 26 in (66.0 cm) tall
– Row 104: 52 in (132.1 cm) tall
If your swatch is too big, go down 0.25 mm in hook size. If it’s too small, go up 0.25 mm. If only the height is off, change how high you pull up your dc loops instead of changing the hook.
Panel (Make 2)
Mesh positions: Meshes are numbered 1–40, with mesh 1 at the right edge when the RS faces you. Odd rows are RS rows and start at mesh 1. Even rows are WS rows and start at mesh 40.
Turning chains: If the first mesh of the row is open, ch 5 (counts as dc + ch 2). If it’s a block, ch 3 (counts as dc). Work the last dc of each row into the top of the turning chain.
Fields: Meshes 1–10 and 31–40 are the vine fields, each 5 in (12.7 cm) wide. Meshes 11–30 are the monogram field, 10 in (25.4 cm) wide.
Row 1 (RS): Ch 123. Dc in the 4th ch from the hook and in each ch across. (121 sts, 40 blocks)
Rows 2–3: Open mesh across. (40 open meshes, 121 sts)
Monogram Section (Work 4 Times)
Each section is 24 rows, or 12 in (30.5 cm). The L takes up motif rows M1–M20. Any mesh not listed as a block is open.
- Section rows 1–2: Open mesh across.
- M1–M3: Blocks at meshes 15–27. (13 blocks, the foot of the L)
- M4–M5: Blocks at meshes 15–16 (the upturned tip of the foot) and 24–26 (the stem). (5 blocks)
- M6–M18: Blocks at meshes 24–26. (3 blocks)
- M19–M20: Blocks at meshes 23–27. (5 blocks, the top serif)
- Section rows 23–24: Open mesh across.
Each letter is 6.5 in (16.5 cm) wide and 10 in (25.4 cm) tall.
Divider row: Blocks at the odd-numbered meshes, open mesh at the even-numbered meshes. (20 blocks, 20 open)
Row Map
- Section A: Rows 4–27 (M1 = Row 6)
- Divider: Row 28
- Section B: Rows 29–52 (M1 = Row 31)
- Divider: Row 53
- Section C: Rows 54–77 (M1 = Row 56)
- Divider: Row 78
- Section D: Rows 79–102 (M1 = Row 81)
- Row 103: Open mesh across.
- Row 104: Blocks across. (121 sts, 40 blocks) Fasten off.
The total is 1 + 2 + (4 x 24) + 3 + 1 + 1 = 104 rows, which is 52 in (132.1 cm).
Surface Vines
With the RS facing and the yarn held behind the panel, work surface slip stitches from Row 3 to Row 102. Follow the line of dc posts between meshes 5 and 6. Repeat between meshes 35 and 36.
For gentle curves, shift one post line to the left or right every 6 rows. Keep the slip stitches loose so the panel doesn’t pucker.
Lily Appliqué (Make 8 Per Panel)
Petal (Make 6 Per Lily)
Ch 14.
Side 1: Sc in the 2nd ch from the hook, hdc in the next ch, dc in the next 3 ch, tr in the next 4 ch, dc in the next 2 ch, hdc in the next ch. (12 sts) Work 3 sc in the last ch.
Side 2: Working along the opposite side of the chain, hdc in the next ch, dc in the next 2 ch, tr in the next 4 ch, dc in the next 3 ch, hdc in the next ch, sc in the next ch. (12 sts)
Ch 2, then sl st in the first sc to make the pointed tip. (27 sts plus the ch-2 tip) Fasten off, leaving an 8 in (20.3 cm) tail.
Center
Make a magic ring.
Rnd 1: Ch 1, 8 sc in the ring, sl st to the first sc. (8 sc)
Rnd 2: Ch 1, 2 sc in each st around, sl st to join. (16 sc)
Stamens: Ch 9, sl st in the 4th ch from the hook to make the anther loop, sl st in the next 5 ch, sl st in the next 3 sc of the center. Work from * 5 times in total. (5 stamens) Sl st in the last sc and fasten off.
Assembly
- Sew 3 petals by their bases to the back of the center, spaced evenly. This is the back layer.
- Pinch the base of each of the remaining 3 petals with 2 stitches so it cups upward.
- Sew these 3 petals on top, in the gaps between the back petals. This is the front layer.
Each lily is about 4.5 in (11.4 cm) across.
Leaf (Make 24 Per Panel)
Ch 12.
Side 1: Sc in the 2nd ch from the hook, hdc in the next ch, dc in the next 2 ch, tr in the next 3 ch, dc in the next 2 ch, hdc in the next ch. (10 sts) Work 3 sc in the last ch.
Side 2: Working along the opposite side of the chain, hdc in the next ch, dc in the next 2 ch, tr in the next 3 ch, dc in the next 2 ch, hdc in the next ch, sc in the next ch. (10 sts)
Ch 2, sl st in the first sc. (23 sts plus the ch-2 tip) Each leaf is 2 in (5.1 cm) long and 0.9 in (2.3 cm) wide.
Make All Pieces
All pieces are ivory.
| Piece | Per panel | Total |
|---|---|---|
| Filet panels | 1 | 2 |
| Lily centers | 8 | 16 |
| Petals | 48 | 96 |
| Leaves | 24 | 48 |
| Tabs (worked onto the panel) | 5 | 10 |
Layout of one panel (the same for both):
[tab]  [tab]  [tab]  [tab]  [tab]
| vine+lily |  L  | vine+lily |   Section A
| leaves    | ::: | leaves    |   divider
| vine+lily |  L  | vine+lily |   Section B
| leaves    | ::: | leaves    |   divider
| vine+lily |  L  | vine+lily |   Section C
| leaves    | ::: | leaves    |   divider
| vine+lily |  L  | vine+lily |   Section D
\_/\_/\_/\_/\_/\_/\_/\_/\_/\_/\_/\_/  12 scallops
On the rod: [Panel 1] [Panel 2], hung side by side and not joined.
Joining: Attaching the Appliqués (No Panel Joining)
The panels are never joined to each other. The only joining in this project is sewing the appliqués onto each panel.
Placement: On each side of each section, center one lily over the vine at motif rows M10–M14. Add 3 leaves per side at M2, M6 and M18, alternating sides of the vine. Pin everything before you sew.
How to sew: Tack the petal bases and each leaf’s 3-sc base to dc posts, never to a chain. Catch only one strand of the mesh. Leave the petal tips and the outer half of each leaf free so they stand up from the panel.
Tension: Make your sewing stitches snug but not tight. A pulled stitch distorts the square mesh around it.
Size checkpoint: With all the appliqués on, the panel should still lie flat at 20 in x 52 in (50.8 cm x 132.1 cm). If it measures narrower, loosen the stitches that are pulling.
Border
Border gauge: The sc gauge is 6 sc per inch. Each mesh is 3 sts and 0.5 in (1.3 cm) wide, so working 1 sc per stitch along the top and bottom matches the sc gauge. Each row is also 0.5 in (1.3 cm) tall, so 3 sc per row end along the sides matches it too. This keeps the edges flat.
The side counts below don’t include the corner ch-2 spaces.
Round 1 (RS): Join the yarn in the last st of Row 104 and ch 1.
- Top: Sc in each st across. (121 sc) Ch 2.
- Left side: 3 sc in each row end. (104 x 3 = 312 sc) Ch 2.
- Bottom: Sc in each free loop of the foundation chain. (121 sc) Ch 2.
- Right side: 3 sc in each row end. (312 sc) Ch 2.
Sl st to the first sc. (866 sc plus 4 corner ch-2 sps) Fasten off.
Bottom Scallops
Work back and forth in rows across the 121 bottom sc only.
Row S1 (RS): Join the yarn in the first bottom sc and ch 1. Sc in the same st. Ch 3, skip 4 sc, sc in the next sc. Repeat from * across. (25 sc and 24 ch-3 loops; 1 + 24 x 5 = 121)
Row S2 (WS): Ch 1, turn. Sc in the first sc. Ch 2, skip the ch-3 loop. In the next sc work (dc, ch 1) 6 times, then 1 more dc. Ch 2, skip the ch-3 loop, sc in the next sc. Repeat from * across. (12 fans of 7 dc, 13 sc)
Row S3 (RS): Ch 1, turn. Sc in the first sc. Ch 1. Work (sc, ch 3, sc) in each of the fan’s 6 ch-1 sps. Ch 1, sc in the next sc. Repeat from * across. (12 scallops, 72 ch-3 loops) Fasten off.
Why it fits: 121 = 12 x 10 + 1. Each scallop uses 10 sts, which is 1.67 in (4.2 cm).
Side Picots
With the RS facing, join the yarn in the top corner ch-2 sp. Sc in the next 3 sc, picot. Repeat from * to the bottom corner. (104 picots, one per filet row) Fasten off. Repeat on the other side.
Tabs (Make 5)
With the RS facing, count the top sc from the right corner. Work tabs over sc 4–10, 31–37, 58–64, 85–91 and 112–118. The center tab is centered on sc 61.
Row 1: Join the yarn in the first sc of the tab and ch 1. Sc in the same st and in the next 6 sts. (7 sc)
Rows 2–26: Ch 1, turn, sc in each st across. (7 sc)
Fasten off, leaving a 10 in (25.4 cm) tail. Fold the tab to the WS and whipstitch the last row behind Round 1.
Each tab is 1.2 in (3.0 cm) wide. It makes a 2 in (5.1 cm) loop that fits a rod up to 1.25 in (3.2 cm) across.
Final Blocking
- Soak the panel in cool water for 15 minutes. Press out the water in a towel; don’t wring it.
- Pin the corners to 20.5 in x 54 in (52.1 cm x 137.2 cm).
- Pin the long sides every 4 in (10.2 cm), squaring up the rows as you go.
- Pin the point of each scallop.
- Shape the petals by hand so they curve upward. Don’t pin them.
- Let the panel dry completely before unpinning.
Final Quality-Control Checklist
- Every filet row has 121 sts (40 meshes)
- All 4 letters match: 13-block foot, 3-block stem, 5-block serif
- Each side border has 312 sc and 104 picots
- Each panel has 12 even scallops, 8 two-layer lilies and 24 leaves
- The 5 tabs on each panel are evenly spaced and the same length
- Both panels measure 20.5 in x 54 in (52.1 cm x 137.2 cm)
Troubleshooting
- Mesh slants: The turning chain is too tight. Loosen your ch 5.
- Letters look blurry: A block has extra dc. Each block must be exactly 3 sts.
- Panel is too short: Pull up taller dc loops, or add an open row before Row 104.
- Sides ruffle: There are more than 3 sc per row end. Undo that side and recount.
- Lilies droop: Restitch the pinched petal bases more firmly and reshape them while damp.
Care
Hand wash in cool water with mild soap, and dry flat, reshaping the lilies while damp. Don’t tumble dry.
Final Notes
Each 0.5 in (1.3 cm) mesh builds the finished size. 40 meshes x 104 rows give 20 in x 52 in (50.8 cm x 132.1 cm). The border adds 0.25 in (0.6 cm) to the top and sides and 1.75 in (4.4 cm) to the bottom, for 20.5 in x 54 in (52.1 cm x 137.2 cm). The tabs bring the hanging length to 56 in (142.2 cm). Check your measurements at the swatch, at Row 27 and at Row 104, and your two panels will match.
Happy crocheting!