

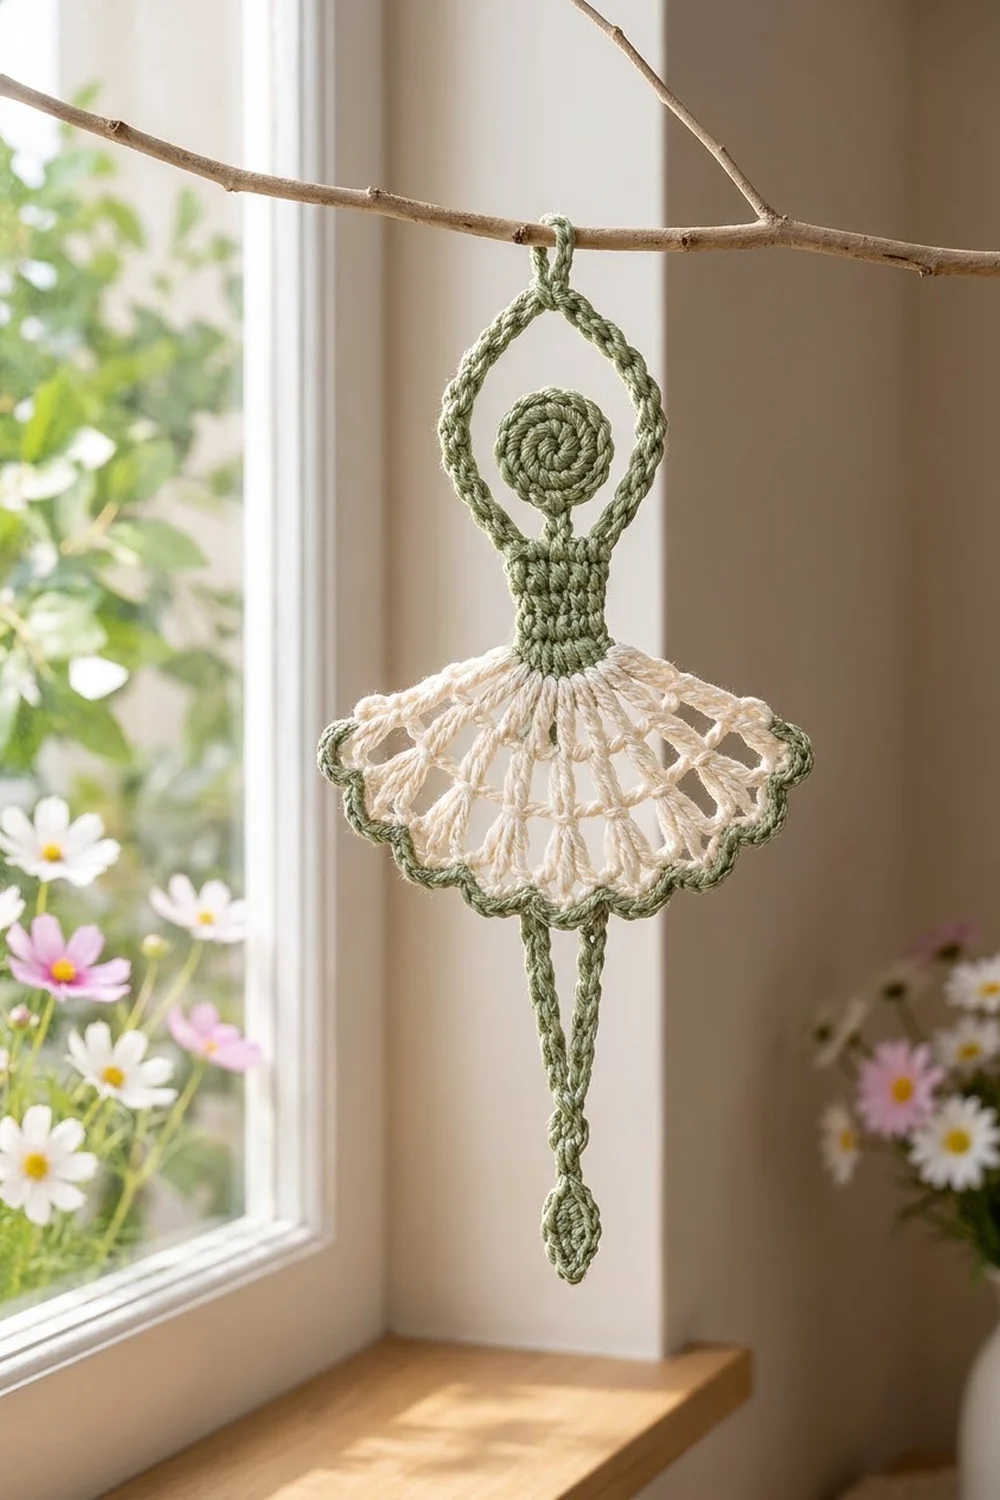
The Sage Pirouette Ballerina is a small lace figure. She has a spiral head, arms raised in a teardrop loop, a neat little bodice, and a cream fan tutu edged in soft sage green. Two slim legs come down from the tutu and meet at one pointed foot, so she looks like she is up on her toes.
The palette is sage green and cream. It looks fresh and a little vintage, and it suits a nursery, a dance-themed gift, or a window ornament. The tutu is the lacy part. Everything else is worked in solid stitches or corded chains, so her outline stays clear.
This pattern uses US crochet terms. The finished motif is about 10.25 in (26.0 cm) tall from the hanging loop to the toe, and 5 in (12.7 cm) wide across the tutu.
Here is the order of work. You make a spiral head separately. Then you work the bodice in rows, and the arm loop grows straight off the last bodice row. The tutu is worked downward from the bodice’s foundation chain, and a green border finishes it. You add the legs and foot last, sew the head in place, and block.
Finished Size and Construction
- Finished size: 10.25 in (26.0 cm) tall x 5 in (12.7 cm) wide
- Skill level: Easy-intermediate
- Terminology: US crochet terms
- Yarn weight: DK / light worsted (#3) cotton
- Hook: 3.5 mm (E-4)
- Number of pieces: 1 motif (the main body is worked in one go, plus 1 small head circle that you sew in)
- Layout: Single figure that hangs vertically
- Piece size: head 1.25 in (3.2 cm) across; bodice 1.4 in (3.6 cm) wide x 1.25 in (3.2 cm) tall; arm loop 2.75 in (7.0 cm) tall
- Size before border: tutu 4.75 in (12.1 cm) wide x 2.5 in (6.4 cm) deep
- Border depth: about 0.25 in (0.6 cm) at the scallops, about 0.125 in (0.3 cm) on each side
Materials
Use a smooth mercerized or matte cotton in DK weight, about 230 m per 100 g. Cotton keeps the spokes crisp and holds the scallops after blocking. Acrylic will work, but the lace will look softer.
- Sage green: 15 g (about 35 m)
- Cream/ivory: 10 g (about 23 m)
Tools:
- 3.5 mm (E-4) crochet hook
- Tapestry needle
- Scissors
- 2 stitch markers
- Rust-proof pins and a blocking mat
- Spray bottle
- Optional: fabric stiffener for a firmer hanging ornament
These quantities include a margin of about 30 percent for swatching and weaving in ends.
Abbreviations (US Terms)
- ch – chain
- sl st – slip stitch
- sc – single crochet
- hdc – half double crochet
- dc – double crochet
- tr – treble crochet
- sp(s) – space(s)
- st(s) – stitch(es)
- RS – right side
- rep – repeat
- MR – magic ring
Special technique – corded chain: Make a chain, then work 1 sc into the back bump of each chain. The front of the chain stays smooth and rounded, so the strand looks like a thick braided cord. This technique forms the arms and the legs.
Gauge and Checkpoints
Gauge: 20 sc and 22 rows = 4 in (10.2 cm) in sc rows. In chains, 5 ch = 1 in (2.5 cm).
Make one complete motif before planning any more. Measure at each checkpoint:
- Head: 1.25 in (3.2 cm) across after Round 4.
- Bodice: 1.4 in (3.6 cm) wide x 1.25 in (3.2 cm) tall after Row 7.
- Arm loop: about 2.75 in (7.0 cm) from the bodice top to the base of the hanging loop, and about 1.9 in (4.8 cm) wide at its widest.
- Tutu before border: 4.75 in (12.1 cm) wide x 2.5 in (6.4 cm) deep.
- Finished tutu: 5 in (12.7 cm) wide.
If your piece is too big, go down to a 3.25 mm (D-3) hook. If it is too small, go up to a 3.75 mm (F-5) hook. Adjust at the bodice checkpoint. A small difference there grows by the time you reach the tutu scallops.
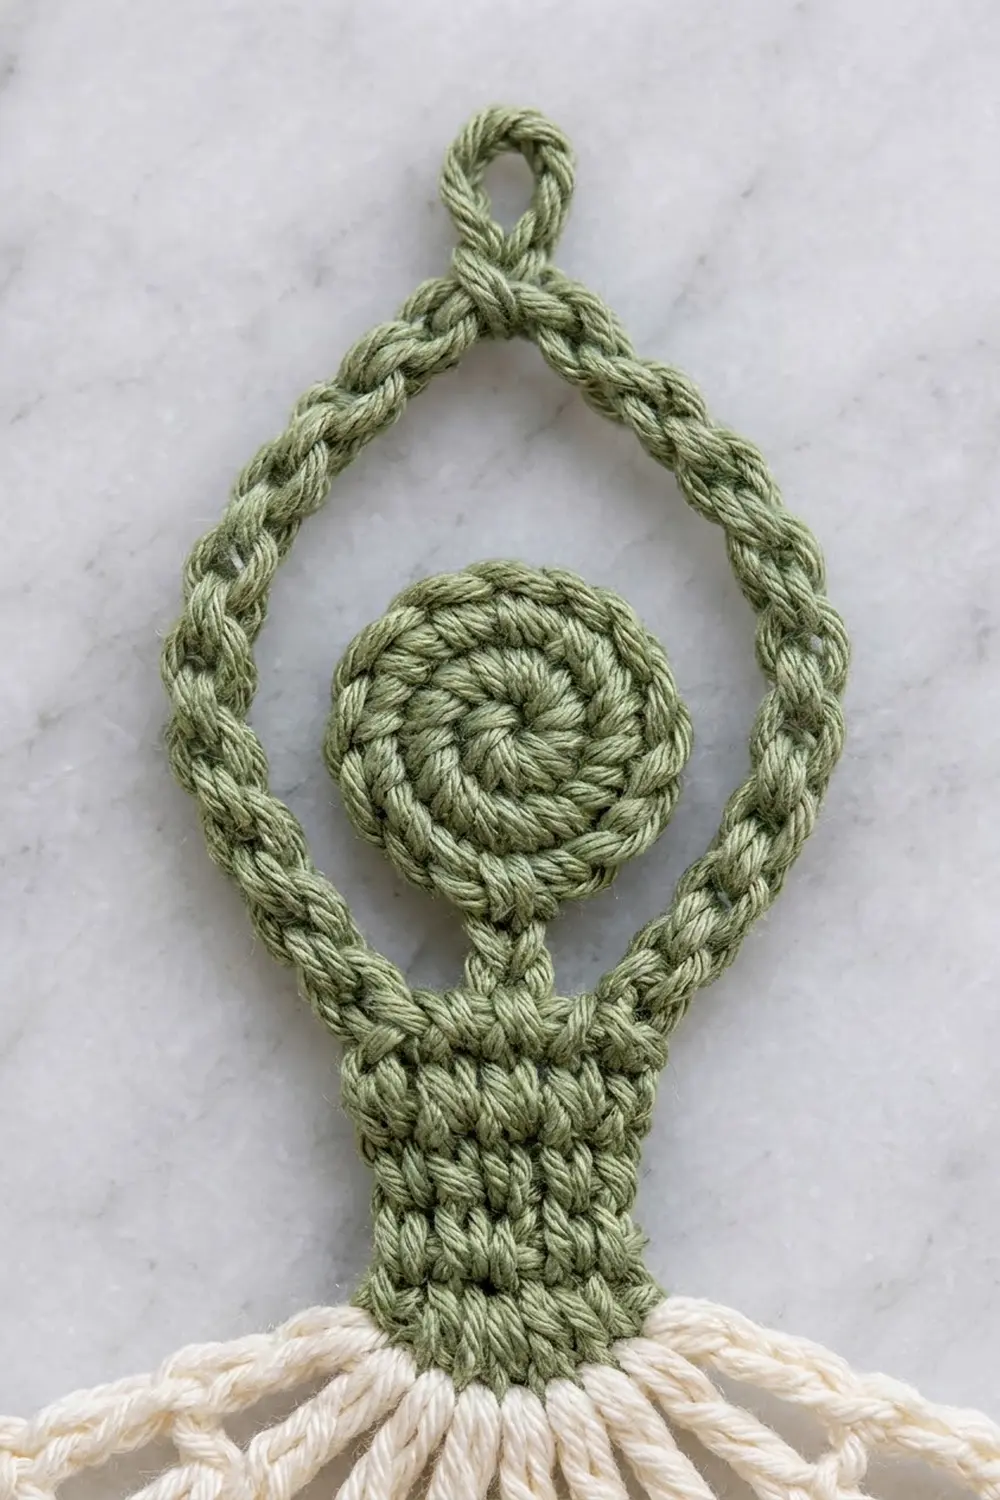
Head (Sage Green)
Work in a continuous spiral. Do not join rounds. Mark the first stitch of each round.
Round 1: Make a MR, then work 6 sc in the ring. (6 sts)
Round 2: 2 sc in each st around. (12 sts)
Round 3: *Sc in next st, 2 sc in next st; rep from * 5 more times. (18 sts)
Round 4: Working in back loops only, sl st loosely in each st around. (18 sl sts)
The back-loop slip stitches leave a raised ridge that traces the spiral. Fasten off and leave a 10 in (25.4 cm) tail for sewing. Pull the magic ring tight.
Checkpoint: 1.25 in (3.2 cm) across.
Bodice (Sage Green)
The bodice is worked in turned rows. The foundation chain is the waist, and Row 7 is the neckline.
Foundation: Ch 8.
Row 1: Sc in 2nd ch from hook and in each ch across. (7 sc)
Rows 2–7: Ch 1, turn, sc in each st across. (7 sc per row)
Do not fasten off. Your hook is now at one top corner of the bodice.
Checkpoint: 1.4 in (3.6 cm) wide x 1.25 in (3.2 cm) tall.
Arms and Hanging Loop (Sage Green)
You make the arm loop straight from the bodice’s top corners.
Arm chain: Ch 38. Sl st in the first sc of Row 7, which is the opposite top corner. The chain now arches over the bodice top.
Cording row: Ch 1, turn. Working in the back bumps of the chain, sc in each of the first 19 ch. Ch 6 and sl st in the last sc you made to form the hanging loop. Sc in each of the remaining 19 ch. Sl st in the last sc of Row 7 to anchor the arm. (38 sc + one ch-6 loop)
Fasten off.
Pinch the top of the arch where the ch-6 loop sits so the arms come to a soft point. This gives the teardrop shape.
Checkpoint: about 2.75 in (7.0 cm) tall from the bodice top to the base of the loop. The hanging loop adds about 0.5 in (1.3 cm).
Tutu (Cream)
Turn the bodice upside down so the foundation chain is on top. You work the tutu into the 7 free loops of the foundation chain. It fans downward from the waist.
Row 1: With RS facing, join cream in the first free loop. Ch 3 (counts as dc), dc in the same loop, 2 dc in each of the next 5 loops, dc in the last loop. (13 dc)
Row 2: Ch 5, turn (counts as tr + ch 1). *Tr in next dc, ch 1; rep from * 10 more times. Tr in the top of the turning ch. (13 tr, 12 ch-1 sps)
Row 3: Ch 6, turn (counts as dc + ch 3). *Dc in next tr, ch 3; rep from * 10 more times. Dc in the 4th ch of the turning ch. (13 dc, 12 ch-3 sps)
These long spokes and widening spaces create the open fan shown in the tutu. Checkpoint: about 4 in (10.2 cm) across the bottom of Row 3.
Row 4: Ch 1, turn. Sc in the first dc. *Ch 7, skip next dc, sc in next dc; rep from * 5 more times. (7 sc, 6 ch-7 arches)
The sc stitches land on spokes 1, 3, 5, 7, 9, 11, and 13, so the arches stay symmetrical. Spoke 7 is the center.
Row 5: Ch 1, turn. *(2 sc, hdc, 5 dc, hdc, 2 sc) in next ch-7 arch; rep from * 5 more times. Sl st in the last sc of Row 4. (6 scallops of 11 sts = 66 sts)
Fasten off cream.
Checkpoint: 4.75 in (12.1 cm) wide x 2.5 in (6.4 cm) deep.
Border (Sage Green)
Border gauge: On the straight side edges, the border follows the main gauge, 5 sc per 1 in (2.5 cm). Each tutu side edge measures about 1.6 in (4.1 cm), so 8 sc per side sits flat.
Border Row 1: With RS facing, join green at the waist end of tutu Row 1 on the right side. Ch 1.
- Right side edge: Work 2 sc around the post of the Row 1 dc, 3 sc around the Row 2 tr, 2 sc around the Row 3 dc, and 1 sc in the end of Row 4. (8 sc)
- Scallop edge: Work 1 sc in each of the 66 sts of Row 5, except work 3 sc in the center (3rd) dc of each scallop. (66 + 12 = 78 sc)
- Left side edge: Work 1 sc in the end of Row 4, 2 sc around the Row 3 dc, 3 sc around the Row 2 tr, and 2 sc around the Row 1 dc. (8 sc)
Total: 8 + 78 + 8 = 94 sc.
Border Row 2: Turn. Sl st loosely in each sc across. (94 sl sts)
Fasten off. The slip stitches cap the sc with a rounded, cord-like rim that matches the arms.
Why the math works: On the sides, one sc matches the height of one sc gauge row. A dc stands about 2 sc tall, so it gets 2 sc. A tr stands about 3 sc tall, so it gets 3 sc. An sc row end gets 1 sc. That gives 2 + 3 + 2 + 1 = 8 per side. On the scallops, each of the 66 stitches gets exactly 1 sc. Each scallop tip also gets 2 extra stitches (13 sc per scallop instead of 11), which lets the border turn the curve without cupping. You do not need extra stitches in the valleys, because the inward curve naturally takes up less length.
Checkpoint: tutu now 5 in (12.7 cm) wide.
Legs and Foot (Sage Green)
Count the scallops from right to left. The legs hang from scallops 3 and 4, which are the two center scallops.
- Join green with a sl st in the Border Row 2 st at the center tip of scallop 3. This is the center of that scallop’s 3-sc group.
- Leg 1: Ch 12.
- Foot: Ch 6 and sl st in the 6th ch from the hook to form a small loop at the ankle. In the loop, work (sc, hdc, 2 dc, ch 1, 2 dc, hdc, sc). Sl st in the ankle st. (8 sts + ch-1 tip) The ch-1 gives the foot its pointed toe.
- Leg 2: Ch 12. Sl st in the Border Row 2 st at the center tip of scallop 4.
- Cording: Turn. Sc in the back bump of each of the 12 ch of Leg 2. Sl st in the ankle st. Sc in the back bump of each of the 12 ch of Leg 1. Sl st in the tip of scallop 3. (12 sc per leg)
Fasten off.
The two tips are about 0.8 in (2.0 cm) apart, and both legs have the same length. That makes the legs form a narrow V that meets at the foot. Checkpoint: the legs are about 2.25 in (5.7 cm) long and the foot is about 0.75 in (1.9 cm) long.
Attach the Head
Lay the motif flat. Center the head inside the arm loop so its lower edge just touches the middle 5 sts of bodice Row 7. Use the head tail to whipstitch the lower third of the head to the bodice top. Add 2 small stitches at each side of the head to tack it to the inner edge of the arm loop. Weave in all ends along stitches of the same color.
Final Blocking
- Lightly spray the motif until it is damp but not dripping.
- Pin the hanging loop at the top and the toe at the bottom so the figure is 10.25 in (26.0 cm) tall.
- Pin the arm loop into a smooth teardrop that is 1.9 in (4.8 cm) wide.
- Pin the bodice square: 1.4 in (3.6 cm) x 1.25 in (3.2 cm).
- Spread the tutu to 5 in (12.7 cm). Place 1 pin in each scallop tip, then straighten every spoke.
- Pin the legs into an even V and pin the foot point.
- If you are stiffening the motif, brush on fabric stiffener now.
- Let the motif dry completely, at least 12 hours, before you unpin it.
Final Quality-Control Checklist
- Head is 1.25 in (3.2 cm) across and the spiral ridge is visible.
- Bodice has 7 sc across and 7 rows.
- Arm loop has 38 sc, and the hanging loop sits at its center.
- Tutu has 13 spokes in Rows 1–3 and 6 even scallops.
- Border has 8 sc per side and 13 sc per scallop, for a total of 94.
- Both legs have 12 sc and meet at the foot.
- Finished size is 10.25 in (26.0 cm) x 5 in (12.7 cm).
- All ends are woven in and nothing shows on the RS.
Troubleshooting
Tutu cups or curls upward: Your chain spaces are too tight. Chain more loosely in Rows 2–4, or go up a hook size for the tutu only.
Tutu ruffles: The spaces are too loose. Go down a hook size for Rows 3–4.
Arm loop is lopsided: Before cording, count 19 ch on each side of the hanging loop.
Border scallops flare: You probably added extra stitches outside the tips. Check that you have 13 sc per scallop.
Legs twist: Make sure each chain is not twisted before you join it, then block the legs flat.
Head pops forward: Add another tacking stitch at each side of the head.
Care
Hand wash in cool water with mild soap, press out water in a towel, and re-block flat. If you used stiffener, spot-clean only.
Final Notes
The measurement chain is: a 1.25 in (3.2 cm) head, then a 1.4 in (3.6 cm) x 1.25 in (3.2 cm) bodice, then a 2.75 in (7.0 cm) arm loop. The tutu measures 4.75 in (12.1 cm) before the border and 5 in (12.7 cm) after it. The legs add 2.25 in (5.7 cm) and the foot adds 0.75 in (1.9 cm), for a finished height of 10.25 in (26.0 cm). If each checkpoint matches, the next stage will fall into place, and your ballerina will hang straight and balanced.
Happy crocheting!