

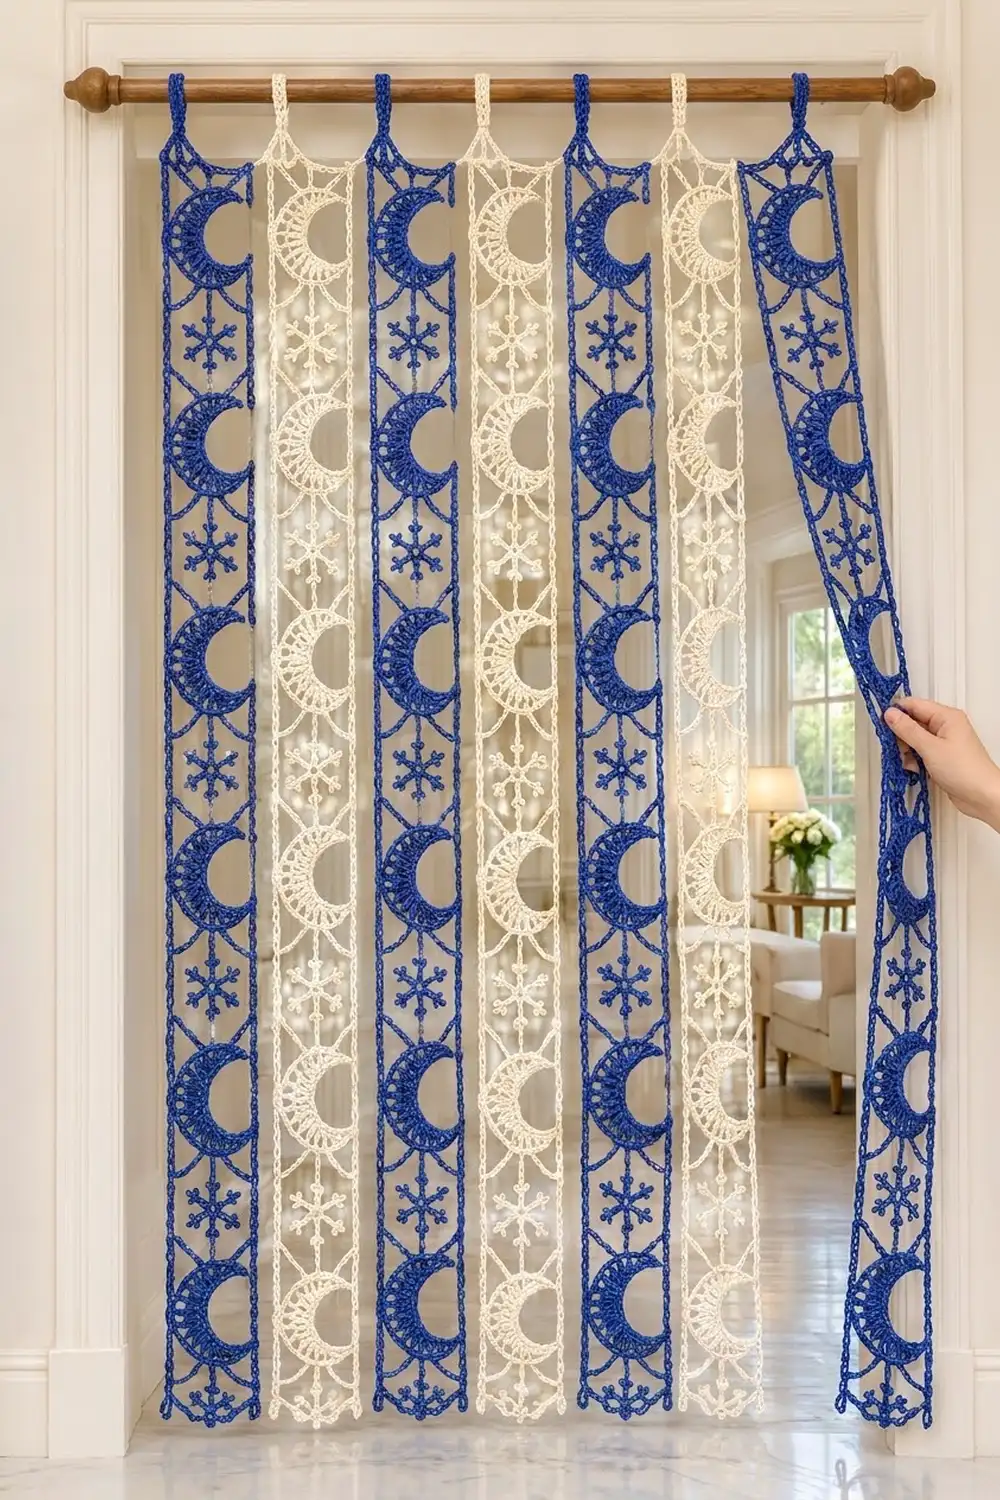
This curtain is made of seven narrow lace strips that hang from a rod and move with every breeze. Each strip is a simple chain ladder holding a column of crescent moons and small snowflakes, so light passes through while the doorway still looks dressed.
The colors alternate cobalt blue and cream: four blue strips and three cream strips, with blue on both outside edges. The look is crisp and wintry, and the open lace keeps it light enough for any season.
The pattern uses US crochet terms. Each finished strip measures 5.5 in (14.0 cm) wide and 76.5 in (194.3 cm) long, plus 1.5 in (3.8 cm) of hanging loop, for a total drop of 78 in (198.1 cm). With 1 in (2.5 cm) gaps, the seven strips cover 44.5 in (113.0 cm).
Construction is modular. You crochet the moons and snowflakes first and link them into a vertical spine. Then you work one long chain frame around the spine, joining it to the motifs as you go. A two-round border firms up the rails. The strips stay separate and are never joined to each other.
Finished Size and Construction
- Finished strip size: 5.5 in x 76.5 in (14.0 cm x 194.3 cm), plus 1.5 in (3.8 cm) of loop
- Skill level: Intermediate
- Terminology: US
- Yarn weight: Worsted (#4) mercerized cotton
- Hook: 5.0 mm (H-8)
- Number of pieces: 7 strips, each built from 6 moons and 6 snowflakes
- Layout: 7 strips side by side on one rod, not joined
- Repeat size: 12 in (30.5 cm) per moon-and-snowflake unit
- Size before border: 5 in x 76 in (12.7 cm x 193.0 cm)
- Border depth: 0.25 in (0.6 cm) on each side
Materials
Pick a smooth, firm, mercerized cotton. It holds the crescent shape, shows the stitch definition and doesn’t stretch much when hung. Avoid acrylic, because a strip this long will grow under its own weight.
- Color A, Cobalt Blue: 300 g, about 510 m (4 strips)
- Color B, Cream: 250 g, about 425 m (3 strips)
These amounts assume a yarn of about 85 m per 50 g. One strip uses about 58 g (about 98 m). The quantities above include a margin for swatching and weaving in ends.
Tools:
- 5.0 mm (H-8) crochet hook
- Tapestry needle
- Locking stitch markers (at least 10)
- Scissors and a tape measure
- Blocking mats, rust-proof pins and a spray bottle
- A curtain rod at least 48 in (121.9 cm) long
Abbreviations (US Terms)
- ch – chain
- sl st – slip stitch
- sc – single crochet
- hdc – half double crochet
- dc – double crochet
- tr – treble crochet
- sk – skip
- sp – space
- st(s) – stitch(es)
- rep – repeat
- BLO – back loop only
Branch picot: ch 3, then sl st into the same ch you just slip stitched into.
Tip loop: sl st in the 4th ch from the hook. This closes the top 3 ch into a small ring.
Gauge and Checkpoints
Gauge: 16 ch = 4 in (10.2 cm), and 16 sc worked into a chain = 4 in (10.2 cm).
Make one moon and one snowflake and check them before you make the rest. Also chain 48 and measure it without stretching. It should be 12 in (30.5 cm).
Checkpoints:
- Moon Row 1, foundation edge before it curls: 4.5 in (11.4 cm)
- Finished moon: about 4 in (10.2 cm) tip to tip and 3.5 in (8.9 cm) across the back
- Finished snowflake: 3.25 in (8.3 cm) from arm tip to arm tip
- One unit of rail: 48 ch = 12 in (30.5 cm)
If your pieces are too big, go down to a 4.5 mm hook. If they are too small, go up to a 5.5 mm hook. The chain gauge matters most, because it sets the length of every strip.
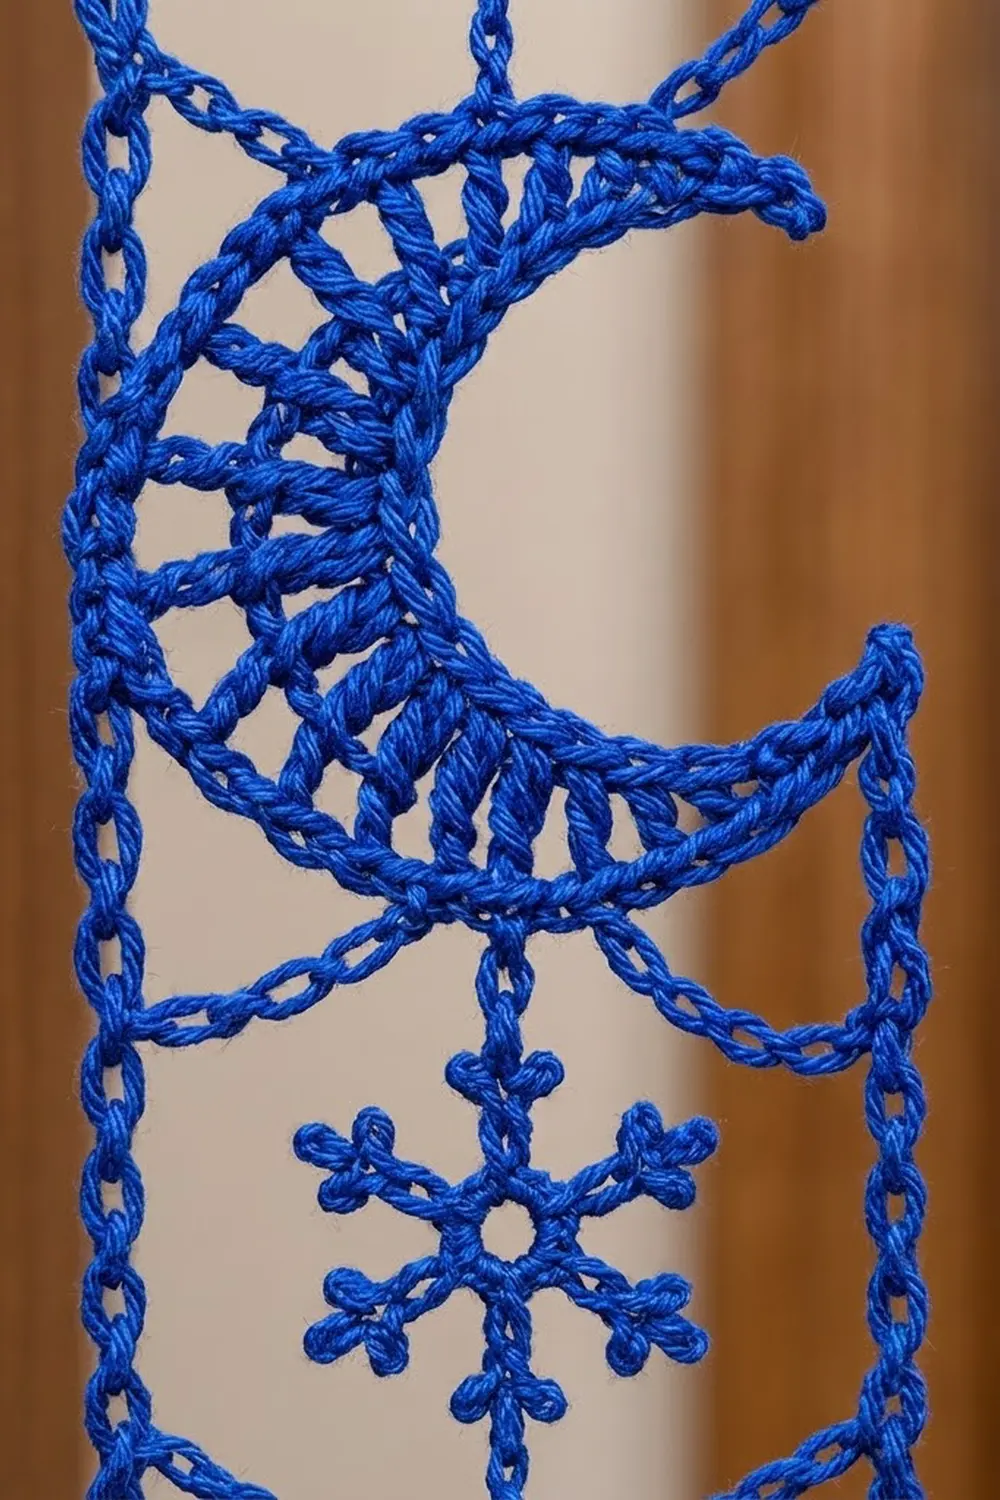
Moon (make 6 per strip)
Ch 19.
Row 1 (RS): Sl st in 2nd ch from hook, sc in next ch, hdc in next ch, dc in next ch, ch 1, [(tr, ch 1) in next ch, (tr, ch 1) twice in next ch] 5 times, dc in next ch, hdc in next ch, sc in next ch, sl st in last ch. You now have 23 sts (15 tr, 2 dc, 2 hdc, 2 sc, 2 sl st) and 16 ch-1 sps.
The tr stitches fan out, and the extra length along the top makes the row curl into a crescent. The ch-1 sps make the gaps between the spokes.
Row 2: Ch 1, turn. Sc in each st and in each ch-1 sp across. This conversion row has 23 sc worked one per st + 16 sc worked into the sps = 39 sc.
Row 3: Ch 1, turn. Loosely sl st in each sc across. This gives 39 sl sts, which form the corded rim. Fasten off and leave a 4 in (10.2 cm) tail.
Number the Row 3 sts 1 to 39, with st 1 at the end where you finished. Lay the moon flat with st 1 at the top tip, st 39 at the bottom tip and the back of the curve facing left. St 20 is the middle of the back.
Snowflake (make 6 per strip)
Ch 4, sl st in first ch to form a ring.
Rnd 1: Ch 1, 12 sc in ring, sl st in first sc. You have 12 sc.
Rnd 2: Ch 1, *sc in next sc, ch 8, tip loop, sl st in each of next 2 ch, branch picot, sl st in each of next 2 ch, sk next sc; rep from * 5 more times, sl st in first sc. You have 6 arms anchored on 6 sc. Fasten off.
Each arm is 4 ch long and ends in a 3-ch tip loop with one picot branch. Pin each snowflake so one arm points straight up. Name the arms clockwise: top, upper right, lower right, bottom, lower left and upper left.
Make All Pieces
For each strip, make 6 moons and 6 snowflakes in that strip’s color.
- Color A (blue), 4 strips: 24 moons, 24 snowflakes
- Color B (cream), 3 strips: 18 moons, 18 snowflakes
Rod layout, seen from the front (B = blue strip, C = cream strip, | = 1 in / 2.5 cm gap):
B | C | B | C | B | C | B
Joining (Building Each Strip)
You join each strip in two steps: the spine first, then the frame. The strips themselves are never joined to each other.
Step 1: Spine Links
Lay out Moon 1, Snowflake 1, Moon 2, Snowflake 2 and so on, down to Snowflake 6.
- Moon to snowflake: Join yarn in moon st 31, ch 3, sl st in the top arm tip loop of the snowflake below it. Fasten off.
- Snowflake to next moon: Join yarn in the bottom arm tip loop, ch 14, sl st in st 8 of the next moon. Fasten off. Do this for Snowflakes 1 to 5. The bottom arm of Snowflake 6 stays free.
Lay the spine flat and check that it is about 70 in (177.8 cm) long without stretching.
Step 2: Frame
The frame is one continuous chain. Each sl st join attaches the frame to a motif, and the joins are not counted as chains.
Left loop: Ch 12, sl st in first ch to form the hanging loop.
Left rail (worked downward): Ch 8 for the top tab. Then work 6 units, one for each moon-and-snowflake pair, from top to bottom:
Ch 10, sl st in moon st 14; ch 5, sl st in moon st 20; ch 5, sl st in moon st 26; ch 14, sl st in the snowflake’s upper left tip loop; ch 14. That is 10 + 5 + 5 + 14 + 14 = 48 ch per unit.
After the last unit, ch 8 for the bottom tail. The left rail has 8 + (6 x 48) + 8 = 304 ch.
Bottom bar: Ch 20.
Right rail (worked upward): Ch 8 for the tail. Then work the units from Unit 6 back up to Unit 1:
Ch 14, sl st in the snowflake’s upper right tip loop; ch 12, sl st in moon st 39; ch 14, sl st in moon st 1; ch 8. That is 14 + 12 + 14 + 8 = 48 ch per unit.
Ch 8 for the top tab. The right rail also has 304 ch.
Right loop and top bar: Ch 12, sl st in the first of these 12 ch to form the loop. Ch 20, sl st at the base of the left loop. Fasten off.
The join positions line up on both rails. Counting from the top of each unit, the snowflake sits at ch 34 on both sides. The moon tips sit at ch 8 and ch 22, beside the left-rail joins at ch 10, 15 and 20.
Tension: Chain at an even, relaxed tension, and don’t pull the motifs toward the rails. Each time you sl st to a motif, check that the rail chain beside it lies straight and that the motif lies flat.
Checkpoint: Each rail is 76 in (193.0 cm), and each bar is 5 in (12.7 cm).
Border
Border gauge: 16 sc = 4 in (10.2 cm). This matches the chain gauge because you work 1 sc into each ch.
Work the border around the outside of the frame only. Sk every sl st join and work only into the chains.
Rnd 1: Join yarn in the first ch of the left rail, just below the left loop. Work as follows:
- Left side: 1 sc in each ch = 304 sc
- Bottom: 2 sc in the first ch, 1 sc in each of the next 18 ch, 2 sc in the last ch. That is 20 worked one per ch + 2 extra at the corners = 22 sc
- Right side: 1 sc in each ch = 304 sc
- Right loop: 18 sc into the loop. That is 12 ch + 6 extra = 18 sc
- Top bar: 1 sc in each ch = 20 sc
- Left loop: 18 sc into the loop
Sl st in the first sc. Total: 304 + 22 + 304 + 18 + 20 + 18 = 686 sc.
Rnd 2: Ch 1, sl st in BLO of each sc around. This gives 686 sl sts. Fasten off.
Why the math works: Each side rail is 8 (tab) + 6 units x 48 + 8 (tail) = 304 ch. Rnd 1 matches that one to one, so 304 sc at 4 per in gives 76 in.
- Joins: Nothing is added at the joins, because you skip the sl st joins.
- Bottom corners: The 2 extra sc at each bottom corner are the only additions. They let the corner turn without pulling, and they are already in the bottom count of 22.
- Loops: Each loop gets 18 sc so it stays round and slides easily on the rod.
- Size: The border adds about 0.25 in (0.6 cm) to each edge. The strip goes from 5 in to 5.5 in (12.7 cm to 14.0 cm) wide and from 76 in to 76.5 in (193.0 cm to 194.3 cm) long.
Final Blocking
- Weave in all ends along the rail chains or inside the moon rims.
- Soak the strip in cool water for 10 minutes, then gently press out the water in a towel. Don’t wring it.
- Lay the strip on mats in sections. Pin the two rails straight and parallel, 5.5 in (14.0 cm) apart.
- Pin each moon tip and open the crescent so the spokes fan out evenly.
- Pin all 6 arm tips of each snowflake to 3.25 in (8.3 cm) across.
- Measure each 12 in (30.5 cm) unit and adjust the pins so all six units match.
- Let the section dry fully, then unpin it and move on to the next section.
- Hang the strip on the rod and let it settle for a day.
Final Quality-Control Checklist
- Each strip has 6 moons and 6 snowflakes, all facing the same way
- Every moon opens to the right, with its back touching the left rail
- Each rail is 304 ch, and Rnd 1 has 686 sc
- The rails are straight and not twisted
- Both hanging loops are the same size
- The strip measures 5.5 in x 76.5 in (14.0 cm x 194.3 cm)
- All seven strips hang to the same length, within 0.5 in (1.3 cm)
- The colors alternate B, C, B, C, B, C, B
Troubleshooting
- Moon curls into a tube: Your tr stitches are too tight. Loosen them, or go up a hook size for Row 1 only.
- Moon stays flat instead of curving: Check that you worked (tr, ch 1) twice into every second ch.
- Rail ripples: Your Rnd 1 sc are too tight. Redo the round with looser tension.
- Rail twists: The chain twisted before a join. Pull back to the last join, flatten the chain and redo it.
- Strips hang at different lengths: Count the rail chains. Every unit must be exactly 48 ch.
- Motif sags: A join was missed. Add the missing sl st with a scrap of yarn.
Care
Hand wash the strips in cool water with mild soap, lay them flat to dry and re-pin them if needed. Don’t hang the strips while they are wet, because the weight will stretch them.
Final Notes
The measurement chain is simple. A gauge of 16 ch = 4 in (10.2 cm) gives a 12 in (30.5 cm) unit. Six units plus the tab and tail make a 76 in (193.0 cm) rail. The border brings the strip to 5.5 in x 76.5 in (14.0 cm x 194.3 cm), and seven strips with 1 in (2.5 cm) gaps fill 44.5 in (113.0 cm) of rod. Check your gauge and count each unit, and the whole curtain will hang evenly.
Happy crocheting!