
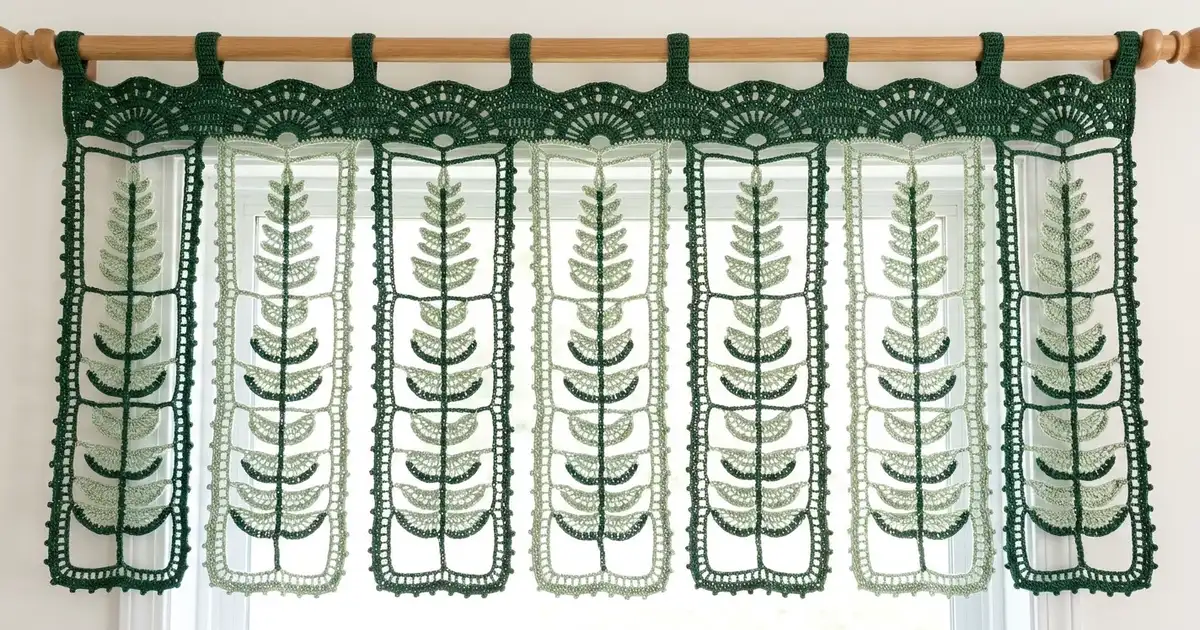
The Fern Grove Panel Curtain is a light, airy window covering made of tall fern fronds. Seven openwork strips hang side by side from a scalloped header. Each strip holds five fronds stacked along a central spine and framed by chain cords with small picot knots.
The strips alternate between deep forest green and soft sage green. Up close it reads like a botanical print; from across the room it looks like a stand of ferns. Light passes through the open leaflets, so the curtain gives privacy without making the room dark.
This pattern uses US crochet terms. The finished curtain measures 54.25 in (137.8 cm) wide by 52 in (132.1 cm) long, not counting the hanging loops. The loops add about 1.75 in (4.4 cm) of drop.
You make it in three stages:
1. Work a continuous spine of five fern fronds for each strip.
2. Add the side cords and cross bars to frame each strip.
3. Join all seven strips by working a fan header across their tops.
Finished Size and Construction
- Finished size: 54.25 in × 52 in (137.8 cm × 132.1 cm), plus 1.75 in (4.4 cm) of loops
- Skill level: Intermediate
- Terminology: US
- Yarn weight: Worsted (4), mercerized cotton
- Hook: 5.0 mm (H-8)
- Number of pieces: 7 strips (4 forest, 3 sage)
- Layout: 7 strips side by side, in 1 row
- Strip size: 7.75 in × 50 in (19.7 cm × 127.0 cm)
- Size before header: 54.25 in × 50 in (137.8 cm × 127.0 cm)
- Header depth: 2 in (5.1 cm), plus loops
Materials
Choose a smooth, mercerized worsted-weight cotton. It shows the leaflet spokes clearly and hangs straight without stretching. Avoid fuzzy or acrylic yarns, which blur the openwork and can sag over time.
The amounts below assume about 100 m per 50 g:
- Color A, Forest Green: 220 g / 440 m (strips 1, 3, 5, 7 and the header)
- Color B, Sage Green: 160 g / 320 m (strips 2, 4, 6)
Tools:
– 5.0 mm (H-8) crochet hook
– Tapestry needle
– Rust-proof pins
– Spray bottle
– Measuring tape
– Blocking mats or a clean carpet with a sheet over it
– Stitch markers
Both quantities include a margin of about 15% for your gauge swatch and weaving in ends.
Abbreviations (US Terms)
- ch: chain
- sl st: slip stitch
- sc: single crochet
- hdc: half double crochet
- dc: double crochet
- tr: treble crochet
- sk: skip
- sp: space
- st(s): stitch(es)
- RS: right side
Special stitch: Picot. Ch 3, then sl st in the 3rd ch from the hook. A picot forms a small knot and does not count toward a cord’s length.
Gauge and Checkpoints
Gauge: 16 sc = 4 in (10.2 cm). Relaxed chain: 16 ch = 4 in (10.2 cm).
Chain gauge matters most here, because the cords, bars and stems are almost all chain. Make one complete frond before starting the curtain and check it:
- Frond, ring bottom to picot tip: about 9 in (22.9 cm)
- Frond width across the Large leaflets: about 7 in (17.8 cm)
- One Large leaflet, stem to tip: about 3.5 in (8.9 cm)
- Frond unit (frond plus 4-ch connector): 10 in (25.4 cm)
- One cord segment (40 ch): 10 in (25.4 cm)
If your frond comes out bigger than this, go down to a 4.5 mm hook. If it comes out smaller, go up to a 5.5 mm hook. The spine and the side cords have to be the same length, so measure a 40-ch cord segment against your frond unit before going further.
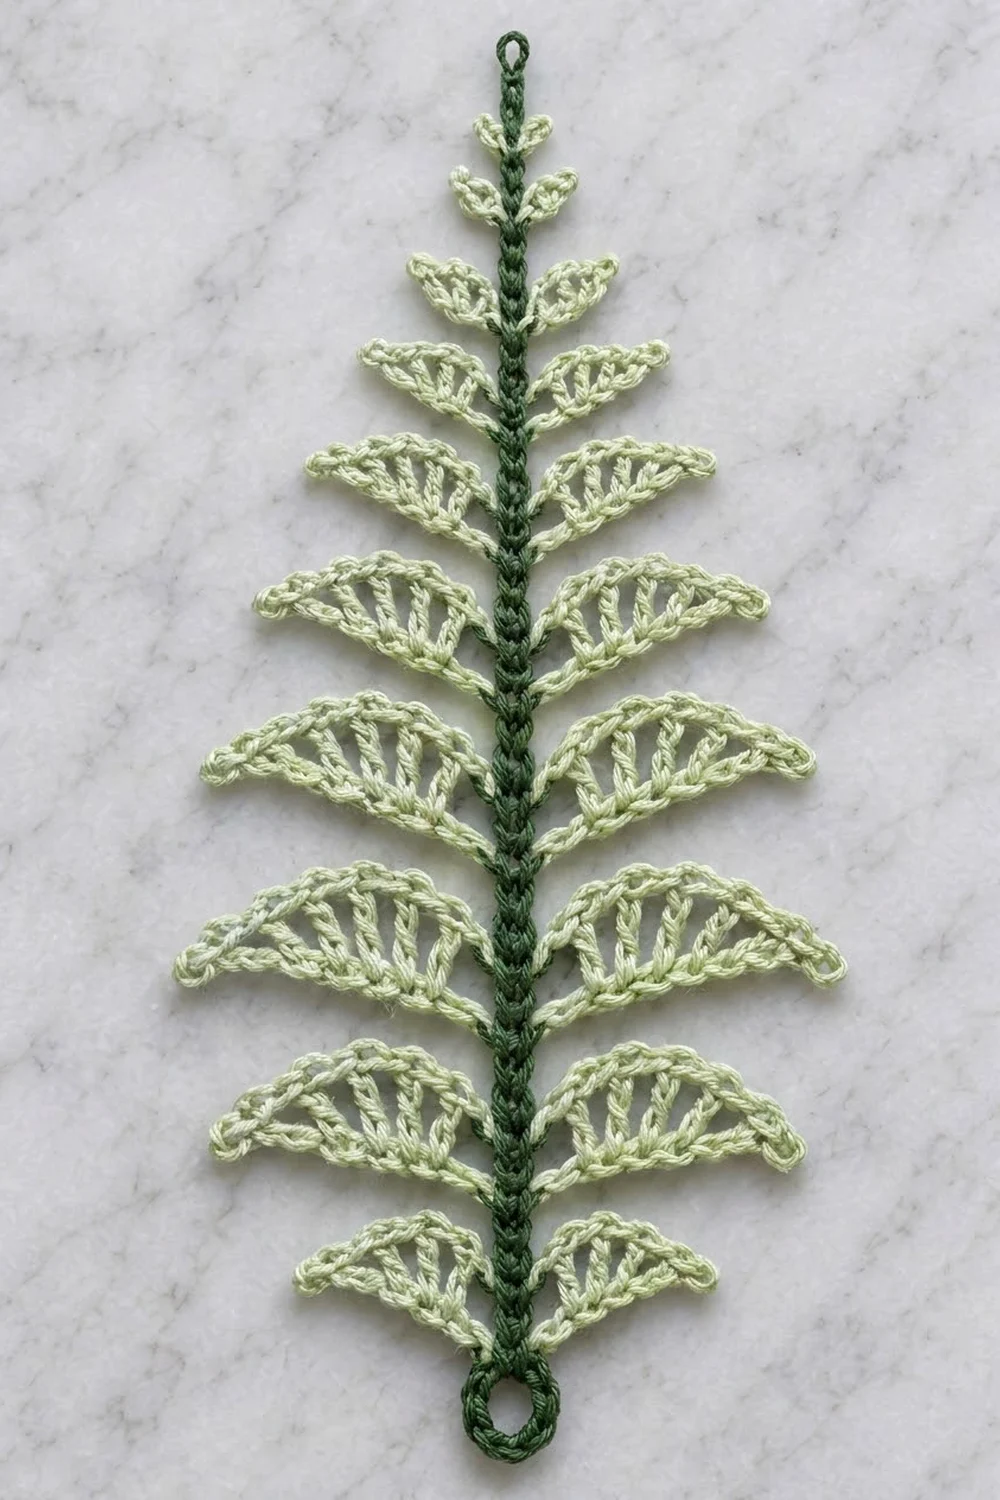
Fern Frond Leaflets
Every leaflet starts from a stem stitch. You chain outward, work back along that chain toward the stem, and then sl st into the same stem stitch you started from.
Tiny leaflet (T): Ch 5. Sc in 2nd ch from hook, hdc in next ch, dc in next ch, hdc in last ch. Sl st in the starting stem st. (4 sts)
Small leaflet (S): Ch 8. Sc in 2nd ch from hook, hdc in next ch, dc in next ch, [ch 1, sk 1, dc in next ch] twice. Sl st in the starting stem st. (5 sts, 2 ch-1 sps)
Medium leaflet (M): Ch 11. Sc in 2nd ch from hook, hdc in next ch, dc in next ch, [ch 1, sk 1, tr in next ch] 3 times, dc in last ch. Sl st in the starting stem st. (7 sts, 3 ch-1 sps)
Large leaflet (L): Ch 14. Sc in 2nd ch from hook, hdc in next ch, dc in next ch, [ch 1, sk 1, tr in next ch] 4 times, ch 1, sk 1, dc in last ch. Sl st in the starting stem st. (8 sts, 5 ch-1 sps)
The rising stitch heights give each leaflet its half-moon curve. The ch-1 gaps create the open ladder spokes.
Strip Spine (Five Fronds)
Use the strip’s color (A or B) throughout.
Frond 1, ring: Ch 8 and sl st in the first ch to form a ring. This joining sl st is the bottom of the ring; mark it. Sl st in the next 4 ch of the ring to move to its top.
Stem: Ch 36. Sl st in the 4th ch from the hook to make the tip picot. The picot’s sl st sits on stem ch 33, which leaves stem ch 1–32 below it, numbered upward from the ring.
Side 1 (working down the stem, from the tip toward the ring):
– [Sl st in next 4 ch, T] once. Leaflet at ch 29.
– [Sl st in next 4 ch, S] twice. Leaflets at ch 25 and 21.
– [Sl st in next 4 ch, M] twice. Leaflets at ch 17 and 13.
– [Sl st in next 4 ch, L] twice. Leaflets at ch 9 and 5.
– Sl st in next 4 ch, M. Leaflet at ch 1.
Side 1 has 8 leaflets on 32 stem ch.
Side 2 (working up the free loops on the other side of the stem):
– M in the free loop of ch 1.
– [Sl st in next 4 free loops, L] twice. Leaflets at ch 5 and 9.
– [Sl st in next 4 free loops, M] twice. Leaflets at ch 13 and 17.
– [Sl st in next 4 free loops, S] twice. Leaflets at ch 21 and 25.
– Sl st in next 4 free loops, T. Leaflet at ch 29.
– Sl st in next 3 free loops, then sl st in the free loop of ch 33.
Side 2 also has 8 leaflets, sitting directly opposite Side 1. Frond total: 16 leaflets (2 T, 4 S, 6 M, 4 L).
Connector: Ch 4. The 4th connector ch is the bar point; mark it.
Fronds 2–5: Ch 8 and sl st in the first of these 8 ch to form the next ring. Sl st in the next 4 ring ch, then work the Stem, Side 1, Side 2 and Connector exactly as for Frond 1.
After Frond 5 and its connector (Connector 5), fasten off.
Spine checkpoint: 5 frond units × 10 in = 50 in (127.0 cm), measured from the marked bottom of Ring 1 to the top of Connector 5.
Strip Frame
Cord segment: [Ch 10, picot] 3 times, ch 10. That is 40 ch, or 10 in (25.4 cm).
Left side:
1. With the RS facing and Ring 1 at the bottom, join the yarn at the marked bottom of Ring 1. Ch 15 for the bottom half-bar. This brings you to the bottom-left corner.
2. Work 1 cord segment.
3. Bar: ch 15, sl st in the 4th ch of Connector 1, turn. Sc in each of the 15 bar ch back toward the cord (15 sc).
4. Repeat steps 2 and 3 for Connectors 2, 3 and 4.
5. Work the 5th cord segment, then ch 15 and sl st in the 4th ch of Connector 5. Fasten off.
Right side: Work it the same way as a mirror image. Join at the marked bottom of Ring 1 again, so both bottom half-bars share that point.
Strip checks:
– Each side cord is 5 × 40 = 200 ch, or 50 in (127.0 cm), which matches the spine.
– The top bar is 15 ch (left) + 1 Connector 5 ch + 15 ch (right) = 31 sts.
– At 4 sts per in, 31 sts = 7.75 in (19.7 cm).
Make All Pieces
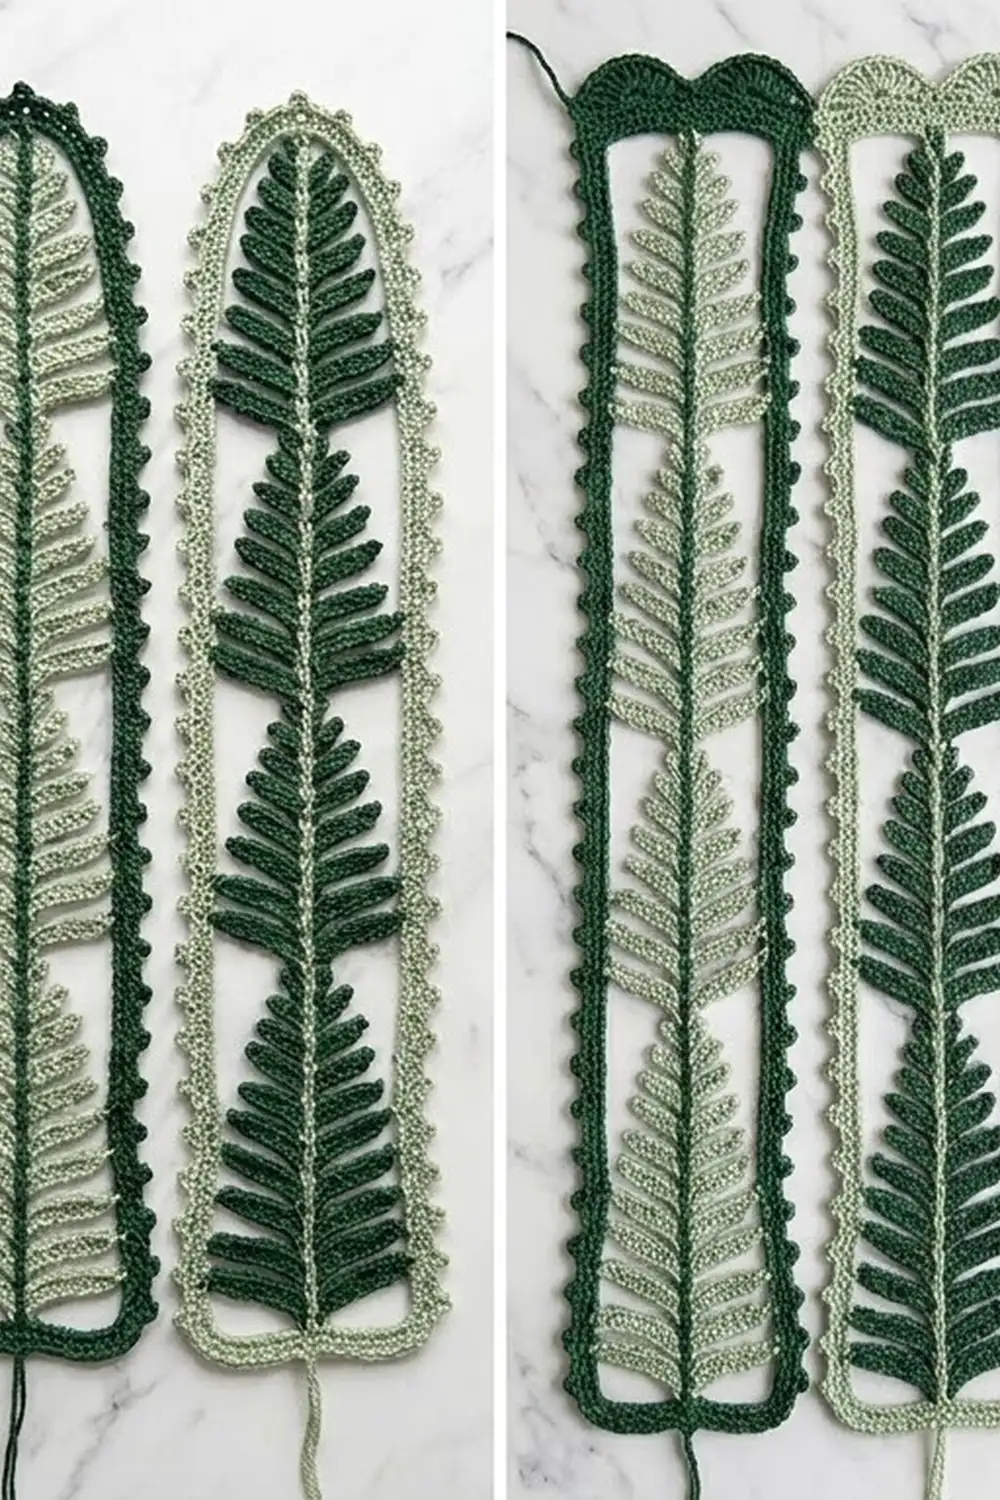
You need 7 strips:
– Color A: 4 strips, 20 fronds
– Color B: 3 strips, 15 fronds
Lay them out like this, with the RS facing:
[ A ][ B ][ A ][ B ][ A ][ B ][ A ]
  1    2    3    4    5    6    7
Steam or spray-block each strip flat before joining, so the header goes in square.
Joining
The strips are joined by working the first header row straight across their top bars. No separate seam is needed.
Header Row 1 (Color A): With the RS facing, join at the top-left corner of Strip 1. Ch 1, sc in each of the 31 top-bar sts of Strip 1. Continue without a turning ch and without any stitches between strips: sc in each of the 31 top-bar sts of Strip 2. Repeat across all 7 strips. (7 × 31 = 217 sc)
Each strip’s last corner ch sits right next to the next strip’s first corner ch, so the side cords of neighboring strips hang touching. Keep your sc tension even and slightly loose; tight sc here will pull the strip tops inward.
Checkpoint: Row 1 measures 54.25 in (137.8 cm). If it’s narrower, re-work it with a hook one size larger.
Border (Fan Header)
The curtain is bordered along its top edge only; the strip cords finish the sides and bottom. The header works at sc gauge, 16 sts = 4 in (10.2 cm).
Row 2: Ch 1, turn. Sc in the first sc, sk 2, 7 dc in next sc, sk 2, sc in next sc. Repeat from * across. (36 fans, 37 sc; 1 + 36 × 6 = 217 sts used)
Row 3: Ch 4 (counts as tr), turn. Ch 3, sc in the 4th dc of the next fan, ch 3, tr in the next sc. Repeat from * across. (37 tr, 36 sc, 72 ch-3 sps)
Row 4: Ch 1, turn. Sc in each tr and sc, and work 2 sc in each ch-3 sp. (73 sts worked 1-per-stitch + 144 sc in the spaces = 217 sc)
Row 5 (rod loops): Ch 1, turn. Sc in the first 7 sc, ch 16, sk 3, sc in next 7 sc. Repeat from * across. (21 loops, 22 groups of 7 sc; 7 + 21 × 10 = 217)
Fasten off.
Why the math works: The fan repeat needs a multiple of 6 + 1 stitches, and 7 × 31 = 217 = 6 × 36 + 1. Row 4 brings the count back to exactly 217. That keeps the header the same width as the joined strips, so it neither ruffles nor pulls in. The 16-ch loops fit a rod up to 1.25 in (3.2 cm) in diameter.
Header checkpoint: Rows 1–4 measure 2 in (5.1 cm) deep.
Final Blocking
- Lay the curtain flat on mats or a sheet, with the RS facing up.
- Pin the header straight to 54.25 in (137.8 cm).
- Pin each strip to 7.75 in × 50 in (19.7 cm × 127.0 cm), keeping its cords parallel.
- Open every leaflet so its spokes fan out evenly, and pin the tips of the Large leaflets.
- Straighten each frond’s stem along the strip’s center line.
- Mist the whole curtain until it is damp, not soaked.
- Leave it to dry completely before unpinning.
Final Quality-Control Checklist
- Each frond has 16 leaflets that mirror each other across the stem.
- The leaflet sizes run M, L, L, M, M, S, S, T from the base to the tip.
- Each strip is 50 in (127.0 cm) long, and its cords hang straight.
- All 4 bars in each strip reach their connectors without puckering.
- Each top bar holds exactly 31 sts.
- Header Row 1 has 217 sc, Row 2 has 36 fans, and Row 4 has 217 sc.
- There are 21 evenly spaced rod loops.
- All yarn ends are woven in along the chains.
Troubleshooting
- Cords are shorter than the spine: Your chain is tighter than your stem. Go up a hook size for the cords only.
- Leaflets curl: Your tr stitches are too tight. Pull up each loop fully, then block the leaflets firmly.
- Leaflets lean the wrong way: Check that every leaflet starts and ends in the same stem st.
- Bars sag: Work the return sc firmly, or shorten the bar to 14 ch on both sides of the strip.
- Header ruffles: Re-check that Row 4 has 217 sc, and work the fans with a hook one size smaller.
- Strips twist when hanging: Re-block them, and check that both side cords have exactly 200 ch.
Care
Hand wash in cool water with mild soap, then lay the curtain flat and pin it to dry. Re-block it whenever the fronds lose their shape.
Final Notes
The measurement chain works like this:
– 16 ch = 4 in (10.2 cm).
– One frond unit is 10 in (25.4 cm), which matches one 40-ch cord segment.
– Five units make a 50 in (127.0 cm) strip.
– Each 31-st top bar is 7.75 in (19.7 cm) wide.
– Seven strips give 217 sts, or 54.25 in (137.8 cm).
– The header adds 2 in (5.1 cm), for a finished length of 52 in (132.1 cm).
If you check each link as you go, the finished curtain will hang square and even. Happy crocheting!