
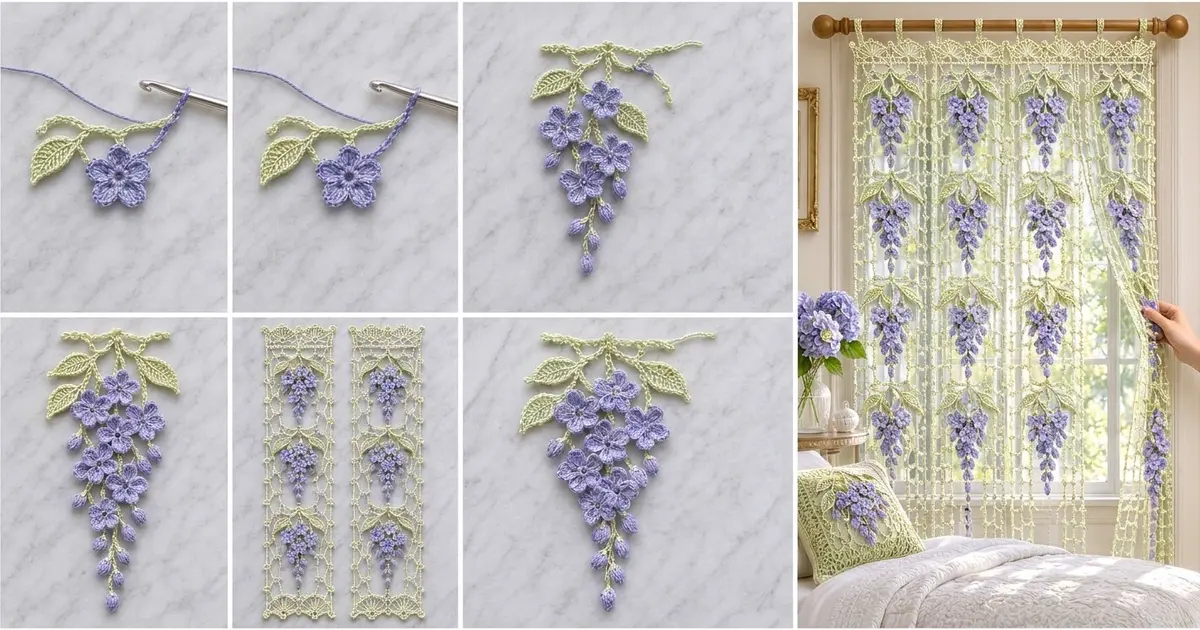
Lavender Rain is a single hanging wisteria cluster. Lavender flowers and plump buds hang from a slim sage-green bar and taper down to one bud at the bottom tip. Four pointed leaves frame the top, and a small loop at the center of the bar lets you hang it.
The palette is soft and botanical: periwinkle-lavender for the blooms and buds, and pale sage for the stems, leaves, and bar. A green French knot sits in the center of each flower and picks up the stem color.
This pattern uses US crochet terms. The finished motif measures 5¼ in (13.3 cm) wide by 8¾ in (22.2 cm) tall, not counting the hanging loop and picots.
The construction is simple. First you make 9 flowers, 13 buds, and 4 leaves. Then you crochet a green top bar and work three chain stems down from it, slip stitching the buds on as you go. Last, you sew on the flowers and leaves and add a slip-stitch edging with picots and the hanging loop.
Finished Size and Construction
- Finished size: 5¼ in × 8¾ in (13.3 cm × 22.2 cm)
- Skill level: Easy-intermediate
- Terminology: US
- Yarn weight: DK (#3) cotton
- Hook: 3.0 mm
- Number of pieces: 1 motif, built from 26 small components plus the green frame
- Layout: one vertical cluster: 9 flowers in 4 tiers (2-3-2-2), 13 buds, 4 leaves
- Component sizes: flower 1¼ in (3.2 cm); leaf 1¾ in × ¾ in (4.4 cm × 1.9 cm); bud ½ in × ¾ in (1.3 cm × 1.9 cm)
- Size before border: 5 in × 8½ in (12.7 cm × 21.6 cm)
- Border depth: ¼ in (0.6 cm) on the top edge and each end of the bar
Materials
Use a smooth, mercerized DK cotton. It shows off the petal shaping and the leaf ridges, and it blocks crisply. Avoid fuzzy or brushed yarns, because they blur the small stitches.
- Color A, Lavender: 30 g, about 66 m (flowers and buds)
- Color B, Sage Green: 20 g, about 44 m (bar, stems, leaves, border, flower centers)
These quantities include a margin of roughly 25% for gauge swatching and tails.
Tools:
- 3.0 mm crochet hook
- Tapestry needle
- Stitch markers (at least 4)
- Rust-proof pins and a blocking mat
- Small scissors
- Spray bottle
Abbreviations (US Terms)
- ch – chain
- sl st – slip stitch
- sc – single crochet
- hdc – half double crochet
- dc – double crochet
- sc2tog – single crochet 2 together
- MR – magic ring
- st(s) – stitch(es)
- picot – ch 3, sl st in the same st
- pedicel – a short bud stem: ch 4, sl st into the top of a bud, sl st back in each of the 4 ch
Special stitch – French knot: with green yarn on a needle, come up at the flower center, wrap the yarn around the needle 2 times, and go back down right beside where you came up.
Gauge and Checkpoints
Gauge: 6 sc = 1 in (2.5 cm), and 6 ch = 1 in (2.5 cm).
Make one flower first and measure it before you go on. It sets the scale for the whole cluster.
- Flower, after Round 1: ½ in (1.3 cm) across
- Flower, finished: 1¼ in (3.2 cm) across, tip to tip
- Leaf: 1¾ in (4.4 cm) long, ¾ in (1.9 cm) wide
- Bud: ½ in (1.3 cm) wide, ¾ in (1.9 cm) long
- Top bar, Row 1: 5 in (12.7 cm) wide
- Center stem: 7½ in (19.1 cm) from bar to tip, before the bud
If your flower comes out larger than 1¼ in (3.2 cm), go down to a 2.75 mm hook. If it is smaller than 1⅛ in (2.9 cm), go up to a 3.25 mm hook. Measure the chain stems flat with no stretch. If they run long, remove chains in multiples of 3 from the plain section at the top of each stem. Never remove them from the bud section.
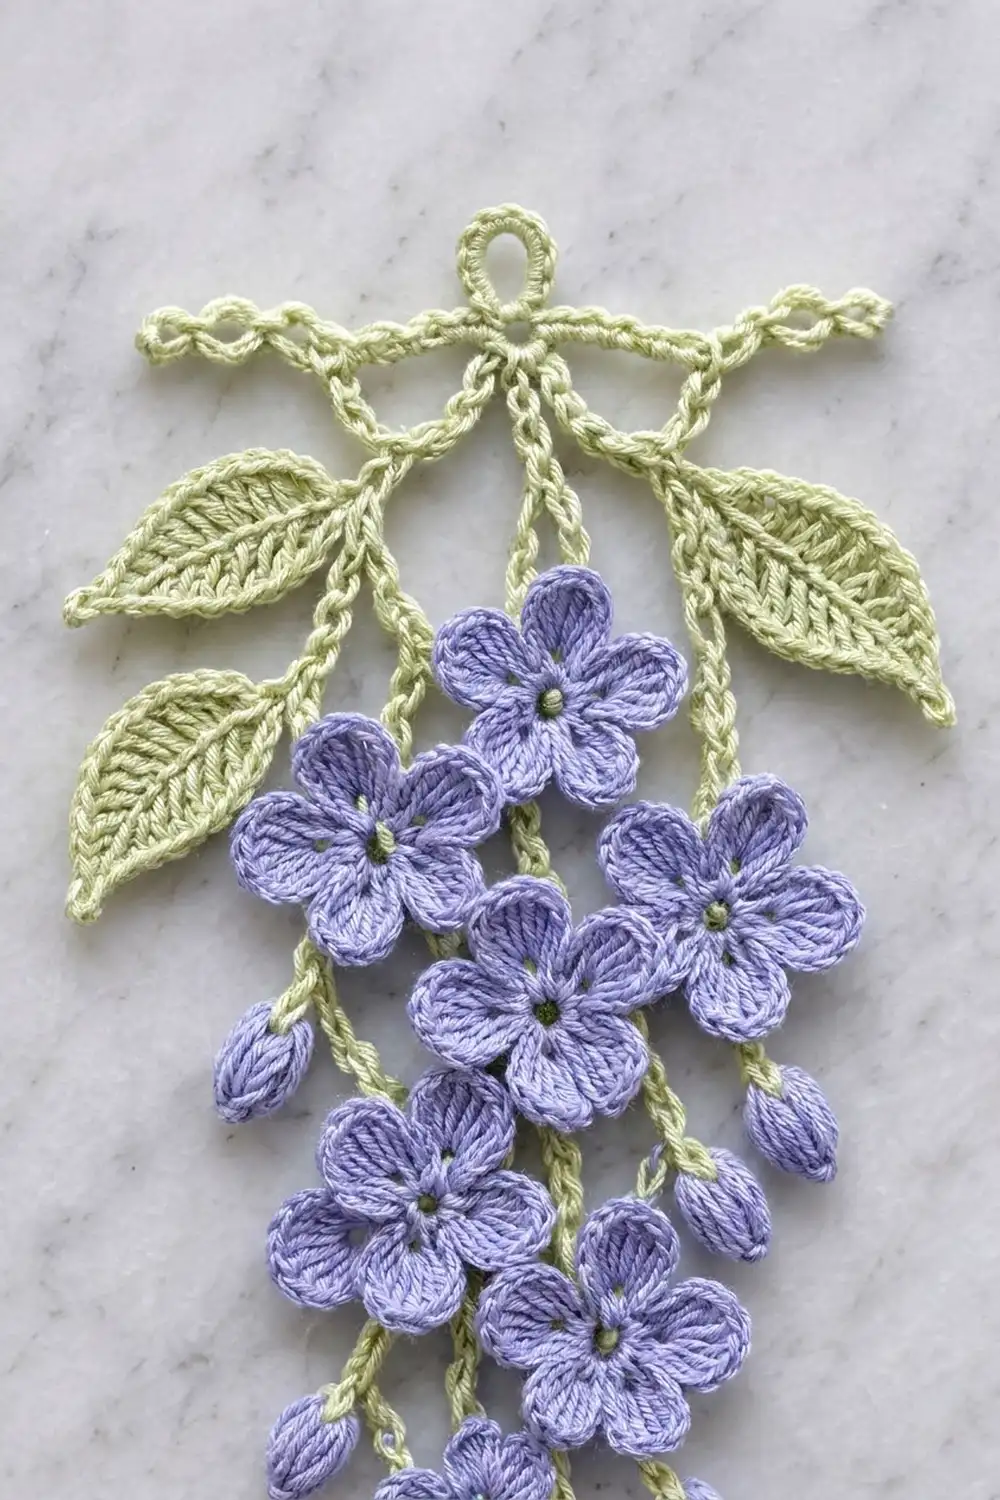
Flowers (Make 9, Color A)
Round 1: Make a MR. Ch 1, work 10 sc in the ring, then sl st to the first sc. (10 sc)
Pull the ring tight and check that the piece measures ½ in (1.3 cm).
Round 2: Ch 1. In the next st work (sc, hdc, dc). In the next st work (dc, hdc, sc). Repeat from * 4 more times, then sl st to the first sc. (30 sts: 5 petals of 6 sts each)
Each petal uses 2 sts from Round 1. 5 petals × 2 sts = 10 sts, so the petals close evenly with no gap.
Fasten off and leave a 10 in (25.4 cm) tail for sewing.
Center: With Color B, work 1 French knot in the center ring. Weave the green ends in on the back.
Buds (Make 13, Color A)
Round 1: Make a MR and work 5 sc in it. (5 sc)
Round 2: Work 2 sc in each st. (10 sc)
Rounds 3–4: Sc in each st. (10 sc each round)
Round 5: Sc2tog 5 times. (5 sts)
Push the starting tail inside to fill the bud. Fasten off, then thread the tail through the front loops of the last 5 sts and pull tight. Weave the tail in.
The closed end is the top of the bud, where the stem attaches. Check the size: ½ in × ¾ in (1.3 cm × 1.9 cm).
Leaves (Make 4, Color B)
Foundation: Ch 11.
Side 1: Sc in the 2nd ch from the hook (this is the leaf tip). Then work hdc in the next ch, dc in each of the next 5 ch, hdc in the next ch, and sc in the next ch. Work 3 sc in the last ch. (12 sts, including the 3 base sc)
Side 2: Rotate the leaf and work along the other side of the foundation chain. Sc in the next ch, hdc in the next ch, dc in each of the next 5 ch, hdc in the next ch, and sc in the next ch. (9 sts)
Tip: Picot, then sl st in the first sc of Side 1. (21 sts + 1 picot)
Both sides use the same stitch sequence, so the leaf is symmetrical. The dc section makes the widest part and the 3 base sc round off the bottom.
Vein: Surface sl st up the center of the leaf, from the base to the tip, along the foundation chain. This makes the raised ridge you see on the finished leaf.
Fasten off with an 8 in (20.3 cm) tail.
Green Frame, Stems, and Buds (Color B)
Top Bar
Row 1: Ch 31. Sc in the 2nd ch from the hook and in each ch across. (30 sc)
Fasten off. Count across the foundation chain (the bottom edge) and place markers in ch 5, in the gap between ch 15 and ch 16, and in ch 26.
Ch 5 and ch 26 are each 5 sts in from their end, so the side stems hang symmetrically.
Center Stem
Join Color B at the center gap.
Down: Ch 45. This should measure 7½ in (19.1 cm). Sl st into the top of 1 bud. This is the tip bud.
Back up: Sl st in each of the next 3 ch, then work a pedicel with a new bud. Repeat from * 5 more times, alternating sides. Then sl st in each of the remaining 27 ch, and sl st into the bar at the starting gap. (45 sl st: 6 × 3 + 27; 7 buds)
The buds fill the lowest 3 in (7.6 cm) of the stem. The plain upper 4½ in (11.4 cm) is left free for the flowers.
Side Stems (Make 2)
Join Color B at the ch-5 marker for the left stem, or the ch-26 marker for the right stem.
Down: Ch 33. This should measure 5½ in (14.0 cm). Sl st into the top of a tip bud.
Back up: Sl st in each of the next 3 ch, then work a pedicel with a new bud. Repeat from * once more. Then sl st in each of the remaining 27 ch, and sl st into the bar. (33 sl st: 2 × 3 + 27; 3 buds)
Bud total: 7 + 3 + 3 = 13 buds.
Arranging and Sewing
Pin the frame flat. Angle each side stem inward so that its tip bud sits 1¼ in (3.2 cm) from the center stem, about 6½ in (16.5 cm) below the top of the bar.
Pin the flowers in tiers. Measure each tier to the flower centers, starting from the bottom of the bar:
- Tier 1, at 1 in (2.5 cm): 2 flowers, one on each side of the center stem
- Tier 2, at 2 in (5.1 cm): 3 flowers, one on each side stem and one on the center stem
- Tier 3, at 3 in (7.6 cm): 2 flowers, between the center stem and each side stem
- Tier 4, at 4 in (10.2 cm): 2 flowers, overlapping slightly and touching the center stem
Let the petals overlap by about ⅛ in (0.3 cm). Sew each flower to its stem through the back of Round 1 only, so the petals stay free.
Next, sew the base of each leaf to the bottom edge of the bar. Place 2 leaves between st 1 and st 4, and 2 leaves between st 27 and st 30. Fan them outward and downward over the Tier 1 flowers, keeping their tips within the 5 in (12.7 cm) width.
Checkpoint: The motif should now measure 5 in × 8½ in (12.7 cm × 21.6 cm). That is the ¼ in (0.6 cm) bar, plus the 7½ in (19.1 cm) center stem, plus the ¾ in (1.9 cm) tip bud.
Border
Border gauge: 6 sc = 1 in (2.5 cm), the same gauge as the bar. Work the border into the bar only, in Color B, and work over the tops of the stems and leaves where they meet the bar.
Round 1: Join Color B in the first sc of Row 1 and ch 1. Then work around the bar:
- Top: 2 sc in the first st, sc in each of the next 28 sts, 2 sc in the last st. (32 sc)
- Right end: 2 sc in the row end. (2 sc)
- Bottom: Work into the foundation chain. 2 sc in the first ch, sc in each of the next 28 ch, 2 sc in the last ch. (32 sc)
- Left end: 2 sc in the row end. (2 sc)
Sl st to the first sc to join. (68 sc: 32 + 2 + 32 + 2)
The top and bottom counts of 32 already include their corner sts, which are the increases at each end. Do not add any more at the corners.
Round 2: This is a trim round.
- Top: Sl st in each of the next 4 sts, picot. Work this 3 times. Then sl st in each of the next 4 sts, ch 9, and sl st in the same st to make the hanging loop. Work sl st in each of the next 4 sts, picot 3 more times, then sl st in each of the last 4 sts.
- Right end, bottom, and left end: Sl st in each st.
Join and fasten off. (68 sl st worked 1 per existing st + 6 picots + 1 ch-9 hanging loop)
Per side: Top has 32 sl st, 6 picots, and the loop. Each end has 2 sl st. The bottom has 32 sl st.
Why the math works: 32 divides evenly into 8 groups of 4. The hanging loop sits after st 16, which is the exact center. The picots after sts 4, 8, 12, 20, 24, and 28 mirror each other around it. The 2-sc increases at each corner let the edging turn without cupping.
The border adds ⅛ in (0.3 cm) at each end, which brings the width to 5¼ in (13.3 cm). It adds ¼ in (0.6 cm) on top, which brings the height to 8¾ in (22.2 cm).
Final Blocking
- Weave in all ends. Pass each one through the back of a stem or flower at least 1 in (2.5 cm).
- Spray the motif until it is evenly damp, but not soaked.
- Lay it face up and pin the bar straight, 5¼ in (13.3 cm) wide.
- Pin the tip bud so the total height is 8¾ in (22.2 cm).
- Shape each flower by pinning the 5 petal tips. Use the dc as the petal point.
- Pin each leaf tip at its picot and press the center vein with a fingertip so it stands up.
- Roll each bud gently between your fingers so it keeps an oval shape.
- Let it dry completely before you unpin it.
Final Quality-Control Checklist
- 9 flowers, each with 30 sts in Round 2 and a green French knot center
- 13 buds, each closed tightly at the top
- 4 leaves, each with 21 sts plus a tip picot and a raised vein
- Bar Row 1 has 30 sc; border Round 1 has 68 sc
- Center stem: 45 ch with 7 buds; each side stem: 33 ch with 3 buds
- 6 evenly spaced picots, with the hanging loop at the exact center
- Finished size 5¼ in × 8¾ in (13.3 cm × 22.2 cm)
- Nothing shows on the front: no loose ends and no visible sewing
Troubleshooting
- Flowers ruffle: Your Round 1 is too tight for Round 2. Work Round 2 with a looser hdc, or go up 0.25 mm for Round 2 only.
- Petals are uneven: Recount Round 1. It must have exactly 10 sc.
- Leaves curl: Your foundation chain is too tight. Chain with a hook one size larger, then switch back.
- Stems twist: Keep all the back-up sl sts in the same loop of the chain, then pin each stem straight while blocking.
- The bar flares: Recount the border. The top side should have 32 sc, not more.
- The buds look flat: Add a small wisp of matching yarn before you close Round 5.
Care
Hand wash in cool water with mild soap, press out the water in a towel, and reshape it flat to dry. Do not tumble dry or wring it.
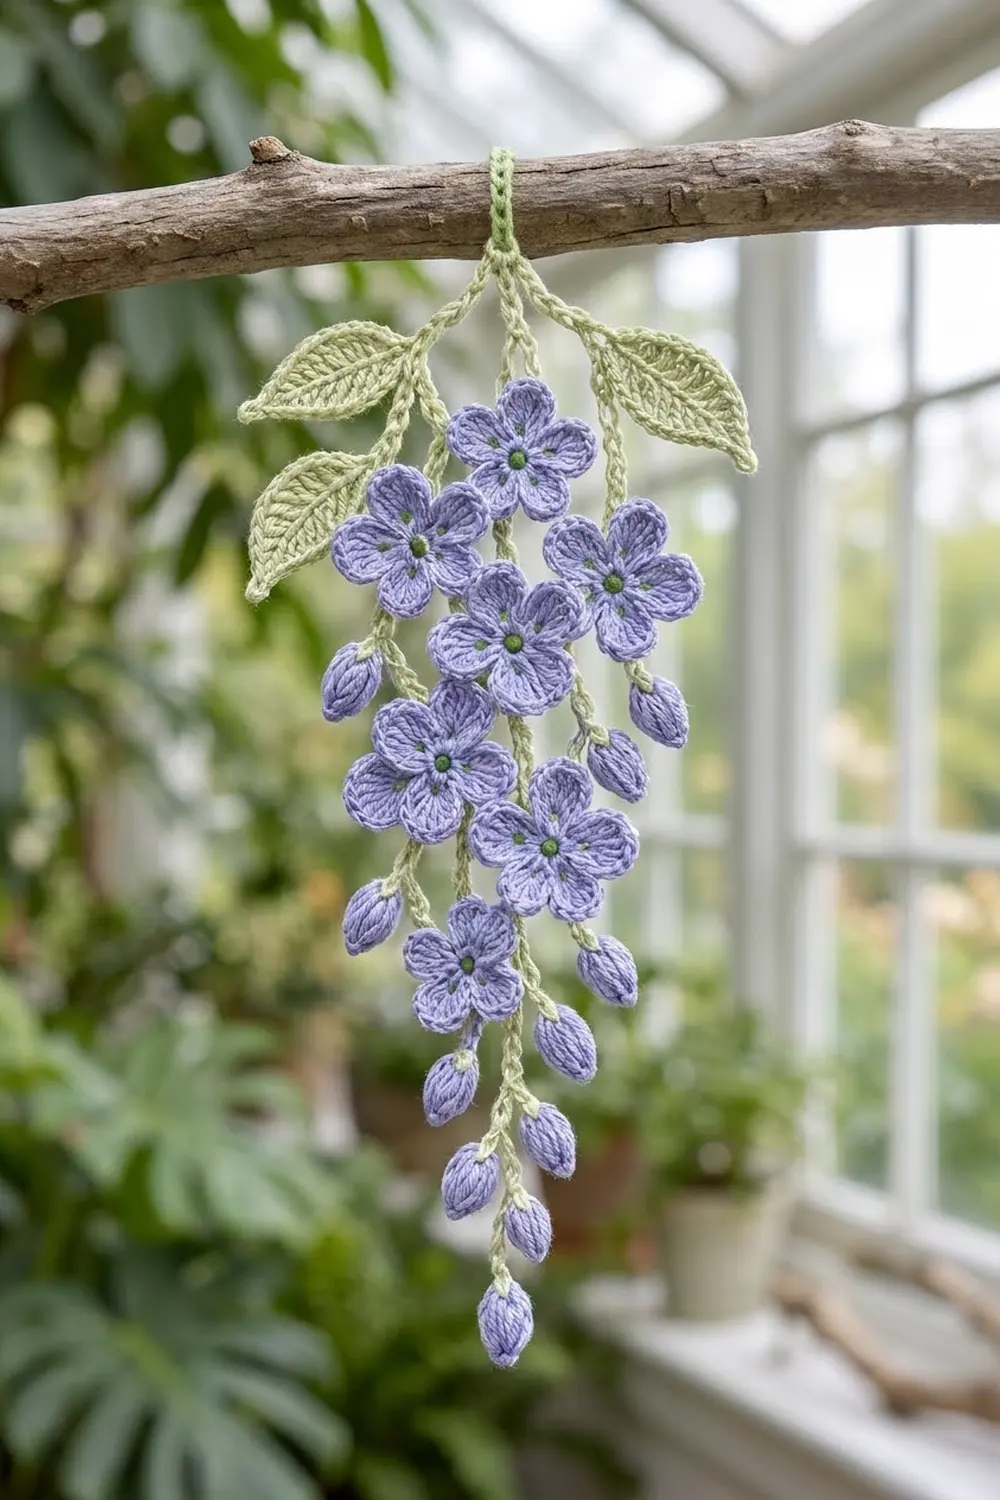
Final Notes
Every measurement builds on the one before it:
- The 10 sc center becomes a 30-st flower that measures 1¼ in (3.2 cm).
- The 30 sc bar sets the width at 5 in (12.7 cm).
- The 45-ch center stem and its tip bud set the height at 8½ in (21.6 cm).
- The 68-st border finishes the motif at 5¼ in × 8¾ in (13.3 cm × 22.2 cm).
Check each stage before you move on, and the finished cluster will match.
Happy crocheting!