

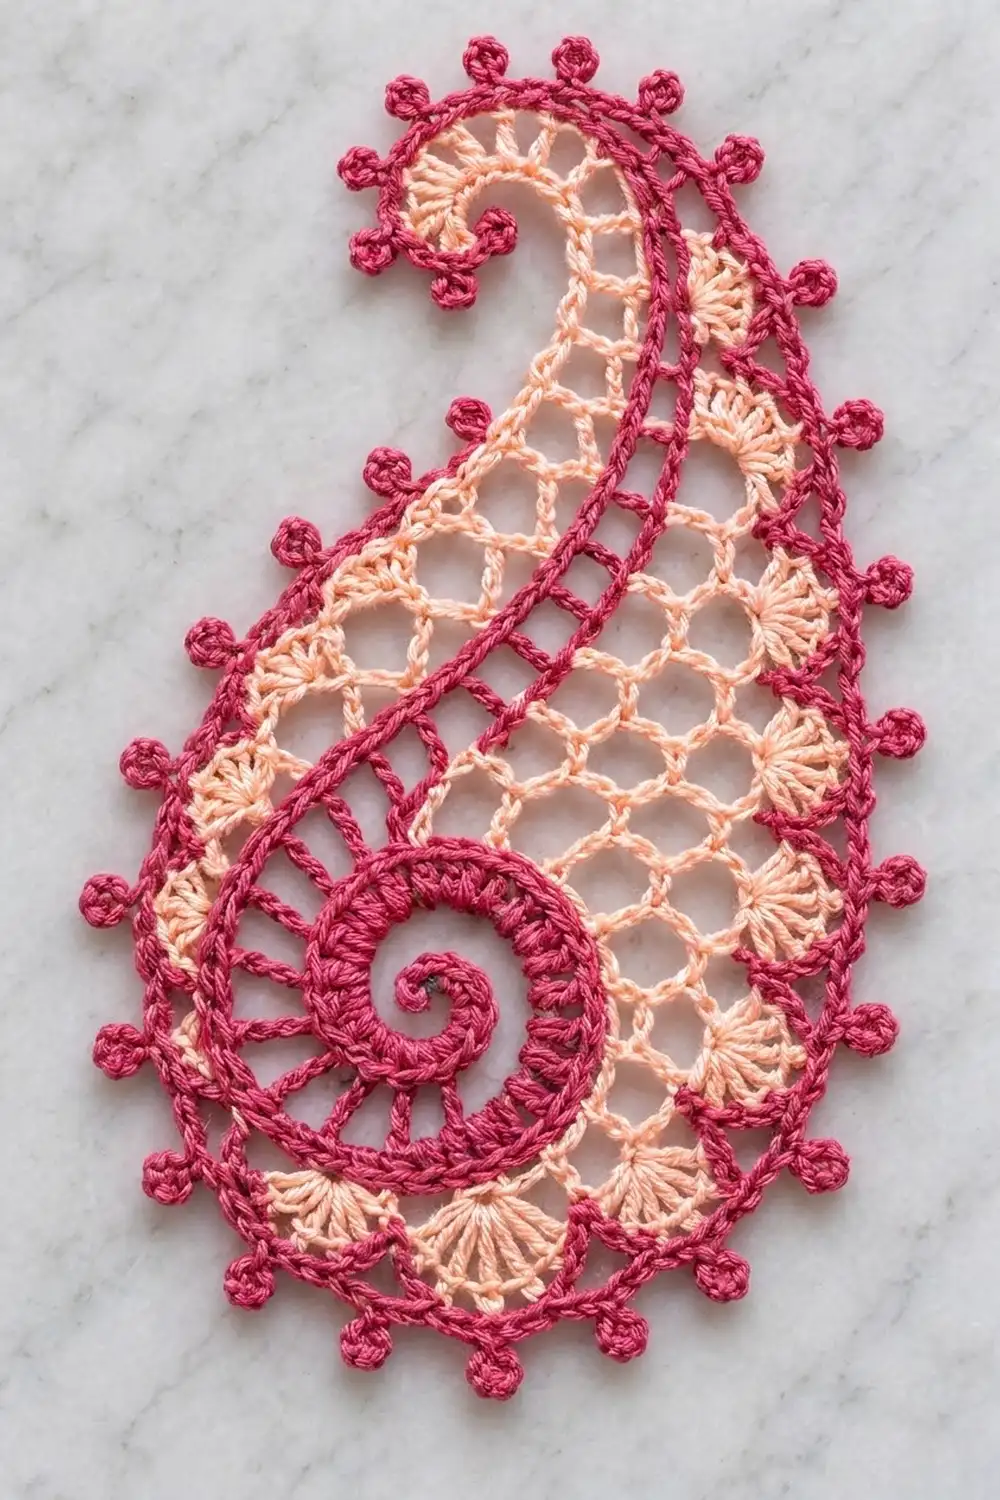
This lace paisley pairs a deep raspberry spiral with a soft peach mesh. It has a curled tail at the top, a row of little peach fans along the outer curve, and round raspberry ball picots that frame the whole shape.
The motif is one single piece worked flat. It finishes at about 5¼ in (13.3 cm) wide and 7¼ in (18.4 cm) tall after blocking, so it works well as an appliqué, a table accent, a bookmark-style ornament or a lace sampler piece.
The pattern uses US crochet terms throughout. You start with the spiral head in rounds, then add a peach mesh crescent in short rows around one side. After that comes a raspberry outline round with the curled tail cord built in. Last, a peach shell row and a raspberry ball-picot round finish the edge.
The steps are short and every key round has a stitch count. Measure at each checkpoint and your paisley will block to the stated size.
Finished Size and Construction
- Finished size: 5¼ in × 7¼ in (13.3 cm × 18.4 cm)
- Skill level: Intermediate
- Terminology: US crochet terms
- Yarn weight: Fine (#2, sport) mercerized cotton
- Hook: 2.75 mm (US C-2)
- Number of pieces: 1 (single motif)
- Layout: Single paisley, spiral head at the bottom and tail curling at the top
- Piece size (body after mesh): 4¼ in × 4¾ in (10.8 cm × 12.1 cm)
- Size before border: 4½ in × 6½ in (11.4 cm × 16.5 cm)
- Border depth: about ⅜ in (1.0 cm)
Materials
Use a smooth, mercerized sport-weight cotton. Its crisp stitch definition makes the spiral, spokes and picots stand out, and it blocks flat and holds its shape. Avoid fuzzy or very stretchy yarns, because the mesh loops will lose their shape.
Yarn (based on about 3 m per gram):
– Raspberry (Color A): 12 g, about 36 m. Used for the head, outline, tail and picots.
– Peach (Color B): 8 g, about 24 m. Used for the mesh and shells.
These amounts include a small safety margin for swatching and weaving in ends.
Tools:
– 2.75 mm (US C-2) crochet hook
– Tapestry needle
– 2 locking stitch markers
– Scissors
– Rustproof pins and a blocking mat
– Spray bottle with cool water
– Ruler or tape measure
Abbreviations (US Terms)
- ch: chain
- sl st: slip stitch
- sc: single crochet
- dc: double crochet
- sk: skip
- sp: space
- st(s): stitch(es)
- BLO: back loop only
- rep: repeat
- ch-5 loop: a loop made of 5 chains
Special stitches
- Ball picot (bp): Ch 3. In the 3rd ch from the hook, work 3 dc, leaving the last loop of each dc on the hook (4 loops on hook). Yarn over and pull through all 4 loops. This makes a small round ball on a short stem.
- Shell: 5 dc worked in the same stitch.
Gauge and Checkpoints
Gauge: 6 sc and 7 sc rows = 1 in (2.5 cm) with a 2.75 mm hook.
Make the head (Rounds 1–5) first and measure it before you go on. The whole motif’s size depends on it.
Checkpoints:
– After Round 3: spiral measures 1¼ in (3.2 cm) across.
– After Round 5: head measures 2½ in (6.4 cm) across.
– After Mesh Row 5: body measures 4¼ in × 4¾ in (10.8 cm × 12.1 cm), lightly stretched.
– After the outline round: 4½ in × 6½ in (11.4 cm × 16.5 cm), tail included.
– After the border: 5¼ in × 7¼ in (13.3 cm × 18.4 cm), blocked.
If your head is too big (more than 2⅝ in / 6.7 cm), go down one hook size, to 2.5 mm. If it is too small (under 2⅜ in / 6.0 cm), go up to a 3.0 mm hook. Don’t change stitch counts, because every later count depends on Round 5 having 48 stitches.
Part 1: Spiral Head (Color A)
The head is worked in joined rounds after a short spiral start. Don’t turn.
Round 1: Make a magic ring. Work 8 sc into the ring and pull it closed. Don’t join; work in a continuous spiral. (8 sc)
Round 2: Work 2 sc in each st around. (16 sc)
Round 3: Working in BLO, (sc in next st, 2 sc in next st) 8 times. (24 sc)
The unused front loops of Round 3 form a raised ridge that curls inward and gives the visible spiral line. To finish the spiral smoothly, sl st into the next st and mark this st as the beginning of Round 4.
Checkpoint: 1¼ in (3.2 cm) across.
Round 4 (spoke round): Ch 6 (counts as dc + ch 3), sk next st, dc in next st, ch 3, sk next st; rep from * 10 more times. Sl st in the 3rd ch of the beginning ch-6. (12 dc spokes, 12 ch-3 sps)
Round 5 (closing ring): Ch 1, sc in the dc, 3 sc in the next ch-3 sp; rep from * 11 more times. Sl st in the first sc. (48 sc: 12 sc worked 1-per-dc + 36 sc worked into the 12 spaces)
Fasten off Color A.
Checkpoint: 2½ in (6.4 cm) across.
Numbering the head: Lay the head right side up. Number the Round 5 stitches 1 to 48 clockwise, with st 1 at 12 o’clock. Sts 1–25 run down the right side, and st 25 sits at about 6 o’clock. Sts 26–48 run up the left side. Put a marker in st 1 and another in st 25.
Part 2: Peach Mesh Crescent (Color B)
The mesh is worked in turned rows across the right half of the head. Each row gains one loop at the top (the “tail end”). This makes the crescent widen and climb toward the tail.
Row 1: With the right side facing, join Color B with a sc in st 25. Ch 5, sk next 3 sts, sc in next st; rep from * 5 more times. The last sc lands in st 1. Turn. (6 ch-5 loops)
Row 2 (tail end at start): Ch 5, sc in the first loop. Ch 5, sc in the same loop (increase). Ch 5, sc in next loop; rep from * 4 more times. Turn. (7 ch-5 loops)
Row 3 (tail end at end): Ch 5, sc in the first loop. Ch 5, sc in next loop; rep from * across to the last loop. Ch 5, sc in the same last loop (increase). Turn. (8 ch-5 loops)
Row 4: Work as Row 2, repeating from * across. (9 ch-5 loops)
Row 5: Work as Row 3. (10 ch-5 loops)
Fasten off Color B. Your hook finished at the top-right corner, which is the tail base.
Checkpoint: Body measures 4¼ in × 4¾ in (10.8 cm × 12.1 cm) when gently stretched flat.
Part 3: Outline Round and Curled Tail (Color A)
This single round creates the raspberry frame and the tail. Work it in this order: tail cord, inner top edge, head left side, bottom edge, outer edge.
Join Color A with a sl st in the last sc of Row 5 (the tail base).
Tail cord: Ch 21. Starting in the 2nd ch from the hook, work 2 sc in each of the next 7 ch, then 1 sc in each of the next 13 ch. That’s 27 sc (20 chains: 14 sc from 7 increased chains + 13 sc from 13 plain chains). The increases at the tip make the cord curl toward the head. Sl st in the tail base.
Inner top edge: Work 20 sc evenly along the tail-end row edges of Rows 5 to 1 (4 sc per row). This brings you down to st 1 of the head.
Head left side: Sc in each of sts 48 down to 26. (23 sc)
Bottom edge: Work 20 sc evenly along the bottom row edges of Rows 1 to 5 (4 sc per row).
Outer edge: Work 4 sc in each of the 10 ch-5 loops of Row 5. (40 sc)
Sl st in the first sc of the tail cord.
Outline total: 27 + 20 + 23 + 20 + 40 = 130 sc
Number the outline stitches 1–130 in the order you made them:
– Sc 1–27: tail cord
– Sc 28–47: inner top edge
– Sc 48–70: head left side
– Sc 71–90: bottom edge
– Sc 91–130: outer edge
Fasten off.
Checkpoint: 4½ in × 6½ in (11.4 cm × 16.5 cm), tail curled.
Part 4: Border
Border gauge: One shell plus its anchor uses 6 outline stitches, about 1 in (2.5 cm) of edge. Each ball picot stands about ¼ in (0.6 cm) tall. Together, the shell row and picot round add about ⅜ in (1.0 cm) on each outer side.
Shell Row (Color B, worked across 61 sts): With the right side facing, join Color B with a sc in outline sc 70 (the last head stitch). Sk 2 sts, shell in next st, sk 2 sts, sc in next st; rep from * 9 more times. The final sc lands in outline sc 130. Fasten off.
(10 shells and 11 anchor sc; 50 dc + 11 sc = 61 sts)
Why the math works: The shell section covers outline sc 70 through 130, which is 61 stitches. Each repeat uses 6 stitches, and the first sc uses 1: 1 + (10 × 6) = 61. The fans begin at the base of the head and end exactly at the tail base, with no partial repeat.
Ball Picot Round (Color A): Join Color A with a sc in outline sc 1 (the base of the tail cord).
- Tail (outline sc 1–27): Sc in next 2 sts (3 sc made, counting the joining sc). Then bp, sc in next 3 sts; rep from * 7 more times. (27 sc, 8 bp)
- Inner top edge (sc 28–47): Sc in each st. No picots, so the inner curve stays smooth. (20 sc)
- Head left side (sc 48–69): Sc in next st, then bp, sc in next 3 sts; rep from * 6 more times. (22 sc, 7 bp)
- Shell section (61 shell-row sts): Sc in anchor sc, sc in next 2 dc, sc in center dc, bp, sc in next 2 dc; rep from * 9 more times. Sc in the final anchor sc. (61 sc, 10 bp)
Sl st in the first sc. Fasten off.
Round total: 27 + 20 + 22 + 61 = 130 sc and 8 + 7 + 10 = 25 ball picots
The round keeps exactly 1 sc per stitch below it, so the edge lies flat without ruffling or cupping. The picots are extra stitches that sit on top.
Final Blocking
- Weave in all ends along the outline sc so they’re hidden in the raspberry frame.
- Soak the motif in cool water for 10 minutes. Press out the water in a towel; don’t wring it.
- Lay the motif face up on the blocking mat.
- Pin the head into a circle 2½ in (6.4 cm) across.
- Pin the body to 4½ in (11.4 cm) wide at its widest point.
- Open each mesh loop with your fingers so the peach lattice looks even.
- Shape the tail into a smooth curl so the total height is 7¼ in (18.4 cm).
- Pin each shell into a neat fan and pull each ball picot straight out.
- Check the full width: 5¼ in (13.3 cm).
- Mist lightly and leave to dry completely before removing the pins.
Final Quality-Control Checklist
- [ ] Head Round 5 has 48 sc and lies flat.
- [ ] 12 spokes are evenly spaced.
- [ ] Mesh Row 5 has 10 loops.
- [ ] Outline round has 130 sc.
- [ ] Tail cord has 27 sc and curls toward the head.
- [ ] 10 peach shells sit between the head base and the tail base.
- [ ] 25 ball picots in total: 8 on the tail, 7 on the head, 10 on the shells.
- [ ] Inner S-curve is plain, with no picots.
- [ ] Blocked size is 5¼ in × 7¼ in (13.3 cm × 18.4 cm).
- [ ] All ends are woven in securely.
Troubleshooting
Head cups like a bowl: Your Round 4 chains are too tight. Ch loosely, or change to ch 4 between spokes and work 4 sc per space in Round 5. Mark the change and keep 48 sts by working 2 sc in each of 12 spaces’ last sc… or simply go up a hook size for Round 4 only.
Head ripples: Round 5 is too loose. Use a smaller hook for that round.
Mesh loops look uneven: Pull each sc snug into the center of its loop, and keep the chains the same size.
Tail won’t curl: Steam the cord lightly, wrap it around a pencil, and let it dry.
Tail curls the wrong way: You worked into the wrong side of the chain. Remake the cord with the right side facing.
Shell section ends early or late: Recount the outline. The shell row must start at sc 70 and end at sc 130.
Picots lean over: Pin each one straight out when blocking.
Care
Hand wash in cool water with mild soap, press out the water in a towel, and dry flat, pinning the tail and picots back into shape. Press with a cool iron through a cloth if needed.

Final Notes
Everything comes back to the measurement chain: a 1¼ in (3.2 cm) spiral grows to a 2½ in (6.4 cm) head. The mesh widens the body to 4¼ in × 4¾ in (10.8 cm × 12.1 cm), and the outline and tail bring it to 4½ in × 6½ in (11.4 cm × 16.5 cm). The ⅜ in (1.0 cm) border finishes the motif at 5¼ in × 7¼ in (13.3 cm × 18.4 cm). If you check each stage, the stitch counts take care of the rest.
Happy crocheting!