

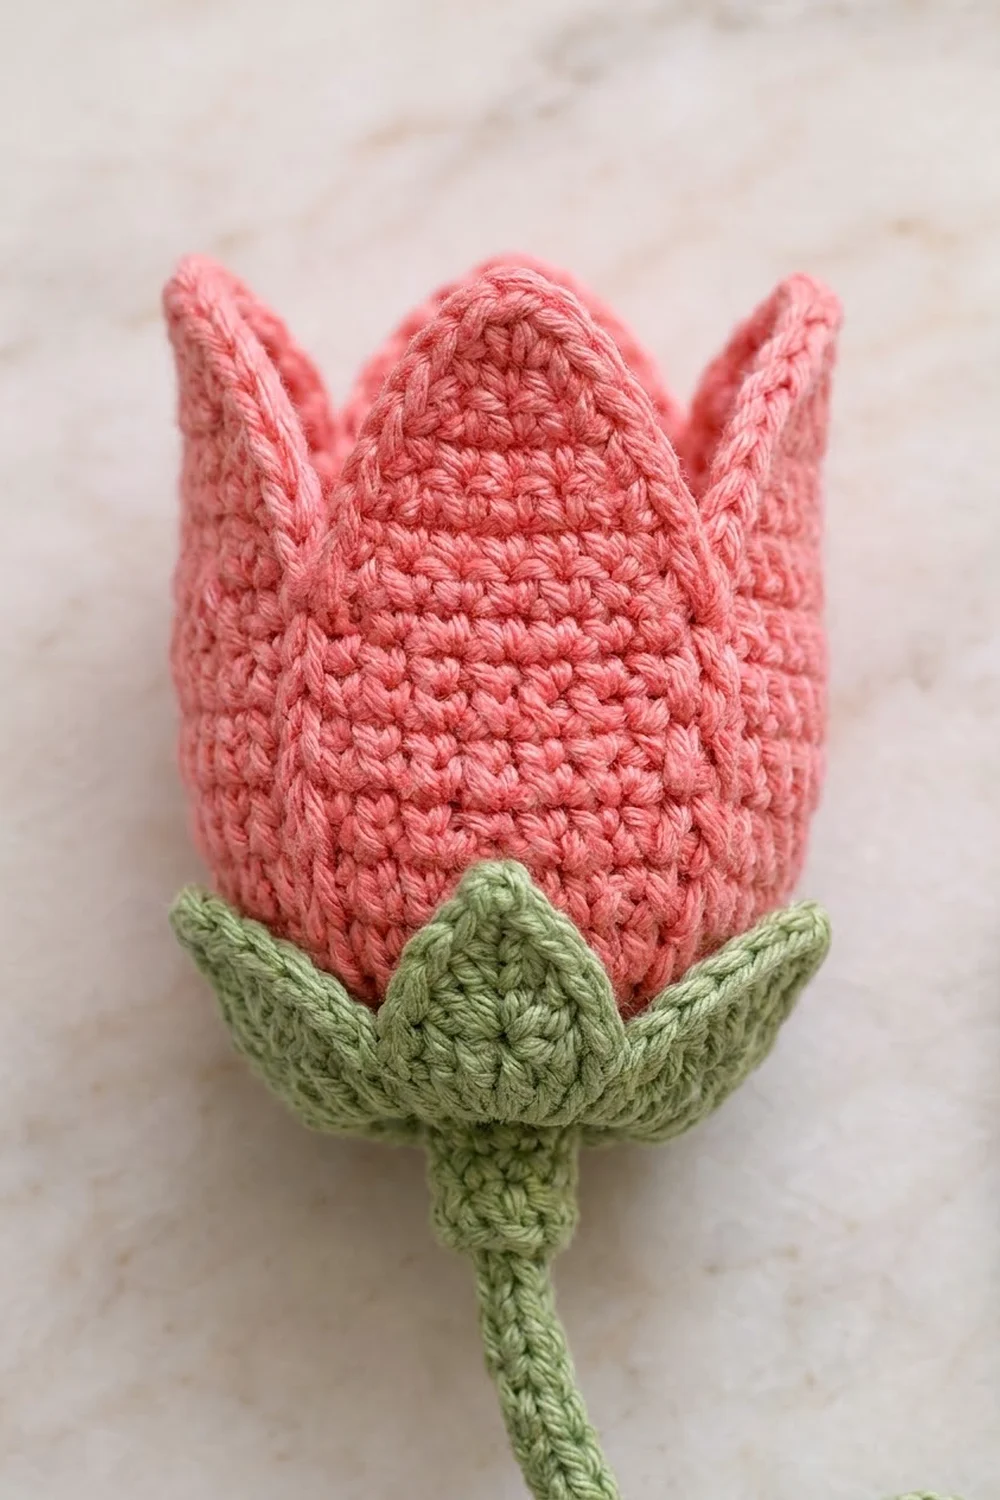
This set turns an ordinary plug-in charger and its cable into a small flowering plant. A coral-pink tulip sleeve slips over the charger, and a sage-green vine with tiny leaves winds along the cord.
The tulip has a pointed crown rim and three almond-shaped outer petals. It sits in a green sepal cup with six flared points. The vine is single crochet worked straight over the cable, which naturally twists into a spiral ridge. Ten small leaves with center veins are sewn along it.
All terms are US crochet terms. The finished tulip is 3 in (7.6 cm) wide when flat, 6 in (15.2 cm) around, and 3.6 in (9.1 cm) tall. The vine covers 36 in (91.4 cm) of cable.
Construction is simple and modular. You crochet a flat rectangle, seam it into a tube, and make three petals. Then you crochet the sepal cup, join it to the tube, and sew on the petals. The crown rim goes on last. Separately, you cover the cable and add the leaves.
Finished Size and Construction
- Tulip size: 3 in (7.6 cm) flat width, 6 in (15.2 cm) circumference, 3.6 in (9.1 cm) tall
- Vine: 36 in (91.4 cm) of covered cable, about 0.25 in (0.6 cm) thick
- Skill level: Advanced beginner
- Terminology: US
- Yarn weight: DK (#3) cotton
- Hook: 3.0 mm (US C/2–D/3)
- Number of pieces: 16 (1 body panel, 3 petals, 1 sepal cup, 1 cable cover, 10 leaves)
- Layout: 3 petals evenly spaced around the tube; 10 leaves spaced every 3 in (7.6 cm) on alternating sides of the vine
- Body panel size: 6 x 2.4 in (15.2 x 6.1 cm)
- Size before border: 2.9 in (7.4 cm) tall (cup plus tube)
- Border depth: 0.7 in (1.8 cm) (crown rim)
- Fits: compact chargers about 1.75 x 1 in (4.4 x 2.5 cm) across and up to 2.75 in (7.0 cm) tall, not counting the prongs
Materials
Use a smooth mercerized cotton or cotton blend in DK weight, about 120 m per 50 g. Cotton holds the crisp petal points and doesn’t stretch out on a charger that gets handled every day.
- Coral pink: 15 g / 36 m (tube, crown rim, petals)
- Sage green: 20 g / 48 m (sepal cup, cable cover, leaves)
These quantities include a margin of about 25%, so you have spare yarn for gauge swatches and sewing tails.
Tools:
– 3.0 mm crochet hook
– Tapestry needle
– Stitch markers (4–6)
– Scissors
– Measuring tape or ruler
– Pins for placing the petals and leaves
– A USB-C charger and its cable (about 39.4 in / 100.1 cm long)
Abbreviations (US Terms)
- ch – chain
- sl st – slip stitch
- sc – single crochet
- hdc – half double crochet
- dc – double crochet
- tr – treble crochet
- sc2tog – single crochet 2 together
- BLO / FLO – back loop only / front loop only
- st(s) – stitch(es)
- rnd – round
Special stitches:
– Picot: Ch 3, then sl st in the 3rd ch from the hook. A picot forms the sharp tip on each crown point and sepal. Picot chains are not counted as stitches.
– Sc over cable: Hold the cable along the top of your work. Insert the hook under the cable from front to back, yarn over, pull up a loop around the cable, yarn over, and pull through both loops. Each stitch wraps around the cable only. There is no fabric underneath.
Gauge and Checkpoints
Gauge: 20 sc and 20 rows = 4 in (10.2 cm), which is 5 sts and 5 rows per inch.
Before making the full set, make one petal as your test piece. It should measure 2 in (5.1 cm) across Row 4 and 3 in (7.6 cm) tall.
Checkpoints:
– Body panel Row 1: 6 in (15.2 cm) wide
– Finished panel: 6 x 2.4 in (15.2 x 6.1 cm)
– Seamed tube: 3 in (7.6 cm) wide when flat
– Sepal cup Rnd 3: about 1.9 in (4.8 cm) across
– Each leaf: 1.25 in (3.2 cm) long, 0.6 in (1.5 cm) wide
– Cable cover: about 12 sc per 1 in (2.5 cm) of cable
If your piece is too big, go down 0.25 mm in hook size. If it is too small, go up 0.25 mm. Don’t change the stitch counts. The tube must match the cup stitch for stitch, and both depend on the 30-stitch count.
Body Panel (make 1, pink)
Ch 31.
Row 1: Sc in the 2nd ch from hook and in each ch across. (30 sc)
Rows 2–12: Ch 1, turn, sc in each st across. (30 sc)
At the end of Row 12, don’t fasten off. The panel should measure 6 x 2.4 in (15.2 x 6.1 cm).
Seam: Fold the panel so that the short edges meet, with the right side inside. Sl st through both layers of row ends, working 1 sl st per row (12 sl sts). Turn the tube right side out. Fasten off, leaving a 6 in (15.2 cm) tail.
The tube is now 6 in (15.2 cm) around with 30 sts on the top edge and 30 free foundation loops on the bottom edge. The seam marks the center back.
Petals (make 3, pink)
Each petal is worked in rows from the base to the tip.
Ch 5.
Row 1: Sc in the 2nd ch from hook and in each ch across. (4 sc)
Row 2: Ch 1, turn, 2 sc in first st, sc in next 2 sts, 2 sc in last st. (6 sc)
Row 3: Ch 1, turn, 2 sc in first st, sc in next 4 sts, 2 sc in last st. (8 sc)
Row 4: Ch 1, turn, 2 sc in first st, sc in next 6 sts, 2 sc in last st. (10 sc)
Rows 5–10: Ch 1, turn, sc in each st across. (10 sc)
Row 11: Ch 1, turn, sc2tog, sc in next 6 sts, sc2tog. (8 sts)
Row 12: Ch 1, turn, sc2tog, sc in next 4 sts, sc2tog. (6 sts)
Row 13: Ch 1, turn, sc2tog, sc in next 2 sts, sc2tog. (4 sts)
Row 14: Ch 1, turn, sc2tog twice. (2 sts)
Row 15: Ch 1, turn, sc2tog. (1 st) Ch 1 to sharpen the tip.
Fasten off, leaving a 12 in (30.5 cm) tail for sewing. Each petal has a flat base 0.8 in (2.0 cm) wide, is 2 in (5.1 cm) at its widest, and is 3 in (7.6 cm) tall.
Sepal Cup (make 1, green)
The cup is worked in joined rounds from the bottom up. The starting ring is the cable hole.
Ch 10 and sl st to the first ch to form a ring.
Rnd 1: Ch 1, 15 sc into the ring, sl st to the first sc. (15 sc)
Check that the hole is about 0.5 in (1.3 cm) across and that a USB-C connector fits through it.
Rnd 2: Ch 1, sc in next 2 sts, 2 sc in next st; repeat from * 5 times total, then sl st to join. (20 sc)
Rnd 3: Ch 1, sc in next st, 2 sc in next st; repeat from * 10 times total, then sl st to join. (30 sc)
Rnd 4: Ch 1, sc in the BLO of each st, sl st to join. (30 sc) This makes the sides turn up.
Rnd 5: Ch 1, sc in each st, sl st to join. (30 sc)
Rnd 6 (sepals): Work in the FLO of Rnd 5 only, so the back loops stay free for joining. Sc in next st, hdc in next st, (dc, tr, picot, tr, dc) in next st, hdc in next st, sc in next st; repeat from * 6 times total, then sl st to the first sc.
Count for Rnd 6: 30 sts worked 1 per existing stitch + 18 extra stitches (3 per sepal x 6) = 48 sts, plus 6 picots. Fasten off and weave in the end.
Vine Cable Cover (make 1, green)
Leave 1.5 in (3.8 cm) of bare cable next to the connector that goes into the charger. This bare section will sit inside the cup.
Make a slip knot and put it on the hook. Starting at the 1.5 in (3.8 cm) mark, work sc over the cable. After every few stitches, push them tightly together toward the start. As the stitches pack together, they twist into a spiral ridge on their own. Let the twist happen.
Work about 72 sc for each 6 in (15.2 cm) of cable. Check this every 6 in (15.2 cm). Continue until 36 in (91.4 cm) is covered, which is about 432 sc. Stop about 1.5 in (3.8 cm) from the far connector.
To finish, sl st into the last stitch, fasten off, and weave the tail back through 2 in (5.1 cm) of stitches. Weave the starting tail in the same way.
Leaves (make 10, green)
Ch 7.
Side 1: Sl st in the 2nd ch from hook, sc in next ch, hdc in next ch, dc in next ch, hdc in next ch, sc in last ch. (6 sts)
Stem: Ch 2.
Side 2: Rotate the work and crochet into the free loops on the other side of the foundation chain. Sc in the first ch, hdc in next ch, dc in next ch, hdc in next ch, sc in next ch, sl st in last ch. (6 sts)
Tip: Ch 2, sl st in the 2nd ch from hook, then sl st into the first sl st of Side 1.
That gives 12 sts plus a 2-ch stem and the tip point. The foundation chain makes a center vein. Fasten off, leaving an 8 in (20.3 cm) tail.
Make All Pieces
Pink: 1 body panel, 3 petals
Green: 1 sepal cup, 1 cable cover, 10 leaves
Tulip layout (around the tube, viewed from above, with the seam at the back):
        [Petal C]
   tip            tip
[Petal B]      [Petal A]
        tip (front)
The petals are centered over tube stitches 10/11, 20/21, and 30/1 (the seam). Their edges meet beneath the crown tips.
Vine layout (distance from the cup, L = left, R = right):
3in L | 6in R | 9in L | 12in R | 15in L
18in R | 21in L | 24in R | 27in L | 30in R
In cm: 7.6, 15.2, 22.9, 30.5, 38.1, 45.7, 53.3, 61.0, 68.6, 76.2.
Joining
Tube to cup: Insert the tube into the cup so that its foundation edge rests on the free back loops of Rnd 5. Line up the tube seam with the cup’s joining point.
Using the green tail or a new green strand, whipstitch 1 foundation loop of the tube to 1 back loop of Rnd 5, all the way around (30 to 30). This 1:1 match keeps the tulip straight without pleats.
Use firm, even tension, but don’t pull so tight that the edge puckers. The sepals from Rnd 6 should flare outward over the seam line.
Petals: Pin each petal flat against the tube. Line up its base with the cup join, with its center on the layout positions. Whipstitch around the sides from the base to Row 10 and leave Rows 11–15 free. The free tips curve slightly outward like real petals.
Leaves: Sew each leaf stem to the vine at its layout point and angle the tip toward the far connector. Add one more tacking stitch under the middle of the leaf.
Size checkpoint: Before adding the border, the tulip should be 2.9 in (7.4 cm) tall and 3 in (7.6 cm) wide when flat.
Border (Crown Rim)
The border is worked on the top edge of the tube. It uses the same gauge as the panel: 5 sts per inch.
There is 1 panel around the rim, so the starting count is 1 x 30 = 30 sts. No extra stitches are added at the seam.
Rnd 1: Join pink at the seam, ch 1, sc in each of the 30 top sts, sl st to join. (30 sc) This adds 0.2 in (0.5 cm).
Rnd 2: Sl st in next st, sc in next st, hdc in next st, dc in next st, tr in next st, picot, tr in next st, dc in next st, hdc in next st, sc in next st, sl st in next st; repeat from * 3 times total.
Count for Rnd 2: 30 sts worked 1 per existing stitch + 0 extra = 30 sts, plus 3 picots. The points rise 0.5 in (1.3 cm).
Why the math works: 30 divides evenly into 3 repeats of 10, so the three crown tips sit evenly at 2 in (5.1 cm) intervals. They fall exactly where the petal edges meet. With 0.2 in (0.5 cm) from Rnd 1 and 0.5 in (1.3 cm) from Rnd 2, the border is 0.7 in (1.8 cm) deep. That brings the tulip from 2.9 in (7.4 cm) to 3.6 in (9.1 cm).
Final Blocking
- Weave in all the ends except the sewing tails you’ve already used.
- Lightly spray the tulip with water until it is damp, not soaked.
- Stuff the tube with a rolled cloth that is 6 in (15.2 cm) around.
- Pinch each crown tip and petal tip into a sharp point.
- Press the sepals outward and pin them while they dry.
- Lay the vine in loose curves and flatten each leaf with your fingers.
- Let everything dry completely, then remove the cloth.
Final Quality-Control Checklist
- The tube is 6 in (15.2 cm) around and 3 in (7.6 cm) wide when flat
- The tulip is 3.6 in (9.1 cm) tall
- There are 3 crown tips, evenly spaced
- There are 3 petals with their edges meeting under the crown tips
- There are 6 sepals, all flaring outward
- The cable hole fits the connector
- 36 in (91.4 cm) of cable is covered, with an even spiral
- There are 10 leaves, alternating sides, every 3 in (7.6 cm)
- No loose ends are visible
Troubleshooting
- The tube is too tight for the charger: Remake the panel with a hook 0.25 mm larger. Keep the 30-stitch count so the cup and crown still match.
- The crown tips are floppy: Your tension is too loose. Use a smaller hook for Rnd 2 only, and block the tips firmly.
- The petals curl inward: Steam-block them flat before sewing.
- The cable cover gaps or shows cable: Push the stitches closer together. Aim for 12 or more per inch.
- The cover doesn’t twist: Keep inserting the hook from the same direction for every stitch.
- The cup hole is too small: Rework Rnd 1 into a 12-ch ring with 15 sc.
Care
Hand wash in cool water with mild soap, then lay flat to dry. Always unplug the charger and take it out of the cover before washing.

Final Notes
The whole set follows one measurement chain. The 30-stitch panel makes a 6 in (15.2 cm) tube. That tube matches the 30-stitch cup 1:1, which makes the tulip 2.9 in (7.4 cm) tall. The 0.7 in (1.8 cm) crown brings it to 3.6 in (9.1 cm). Three 2 in (5.1 cm) petals wrap exactly around the 6 in (15.2 cm) tube. The vine covers 36 in (91.4 cm) of cable at 12 sc per inch and carries ten leaves set 3 in (7.6 cm) apart.
Happy crocheting!