

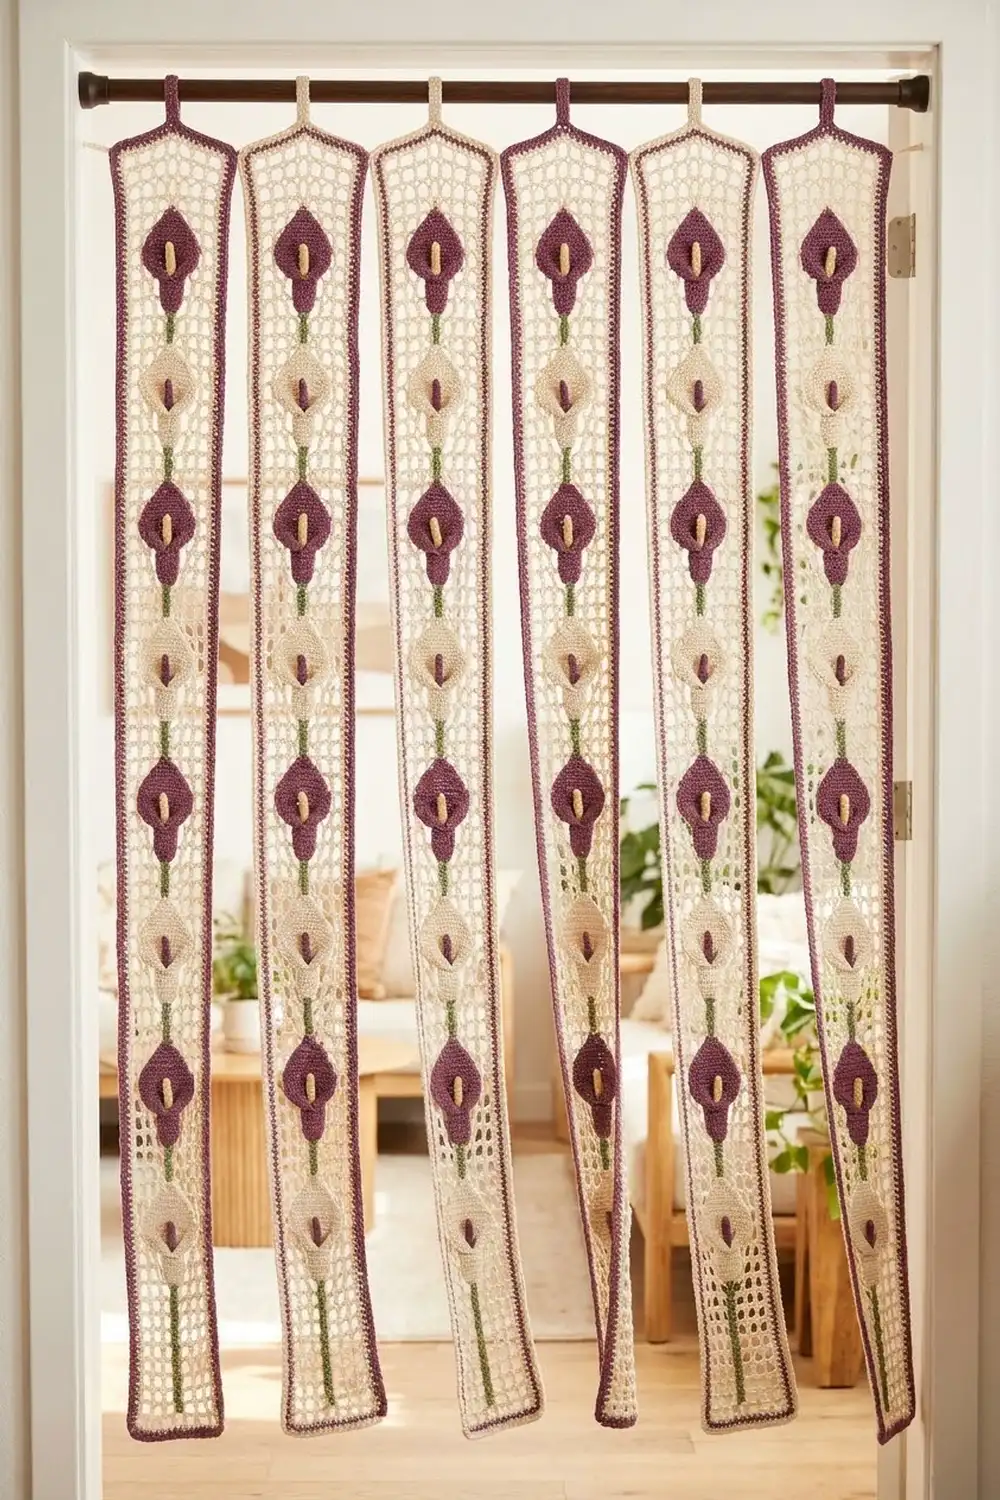
The Calla Cascade curtain is made of six long, airy lace strips, each with a column of calla lilies down the center. A soft cream fishnet mesh fills each strip, and a narrow solid frame keeps the edges straight. The lilies alternate plum and cream, and each one has a small raised spadix in the opposite color.
The strips are hung side by side but not joined. Three strips have a plum frame and three have a cream frame, hung in alternating order. When you walk through, the strips part easily and fall back into line.
The pattern uses US crochet terms. Each finished strip measures 6 in × 73 in (15.2 cm × 185.4 cm), not counting the hanging loop. Six strips hung edge to edge give a curtain about 36 in (91.4 cm) wide.
Construction is simple and modular. You work each strip bottom-up in rows of fishnet mesh and then add a two-round border with a hanging loop. You make the lilies and spadices separately and sew them down the center.
Finished Size and Construction
- Finished strip: 6 in × 73 in (15.2 cm × 185.4 cm), plus a loop about 1.5 in (3.8 cm) tall
- Full curtain: 6 strips, about 36 in (91.4 cm) wide
- Skill level: Intermediate
- Terminology: US
- Yarn weight: DK / light (#3) cotton
- Hook: 3.5 mm (E-4)
- Pieces per strip: 1 mesh strip, 12 lilies, 12 spadices
- Layout: 6 unjoined strips hung in alternating order: plum frame, cream frame
- Lily size: about 4 in × 4 in (10.2 cm × 10.2 cm)
- Strip size before border: 5 in × 72 in (12.7 cm × 182.9 cm)
- Border depth: 0.5 in (1.3 cm) on every side
Materials
Use a smooth mercerized or combed cotton in DK weight. Cotton holds the lily shapes crisply and doesn’t stretch much when the strips hang. Avoid acrylic, because long hanging strips of it can grow in length over time.
- Color A – Cream: 750 g / about 1,650 m
- Color B – Plum: 300 g / about 660 m
These quantities assume about 110 m per 50 g and include a margin of roughly 10%.
Tools:
– 3.5 mm (E-4) crochet hook
– Tapestry needle
– Locking stitch markers
– Rust-proof pins
– Blocking mats or a long padded surface
– Spray bottle
– Measuring tape
– Curtain rod up to 0.75 in (1.9 cm) in diameter
Abbreviations (US Terms)
- ch – chain
- sl st – slip stitch
- sc – single crochet
- hdc – half double crochet
- dc – double crochet
- tr – treble crochet
- sk – skip
- sp – space
- st(s) – stitch(es)
Special stitch – Lily Point: ch 5, sl st in 2nd ch from hook, sc in next ch, hdc in next ch, dc in next ch. This makes a small tapered spike with 4 stitches along the chain.
Gauge and Checkpoints
- Solid gauge: 20 sc = 4 in (10.2 cm), and 4 sc rows = 1 in (2.5 cm)
- Mesh gauge: 2 mesh rows = 1 in (2.5 cm)
- Lily gauge: 5 dc = 1 in (2.5 cm), and each dc row is about 0.45 in (1.1 cm) tall
Test one piece first. Make one lily and the first 10 rows of a strip before you commit to six strips.
Checkpoints:
– Strip Row 1 (25 sc) measures 5 in (12.7 cm) wide.
– 8 mesh rows measure 4 in (10.2 cm) tall.
– After Row 8, the lily measures about 3.6 in (9.1 cm) across the top and 3.6 in (9.1 cm) tall.
– The finished lily measures about 4 in × 4 in (10.2 cm × 10.2 cm).
If your pieces come out too big, go down 0.25 mm in hook size. If they come out too small, go up 0.25 mm. Across 73 in (185.4 cm), small errors add up quickly, so match the row gauge carefully.
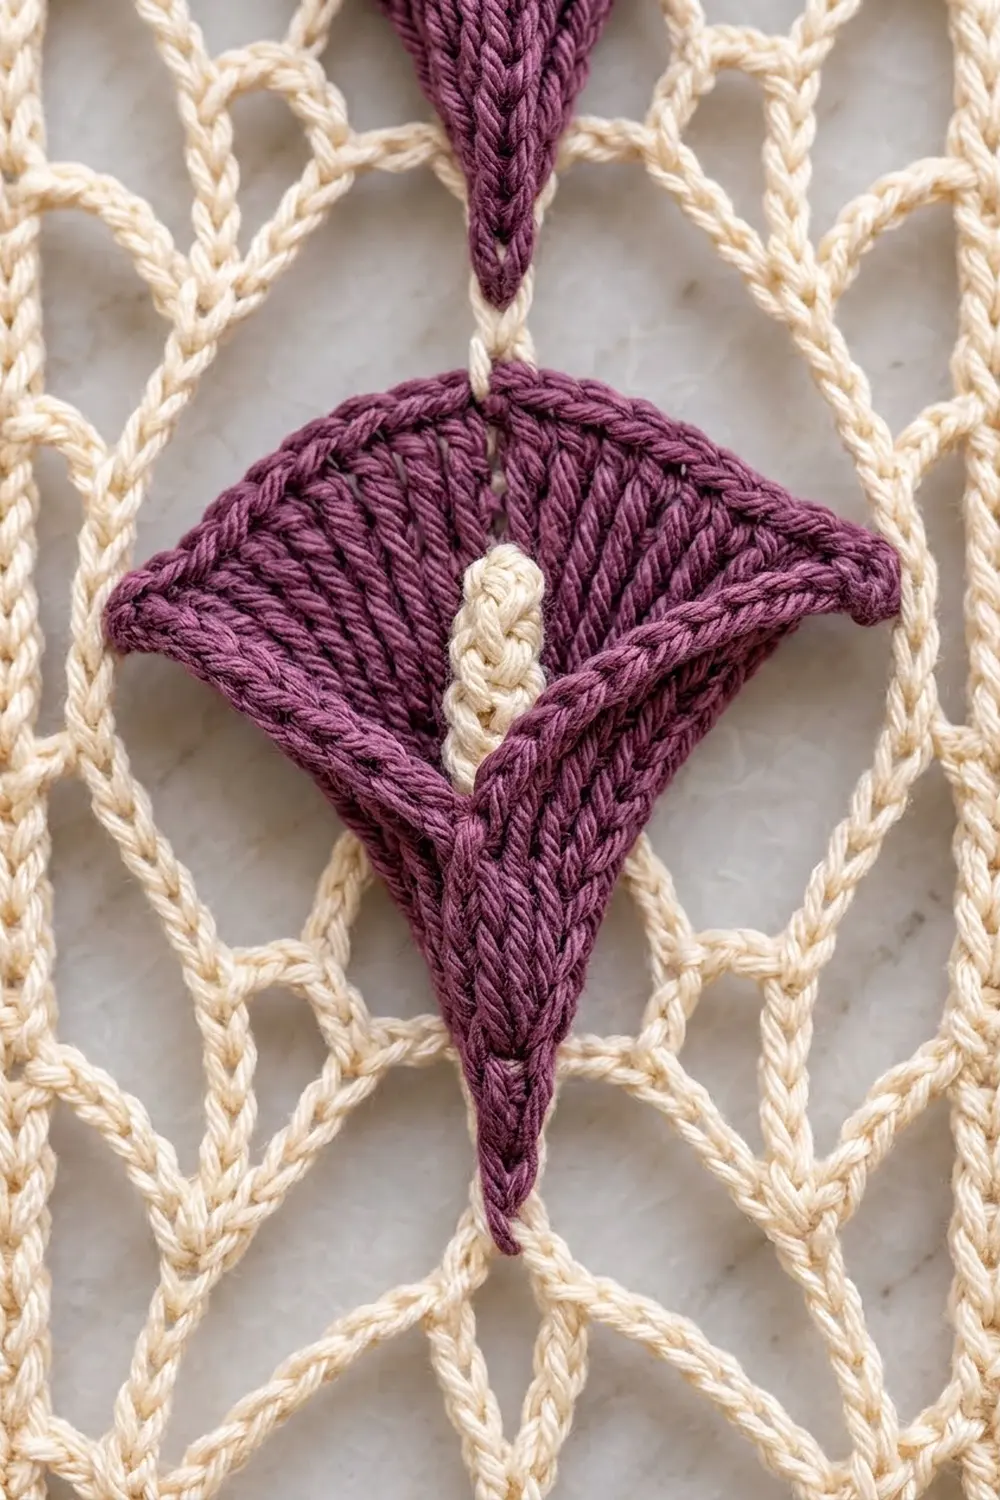
Mesh Strip (make 6, all in Color A)
Foundation: Ch 26.
Row 1: Sc in 2nd ch from hook and in each ch across. Turn. (25 sc)
Row 2 (A-row): Ch 1, sc in first sc, ch 5, sk 3 sc, sc in next sc 6 times. Turn. (6 ch-5 arches, 7 sc)
Row 3 (B-row): Ch 5 (counts as dc + ch 2), sc in first ch-5 arch, ch 5, sc in next arch 5 times, ch 2, dc in last sc. Turn. (5 full arches + 2 half arches)
Row 4 (A-row): Ch 1, sc in first dc, ch 5, sc in next arch 5 times, ch 5, sc in 3rd ch of turning ch-5. Turn. (6 arches, 7 sc)
Rows 5–144: Repeat Rows 3–4 seventy more times, ending with an A-row. You now have 143 mesh rows: 72 A-rows and 71 B-rows.
Checkpoint: The mesh section measures 71.5 in (181.6 cm). Hang the strip briefly to check it, because cotton mesh drops slightly under its own weight.
Row 145: Ch 1, sc in first sc, 3 sc in next arch, sc in next sc 6 times. (25 sc: 7 sc worked into the existing sc + 18 sc worked into the arches.) Fasten off.
Body checkpoint: 5 in × 72 in (12.7 cm × 182.9 cm). That is 0.25 in (0.6 cm) for Row 1, 71.5 in (181.6 cm) of mesh, and 0.25 in (0.6 cm) for Row 145.
Lily (make 72 total)
Work with the right side facing you. The pointed tip ends up on the right.
Foundation: Ch 4.
Row 1: 2 dc in 4th ch from hook. The skipped ch-3 counts as a dc. Turn. (3 sts)
Row 2: Ch 3 (counts as dc throughout), dc in same st, 2 dc in next st, 2 dc in last st. Turn. (6 sts)
Row 3: Ch 3, dc in same st, dc in next 4 sts, 2 dc in last st. Turn. (8 sts)
Row 4: Ch 3, dc in same st, dc in next 6 sts, 2 dc in last st. Turn. (10 sts)
Row 5: Ch 3, dc in same st, dc in next 8 sts, 2 dc in last st. Turn. (12 sts)
Row 6: Ch 3, dc in same st, dc in next 10 sts, 2 dc in last st. Turn. (14 sts)
Row 7: Ch 3, dc in same st, dc in next 12 sts, 2 dc in last st. Turn. (16 sts)
Row 8: Ch 3, dc in same st, dc in next 14 sts, 2 dc in last st. Turn. (18 sts)
The stacked dc posts form the ribbed fan lines that run up from the point.
Row 9 (trim row): Ch 1, sc in first 4 sts, hdc in next 4 sts, dc in next 4 sts, tr in next 5 sts. In the last st, work (tr, Lily Point, sl st). Count: 18 sts worked one per existing stitch + 4 Lily Point stitches = 22 sts, plus the closing sl st. The stitches rise from sc to tr, so the top edge sweeps upward into the spike. Fasten off and leave a 16 in (40.6 cm) tail.
Colors: Make 36 lilies in Color B (plum) and 36 in Color A (cream).
Spadix (make 72 total)
Ch 9. Sc in 2nd ch from hook, hdc in next 6 ch, sl st in last ch. (8 sts, about 1.6 in / 4.1 cm long.) Fasten off and leave a 10 in (25.4 cm) tail.
Colors: Make 36 spadices in Color A for the plum lilies and 36 in Color B for the cream lilies.
Make All Pieces
| Piece | Color A (cream) | Color B (plum) |
|---|---|---|
| Mesh strips | 6 | 0 |
| Lilies | 36 | 36 |
| Spadices | 36 | 36 |
| Border | 3 strips | 3 strips |
Curtain layout (front view, left to right), with lily colors listed from the top down:
Strip 1   Strip 2   Strip 3   Strip 4   Strip 5   Strip 6
[B frame] [A frame] [B frame] [A frame] [B frame] [A frame]
  B         A         B         A         B         A
  A         B         A         B         A         B
  B         A         B         A         B         A
  ...       ...       ...       ...       ...       ...
(12 lilies per strip, alternating; plum frame starts plum, cream frame starts cream)
Joining (Attaching the Lilies)
The strips are never joined to each other. The only joining is sewing the lilies and spadices onto the mesh.
Spadix first. Center the spadix vertically on the lily with its rounded hdc side up. Place its bottom end 1 in (2.5 cm) above the lily point. Whipstitch along both long edges so that it stands slightly raised.
Placement on the strip. Lay the strip flat with Row 145 at the top. The flared edge of each lily faces up and the point faces down. Center each lily on the middle sc of the mesh: the 13th stitch of Row 1 marks the center line.
- Place the top edge of Lily 1 1 in (2.5 cm) below the top of the strip body.
- Place each following lily so its top edge is 6 in (15.2 cm) below the top edge of the lily above.
- Lily 12 ends 1 in (2.5 cm) above the bottom of the body.
- Spacing check: 12 lilies × 6 in (15.2 cm) = 72 in (182.9 cm).
Stitch-to-stitch logic. Using the lily’s own tail, whipstitch through the sc anchor points of the mesh wherever the lily edge crosses them. Sew the bottom point and both sides. Tack the top edge at three points and leave the Lily Point free so it stays dimensional.
Tension. Sew loosely enough that the mesh behind the lily stays flat. If the arches pucker, the stitches are too tight.
Checkpoint: With all 12 lilies attached, the strip should still measure 5 in × 72 in (12.7 cm × 182.9 cm) when laid flat.
Border
Border gauge: 5 sc = 1 in (2.5 cm), and 4 rounds = 1 in (2.5 cm). Each round adds 0.25 in (0.6 cm) per side.
Colors: Use Color B for Strips 1, 3, and 5, and Color A for Strips 2, 4, and 6.
Round 1: With the right side facing, join the yarn in the last sc of Row 145.
– Top corner: Ch 1, 3 sc in the same st (corner). Place a marker in the middle sc.
– Top edge: Sc in next 23 sts, then 3 sc in the last st (corner).
– First long side: Working down the row ends, sc 1 in the end of Row 145. Work 2 sc in the end of each A-row and 3 sc around the dc post at the end of each B-row. Finish with 1 sc in the end of Row 1. That gives 1 + (72 × 2) + (71 × 3) + 1 = 359 sc.
– Bottom edge: Working into the foundation ch, make 3 sc in the first st (corner), sc in next 23 sts, and 3 sc in the last st (corner).
– Second long side: Work up the row ends exactly as before (359 sc). Sl st to the first sc to join.
Each side count below includes both of its corner sc:
– Short sides: 27 sts each
– Long sides: 363 sts each
– Total: 2 × 27 + 2 × 363 − 4 shared corners = 776 sts
Round 2: Ch 1, sc in each st around, working 3 sc in each marked corner sc. Sl st to the first sc. Each side gains 2 sts: short sides 29 sts, long sides 365 sts. Total: 2 × 29 + 2 × 365 − 4 = 784 sts. Do not fasten off.
Hanging loop: Sl st along the top edge to the 13th st, counting from the corner sc. Ch 14, sk 3 sts, and sl st in the 17th st. Turn and work 20 sc into the ch-14 loop. Sl st in the next border st and fasten off. The loop is centered over the 15th (middle) stitch.
Why the math works: The mesh rows average 0.5 in (1.3 cm) each. Alternating 2 and 3 sc gives 2.5 sc per row, which is 5 sc per inch and exactly matches the sc gauge. That puts 359 sc along 72 in (182.9 cm), so the long edges stay flat without ruffling or cupping. Two rounds add 0.5 in (1.3 cm) to each side, making the strip 5 + 1 = 6 in (15.2 cm) wide and 72 + 1 = 73 in (185.4 cm) long.
Final Blocking
- Weave in all ends except the ones you may still need for adjustments.
- Pin the strip face up in sections of about 24 in (61.0 cm), pinning the border straight along a measuring tape.
- Pin each section to 6 in (15.2 cm) wide.
- Open each mesh arch with your fingers and shape the lily tops into a gentle curve, lifting each Lily Point slightly.
- Spray each section until it is damp, not soaked.
- Let each section dry completely before you move to the next one.
- Hang the strip from its loop for 24 hours and check that it is 73 in (185.4 cm) long.
Final Quality-Control Checklist
- [ ] Each strip measures 6 in × 73 in (15.2 cm × 185.4 cm).
- [ ] Each strip has 12 lilies spaced at 6 in (15.2 cm), with colors alternating correctly.
- [ ] Every spadix contrasts with its lily and sits centered and raised.
- [ ] All Lily Points face the same direction.
- [ ] The border counts are 784 sts in Round 2, with square corners.
- [ ] Each loop is centered and fits the rod.
- [ ] All ends are woven in securely.
- [ ] The frame colors alternate plum, cream, plum, cream, plum, cream.
Troubleshooting
- Strip too short when hanging: The mesh is too tight. Go up a hook size, or add pairs of mesh rows and keep the A-row ending.
- Long edges ruffle: You worked too many sc into the row ends. Recheck the 2/3 alternation.
- Long edges cup inward: You worked too few sc into the row ends, or the border tension is too tight.
- Lily curls or cups: Block it flat before sewing. Make sure each increase row adds exactly 2 sts.
- Mesh puckers behind a lily: Your sewing is too tight. Remove the stitches and resew loosely.
- Loop too small for the rod: Increase to ch 18 and 26 sc, and skip 5 border sts instead of 3.
Care
Hand wash in cool water with mild soap, roll the strip in a towel, and dry it flat or hanging. Do not tumble dry, because heat distorts the mesh and lilies.
Final Notes
The measurement chain runs from 25 sc = 5 in (12.7 cm) wide, through 143 mesh rows = 71.5 in (181.6 cm), to a body of 5 in × 72 in (12.7 cm × 182.9 cm). Twelve lilies at 6 in (15.2 cm) spacing fill that length exactly. The 0.5 in (1.3 cm) border brings each strip to 6 in × 73 in (15.2 cm × 185.4 cm), and six strips make a curtain 36 in (91.4 cm) wide. Check gauge at each step and the curtain will hang straight.
Happy crocheting!