
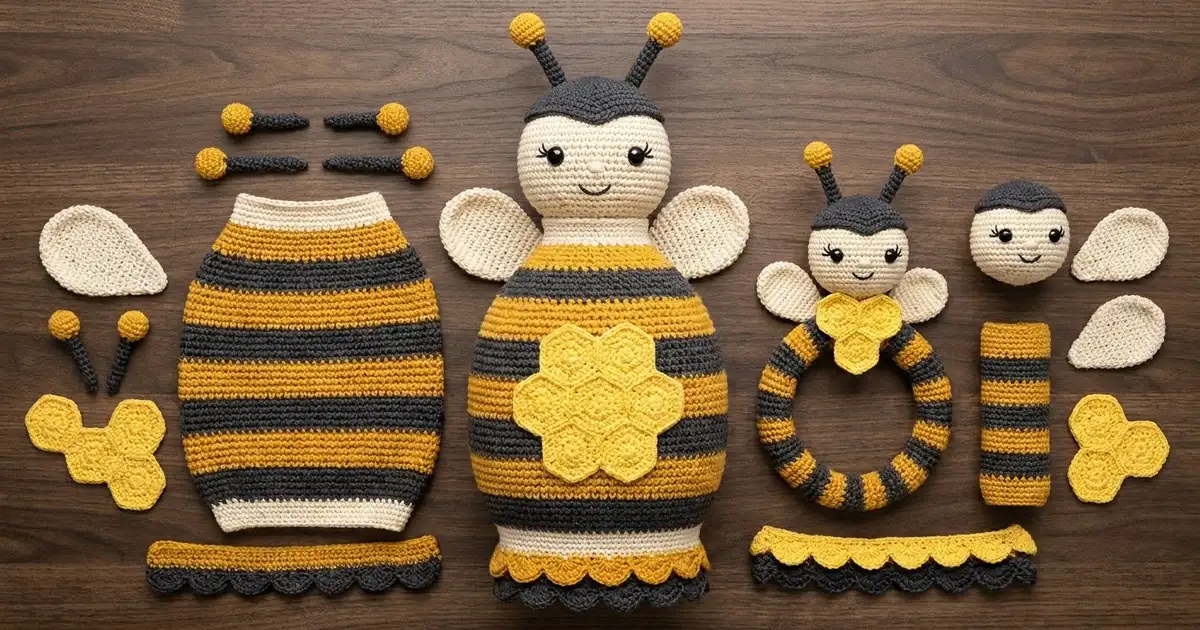
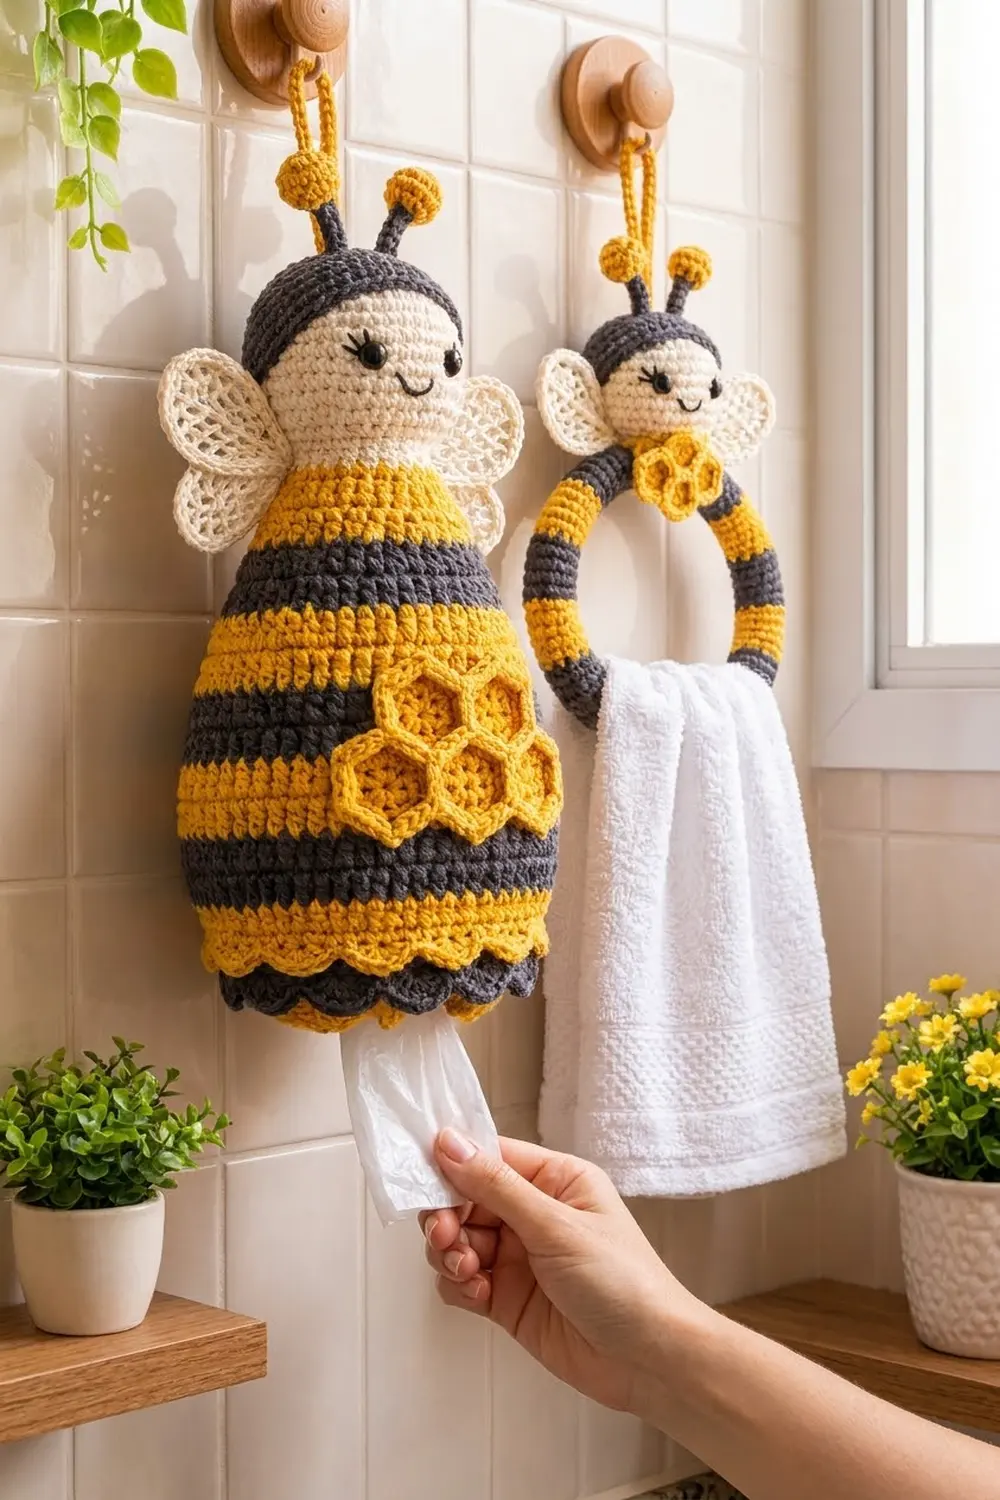
This cheerful bee set brings warm honey tones into a kitchen or bathroom. It has two matching pieces: a plump, vase-shaped bag holder that dispenses plastic bags from the bottom, and a padded towel ring with a smaller bee face. Both have cream mesh wings, yellow-tipped antennae, and raised honeycomb patches.
The palette is mustard yellow, charcoal gray, and cream. The bag holder finishes at about 15 in (38.1 cm) tall to the antenna tips and 10 in (25.4 cm) wide. The towel ring measures about 6.25 in (15.9 cm) across and about 9.5 in (24.1 cm) tall with its head.
The pattern uses US crochet terms throughout.
Every part is worked separately in single crochet and then sewn together. The body and heads are worked in joined rounds, the ring cover is a flat striped strip, the hexagons are small motifs joined into patches, and the bag holder’s bottom edge gets two scalloped trims.
Finished Size and Construction
- Bag holder: 10.5 in (26.7 cm) body including trim; 15 in (38.1 cm) total to the antenna tips
- Towel ring: 6.25 in (15.9 cm) outer diameter; 9.5 in (24.1 cm) tall with head
- Skill level: Intermediate
- Terminology: US
- Yarn weight: Worsted (#4) cotton
- Hook: 4.0 mm (G-6)
- Number of pieces: 17 for the bag holder and 11 for the ring (see “Make All Pieces”)
- Honeycomb layout: 3 over 4 (bag holder) and 1 over 2 (ring)
- Piece size: large hexagon 1.75 in (4.4 cm); mini hexagon 1.2 in (3.0 cm)
- Size before border: body 10 in (25.4 cm) tall, 8 in (20.3 cm) flat width at the bottom edge
- Border depth: each scallop trim extends 0.5 in (1.3 cm) below the row it is sewn to
Materials
Use a smooth worsted-weight cotton or cotton blend. Cotton holds its shape, handles kitchen humidity well, and shows the stitch definition on the honeycomb. The amounts below assume about 95 m per 50 g.
- Mustard yellow: 75 g / 145 m
- Charcoal gray: 60 g / 115 m
- Cream: 40 g / 75 m
All quantities include roughly a 15% margin for swatching and sewing tails.
Tools and notions:
– 4.0 mm (G-6) hook
– Tapestry needle
– Stitch markers
– Sewing pins
– 2 pairs of black safety eyes: 10 mm for the bag holder and 8 mm for the ring
– About 40 g of polyester fiberfill
– One 5 in (12.7 cm) metal or wooden macramé ring
– 9 in (22.9 cm) of 1/4 in (0.6 cm) wide elastic, plus a sewing needle and thread
Abbreviations (US Terms)
- ch: chain
- sl st: slip stitch
- sc: single crochet
- dc: double crochet
- inc: 2 sc in the same stitch
- dec: single crochet decrease (invisible decrease recommended)
- BLO: back loop only
- MR: magic ring
- sk: skip
- st(s): stitch(es)
Special stitch – scallop: 5 dc worked in the same stitch.
Joined rounds: Unless stated otherwise, end each round with a sl st to the first sc, and begin the next round with ch 1, which does not count as a stitch. To change color, complete the joining sl st with the new color.
Gauge and Checkpoints
Gauge: 18 sc and 20 rounds = 4 in (10.2 cm) in sc worked in the round.
Test one piece first. Make the bag holder head through Rnd 6. Laid flat, it should measure 2.4 in (6.1 cm) across. Then make one large hexagon; it should measure 1.75 in (4.4 cm) from flat side to flat side.
Checkpoints:
– Body after Rnd 2: 8 in (20.3 cm) flat width
– Body after Rnd 7: 10 in (25.4 cm) flat width; 1.4 in (3.6 cm) tall
– Body after Rnd 32: 6.4 in (16.3 cm) tall
– Body after Rnd 50: 10 in (25.4 cm) tall; neck 4 in (10.2 cm) flat
– Ring strip: 4 in (10.2 cm) wide × 16 in (40.6 cm) long
If your pieces are too big, go down half a hook size. If they are too small, go up half a size. Cotton doesn’t stretch much, so a body that’s 0.5 in (1.3 cm) too wide stays too wide.
Bag Holder Body
The body is worked from the bottom up as an open tube. Begin with cream.
Foundation: Ch 72 and join with a sl st to form a ring, taking care not to twist the chain.
Rnd 1: Ch 1, sc in each ch around. (72)
Rnd 2: Sc in each st. (72)
Change to yellow.
Rnd 3: [Sc 11, inc] 6 times. (78)
Rnd 4: Sc around. (78)
Rnd 5: [Sc 12, inc] 6 times. (84)
Rnd 6: Sc around. (84)
Rnd 7: [Sc 13, inc] 6 times. (90)
Rnds 8–32: Sc around (90 sts each round), working 5-round stripes in this order:
– Rnds 8–12: charcoal
– Rnds 13–17: yellow
– Rnds 18–22: charcoal
– Rnds 23–27: yellow
– Rnds 28–32: charcoal
Change to yellow.
Rnd 33: [Sc 13, dec] 6 times. (84)
Rnd 34: Sc around. (84)
Rnd 35: [Sc 12, dec] 6 times. (78)
Rnd 36: Sc around. (78)
Rnd 37: [Sc 11, dec] 6 times. (72)
Change to charcoal.
Rnd 38: [Sc 10, dec] 6 times. (66)
Rnd 39: Sc around. (66)
Rnd 40: [Sc 9, dec] 6 times. (60)
Rnd 41: Sc around. (60)
Rnd 42: [Sc 8, dec] 6 times. (54)
Change to yellow.
Rnd 43: [Sc 7, dec] 6 times. (48)
Rnd 44: Sc around. (48)
Rnd 45: [Sc 6, dec] 6 times. (42)
Rnd 46: Sc around. (42)
Rnd 47: [Sc 5, dec] 6 times. (36)
Change to cream.
Rnds 48–50: Sc around. (36)
Fasten off, leaving a 24 in (61.0 cm) tail for attaching the head.
Bag Holder Head
Begin with charcoal.
Rnd 1: 6 sc in MR. (6)
Rnd 2: Inc in each st. (12)
Rnd 3: [Sc 1, inc] 6 times. (18)
Rnd 4: [Sc 2, inc] 6 times. (24)
Rnd 5: [Sc 3, inc] 6 times. (30)
Rnd 6: [Sc 4, inc] 6 times. (36)
Rnd 7: [Sc 5, inc] 6 times. (42)
Rnd 8: [Sc 6, inc] 6 times. (48)
Rnds 9–10: Sc around. (48)
Change to cream.
Rnds 11–18: Sc around. (48)
Insert the 10 mm eyes between Rnds 14 and 15, with 8 stitches between them.
Rnd 19: [Sc 6, dec] 6 times. (42)
Rnd 20: [Sc 5, dec] 6 times. (36)
Place a marker in Rnd 20, because this is the joining round.
Rnd 21: [Sc 4, dec] 6 times. (30)
Rnd 22: [Sc 3, dec] 6 times. (24)
Stuff the head firmly.
Rnd 23: [Sc 2, dec] 6 times. (18)
Rnd 24: [Sc 1, dec] 6 times. (12)
Rnd 25: Dec 6 times. (6)
Close the opening and weave in the tail.
Face: Using charcoal, embroider a smile 3 stitches wide, 2 rounds below the eyes. Add two short lash stitches angled outward from each eye.
The head is about 3.4 in (8.6 cm) in diameter.
Towel Ring Head
Begin with charcoal.
Rnds 1–6: Work as Bag Holder Head Rnds 1–6. (36)
Rnds 7–8: Sc around. (36)
Change to cream.
Rnds 9–13: Sc around. (36)
Insert the 8 mm eyes between Rnds 10 and 11, with 6 stitches between them.
Rnd 14: [Sc 4, dec] 6 times. (30)
Rnd 15: [Sc 3, dec] 6 times. (24)
Stuff the head.
Rnd 16: [Sc 2, dec] 6 times. (18)
Rnd 17: [Sc 1, dec] 6 times. (12)
Rnd 18: Dec 6 times. (6)
Close the opening and embroider the face as before. The finished head is about 2.5 in (6.4 cm) in diameter.
Towel Ring Cover
The ring cover is worked flat in rows, so the stripes run across the tube.
With yellow, ch 19.
Row 1: Sc in the 2nd ch from the hook and in each ch across. (18)
Rows 2–80: Ch 1, turn, sc across. (18)
Change color every 5 rows: Rows 1–5 are yellow, Rows 6–10 are charcoal, and so on. Row 80 finishes the 8th charcoal stripe, giving 16 stripes in total.
The strip measures 4 in (10.2 cm) × 16 in (40.6 cm).
Hexagons
Large hexagon (make 7)
Work in yellow.
Rnd 1: Ch 1, 12 sc in MR. (12)
Rnd 2: Ch 1, [sc in next st, (sc, ch 2, sc) in next st] 6 times. (18 sc and 6 ch-2 corners; 3 sc per side)
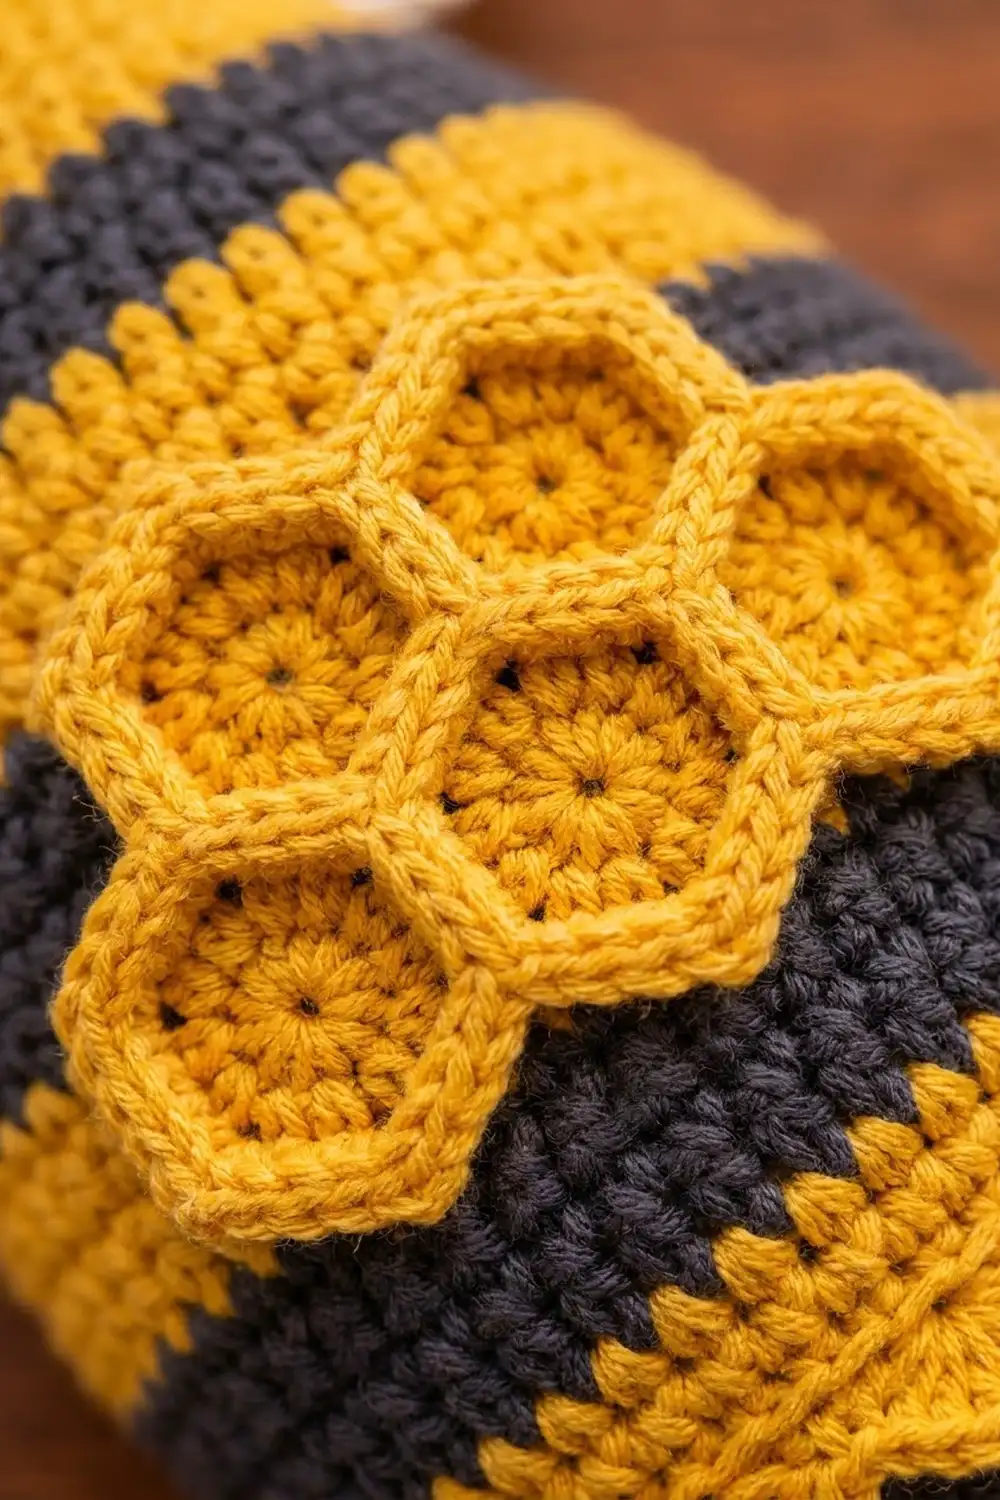
Rnd 3: Working in BLO, ch 1, sc in each sc and work (sc, ch 1, sc) in each ch-2 space. (30 sc and 6 ch-1 corners; 5 sc per side)
Working Rnd 3 in the back loops leaves the front loops of Rnd 2 standing up as a ridge. This ridge creates the raised inner outline of each cell.
Mini hexagon (make 3)
Work Rnds 1–2 only. Each side has 3 sc, and the motif measures 1.2 in (3.0 cm) across.
Wings, Antennae, and Hanging Loops
Large wing (make 2, cream)
Foundation: Ch 12.
Rnd 1: Sc in the 2nd ch from the hook, sc in the next 9 ch, 3 sc in the last ch. Working along the opposite side of the chain, sc in the next 9 ch, then 2 sc in the same ch as the first sc. (24)
Rnd 2: Ch 1, sc in the first st, [ch 3, sk 1, sc in next st] 11 times, ch 3, sk the last st, join. (12 ch-3 loops)
Rnd 3: Sl st into the first loop, ch 1, sc in the same loop, [ch 4, sc in next loop] 11 times, ch 4, join. (12 ch-4 loops)
Rnd 4: Ch 1, 5 sc in each ch-4 loop around. (60)
The wing is a teardrop about 3 in × 2 in (7.6 cm × 5.1 cm).
Small wing (make 2, cream)
Work Rnds 1–2 of the large wing.
Rnd 3: Ch 1, 4 sc in each ch-3 loop around. (48)
The small wing measures 2.5 in × 1.5 in (6.4 cm × 3.8 cm).
Antenna ball (make 4, yellow)
Rnd 1: 6 sc in MR. (6)
Rnd 2: Inc in each st. (12)
Rnds 3–4: Sc around. (12)
Stuff the ball.
Rnd 5: Dec 6 times. (6)
Close. Each ball measures about 0.75 in (1.9 cm).
Antenna stem (charcoal)
- Bag holder (make 2): Ch 9, then sl st in the 2nd ch from the hook and in each ch back. (8 sl st) Each stem is about 1.5 in (3.8 cm).
- Ring (make 2): Ch 7, then sl st back along the chain. (6 sl st) Each stem is about 1.25 in (3.2 cm).
Hanging loop (make 2, yellow)
Ch 41, then sc in the 2nd ch from the hook and in each ch across. (40)
The strip is about 9 in (22.9 cm) long. Folded in half, it makes a 4.5 in (11.4 cm) loop.
Scalloped Trims (Border)
Make 2 trims: 1 in yellow and 1 in charcoal.
Row 1: Ch 73, then sc in the 2nd ch from the hook and in each ch across. (72)
Sew the short ends together to form a ring, matching the stitches edge to edge. Do not add any stitches at the seam.
Rnd 2: Ch 1, [sc in next st, sk 2, 5 dc in next st, sk 2] 12 times, join. (12 scallops)
Border gauge: Each scallop uses 6 base stitches, which equals 1.33 in (3.4 cm). Twelve scallops measure 16 in (40.6 cm) around.
Why the math works: The body’s Rnds 1 and 2 each have exactly 72 stitches. The trim’s base ring also has 72 stitches, and 72 ÷ 6 = 12 full repeats. There is no partial scallop, and each trim lines up stitch for stitch with the body round it is sewn to.
Placement:
– Sew the base of the charcoal trim to the inside of Rnd 1, matching all 72 stitches. Its scallops will hang 0.5 in (1.3 cm) below the cream edge.
– Sew the base of the yellow trim along the outside of Rnd 2, also matching all 72 stitches. Its scallops cover the cream band and overlap the charcoal trim.
Make All Pieces
Bag holder (17 pieces):
| Color | Pieces |
|---|---|
| Multicolor | 1 body, 1 head |
| Yellow | 7 large hexagons, 2 antenna balls, 1 trim, 1 loop |
| Charcoal | 2 stems, 1 trim |
| Cream | 2 large wings |
Towel ring (11 pieces):
| Color | Pieces |
|---|---|
| Multicolor | 1 cover strip, 1 head |
| Yellow | 3 mini hexagons, 2 antenna balls, 1 loop |
| Charcoal | 2 stems |
| Cream | 2 small wings |
Honeycomb layouts:
Bag holder:        Ring:
  [H][H][H]          [h]
 [H][H][H][H]       [h][h]
Joining
Honeycomb patches: Hold two hexagons with right sides up and whipstitch through the outer loops with yellow.
- Large hexagons: Match 5 sc to 5 sc, and corner space to corner space. The bag holder patch has 11 seams: 3 in the bottom row, 2 in the top row, and 6 between the rows.
- Mini hexagons: Match 3 sc to 3 sc. The ring patch needs 3 seams.
Keep the tension snug but not puckered; the patch should lie flat without any cupping.
- The large patch measures 7 in (17.8 cm) wide × 3.5 in (8.9 cm) tall.
- The mini patch measures 2.4 in × 2.4 in (6.1 cm × 6.1 cm).
Bag holder assembly:
- Sew both trims to the body as described in the Border section.
- Place the head over the neck so that Rnd 50 (36 stitches) meets the marked Rnd 20 of the head (36 stitches). Whipstitch them together one stitch to one stitch. The head now closes off the top of the tube.
- Pin the honeycomb patch to the front, centered on Rnd 23, so it covers roughly Rnds 14–32. Sew around its outer edge.
- Sew one wing to each side at the back of Rnds 44–47, pinching the narrow end of each wing slightly.
- Sew the antenna stems into Rnds 3–4 of the head, 6 stitches apart, and attach a ball to the top of each stem.
- Sew both ends of the hanging loop to the crown of the head, between the antennae.
- Overlap the elastic ends by 1 in (2.5 cm) and stitch them to make an 8 in (20.3 cm) loop. Weave the elastic through the posts of Rnd 2 on the inside. This gathers the opening to about 2.5 in (6.4 cm) across, which lets bags pull out one at a time.
Ring assembly:
- Wrap the cover strip around the metal ring, wrong side in, with the seam on the inner edge.
- Whipstitch the long edges together, matching row end to row end (80 to 80). Stuff lightly as you go.
- Whipstitch the short ends together, matching 18 stitches to 18 stitches.
- Sew the head to the top of the ring, directly opposite the short-end seam.
- Sew the mini honeycomb patch under the chin, overlapping the ring.
- Attach the small wings behind the head, then add the antennae (4 stitches apart) and the hanging loop.
Final Blocking
- Lay the wings and trims on a towel.
- Pin the wing tips into teardrop points and the scallops into even curves.
- Steam from 1 in (2.5 cm) above the fabric without touching it.
- Steam the honeycomb patch lightly to flatten the seams.
- Do not steam the safety eyes or the elastic.
- Let everything dry completely before hanging.
Final Quality-Control Checklist
- [ ] The body measures 10.5 in (26.7 cm) including the trim, and each stripe has 5 rounds.
- [ ] The head joins the neck with 36 stitches matched to 36, with no gaps.
- [ ] The eyes are level and secured with their backs.
- [ ] The honeycomb is centered and its ridges face out.
- [ ] Both trims show 12 even scallops.
- [ ] The elastic lets a bag pull out without the opening gaping.
- [ ] The ring seam is hidden on the inner edge and the stuffing is even.
- [ ] The hanging loops are firmly anchored.
Troubleshooting
- The stripes have a jog: Use joined rounds and keep the seam at the back.
- The body bulges or cones: Check that every increase and decrease round has the correct count from the pattern.
- The hexagons ruffle: Go down a hook size for the motifs only.
- The scallops flip upward: Block them and pin them downward.
- The cover strip is too short: Add rows in complete 5-row stripe pairs.
- The head wobbles: Add stuffing, and stitch a second pass around the neck seam.
Care
Spot-clean with mild soap and cool water, or remove the elastic and hand-wash. Reshape the pieces and lay them flat to dry.
Final Notes
Every measurement depends on the gauge: 18 stitches = 4 in (10.2 cm).
- The 72-stitch base gives the 8 in (20.3 cm) bottom width, increases to 90 stitches for the 10 in (25.4 cm) belly, and decreases to the 36-stitch neck.
- The neck matches head Rnd 20 stitch for stitch.
- Both trims divide the 72-stitch base into 12 even scallops.
- The 18-stitch, 80-row strip wraps the 5 in (12.7 cm) ring.
Check the measurements at each stage, and both bees will hang neatly side by side.
Happy crocheting!