

This owl set brings some woodland charm to a kitchen or bathroom. The tall teal owl holds plastic bags that you pull from the bottom one at a time. Its smaller partner sits on a padded cream ring that holds a hand towel.
The palette is teal, warm cream and mustard yellow, with glossy black safety eyes. The textures are what make the set: a puffy cream belly, wings made of stacked shell tiers, and a two-layer scalloped hem.
The pattern uses US crochet terms. The finished bag holder measures about 8 in (20.3 cm) wide across the body and 15.5 in (39.4 cm) tall, not counting the loop. The towel ring is 6 in (15.2 cm) across and about 8.5 in (21.6 cm) tall with the head.
All the parts are worked separately and then sewn together. The bag holder body is worked in the round from the top down. The belly, wing tiers and skirts are worked flat. The eyes and the towel-ring head are worked as flat circles.
Finished Size and Construction
- Bag holder: 8 in (20.3 cm) wide body; 15.5 in (39.4 cm) tall including ears and skirt
- Towel ring: 6 in (15.2 cm) ring; 8.5 in (21.6 cm) tall with head
- Skill level: Intermediate
- Terminology: US
- Yarn weight: Worsted (#4) cotton
- Hook: 4.0 mm (G-6)
- Number of pieces: 22 crocheted pieces plus 1 padded ring
- Layout: Owl front with eyes, beak, belly, two wings and two skirts; owl head mounted on a ring
- Body size before skirts: 8 in × 14 in (20.3 × 35.6 cm), flat
- “Border” depth: The skirts hang about 0.75 in (1.9 cm) below the body edge
Materials
Use a smooth worsted-weight cotton or cotton blend so the puffs and shells stay crisp. The amounts below assume about 85 m per 50 g.
- Teal: 120 g / 204 m
- Cream: 70 g / 119 m
- Mustard: 20 g / 34 m
All quantities include a margin of about 10–15%.
Tools and notions:
– 4.0 mm (G-6) hook
– Tapestry needle, stitch markers and scissors
– 12 mm black safety eyes (2) and 10 mm black safety eyes (2)
– 0.25 in (0.6 cm) wide elastic, 9 in (22.9 cm) long, plus a sewing needle and thread
– 6 in (15.2 cm) outer-diameter metal or plastic ring
– A strip of quilt batting to pad the ring to about 0.75 in (1.9 cm) thick
– Pins
Abbreviations (US Terms)
- ch – chain
- sl st – slip stitch
- sc – single crochet
- dc – double crochet
- inc – 2 sc in the same stitch
- sc2tog – single crochet 2 together
- sc3tog – single crochet 3 together
- st(s) – stitch(es)
- MR – magic ring
- rnd – round
Special stitches
- Puff: (Yarn over, insert hook into the stitch, yarn over and pull up a loop) 4 times. That leaves 9 loops on the hook. Yarn over and pull through all 9 loops.
- Shell: 5 dc in the same stitch.
Gauge and Checkpoints
Gauge is 16 sc × 18 rows = 4 in (10.2 cm). Before you start the body, make one wing tier as a test piece.
Test checkpoint: The 9-st base of a wing tier should measure 2.25 in (5.7 cm).
– If it’s wider, go down a hook size.
– If it’s narrower, go up a hook size.
Stage checkpoints:
– Body, Rnd 1: 10 in (25.4 cm) around, or 5 in (12.7 cm) when laid flat.
– Body, Rnd 24: 16 in (40.6 cm) around, or 8 in (20.3 cm) flat.
– Finished body: 14 in (35.6 cm) tall, 7 in (17.8 cm) flat at the bottom.
– Belly panel before edging: 4.25 × 5.25 in (10.8 × 13.3 cm).
– Large eye: 2.25 in (5.7 cm) across. Small eye: 1.75 in (4.4 cm).
If your row gauge is short, add even rounds in Rnds 25–50 rather than changing the stitch counts.
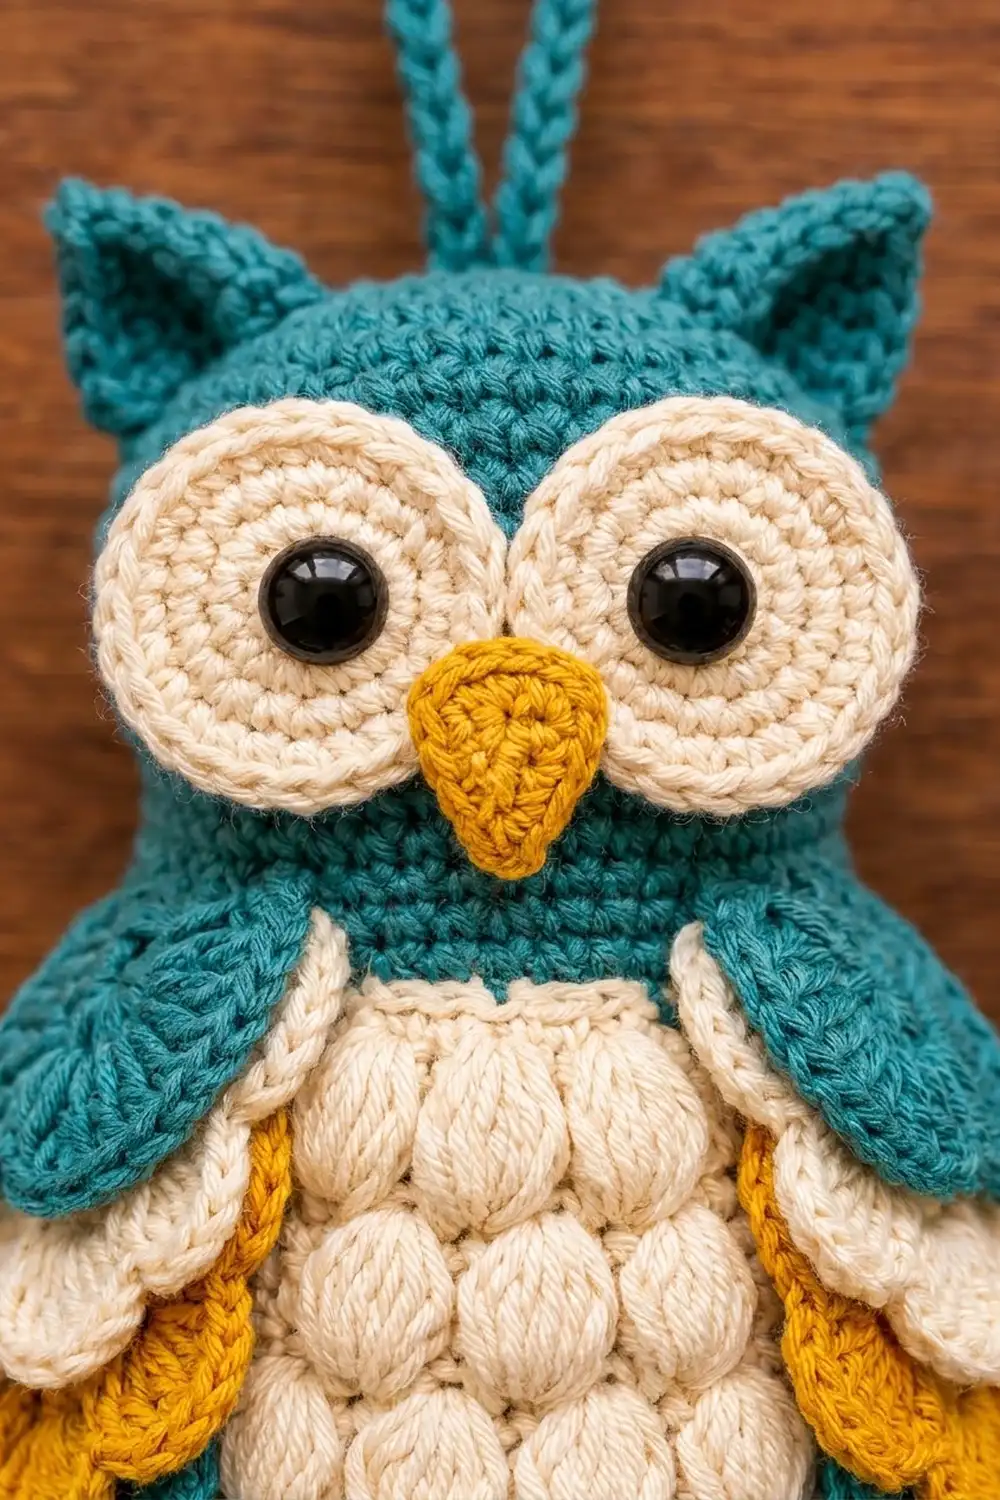
Bag Holder Body (Teal, Make 1)
The body is worked in continuous rounds from the top down. Mark the first stitch of each round.
Rnd 1: Ch 40 and join with a sl st, taking care not to twist the chain. Sc in each ch around. (40)
Rnds 2–8: Sc in each st around. (40)
Rnd 9: Sc 9, inc 4 times. (44)
Rnds 10–11: Sc around. (44)
Rnd 12: Sc 10, inc 4 times. (48)
Rnds 13–14: Sc around. (48)
Rnd 15: Sc 11, inc 4 times. (52)
Rnds 16–17: Sc around. (52)
Rnd 18: Sc 12, inc 4 times. (56)
Rnds 19–20: Sc around. (56)
Rnd 21: Sc 13, inc 4 times. (60)
Rnds 22–23: Sc around. (60)
Rnd 24: Sc 14, inc 4 times. (64)
Rnds 25–50: Sc around. (64)
Rnd 51: Sc 14, sc2tog 4 times. (60)
Rnds 52–54: Sc around. (60)
Rnd 55: Sc 13, sc2tog 4 times. (56)
Rnds 56–63: Sc around. (56)
Sl st to the next st and fasten off. The body has 63 rounds, which is 14 in (35.6 cm) at 4.5 rows per inch. It flares from 5 in (12.7 cm) wide at the top to 8 in (20.3 cm) in the middle, then narrows to 7 in (17.8 cm) at the bottom. That gives the vase silhouette.
Top seam and ears: Flatten the top so the round’s join sits at one side edge. Join teal at that edge. Ch 1, then sc through both layers across the top. (20)
- Ear row 1: Ch 1, turn, and sc in the first 5 sts. (5)
- Ear row 2: Ch 1, turn, sc2tog, sc, sc2tog. (3)
- Ear row 3: Ch 1, turn, sc3tog. (1) Fasten off.
Rejoin at the other end and work the second ear over the last 5 sts. This leaves 10 sts between the ears. Each ear is about 0.7 in (1.8 cm) tall.
Eyes (Cream)
Large eyes (make 2, for the bag holder):
– Rnd 1: 6 sc in a MR. (6)
– Rnd 2: Inc in each st. (12)
– Rnd 3: Sc, inc around. (18)
– Rnd 4: Sc 2, inc around. (24)
– Rnd 5: Sc 3, inc around. (30)
Sl st and fasten off, leaving a long tail. Fix a 12 mm safety eye between Rnds 1 and 2, a little off-center.
Small eyes (make 2, for the towel ring): Work Rnds 1–4 only. (24) Fix a 10 mm safety eye in the same position.
Beaks (Mustard, Make 2)
- Row 1: Ch 2, then 3 sc in the 2nd ch from the hook. (3)
- Row 2: Ch 1, turn. 2 sc in the first st, sc, 2 sc in the last st. (5)
- Row 3: Ch 1, turn, sc across. (5)
Fasten off. Sew the beak with the point facing down. It is about 1.25 in (3.2 cm) wide.
Puff Belly (Cream, Make 1)
Row 1 (WS): Ch 18. Sc in the 2nd ch from the hook and in each ch across. (17)
Row 2 (RS): Ch 1, turn. Sc, then puff, sc 8 times. (8 puffs + 9 sc = 17)
Row 3: Ch 1, turn. Sc in each st across. (17)
Row 4: Ch 1, turn. Sc 2, puff, sc 7 times, then sc 1. (7 puffs + 10 sc = 17)
Row 5: Ch 1, turn. Sc across. (17)
Rows 6–21: Repeat Rows 2–5 four more times. You now have 10 puff rows, offset in a honeycomb.
Edging round: Ch 1, but don’t turn. Work 21 sc down the first side (1 per row end) and 17 sc along the foundation ch. Then work 21 sc up the second side and 17 sc across the top. Sl st to the first sc. (76)
There are no corner increases. That makes the edging pull the corners in, so the panel turns into an oval. The finished belly is 4.75 × 5.75 in (12.1 × 14.6 cm).
Shell Tiers (Wings and Shoulders)
Every tier is worked the same way.
- Row 1: Ch 10. Sc in the 2nd ch from the hook and across. (9)
- Row 2: Ch 1, turn, sc across. (9)
- Row 3: Ch 1, turn. Sc in the first st, then skip 1, shell in the next st, skip 1, sc in the next st twice. (3 sc + 10 dc = 13)
Fasten off. Each tier is 2.5 in (6.4 cm) wide at the scallops and 1 in (2.5 cm) tall. The base works out because 1 + (4 × 2) = 9, so each shell repeat uses exactly 4 base stitches.
Skirts (Make 2)
Row 1 (teal): Ch 58. Sc in the 2nd ch from the hook and across. (57)
Row 2: Ch 1, turn. Sc, then skip 1, shell, skip 1, sc 14 times. (15 sc + 70 dc = 85)
The upper skirt stops here. Fasten off.
Lower skirt, Row 3 (cream): Join cream. Ch 1 and sc in each st across, working around the shells. (85)
Elastic Band and Hanging Loops
Elastic band: Overlap the ends of the elastic by 0.5 in (1.3 cm) and sew them, making a ring 8.5 in (21.6 cm) around. With teal, work 40 sc over the ring. Sl st to join and fasten off.
Hanging loops (teal, make 2): Ch 31. Sc in the 2nd ch from the hook and across. (30) The strip is 7.5 in (19.1 cm) long. Folded in half, it makes a 3.75 in (9.5 cm) loop.
Towel Ring Pieces
Ring cover (cream):
– Row 1: Ch 11. Sc in the 2nd ch from the hook and across. (10)
– Rows 2–74: Ch 1, turn, sc across. (10)
The strip is 2.5 × 16.5 in (6.4 × 41.9 cm). That matches the centerline of a 6 in (15.2 cm) ring padded to 0.75 in (1.9 cm): 5.25 in × 3.14 = 16.5 in.
Head (teal, make 2):
– Rnd 1: 6 sc in a MR. (6)
– Rnd 2: Inc in each st. (12)
– Rnds 3–7: Increase 6 sts evenly in each round, as for the eyes. Rnd 7 has 42 sts, and the circle measures 3.5 in (8.9 cm).
Ears (front head only): Count 16 sts back from the end of Rnd 7 and join teal.
– Row 1: Sc 4. (4)
– Row 2: Ch 1, turn, sc2tog twice. (2)
– Row 3: Ch 1, turn, sc2tog. (1) Fasten off.
Skip 10 sts and work the second ear over the next 4 sts.
Make All Pieces
| Color | Pieces |
|---|---|
| Teal | Body (1), wing tiers (4), upper skirt (1), lower skirt Rows 1–2 (1), elastic band (1), loops (2), heads (2) |
| Cream | Large eyes (2), small eyes (2), belly (1), wing tiers (2), lower skirt edge, ring cover (1), shoulder tiers (2) |
| Mustard | Beaks (2), wing tiers (2), shoulder tiers (2) |
Bag holder front layout:
  [ear]  --loop--  [ear]
    [eye]       [eye]
          [beak]
 [wing] [ belly ] [wing]
 [ upper skirt, teal  ]
 [ lower skirt, cream ]
Joining
Sew everything with whipstitch and matching yarn. Catch only the outer loops of the appliqué and a single strand of the body, so no stitches show inside. Pin each piece before sewing. Pull each stitch just snug enough to close the gap; if you pull harder, the body will pucker.
Bag holder:
- Sew the loop ends to the center of the top seam, 0.25 in (0.6 cm) apart.
- Sew on the eyes just below the top seam, touching at the center. Add the beak between them, overlapping the eyes.
- Center the belly below the beak, starting about 0.5 in (1.3 cm) under it.
- Wings: Stack the tiers in this order from the top: teal, cream, mustard, teal. Overlap each tier’s Rows 1–2 under the scallops of the tier above, by about 0.25 in (0.6 cm). Sew the stack along the inner edge only. Each wing is 3.25 in (8.3 cm) long. Sew one along each side of the belly so the scallops overlap the belly edge.
- Upper skirt: Wrap it around the body with Row 1 sitting along Rnd 60. Lay the first and last sc on top of each other and sew them as one. That turns 57 sts into 56, matching the body’s 56 sts stitch for stitch. Sew it along Row 1.
- Lower skirt: Attach it the same way along Rnd 63.
- Stretch the elastic band evenly inside the bottom edge and tack it every 2 in (5.1 cm).
Towel ring:
- Wrap batting around the ring until it is 0.75 in (1.9 cm) thick.
- Wrap the cover around the ring. Whipstitch the long edges together on the inner side, then join the two short ends.
- Sew the eyes and beak onto the front head.
- Place the two head circles over the top of the ring, front and back. Sew them together around the edge, stitching through the cover where the ring passes between them.
- Shoulders: On each side below the head, sew a cream tier over a mustard tier.
- Sew the second loop to the top of the head, between the ears.
Size checkpoint: The bag holder should lie 8 in (20.3 cm) wide at the widest point and 15.5 in (39.4 cm) tall, excluding the loop.
Border
The two skirts are this project’s border. Border gauge: 4 base stitches per scallop, and each scallop is 1 in (2.5 cm) wide.
- Row 1: 57 sc, which becomes 56 once the ends are overlapped.
- Row 2: 14 shells. That’s 15 sc + 70 dc = 85 sts.
- Row 3 (lower skirt only): 85 cream sc.
Why the math works: The body’s bottom round has 56 sts, and 56 = 14 × 4. Each shell repeat (skip, shell, skip, sc) uses exactly 4 base stitches, so 14 scallops close evenly with no half scallop at the seam.
Final Blocking
- Mist all pieces lightly, or wet-block them before assembly.
- Pin the belly flat to 4.75 × 5.75 in (12.1 × 14.6 cm).
- Pin each shell into a rounded fan and let it dry.
- After assembly, stuff the body loosely with a towel. Steam it from 1 in (2.5 cm) away without touching it.
- Fluff the skirt scallops with your fingers so they flare evenly. Let everything dry completely.
Final Quality-Control Checklist
- The body has 56 sts at the bottom and is 14 in (35.6 cm) tall.
- The ears are symmetrical, with 10 sts between them.
- The safety eye backs are fully secured.
- The belly is centered and the puffs are in a clean honeycomb.
- Both wings have their tiers in the same color order.
- The skirt seams line up at the back with no half scallop.
- The elastic pulls the opening in evenly.
- The ring cover seam is hidden on the inner side.
- All tails are woven in.
Troubleshooting
- The body cones instead of curving: Spread the increases out with the even rounds as written. Don’t stack them.
- The puffs lean or look flat: Pull each loop up to the same height before the final yarn over.
- The shells cup: Use a slightly looser tension on the dc, or block them flatter.
- The skirt is too long or too short: Check that Row 1 has exactly 57 sts, and remember to overlap the ends.
- Bags fall out: Shorten the elastic by 0.5 in (1.3 cm).
- The ring cover twists: Pin the seam all the way around before sewing.
Care
Remove the safety-eye pieces from use around small children. Spot clean, or hand wash cool and dry flat. Don’t wring the shells.
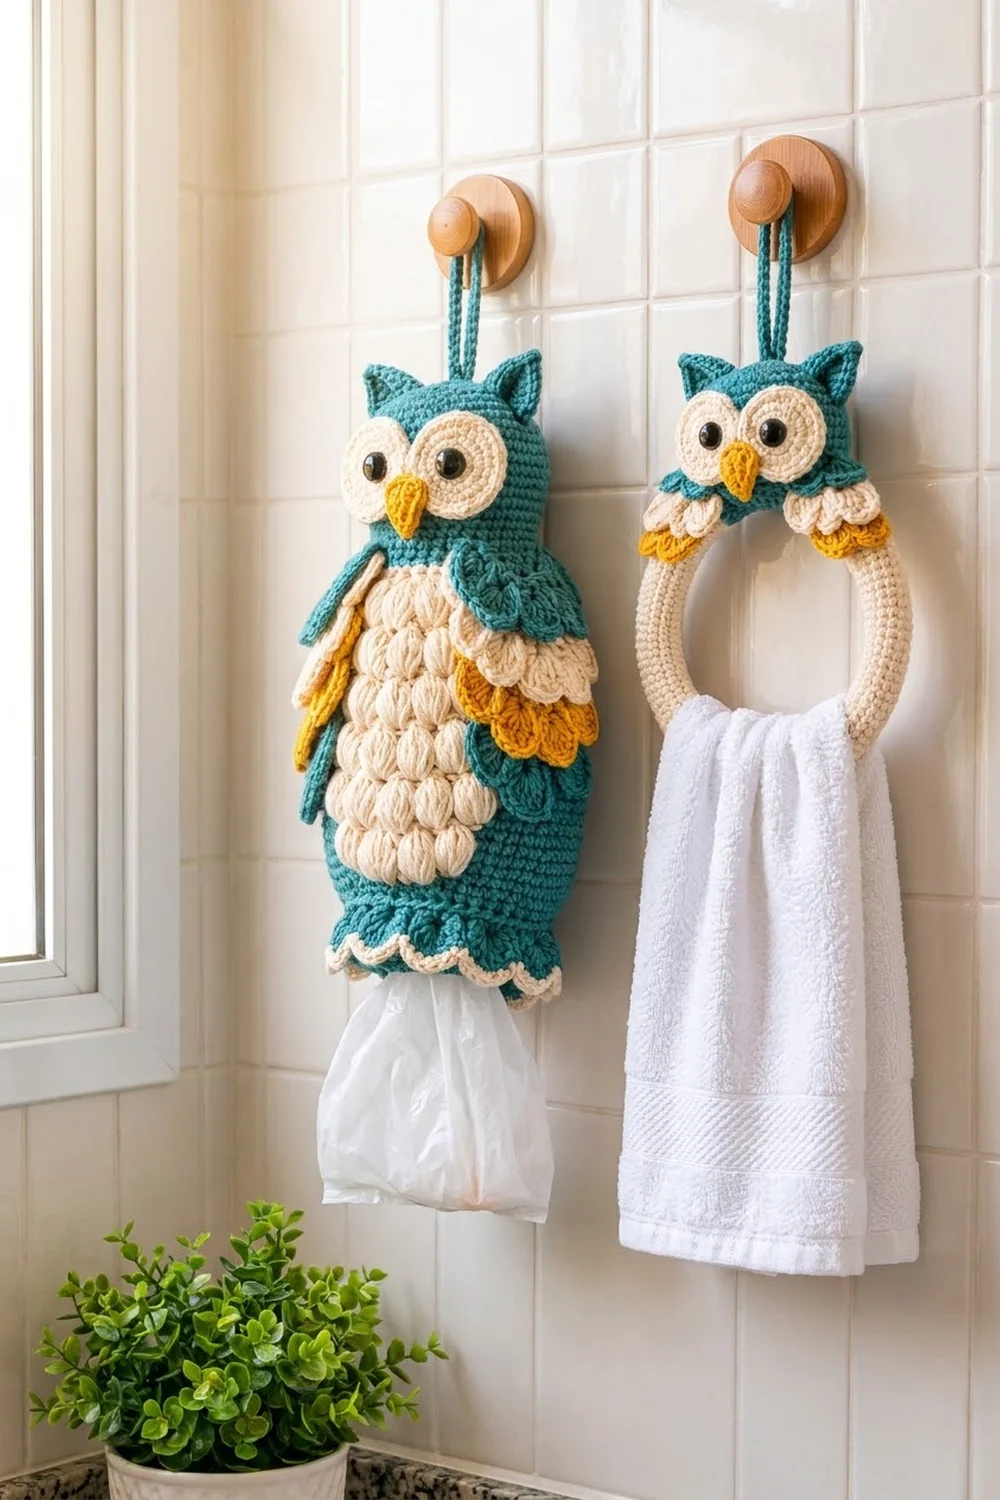
Final Notes
Everything rests on one measurement chain:
- 16 sc = 4 in (10.2 cm).
- That gives a 40-st top of 5 in (12.7 cm) flat, a 64-st middle of 8 in (20.3 cm) flat, and a 56-st bottom of 7 in (17.8 cm) flat.
- The 56 bottom sts take exactly 14 scallops.
- The 74-row ring cover fits the 16.5 in (41.9 cm) centerline of the padded ring.
Check your gauge on one wing tier, then measure at each checkpoint, and both owls will come out matching. Happy crocheting!