

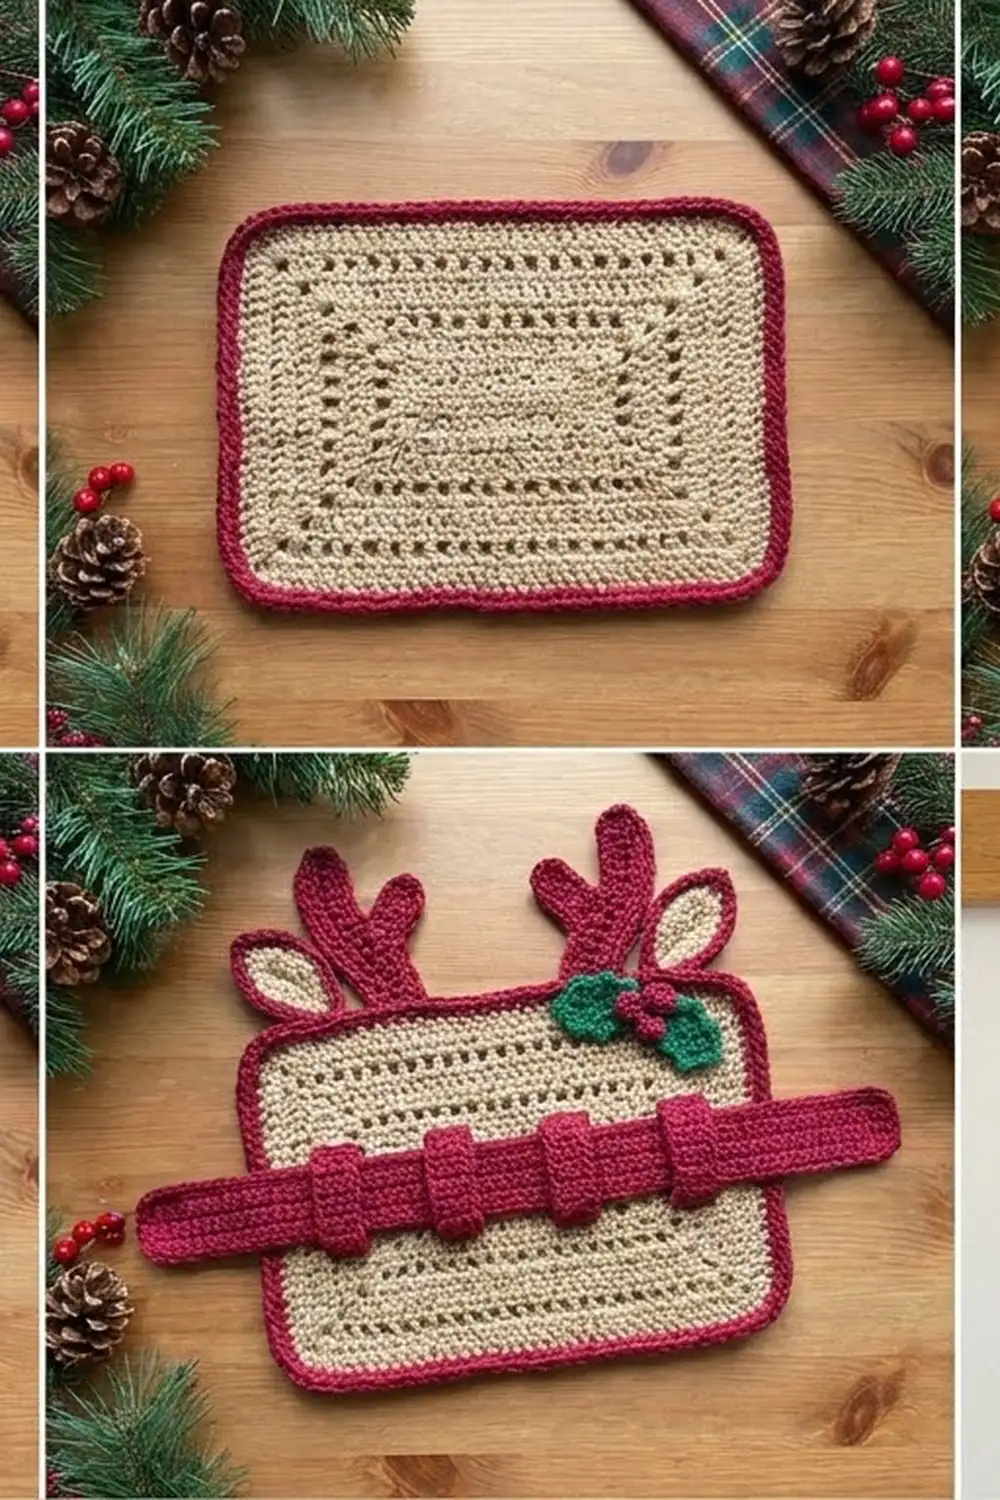
This reindeer cable keeper is a festive wall hanger with a job to do. A light camel diamond mesh makes up the reindeer’s body. A crisp cranberry border frames it, and two red antlers, two outlined ears and a little holly cluster sit at the top. Four tabs on a center strap hold coiled charging cords, so your desk stays tidy all season.
The colors are classic and cozy: camel, cranberry and holly green. The style is clean and graphic, with open mesh in the middle and solid stitches around the edges and on the details.
This pattern uses US crochet terms. The finished panel measures 7.5 x 14 in (19.1 x 35.6 cm). It is about 16.5 in (41.9 cm) tall to the antler tips, and the hanging loop rises about 3 in (7.6 cm) above the top border.
To build it, you work the mesh in rows, add one tan edge round, and finish with a two-round cranberry border. Then you make the ears, antlers, holly, berries, loop and strap separately and sew them on.
Finished Size and Construction
- Finished panel: 7.5 x 14 in (19.1 x 35.6 cm)
- Skill level: Easy-intermediate
- Terminology: US
- Yarn weight: Worsted (#4) cotton
- Hook: 4.5 mm (US 7)
- Number of pieces: 1 main panel, plus 13 small parts sewn on (2 ears, 2 antlers, 4 leaves, 3 berries, 1 loop, 1 strap). The 4 tabs are worked onto the strap.
- Layout: One single panel, not a joined project
- Mesh size: 6 x 12.5 in (15.2 x 31.8 cm)
- Size before border (after tan edge round): 6.5 x 13 in (16.5 x 33.0 cm)
- Border depth: 0.5 in (1.3 cm) per side
Materials
Choose a smooth worsted-weight cotton or cotton blend. Cotton keeps the mesh crisp and holds the hanging weight of cables without stretching much. Avoid fuzzy yarn, because it blurs the diamond pattern.
The amounts below assume a ball of 50 g = 92 m:
- Camel/tan (A): 45 g, 83 m (mesh, edge round, ears)
- Cranberry red (B): 45 g, 83 m (border, ear outlines, antlers, berries, loop, strap, tabs)
- Holly green (C): 5 g, 9 m (leaves)
All quantities include a margin of about 15%.
Tools:
– 4.5 mm (US 7) crochet hook
– Tapestry needle
– Stitch markers (4)
– Fiberfill or yarn scraps (a pinch, for the berries)
– Rust-proof pins and a blocking board
– Measuring tape
– Spray bottle
Abbreviations (US Terms)
- ch – chain
- sl st – slip stitch
- sc – single crochet
- hdc – half double crochet
- dc – double crochet
- sc2tog – single crochet 2 together
- sp – space
- st(s) – stitch(es)
- rev sc – reverse single crochet (crab stitch)
- MR – magic ring
Special stitches
- Reverse sc: Work from left to right (right-handed). Insert the hook into the next stitch to the right, yarn over, pull up a loop, then yarn over and pull through both loops. This makes the rope-like edge.
- Picot: Ch 2, then sl st into the 2nd ch from the hook.
Gauge and Checkpoints
Mesh gauge: 4 ch-5 loops = 4 in (10.2 cm) wide, and 8 rows = 4 in (10.2 cm) tall. Each loop is 1 in (2.5 cm) wide and each row is 0.5 in (1.3 cm) tall.
Solid gauge: 16 sc x 18 rows = 4 in (10.2 cm).
Work the first 8 rows of the mesh as your test piece. It should measure 6 in (15.2 cm) wide and 4 in (10.2 cm) tall when you lay it flat and pat it lightly into shape. Don’t stretch it.
Checkpoints:
1. After Row 8: 6 x 4 in (15.2 x 10.2 cm).
2. After Row 25: 6 x 12.5 in (15.2 x 31.8 cm).
3. After the edge round: 6.5 x 13 in (16.5 x 33.0 cm).
4. After the border: 7.5 x 14 in (19.1 x 35.6 cm).
If your piece is too big, go down to a 4 mm hook. If it’s too small, go up to a 5 mm hook. The edge round only works if each loop is 1 in (2.5 cm) wide and each row is 0.5 in (1.3 cm) tall, so get the mesh gauge right before you go on.
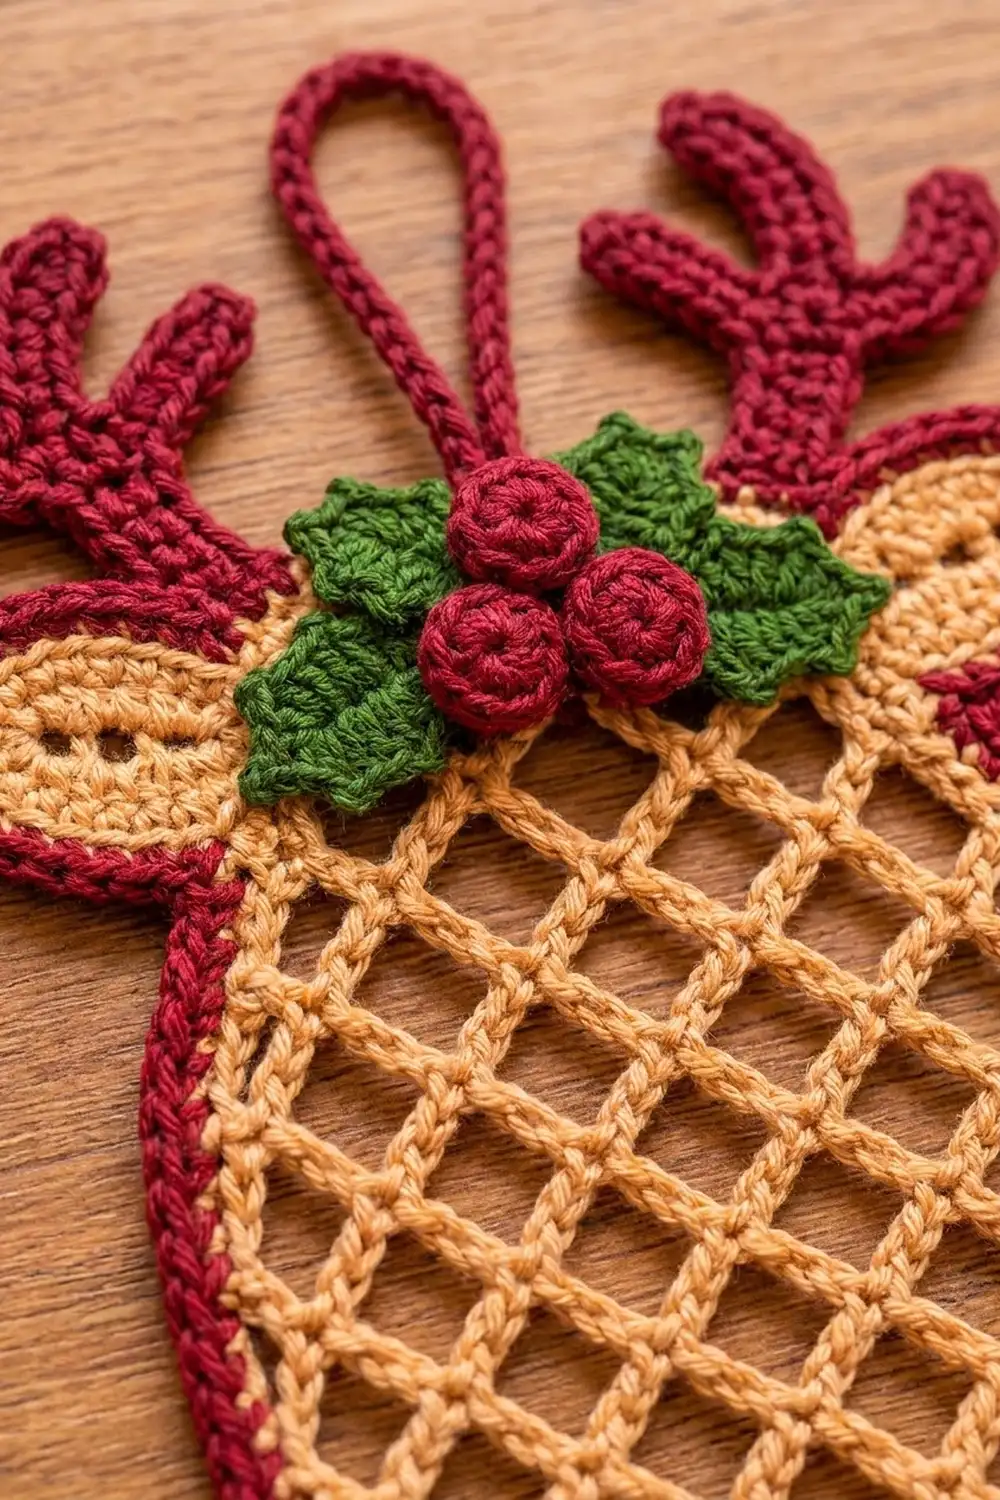
Mesh Panel
Use color A.
Foundation: Ch 26.
Row 1 (A row): Sc in 2nd ch from hook, *ch 5, skip 3 ch, sc in next ch; repeat from * 5 more times. (7 sc, 6 ch-5 loops)
Row 2 (B row): Ch 5 (counts as dc + ch 2), turn, sc in first ch-5 loop, *ch 5, sc in next ch-5 loop; repeat from * 4 more times, ch 2, dc in last sc. (6 sc, 5 ch-5 loops, 2 half loops)
Row 3 (A row): Ch 1, turn, sc in dc, *ch 5, sc in next ch-5 loop; repeat from * 4 more times, ch 5, sc in 3rd ch of turning ch-5. (7 sc, 6 ch-5 loops)
Rows 4–25: Repeat Rows 2–3 eleven more times. Every odd row is an A row and every even row is a B row. Row 25 is an A row with 6 full loops along the top. Do not fasten off.
Checkpoint: 6 x 12.5 in (15.2 x 31.8 cm).
Tan Edge Round
This round turns the open mesh into a solid outline and starts rounding the corners.
Edge Round: Ch 1. Do not turn.
- Top: Work 3 sc in the last sc of Row 25 (corner group). Then, working back across the top, work 4 sc in each of the 6 ch-5 loops (24 sc).
- Left side: Work 3 sc in the first sc of Row 25 (corner group). Then work 2 sc into each row-end down the side, around the turning chains and the dc posts (25 row-ends x 2 = 50 sc).
- Bottom: Work 3 sc in the first foundation ch (corner group). Then work 4 sc over each of the 6 groups of 3 skipped chains (24 sc).
- Right side: Work 3 sc in the last foundation ch (corner group). Then work 2 sc into each row-end up the side (50 sc).
- Sl st to the first sc. Fasten off color A.
Count: 24 + 50 + 24 + 50 = 148 side sts, plus 4 corner groups of 3 = 12 corner sts. That is 160 sts in total. In this round, the corner groups are counted separately from the side counts.
Place a marker in the middle sc of each corner group.
Checkpoint: 6.5 x 13 in (16.5 x 33.0 cm).
Ears (make 2)
Rnd 1: With A, ch 9. Sc in 2nd ch from hook, hdc in next ch, dc in next 3 ch, hdc in next ch, sc in next ch, 3 sc in last ch (tip). Rotate and work along the other side of the chain: sc in next ch, hdc in next ch, dc in next 3 ch, hdc in next ch, sc in last ch. Sl st to the first sc. (17 sts) Fasten off A.
Rnd 2: Join B in any st. Sc in each st around, working (sc, ch 2, sc) in the center sc of the tip. Sl st to the first sc. (18 sc, 1 ch-2 sp)
Each ear is a pointed leaf shape about 2.5 x 1.25 in (6.4 x 3.2 cm).
Antlers (make 2)
With B, ch 11.
Side A: Sc in 2nd ch from hook (this is the tip) and in the next 8 ch, then 3 sc in the last ch (base). (12 sc)
Side B: Rotate and work along the other side of the chain:
- Sc in next 3 ch.
- Ch 4, sc in 2nd ch from hook and in next 2 ch (tine made), sc in next 2 ch of the beam. Repeat from * 2 more times.
- Work 2 sc in the tip ch, which already holds 1 sc.
That gives 3 + 3 x (3 tine sc + 2 beam sc) + 2 = 20 sc on Side B. Sl st to the first sc and fasten off.
Total: 32 sc, with 3 tines on one side.
The beam is about 2.5 in (6.4 cm) long. Turn one antler over so that both sets of tines point outward.
Holly Leaves (make 4)
With C, ch 8.
Side 1: Sl st in 2nd ch from hook, sc in next ch, hdc in next ch, picot, dc in next ch, hdc in next ch, picot, sc in next ch, (sc, ch 1, sc) in last ch.
Side 2: Working along the other side of the chain: sc in next ch, hdc in next ch, picot, dc in next ch, hdc in next ch, picot, sc in next ch, sl st in last ch. Fasten off.
Count: 14 sts plus 4 picot points. Each leaf is about 1.75 in (4.4 cm) long.
Berries (make 3)
With B:
- Rnd 1: 6 sc in MR. (6)
- Rnd 2: 2 sc in each st. (12)
- Rnd 3: Sc2tog 6 times. (6)
Stuff with a pinch of fiberfill, then close the hole. Each berry is about 0.6 in (1.5 cm) across.
Hanging Loop
With B, ch 31.
Row 1: Sc in 2nd ch from hook and in each ch across. (30 sc)
Fasten off, leaving a long tail. The strip is about 7.5 in (19.1 cm) long.
Cable Strap and Tabs
Strap: With B, ch 5.
- Row 1: Sc in 2nd ch from hook and in each ch across. (4 sc)
- Rows 2–50: Ch 1, turn, sc in each st. (4 sc)
Fasten off. The strap is about 1 x 11 in (2.5 x 27.9 cm).
Tabs (make 4): With B, ch 13.
- Row 1: Sc in 2nd ch from hook and in each ch across. (12 sc)
- Rows 2–4: Ch 1, turn, sc in each st. (12 sc)
Fasten off, leaving a long tail. Each tab is about 3 x 0.9 in (7.6 x 2.3 cm).
Border
Border gauge: 4 sc per inch (2.5 cm), the same as the edge round.
Border Rnd 1: Join B in any side st. Sc in each side st. In each 3-st corner group, work 2 sc in each of the 3 sts.
- Per side: Top 24, bottom 24, left 50, right 50 (148 sts).
- Corners: Each 3-st corner group becomes 6 sts (4 x 6 = 24).
- Total: 172 sts.
Sl st to the first sc.
Border Rnd 2: Ch 1, rev sc in each st around. (172 rev sc) Sl st to the first st and fasten off.
Why the math works: Each 1-in (2.5 cm) loop gets 4 sc, and each 0.5-in (1.3 cm) row-end gets 2 sc. Both of those match a gauge of 4 sc per inch, so the edges stay flat. At each corner, the 3 increases are spread over 3 stitches instead of being stacked in one point. That bends the corner into a curve instead of a sharp angle. The rev sc round adds height without adding stitches, so the count stays at 172.
Checkpoint: 7.5 x 14 in (19.1 x 35.6 cm).
Assembly
Assemble the pieces in this order:
- Loop: Fold the strip in half. Sew both ends to the back of the top center, overlapping the panel by 0.75 in (1.9 cm). This leaves about 3 in (7.6 cm) of loop standing above the edge.
- Antlers: Center each antler 1.75 in (4.4 cm) from the top center. Sew each base behind the top border so that 2.5 in (6.4 cm) of antler rises above it, with the tines facing outward.
- Ears: Angle the ears outward and slightly upward at the top corners. Tuck each base 0.5 in (1.3 cm) behind the border and sew it in place.
- Holly: On the front top center, fan two leaves to the left and two to the right, with their bases meeting at the loop. Sew three berries in a triangle over the leaf bases.
- Strap: Center the strap vertically, starting 0.5 in (1.3 cm) below the holly. Whipstitch both long edges to the mesh.
- Tabs: Center each tab across the strap. Space the tab centers 2.75 in (7.0 cm) apart, with the first one 1.5 in (3.8 cm) below the top of the strap. Sew only the short ends of each tab to the mesh, placing them 2.5 in (6.4 cm) apart. This leaves 0.5 in (1.3 cm) of slack, which makes a tunnel for a coiled cable.
Final Blocking
- Weave in all ends. Keep the joins on the back.
- Pin the panel out to 7.5 x 14 in (19.1 x 35.6 cm).
- Pin each corner into a smooth curve.
- Pin the ears into points and pin the antler tines straight.
- Open the mesh diamonds evenly by pinning a few rows at intervals.
- Spray the piece until it is damp. Don’t soak it.
- Let it dry completely, then unpin it.
Final Quality-Control Checklist
- The panel measures 7.5 x 14 in (19.1 x 35.6 cm).
- Border Rnd 1 and Rnd 2 each have 172 sts.
- All 4 corners are rounded and match each other.
- The diamonds are even, with no twisted loops.
- The ears are mirrored and the antler tines point outward.
- The loop is firmly anchored at the back.
- The tab tunnels are open and evenly spaced.
- No ends are showing on the front.
Troubleshooting
- The border ruffles: You probably added extra sts on the sides. Recount to 50 per long side and 24 per short side.
- The border cups: Your tension is too tight. Go up 0.5 mm for the border only.
- The corners are pointed: You may have worked 3 sc into one st. Spread the increases over the 3 corner sts.
- The mesh slants: You probably missed the half loop at the end of a B row. Check that each B row ends with ch 2, dc.
- The panel sags when loaded: Sew the strap edges more often. The stitching anchors carry the weight.
- The tabs are too tight for your cables: Move the sewn ends closer together to add slack.
Care
Hand wash in cool water, press out the water in a towel, and dry flat. Reshape the corners and antlers while the piece is damp.
Final Notes
The measurement chain is simple. Each loop is 1 in (2.5 cm) wide and each row is 0.5 in (1.3 cm) tall, so the mesh comes out at 6 x 12.5 in (15.2 x 31.8 cm). The tan edge round brings it to 6.5 x 13 in (16.5 x 33.0 cm), and the border finishes it at 7.5 x 14 in (19.1 x 35.6 cm). If your gauge matches at the first checkpoint, every count after that will fall into place. Hang it on a peg, load it with cables, and enjoy a cheerful, tidy desk.
Happy crocheting!