
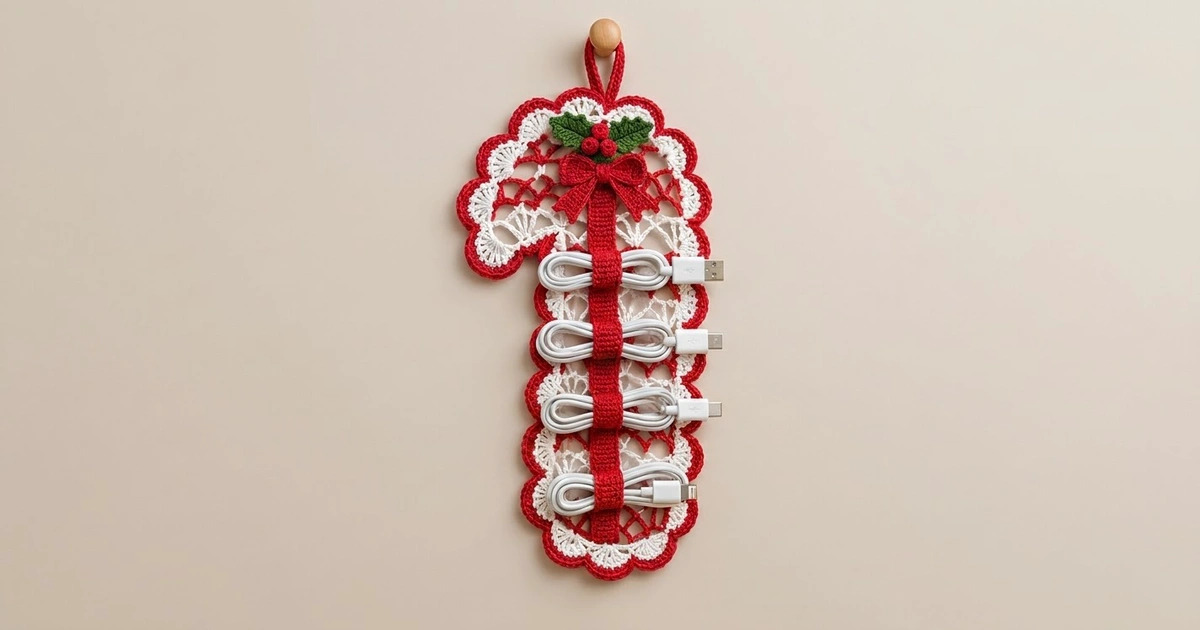
This candy cane wall hanging has a practical job. It is one lace panel in red and white stripes with a scalloped border, a hanging loop, and a red strap down the shaft. Four red bands on the strap hold coiled charging cables. A red bow and a sprig of holly finish the top.
The panel alternates red diamond-mesh stripes with white fan stripes. The border is a white scallop round with a solid red scalloped edge. The appliqués are red, white, and leaf green.
Terminology is US throughout. The finished piece measures 11.3 in wide x 18 in tall (28.7 x 45.7 cm), not counting the 2 in (5.1 cm) hanging loop.
You make the short crook leg first and use it as your gauge swatch. Then you work the long shaft and join the two legs with a chain bridge in a single row. Next come the arch rows, which step in to round the top. A four-round border goes around the whole outline, and the strap, bands, bow, and holly are sewn on after blocking.
Finished Size and Construction
- Finished size: 11.3 x 18 in (28.7 x 45.7 cm), plus a 2 in (5.1 cm) loop
- Skill level: Intermediate
- Terminology: US
- Yarn weight: DK (#3) cotton
- Hook: 4.0 mm (G-6)
- Number of pieces: 1 main panel, plus sewn-on strap, 4 bands, bow (3 parts), 2 leaves, 3 berries
- Layout: single candy cane panel, crook on the left
- Panel size before border: 9.8 x 16.5 in (24.9 x 41.9 cm)
- Border depth: 0.75 in (1.9 cm) on every edge
Materials
Use a smooth mercerized cotton or a cotton blend. Cotton gives crisp stitch definition and doesn’t sag when the cables hang from it.
- Red: 110 g / about 255 m
- White: 60 g / about 140 m
- Leaf green: 5 g / about 12 m
These quantities include a margin of about 15%.
Tools:
– 4.0 mm (G-6) hook
– Tapestry needle
– Stitch markers
– Scissors
– Rustproof pins and a blocking board
– A pinch of fiberfill or yarn scraps for the berries
Abbreviations (US Terms)
- ch chain
- sl st slip stitch
- sc single crochet
- hdc half double crochet
- dc double crochet
- sc2tog single crochet 2 together
- st(s) stitch(es)
- sp space
- sk skip
- RS / WS right side / wrong side
- rnd round
- rep repeat
Special stitches
– Picot: ch 3, sl st in 3rd ch from hook.
– Standing sc: start with a slipknot on the hook, insert the hook in the stitch, and complete a sc.
– Fan: 5 dc in the same loop or stitch.
Gauge and Checkpoints
Lace gauge (blocked): 25 sts = 5 in (12.7 cm) wide, and one 4-row stripe repeat = 1.5 in (3.8 cm) tall.
Solid sc gauge: 20 sts and 22 rows = 4 in (10.2 cm). This gauge applies to the strap, bands, and bow.
Test one piece first. The crook leg is your swatch. Lightly pinned, it should measure 2.6 x 3 in (6.6 x 7.6 cm).
Checkpoints:
– Shaft after Row 1: 5 in (12.7 cm) wide
– Shaft after Row 29: 10.75 in (27.3 cm) tall
– Shaft after Row 32: 12 in (30.5 cm) tall
– After the Join Row: 9.8 in (24.9 cm) wide
– After Row T11: 16.5 in (41.9 cm) tall
– After the border: 11.3 x 18 in (28.7 x 45.7 cm)
If the crook leg is too big, go down 0.5 mm in hook size. If it’s too small, go up 0.5 mm. Make a new crook leg and measure again. Lace width depends on the size of your chain loops, so keep the ch-5 loops even and relaxed.
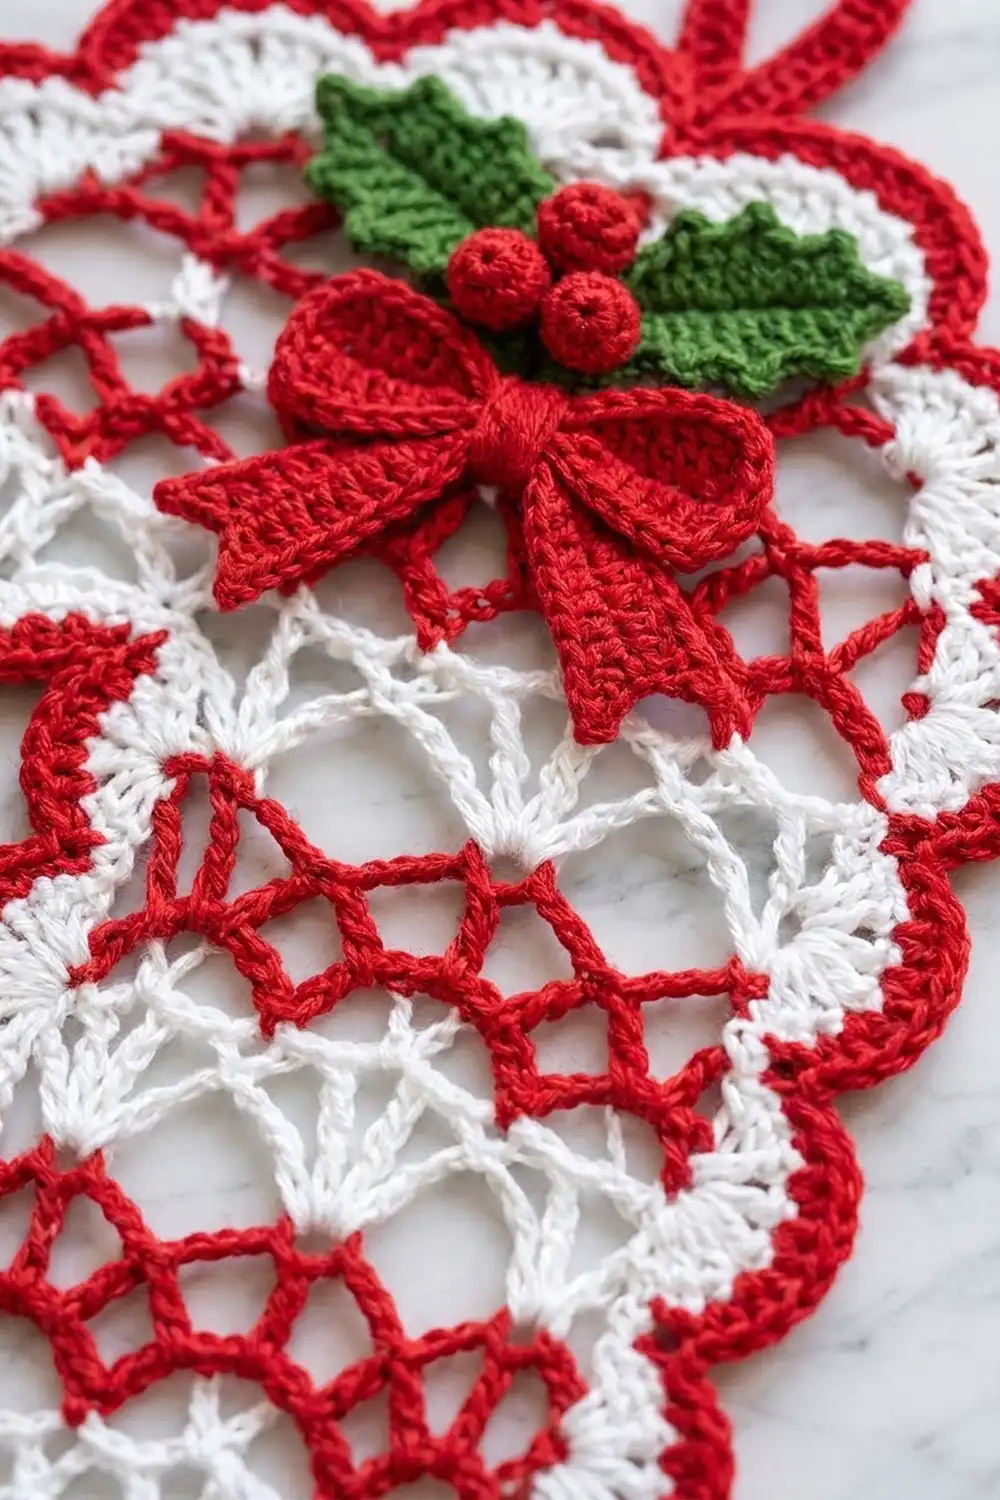
Stripe Pattern
All three sections are built on a multiple of 6 sts + 1. In the instructions below, n is the number of 6-st repeats in a section.
- R1 (red, mesh): Ch 1, sc in first st, ch 5, sk 2 sts, sc in next st across. (2n loops)
- R2 (red, mesh): Ch 5 (counts as dc + ch 2), sc in first ch-5 loop, ch 5, sc in next loop across, ch 2, dc in last sc. (2n − 1 loops + 2 half loops)
- W1 (white, fans): Ch 1, sc in first dc, sk ch-2 sp, fan in next loop, sc in next loop n − 1 times, fan in last loop, sk ch-2 sp, sc in 3rd ch of turning ch. (n fans; 6n + 1 sts)
- W2 (white): Ch 1, sc in each st across. (6n + 1 sts)
Each color works 2 rows, so on the legs you can carry the unused color up the edge. The border will hide it.
Crook Leg (Gauge Piece)
With white, ch 14.
Row 1 (RS): Sc in 2nd ch from hook and in each ch across. Turn. (13 sts, n = 2)
Rows 2–5: Work R1, R2, W1, W2. (R1: 4 loops; R2: 3 loops + 2 halves; W1: 2 fans, 13 sts; W2: 13 sts)
Rows 6–8: Work R1, R2, W1. (W1: 13 sts)
Fasten off. The leg should measure 2.6 x 3 in (6.6 x 7.6 cm).
Shaft
With white, ch 26.
Row 1 (RS): Sc in 2nd ch from hook and in each ch across. Turn. (25 sts, n = 4)
Rows 2–29: Work R1, R2, W1, W2 seven times. (R1: 8 loops; R2: 7 loops + 2 halves; W1: 4 fans, 25 sts; W2: 25 sts)
Rows 30–32: Work R1, R2, W1. (Row 32: 25 sts)
Cut red. Do not cut white. The shaft should measure 5 x 12 in (12.7 x 30.5 cm).
Join Row and Arch
Join Row (RS, white, W2): Turn. Ch 1, sc in each of the 25 shaft sts. Ch 11. Lay the crook leg to the left with its RS facing you and its Row 8 at the top. Sc in each of its 13 sts. Turn. (25 sc + 11 ch + 13 sc = 49 sts, n = 8)
On the next row, work into each chain of the bridge the same way as a stitch. From this point, fasten off each color at the end of its stripe.
Rows T1–T4: Work R1, R2, W1, W2 across all 49 sts. (R1: 16 loops; R2: 15 loops + 2 halves; W1: 8 fans, 49 sts; W2: 49 sts)
Row T1 begins at the crook edge, and Row T4 ends there.
Row T5 (red, step-in): Make a standing sc in the 13th st from the crook edge. Then ch 5, sk 2, sc in next st 10 times. Leave the last 6 sts at the shaft edge unworked. (Covers 31 sts; 10 loops)
Rows T6–T8: Work R2, W1, W2 over this section. (R2: 9 loops + 2 halves; W1: 5 fans, 31 sts; W2: 31 sts)
Row T9 (red, step-in): Make a standing sc in the 7th st from the crook end. Then ch 5, sk 2, sc in next st 6 times. Leave the last 6 sts unworked. (Covers 19 sts; 6 loops)
Rows T10–T11: Work R2, W1. (R2: 5 loops + 2 halves; W1: 3 fans, 19 sts)
Fasten off. The panel should be 9.8 x 16.5 in (24.9 x 41.9 cm). The steps form a dome that sits slightly toward the shaft, like a real candy cane.
Strap, Bands, and Appliqués
Strap (red): Ch 7. Row 1: sc in 2nd ch and each ch across. (6 sts) Rows 2–77: ch 1, sc in each st. (6 sts) The strap measures 1.2 x 14 in (3.0 x 35.6 cm).
Bands (red, make 4): Ch 25. Row 1: sc in 2nd ch and each ch across. (24 sts) Rows 2–4: ch 1, sc in each st. (24 sts) Each band measures 4.8 x 0.75 in (12.2 x 1.9 cm). Leave a long tail.
Bow (red):
– Loops: Ch 26 and work 25 sc for 4 rows. Seam the short ends into a ring and flatten it with the seam at center back.
– Tails: Ch 16 and work 15 sc for 3 rows. Fold into an inverted V and tack it behind the bow center.
– Knot: Ch 5 and work 4 sc for 5 rows. Wrap it around the pinched center and seam it at the back.
– The finished bow is about 2.5 in (6.4 cm) wide.
Holly leaf (green, make 2): Ch 10.
– Side 1: Sc in 2nd ch from hook, hdc in next ch, dc in next ch, picot, dc in next 2 ch, picot, dc in next ch, hdc in next ch, sc in next ch.
– Tip: (Sc, picot, sc) in last ch.
– Side 2 (opposite loops of the chain): Sc in next ch, hdc in next ch, dc in next ch, picot, dc in next 2 ch, picot, dc in next ch, hdc in next ch, sc in next ch. Sl st in the first ch.
– Each leaf has 2 picot points per side plus the tip and is about 2 in (5.1 cm) long.
Berry (red, make 3):
– Rnd 1: 6 sc in a magic ring. (6)
– Rnd 2: 2 sc in each st. (12)
– Rnd 3: Sc in each st. (12)
– Rnd 4: Stuff the berry, then sc2tog 6 times. (6)
– Close the top. Each berry is 0.6 in (1.5 cm) across.
Border
Border gauge: Along top and bottom edges, work 5 sc per 1 in (2.5 cm): 1 sc per st or ch. Along row edges, work 7 sc per 1.5 in (3.8 cm) stripe repeat: 1 sc per sc row end, and 2 sc per R1, R2, or W1 row end. Inner corners get no extra stitches.
Rnd 1 (white): With RS facing, join white at the bottom-left corner of the shaft. Work these counts in order:
– Shaft bottom: 29 sc (3 sc in first ch, 23 sc, 3 sc in last ch)
– Shaft right edge: 63
– Right steps: 6 (T4 sts), 7 (T5–T8 ends), 6 (T8 sts), 6 (T9–T11 ends)
– Top of T11: 19
– Left steps: 6 (T11–T9 ends), 6 (T8 sts), 7 (T8–T5 ends), 12 (T4 sts)
– Crook outer edge: 21
– Crook bottom: 17 (3 sc, 11 sc, 3 sc)
– Crook inner edge: 13
– Bridge underside: 11
– Shaft left edge: 55
Join to the first sc. (284 sc)
Rnd 2 (white): Ch 1, sc in same st as join, sk 1, fan in next st, sk 1. Then sc in next st, sk 1, fan in next st, sk 1 70 times. Join. (71 scallops: 71 sc + 355 dc = 426 sts) Fasten off.
Rnd 3 (red): Join red in any valley sc. Ch 1, sc in valley sc, sc in next 2 dc, 3 sc in center dc, sc in next 2 dc around. Join. (426 worked one per st + 142 added at tips = 568 sts)
Rnd 4 (red): Ch 1, sc2tog over the valley sc and the next st, sc in next 2 sts, 3 sc in center sc of the tip, sc in next 3 sts around. Join. (568 worked one per st − 71 from valley decreases + 142 added at tips = 639 sts)
Hanging loop: Do not fasten off. Sl st along the edge to the Rnd 4 stitch above the center of the T11 edge. Ch 16, sl st in the same st. Ch 1, work 24 sc into the loop, and sl st to finish. Fasten off.
Why the math works: Each scallop uses 4 sts of Rnd 1, and 284 = 4 x 71, so the scallops close evenly all the way around. Rnds 3 and 4 are worked per scallop, so there’s nothing left over. The four rounds add 0.75 in (1.9 cm) per edge: 9.8 + 1.5 = 11.3 in (28.7 cm), and 16.5 + 1.5 = 18 in (45.7 cm).
Final Blocking
- Weave in all tails except the long sewing tails.
- Spray the panel until damp, or soak it and press out the water in a towel.
- Pin it to 11.3 x 18 in (28.7 x 45.7 cm). Open each fan and diamond, then pin every red scallop tip.
- Keep the bridge gap 2.2 in (5.6 cm) wide and the crook leg 2.6 in (6.6 cm) wide.
- Block the strap to 1.2 x 14 in (3.0 x 35.6 cm), and pin the leaves flat to open their picots.
- Let everything dry completely.
- Slide the 4 bands onto the strap. Seam each band into a ring around the strap with the seam at the back. Center the bands 2, 5, 8, and 11 in (5.1, 12.7, 20.3, 27.9 cm) from the strap’s lower end, and tack each one in place at the back.
- Center the strap on the shaft, with its top end 3 in (7.6 cm) below the top edge and its bottom 1 in (2.5 cm) above the lower edge. Whipstitch both long edges to the panel, sewing between the bands.
- Sew the bow over the strap top, with the knot 3.5 in (8.9 cm) below the top edge.
- Sew the leaves above the bow in a shallow V, with their bases overlapping the knot. Stitch the 3 berries in a triangle over the leaf bases.
Final Quality-Control Checklist
- Rnd 1 has 284 sc and Rnd 2 has 71 scallops.
- Fans line up in vertical columns on each section.
- The panel measures 11.3 x 18 in (28.7 x 45.7 cm).
- The bands hold cables without stretching out.
- The loop is centered over the dome and firmly anchored.
- No carried strands show on the RS.
Troubleshooting
- Panel narrower than 9.8 in (24.9 cm): Your ch-5 loops are tight. Go up a hook size or relax your chain tension.
- Wrong fan count: Recount the loops in R1. It must be 2n.
- Border ruffles inside the crook: You worked extra sts at the inner corners. Use exactly 13 and 11 sc there.
- Border cups: Check that Rnd 1 follows the border gauge rather than being worked into every chain of the mesh.
- Strap puckers the panel: Sew more loosely, and catch only the outer loops of the panel.
- Bands too tight for cables: Add 2 sts to the chain, or stretch the bands when blocking.
Care
Hand wash in cool water with a mild soap and dry flat. Reshape the scallops while damp, and keep the piece out of direct sun to protect the red.

Final Notes
Here is the full measurement chain:
– Crook leg: 2.6 x 3 in (6.6 x 7.6 cm)
– Shaft: 5 x 12 in (12.7 x 30.5 cm)
– Joined width: 9.8 in (24.9 cm)
– Panel: 9.8 x 16.5 in (24.9 x 41.9 cm)
– Finished piece: 11.3 x 18 in (28.7 x 45.7 cm)
If each checkpoint matches, the border will lie flat and the strap will fit.
Happy crocheting!