

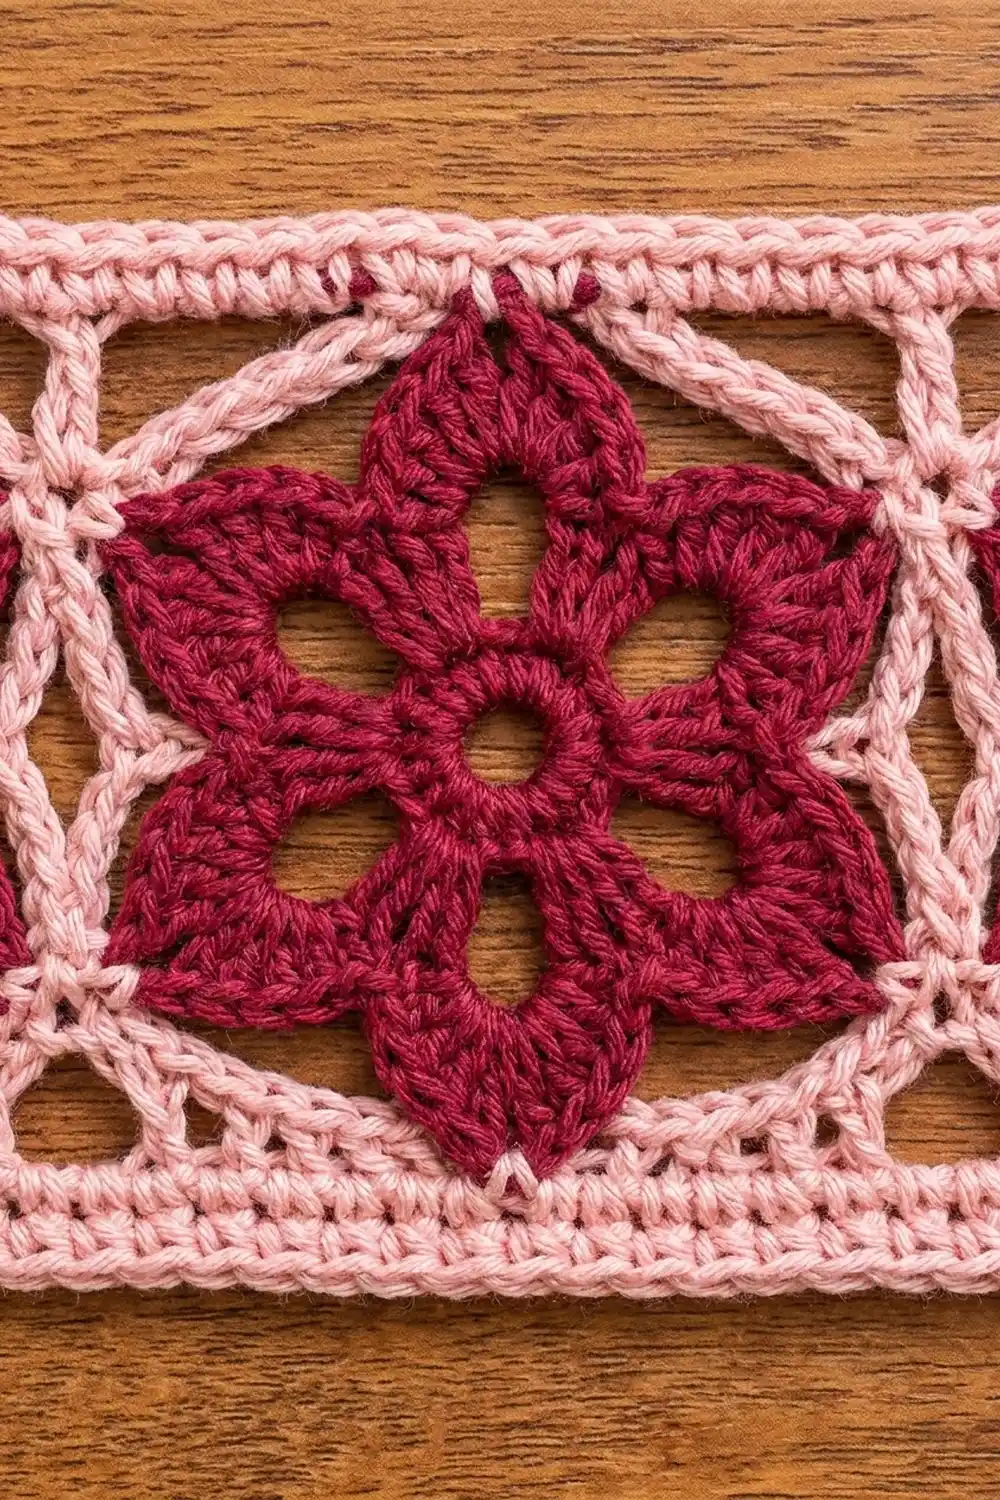
The Rosewood Bloom caddy is a two-tier hanging basket that keeps spare toilet paper rolls off the floor. Each oval basket has a firm burgundy base and a wall made of eight pointed six-petal flowers set inside a light pink lattice. The rim has a corded pink edge.
The burgundy and blush pink colors give it a warm, vintage cottage look. The caddy hangs from two wide straps with wooden rings, so it works on a towel bar, a hook rail or a closet rod.
This pattern uses US crochet terms. Each basket measures about 9.5 in (24.1 cm) long, 5.5 in (14.0 cm) wide and 4.4 in (11.2 cm) tall. The full caddy hangs about 23.3 in (59.2 cm) from the top of the rod to the bottom of the lower basket.
Here is how it goes together:
– Crochet two oval bases in rounds.
– Make 16 flower motifs and give each one a square pink frame.
– Join eight motifs into a ring for each basket wall.
– Attach each wall to its base, then finish the rim.
– Make the straps, add the rings, and assemble the tiers.
Finished Size and Construction
- Basket size: 9.5 in x 5.5 in (24.1 cm x 14.0 cm) at the base, 4.4 in (11.2 cm) tall
- Overall hanging length: about 23.3 in (59.2 cm)
- Skill level: Intermediate
- Terminology: US
- Yarn weight: Worsted (#4) cotton
- Hook: 5.0 mm (H-8)
- Number of pieces: 2 bases, 16 motifs, 2 hanger straps, 2 connector straps, plus 2 wooden rings
- Wall layout: 8 motifs joined in a ring per basket
- Motif size: 3.1 in (7.9 cm) square
- Wall circumference before the rim: 25.1 in (63.8 cm), 88 sts
- Rim depth: 0.5 in (1.3 cm)
Materials
Use a smooth, mercerized or combed cotton in worsted weight. Cotton holds the basket’s shape and stands up to a humid bathroom. Avoid fuzzy acrylic, because it hides the flower outlines.
- Burgundy: 250 g, about 390 m (427 yd), for the bases, flowers and all straps
- Light pink: 100 g, about 156 m (171 yd), for the frames, joins and rims
Quantities include a margin of about 25% for swatching and weaving in ends.
Tools:
– 5.0 mm (H-8) crochet hook
– Two wooden rings, 2 in (5.1 cm) inner diameter
– Tapestry needle
– 6 stitch markers
– Measuring tape
– Blocking mat and pins
– Spray bottle
Abbreviations (US Terms)
- ch: chain
- sl st: slip stitch
- sc: single crochet
- hdc: half double crochet
- dc: double crochet
- tr: treble crochet (yarn over twice, insert hook, pull up a loop, then [yarn over, pull through 2 loops] 3 times)
- BLO: back loop only
- st(s): stitch(es)
- sp: space
- rnd: round
- RS: right side
Special stitch – crab stitch (reverse sc): Work from left to right (right-handed). Insert the hook into the next st to the right, pull up a loop, yarn over and pull through both loops. This makes a twisted, corded edge.
Gauge and Checkpoints
Gauge: 14 sc and 16 rows = 4 in (10.2 cm) in sc. One sc is about 0.29 in wide and one row is 0.25 in (0.6 cm) tall.
Test with one motif before you make the rest. A finished, lightly blocked motif should be 3.1 in (7.9 cm) square.
Checkpoints:
– Flower after Rnd 3: 2.4 in (6.1 cm) from petal tip to petal tip
– Motif after Rnd 5: 3.1 in (7.9 cm) per side
– Base after Rnd 5: about 6.7 in x 2.7 in (17.0 cm x 6.9 cm)
– Base after Rnd 10: 9.5 in x 5.5 in (24.1 cm x 14.0 cm)
– Joined wall ring: 25.1 in (63.8 cm) around and 3.1 in (7.9 cm) tall
If your motif is bigger than 3.3 in (8.4 cm), go down half a hook size. If it is smaller than 2.9 in (7.4 cm), go up half a hook size. Change hooks for the base too, so that it still matches the wall’s 88 sts.
Oval Base (make 2)
Use burgundy. Work in continuous joined rnds with the RS facing you.
Ch 17.
Rnd 1: 3 sc in 2nd ch from hook, sc in next 14 ch, 3 sc in last ch. Rotate and work along the other side of the foundation ch: sc in next 14 ch. Join with sl st to the first sc. (34 sts)
The 3 sc groups are the curved ends. The two groups of 14 sts are the straight sides.
Rnd 2: Ch 1, 2 sc in each of the next 3 sts, sc in next 14, 2 sc in each of the next 3 sts, sc in next 14. Join. (40 sts)
Rnd 3: Ch 1, (sc in next st, 2 sc in next st) 3 times, sc in next 14, (sc in next st, 2 sc in next st) 3 times, sc in next 14. Join. (46 sts)
Rnds 4–10: Keep increasing 3 sts at each curved end and work the straight sides even. In Rnd n, work (sc in next n−1 sts, 2 sc in next st) 3 times at each end.
| Rnd | Each end | Each straight side | Total |
|---|---|---|---|
| 4 | 12 | 14 | 52 |
| 5 | 15 | 14 | 58 |
| 6 | 18 | 14 | 64 |
| 7 | 21 | 14 | 70 |
| 8 | 24 | 14 | 76 |
| 9 | 27 | 14 | 82 |
| 10 | 30 | 14 | 88 |
Check the size: the base should measure 9.5 in x 5.5 in (24.1 cm x 14.0 cm).
Rnd 11 (turning ridge): Ch 1, sc in BLO of each st around. Join. (88 sts)
Rnd 12: Ch 1, sc in each st around. Join. (88 sts)
Fasten off. Rnds 11–12 make a burgundy band 0.5 in (1.3 cm) tall.
Place markers in the 15th and 16th sts of each curved end on Rnd 12. These are the two center sts of the end.
Flower Motif (make 16)
Flower
Use burgundy.
Rnd 1: Make a magic ring, ch 1, work 12 sc into the ring. Pull the ring nearly closed but leave a small hole. Join. (12 sc)
Rnd 2: Ch 1, sc in the first st, ch 3, skip 1 st. Sc in next st, ch 3, skip 1 st. Repeat from * 4 more times. Join. (6 sc, 6 ch-3 sps)
Rnd 3: In each ch-3 sp, work (sc, hdc, dc, ch 2, dc, hdc, sc). Join to the first sc and fasten off. (6 pointed petals, each with a ch-2 tip)
Lay the flower with one petal pointing straight right and number the petals clockwise from the top right:
– P1: top right
– P2: right
– P3: bottom right
– P4: bottom left
– P5: left
– P6: top left
Pink Frame
Rnd 4: Join pink with a sc in the ch-2 tip of P1. Then:
– Ch 4, sc in P2 tip.
– Ch 4, sc in P3 tip.
– Ch 4, tr in the Rnd 2 sc between P3 and P4.
– Ch 4, sc in P4 tip.
– Ch 4, sc in P5 tip.
– Ch 4, sc in P6 tip.
– Ch 4, tr in the Rnd 2 sc between P6 and P1.
– Ch 4, join to the first sc.
(8 sts, 8 ch-4 sps)
The sc at P1, P3, P4 and P6 are the corners. The sc at P2 and P5, and the two tr, are the side centers.
Rnd 5: Ch 1. (Sc, ch 2, sc) in the corner sc, 4 sc in the ch-4 sp, sc in the center st, 4 sc in the next ch-4 sp. Repeat from * 3 more times. Join and fasten off, leaving a 12 in (30.5 cm) tail on 8 of the motifs for seaming.
(44 sc and 4 ch-2 corner sps)
Each side has 11 sc: 1 corner sc + 4 + 1 + 4 + 1 corner sc. The two corner sc are included in that count.
Check the size: the motif should be 3.1 in (7.9 cm) square.
Strap Pieces
Hanger Strap (make 2)
Use burgundy. Ch 9.
Row 1: Sc in 2nd ch from hook and in each ch across. (8 sc)
Rows 2–64: Ch 1, turn, sc in each st across. (8 sc)
The strap should measure 2.3 in x 16 in (5.8 cm x 40.6 cm). Fasten off and leave a long tail.
Connector Strap (make 2)
Use burgundy. Ch 5.
Row 1: Sc in 2nd ch from hook and across. (4 sc)
Rows 2–60: Ch 1, turn, sc in each st across. (4 sc)
The strap should measure 1.1 in x 15 in (2.8 cm x 38.1 cm). Fasten off and leave a long tail.
Make All Pieces
| Piece | Qty | Colors |
|---|---|---|
| Oval base | 2 | Burgundy |
| Flower motif | 16 | Burgundy flower, pink frame |
| Hanger strap | 2 | Burgundy |
| Connector strap | 2 | Burgundy |
Each basket wall uses 8 motifs. They are joined in a closed ring, shown flat here with the ring broken open between M8 and M1:
[M1]-[M2]-[M3]-[M4]-[M5]-[M6]-[M7]-[M8]-(back to M1)
 end   front  front front end  back  back  back
M1 and M5 sit at the curved ends, M2–M4 face the front, and M6–M8 face the back.
Joining the Wall Ring
Hold two motifs with RS together, so that the flowers point left and right. Join the side edges that hold the P2 and P5 tips. The top and bottom sides, with the tr centers, become the rim and bottom edges.
Use pink and work through both layers:
1. Sl st through both matching corner ch-2 sps.
2. Sl st through the BLO of all 11 matching sc.
3. Sl st through the next pair of corner ch-2 sps.
Join M1 to M2, M2 to M3, and so on to M8. Then join M8 back to M1 to close the ring, for 8 seams in total.
Keep your sl sts as loose as the sc in Rnd 5. If the seams pucker, the ring will come out shorter than the base.
Stitch logic: Each seam uses up the corner sps, so every motif adds exactly its 11 sc along the top and bottom edges. That gives 8 x 11 = 88 sts on each open edge.
Check the size: the ring should be 25.1 in (63.8 cm) around and 3.1 in (7.9 cm) tall.
Attach the Wall to the Base
- Line up the bottom edge of the wall with Rnd 12 of the base, with the WS of the wall facing the base.
- Center M1 between the markers at one curved end and M5 at the other.
- Join pink through both layers and sc through one wall st and one base st together, all the way around. Join. (88 sc)
Match the sts one-to-one. Don’t skip any or work any twice.
Rim (Border)
Rim gauge: 88 sts = 25.1 in (63.8 cm), the same as the sc gauge.
Work into the top edge of the wall with pink.
Rnd 1: Join pink in the first sc of M1’s top edge. Ch 1, then sc in each of the 11 sc along the top of each motif. Skip the closed corner sps at the seams. Join.
(11 per motif x 8 motifs = 88 sc)
Rnd 2: Ch 1, crab stitch in each st around. Join and fasten off. (88 sts)
Why the math works: Base Rnd 10 ends at 88 sts (30 + 14 + 30 + 14). The wall is 8 motifs x 11 sc = 88 sts. Because the base, the joining rnd and both rim rnds all have 88 sts, the wall stands straight without ruffling or pulling in.
The finished wall height is 0.5 in base band + 0.25 in (0.6 cm) joining rnd + 3.1 in motif + 0.5 in rim, about 4.4 in (11.2 cm).
Assembly
Hangers:
1. Fold 1 in (2.5 cm) of one end of a hanger strap through a wooden ring and sew it flat.
2. Pass the strap over the rod.
3. Bring the other end through the same ring, fold it 1 in (2.5 cm), and sew it down.
The drop from the rod to the ring is about 7 in (17.8 cm).
Connectors:
1. Fold 1 in (2.5 cm) of one end of a connector strap through the bottom of the ring and sew it.
2. Leave a 1.5 in (3.8 cm) gap, then whipstitch the strap down the center of M1 on the top basket, from the rim to the turning ridge.
3. Leave a 4 in (10.2 cm) gap between the tiers.
4. Whipstitch the rest of the strap down the center of M1 on the bottom basket.
5. Repeat at the other end with M5 and the second connector strap.
Sew both long edges of the strap to the wall so that the baskets hang level.
Final Blocking
- Weave in all ends along same-color sts.
- Mist each basket until it is damp but not soaked.
- Stuff each basket firmly with a towel so that the walls stand upright.
- Pin the pink frames square and open the petal tips with your fingers.
- Shape the curved ends so that they are smooth, with no corners.
- Pin the straps flat at 2.3 in (5.8 cm) and 1.1 in (2.8 cm) wide.
- Let everything dry completely, about 24 hours.
Final Quality-Control Checklist
- Both bases measure 9.5 in x 5.5 in (24.1 cm x 14.0 cm) and have 88 sts.
- All 16 motifs are 3.1 in (7.9 cm) square and have 11 sc per side.
- Each wall ring has 8 motifs and 8 even seams.
- M1 and M5 are centered on the curved ends.
- Both rims are 88 sts with smooth crab stitch.
- The connector straps are sewn down both edges.
- The tiers hang level, about 4 in (10.2 cm) apart.
Troubleshooting
- The base cups upward: Your increases are too tight. Use a looser tension or go up half a hook size.
- The base ruffles: You added extra sts. Recount each rnd against the table.
- The motifs aren’t square: Check the ch-4 lengths, then block the motif with pins at the corners.
- The wall is shorter than the base: The seams are too tight. Redo them with looser sl sts.
- The basket tilts: One connector is sewn higher than the other. Re-sew both at the same height.
- The rim flares: Your crab stitch is too loose. Work it with a smaller hook.
Care
Hand wash in cool water, press out the water in a towel, and reshape the baskets while damp. Lay flat or stuff with a towel to dry.

Final Notes
The measurements build on each other:
– A gauge of 14 sc = 4 in (10.2 cm) gives a 3.1 in (7.9 cm) motif with 11 sts per side.
– Eight motifs make an 88-st, 25.1 in (63.8 cm) wall.
– That wall matches the 88-st base at 9.5 in x 5.5 in (24.1 cm x 14.0 cm).
– The 88-st rim locks the basket into shape.
Check your gauge on one motif first, and the rest of the project will follow. Happy crocheting!