

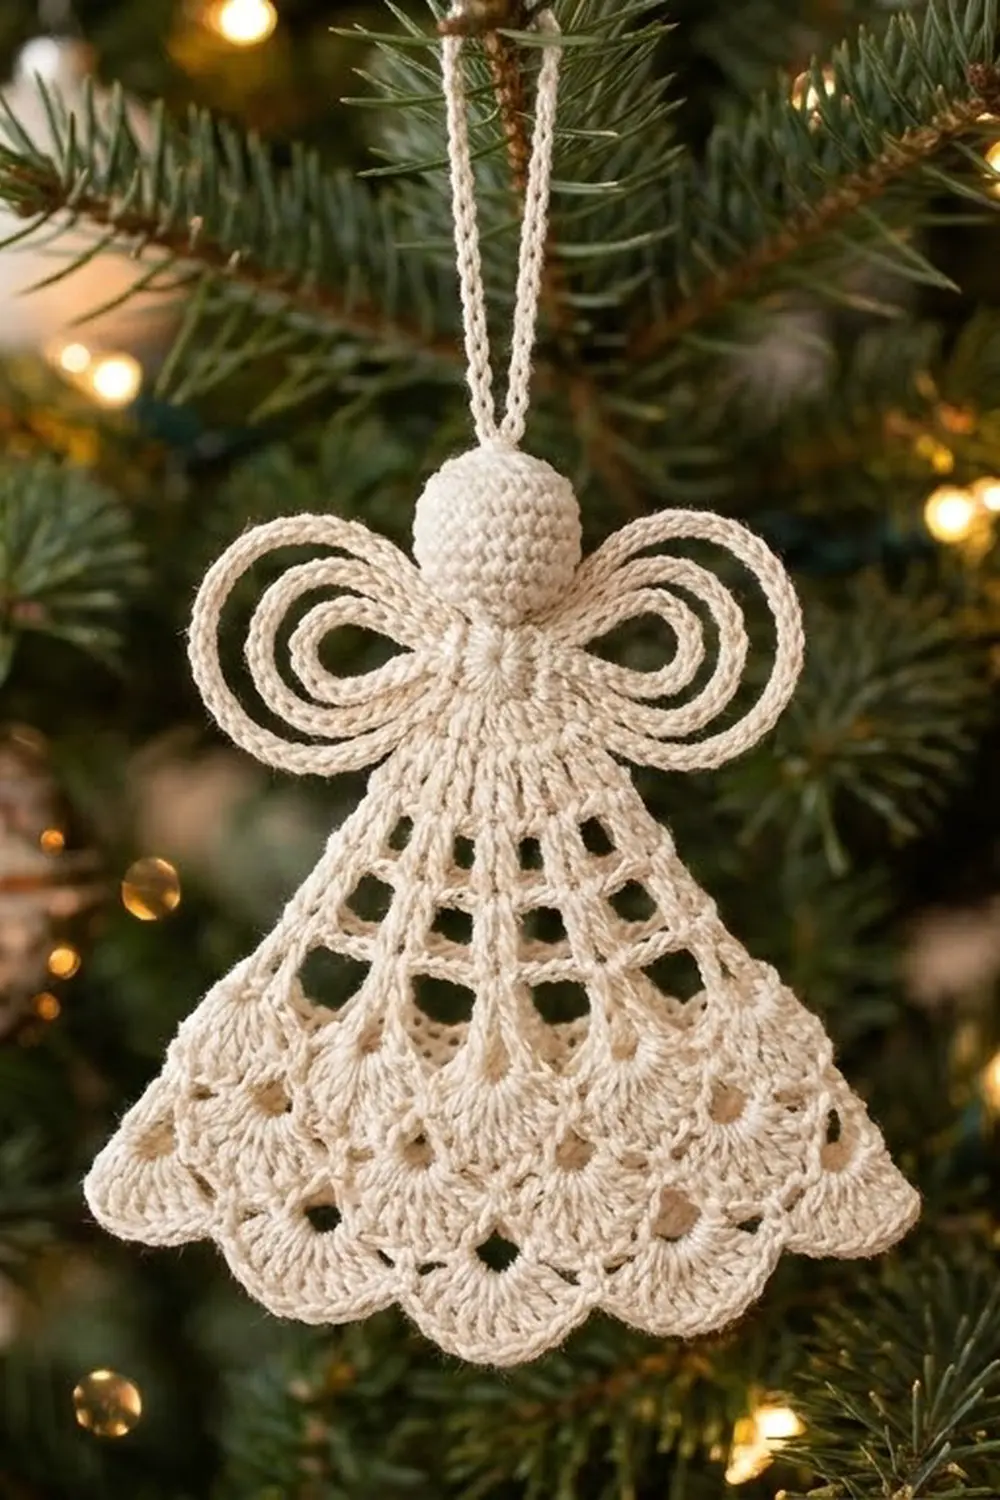
This little lace angel is a classic heirloom-style ornament. It has a flared, open-mesh skirt, a hem of five fan shells, two airy loop wings, and a firm round head. A simple chain loop at the top lets it hang straight on a tree branch.
The sample uses a single cream cotton thread, which gives it a vintage, snow-white look against green branches and warm lights. Everything is one color, so the texture does all the work: chain loops, fans, and a scalloped edge.
The pattern uses US crochet terms. The finished angel measures 4.5 in (11.4 cm) wide at the hem and 4.15 in (10.5 cm) tall from hem to top of head, plus a 1.5 in (3.8 cm) hanging loop.
Construction is simple. You work the skirt flat from the top down in turned rows, adding one chain loop per row. Next you work a fan row and a scallop border along the hem. Then you chain the wings directly from the neck, make a tiny stuffed ball head, sew it on, and add the hanging loop.
Finished Size and Construction
- Finished size: 4.5 in (11.4 cm) wide x 4.15 in (10.5 cm) tall, plus 1.5 in (3.8 cm) hanging loop
- Wingspan: about 3.5 in (8.9 cm)
- Skill level: Easy-Intermediate
- Terminology: US crochet terms
- Yarn weight: Size 3 cotton crochet thread
- Hook: 2.25 mm (US B-1)
- Number of pieces: 1 ornament, made from 1 lace body (skirt + wings) and 1 small head sewn on
- Layout: single angel; no motifs to join
- Skirt size before border: 4.5 in (11.4 cm) wide x 3.15 in (8.0 cm) tall
- Border depth: 0.25 in (0.6 cm), hem edge only
- Head: 0.75 in (1.9 cm) diameter when stuffed
Materials
Choose a mercerized size 3 cotton thread. It holds starch well, shows the stitches clearly, and stays crisp. Thinner thread (size 10) makes a smaller angel; a light fingering cotton makes it slightly larger.
- Cream / ivory: about 18 g, approximately 25 m (27 yd)
Tools:
- 2.25 mm (US B-1) crochet hook
- Tapestry needle
- A pinch of polyester fiberfill
- 1 stitch marker
- Rustproof pins and a foam blocking board
- Fabric stiffener or heavy spray starch
- Scissors
The quantity includes a margin of about 25 percent for swatching, weaving in ends, and tails.
Abbreviations (US Terms)
- ch = chain
- sl st = slip stitch
- sc = single crochet
- dc = double crochet
- sc2tog = single crochet 2 together
- inc = 2 sc in the same stitch
- MR = magic ring
- sk = skip
- sp = space
- st(s) = stitch(es)
- RS = right side
Special stitch – Fan: 7 dc worked into the same ch-5 loop.
Gauge and Checkpoints
Lace gauge depends on stretch and drape, so make the skirt first and treat it as your test piece. Measure it lightly pinned flat, before starching.
- Mesh gauge: 2 ch-5 loops = 1 in (2.5 cm) wide; 5 mesh rows = 2 in (5.1 cm) tall
- After Row 1: neck band is 1 in (2.5 cm) wide and 0.25 in (0.6 cm) tall
- After Row 4: lower edge is 3 in (7.6 cm) wide; piece is about 1.45 in (3.7 cm) tall
- After Row 7: lower edge is 4.5 in (11.4 cm) wide; piece is 2.65 in (6.7 cm) tall
- After Row 8 (fans): 4.5 in (11.4 cm) wide x 3.15 in (8.0 cm) tall
- After border: 4.5 in (11.4 cm) wide x 3.4 in (8.6 cm) tall
If your skirt is too big, go down to a 2.0 mm hook or chain more firmly. If it is too small, go up to a 2.5 mm hook. Don’t change the chain counts; that changes the shape, not just the size.
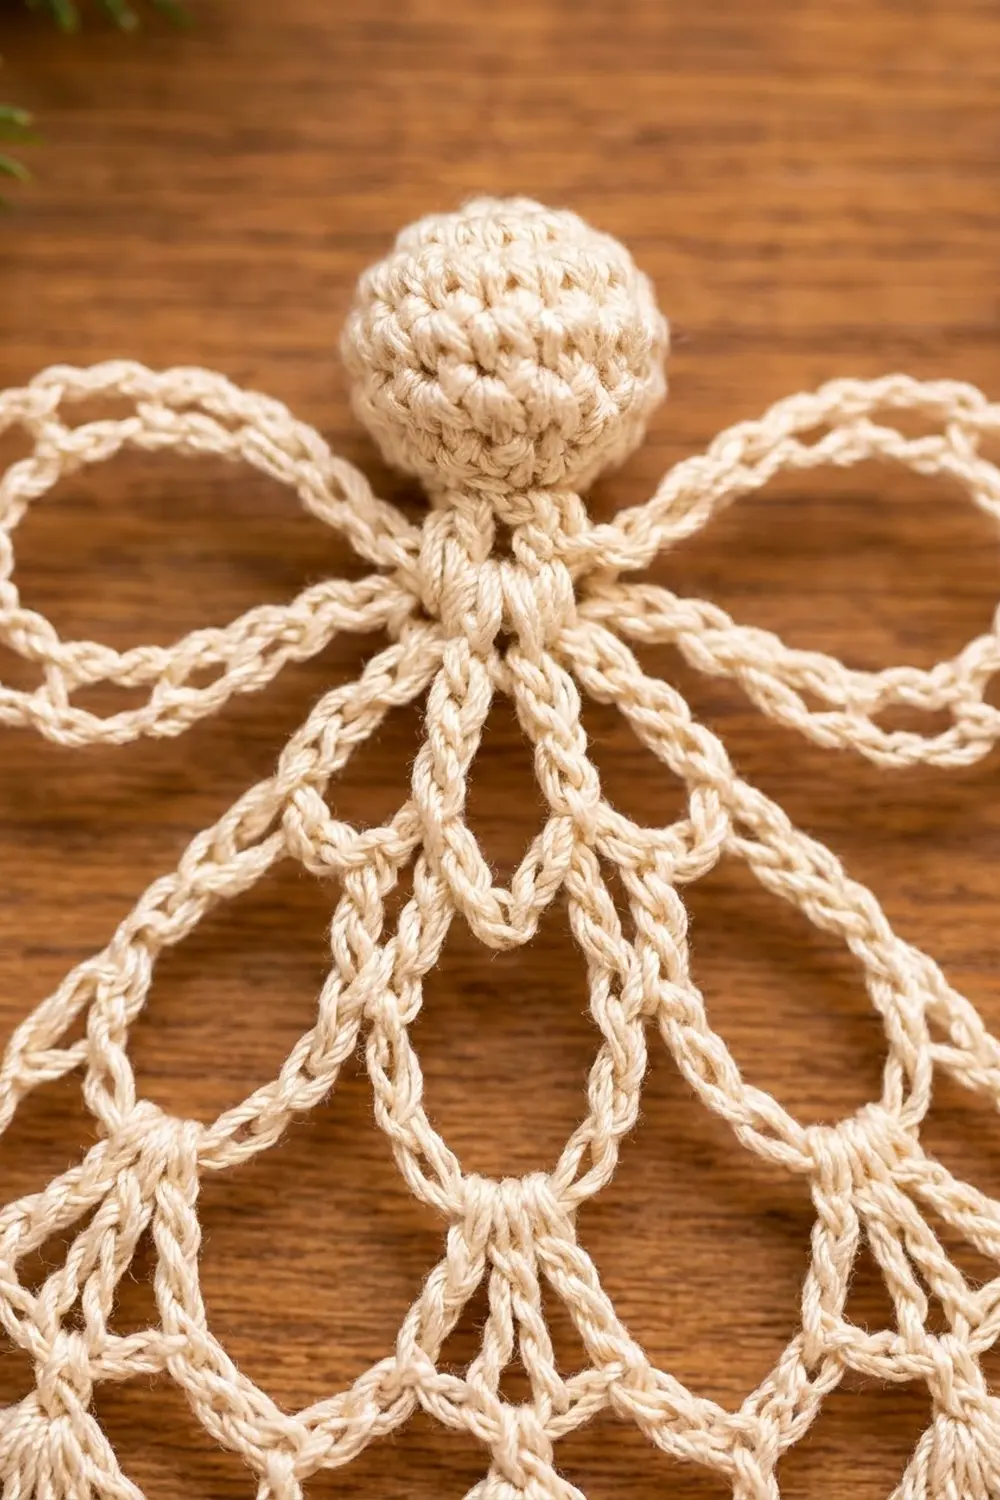
Skirt
Worked flat, top-down, in turned rows. Each mesh row adds exactly one ch-5 loop.
Row 1 (neck band): Ch 11. Dc in 4th ch from hook and in each of the next 7 ch. Turn. (9 dc, counting the skipped ch-3 as 1 dc)
Row 2: Ch 1, sc in first dc, [ch 5, sk next dc, sc in next dc] 4 times, working the last sc in the top of the turning ch. Turn. (5 sc, 4 ch-5 loops)
Row 3: Ch 1, sc in first sc, ch 5, sc in first loop, [ch 5, sc in next loop] 3 times, ch 5, sc in last sc. Turn. (6 sc, 5 ch-5 loops)
Row 4: Ch 1, sc in first sc, ch 5, sc in first loop, [ch 5, sc in next loop] 4 times, ch 5, sc in last sc. Turn. (7 sc, 6 ch-5 loops)
Row 5: Ch 1, sc in first sc, ch 5, sc in first loop, [ch 5, sc in next loop] 5 times, ch 5, sc in last sc. Turn. (8 sc, 7 ch-5 loops)
Row 6: Ch 1, sc in first sc, ch 5, sc in first loop, [ch 5, sc in next loop] 6 times, ch 5, sc in last sc. Turn. (9 sc, 8 ch-5 loops)
Row 7: Ch 1, sc in first sc, ch 5, sc in first loop, [ch 5, sc in next loop] 7 times, ch 5, sc in last sc. Turn. (10 sc, 9 ch-5 loops)
The rule for every mesh row: the chain from the first sc and the chain to the last sc make 2 loops, and the chains between the old loops make the rest. So a row worked over n loops always has n + 1 loops and n + 2 sc.
Row 8 (fan row): Ch 1, sc in first sc, ch 2, Fan in first loop, [ch 2, sc in next loop, ch 2, Fan in next loop] 4 times, ch 2, sc in last sc. Turn.
This is a conversion row. The 9 loops become 5 Fans (loops 1, 3, 5, 7, 9) and 4 anchoring sc (loops 2, 4, 6, 8). Count: 35 dc (5 Fans x 7) + 6 sc (4 in loops + 2 edge sc) = 41 sts, plus 10 ch-2 sps. Do not fasten off.
Border (Hem Scallop Edge)
The border runs along the hem only. The side edges are already finished by the outer ch-5 loops of each mesh row, so they need no extra stitches.
Border gauge: each sc + ch-3 unit covers about 0.11 in (0.3 cm) of hem along the curve of a Fan, and the row adds 0.25 in (0.6 cm) of depth.
Border Row: Ch 1, sc in first sc, ch 3, sk ch-2 sp, [sc in next dc, ch 3] 6 times, sc in next dc (7th dc of Fan), *ch 3, sk ch-2 sp, sc in next sc, ch 3, sk ch-2 sp, [sc in next dc, ch 3] 6 times, sc in next dc; repeat from * 3 more times, ch 3, sk ch-2 sp, sc in last sc. Fasten off.
Counts for the hem (the only bordered side):
- Per Fan: 7 sc and 6 ch-3 sps
- Between Fans: 1 sc with a ch-3 sp on each side
- Total: 41 sc (41 worked 1-per-existing-stitch + 0 extra) and 40 ch-3 sps
Why the math works: Row 8 has 35 dc + 6 sc = 41 stitches. The border puts exactly one sc on each of them and skips all 10 ch-2 sps. With 41 sc in a line there are 41 − 1 = 40 gaps, and each gap is one ch-3. No stitches are added, so the hem doesn’t ruffle or pull in, and the width stays 4.5 in (11.4 cm).
Wings
Hold the skirt RS facing with the neck band on top. The free loops of the foundation chain run along the top edge of Row 1.
Join: Join thread with sl st in the free loop at the base of the 5th dc (the center dc of the neck band). Place a marker in this st.
Right wing: Ch 24, sl st in marked st (inner loop). Ch 34, sl st in marked st (outer loop).
Left wing: Ch 24, sl st in marked st (inner loop). Ch 34, sl st in marked st (outer loop). Fasten off, leaving a 6 in (15.2 cm) tail.
You now have 4 chain loops coming from one point, with a small loop nested inside a large loop on each side. Use the tail to stitch the base of each pair together once so the wings stay pinched at the neck like a bow.
Checkpoint: laid out to the sides, each outer loop extends about 1.6 in (4.1 cm), giving a wingspan of about 3.5 in (8.9 cm).
Head
Worked in continuous rounds; move your marker up each round.
Rnd 1: 6 sc in MR. (6 sc)
Rnd 2: Inc in each st around. (12 sc)
Rnd 3: [Sc in next st, inc] 6 times. (18 sc)
Rnds 4–6: Sc in each st around. (18 sc)
Rnd 7: [Sc in next st, sc2tog] 6 times. (12 sc)
Stuff firmly with a small pinch of fiberfill.
Rnd 8: Sc2tog 6 times. (6 sc)
Fasten off, leaving a 12 in (30.5 cm) tail. Weave the tail through the front loops of the last 6 sts and pull closed.
Checkpoint: the head should be a firm ball about 0.75 in (1.9 cm) across.
Assembly and Hanging Loop
- Place the head so its closed bottom sits on the center of the neck band, covering the wing join.
- Using the tail, sew around the base of the head through the foundation chain and the wing join. Go around twice for strength.
- Bring the needle up through the head to the top center (the MR). Fasten off and weave in.
- Hanging loop: Join thread with sl st into the center of the MR at the top of the head. Ch 30, sl st in the same st. Fasten off and weave both ends into the head.
Checkpoint: total height from hem to top of head is 4.15 in (10.5 cm); the loop adds 1.5 in (3.8 cm).
Final Blocking
- Weave in all remaining ends, hiding them inside sc or the head.
- Soak the lace body (not the head) in fabric stiffener, or wet it and plan to spray-starch heavily.
- Squeeze out the excess gently in a towel. Do not wring.
- Pin the neck center on your board, then pin the two hem corners 4.5 in (11.4 cm) apart.
- Pin the bottom center so the skirt is 3.4 in (8.6 cm) tall from neck band to hem.
- Pin each ch-5 loop open into a rounded teardrop, working from the neck down.
- Pin each Fan open evenly and pin the tip of each ch-3 scallop.
- Shape each wing pair into nested teardrops angled slightly upward, and pin the outer tips 3.5 in (8.9 cm) apart.
- Let it dry completely, at least 12 hours, before unpinning.
Final Quality-Control Checklist
- Neck band has 9 dc
- Mesh rows have 4, 5, 6, 7, 8, and 9 loops in order
- Row 8 has 5 Fans of 7 dc and 6 sc
- Border has 41 sc and 40 ch-3 sps
- Each wing has a ch-24 inner loop and a ch-34 outer loop
- Head is 18 sc around at its widest and closed firmly
- Hem measures 4.5 in (11.4 cm); total height is 4.15 in (10.5 cm)
- Hanging loop is centered so the angel hangs straight
- All ends are woven in and invisible
Troubleshooting
Skirt is lopsided: You probably missed the edge loop on one side. Every mesh row starts with ch 5 into the first loop and ends with ch 5 into the last sc.
Hem ruffles: Check that you skipped the ch-2 sps in the border and worked only 41 sc.
Hem cups inward: Your border chains are too tight. Loosen your ch-3 or go up a hook size for the border only.
Wings flop: Use more stiffener on the wings and stitch the base of each pair together firmly.
Stuffing shows through the head: Stuff a little less, or go down to a 2.0 mm hook for the head only.
Angel hangs crooked: Reattach the hanging loop exactly at the MR center.
Care
Spot clean gently with cool water. If the angel goes soft, dampen it and block again with fresh stiffener, and store it flat between sheets of tissue paper.
Final Notes
The measurements build in a short chain. A 9-dc neck band 1 in (2.5 cm) wide grows by one loop per row to 9 loops at 4.5 in (11.4 cm). The fan row keeps that width and brings the skirt to 3.15 in (8.0 cm) tall. The 41-sc border adds 0.25 in (0.6 cm), for a 3.4 in (8.6 cm) skirt. The 0.75 in (1.9 cm) head brings the angel to 4.15 in (10.5 cm), and the loop adds 1.5 in (3.8 cm) for hanging.
Make one, check your numbers, and then make a whole choir for the tree.
Happy crocheting!