

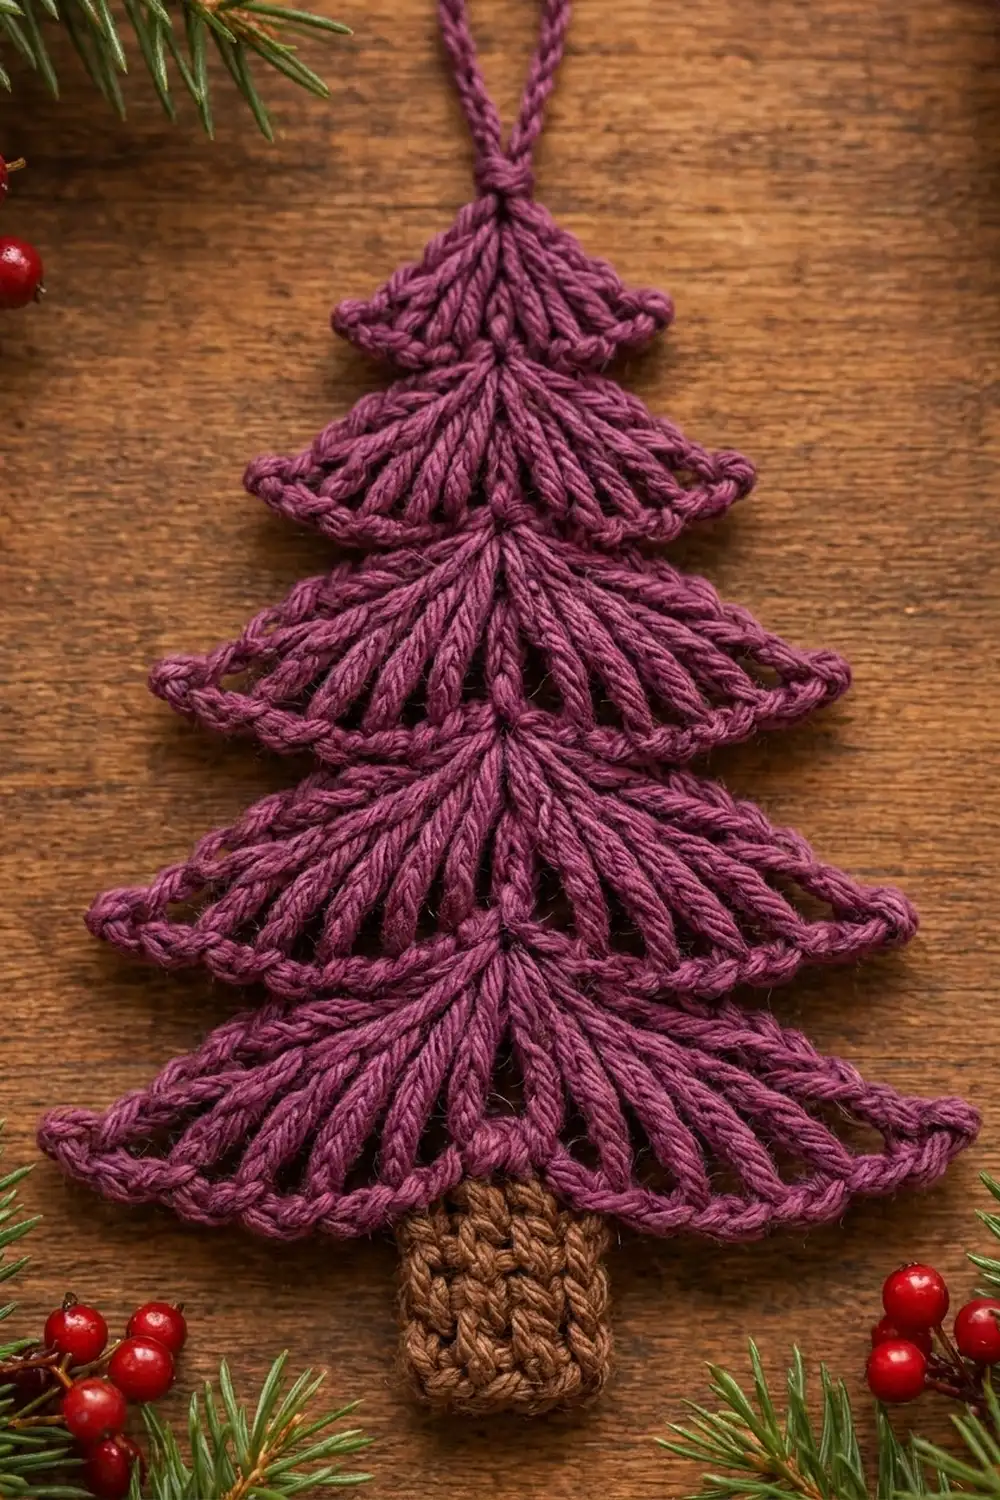
The Plum Spruce Tree Ornament is a small, flat Christmas tree made of five fanned tiers. Each tier is a spray of tall stitches that spread out from one point. The stitch posts look like the needles of an evergreen branch, and a lacy edge with small upturned tips finishes each tier.
The tree is a rich plum purple and the short single crochet trunk is a warm brown. The style is cozy and slightly vintage. It looks lovely on a real tree, tied onto a gift, or hung in a window.
This pattern uses US crochet terms. The finished ornament is 3 1/4 in (8.3 cm) wide and 5 in (12.7 cm) tall. With the hanging loop it is 6 1/4 in (15.9 cm) tall overall.
You work the tree from the top down in one continuous strand. Start with the hanging loop. Each tier is a fan worked into a single chain at the top of a short chain “spine”, followed by an edging row. You then slip stitch back to that tier’s top point and chain down to start the next tier. Last, you join the trunk to the center of the bottom tier.
Finished Size and Construction
- Finished size: 3 1/4 in (8.3 cm) wide × 5 in (12.7 cm) tall; 6 1/4 in (15.9 cm) including the loop
- Skill level: Intermediate (tall stitches up to quadruple treble)
- Terminology: US
- Yarn weight: Worsted (#4)
- Hook: 4.0 mm (G-6)
- Number of pieces: 1 (worked continuously, with the trunk added afterward)
- Layout: Single ornament; no joining
- Piece size: 3 1/4 × 5 in (8.3 × 12.7 cm)
- Size before border (Tier 5 fan without edging): 2 1/2 in (6.4 cm) wide
- Border depth: 1/4 in (0.6 cm) of edging, plus a picot tip that adds 1/8 in (0.3 cm) at each outer corner
Materials
Choose a smooth, plied worsted yarn. Cotton or a cotton blend gives the clearest stitch definition and holds the fanned shape well. Acrylic also works, but it may need firmer blocking. Avoid fuzzy or brushed yarns, because they hide the radiating stitch lines.
- Color A – Plum purple: 15 g, about 30 m (33 yd)
- Color B – Medium brown: 5 g, about 10 m (11 yd)
These quantities include a margin of about 30% for your gauge swatch and weaving in ends.
Tools:
– 4.0 mm (G-6) crochet hook
– Tapestry needle
– Scissors
– Stitch marker
– Blocking mat and rust-proof pins
– Spray bottle
– Ruler or tape measure
Abbreviations (US Terms)
- ch – chain
- sl st – slip stitch
- sc – single crochet
- hdc – half double crochet
- dc – double crochet
- tr – treble crochet (yo twice)
- dtr – double treble crochet (yo 3 times)
- trtr – triple treble crochet (yo 4 times)
- sp – space
- st(s) – stitch(es)
- yo – yarn over
Special Stitches
Quadruple treble (quadtr): Yo 5 times. Insert the hook in the stitch, yo and pull up a loop (7 loops on hook). Then (yo, pull through 2 loops) 6 times.
Picot: Ch 3, then sl st in the 3rd ch from the hook. This makes the small upturned tip at each outer corner of a tier.
Tier Edging (worked over a fan of N stitches): Turn. Make 1 picot. Sc in the first st, then (ch 1, sc in the next st) across. Your last sc goes into the top of the beginning chain. Make 1 picot. This gives N sc + (N − 1) ch-1 sps + 2 picots.
Gauge and Checkpoints
- Gauge: 16 sc × 20 rows = 4 in (10.2 cm) in Color B.
- Tall-stitch check: One tr should measure 3/4 in (1.9 cm) from base to top.
Make Tier 1 and Tier 2 as a test before you go on. These are the checkpoints, with each fan laid flat and measured across its widest point:
- Tier 1: fan 1 in (2.5 cm) wide; with edging, 1 3/4 in (4.4 cm)
- Tier 2: fan 1 1/4 in (3.2 cm); with edging, 2 in (5.1 cm)
- Tier 3: fan 1 3/4 in (4.4 cm); with edging, 2 1/2 in (6.4 cm)
- Tier 4: fan 2 in (5.1 cm); with edging, 2 3/4 in (7.0 cm)
- Tier 5: fan 2 1/2 in (6.4 cm); with edging, 3 1/4 in (8.3 cm)
- After Tier 3: 2 in (5.1 cm) from the Tier 1 top point to the bottom of the Tier 3 edging
- After Tier 5: 4 in (10.2 cm) from the top point to the bottom edging
- After the trunk: 5 in (12.7 cm)
If your tiers are too big, go down to a 3.75 mm hook, or pull each tall stitch’s first loop up only to the height of the hook shaft. If they are too small, go up to a 4.5 mm hook. Tall stitches grow quickly with loose tension, so check Tier 2 before you continue.
Pattern
Hanging Loop
With Color A, ch 14 and sl st in the first ch to form a ring. Laid flat, the loop measures about 1 1/4 in (3.2 cm) tall.
Tier 1 (7 sts)
Fan: Ch 4. Dc in the 4th ch from the hook. This 4th ch is the top point (apex) of the tier, sitting right under the loop join, and the skipped ch-3 counts as the first dc. In the same apex ch, work 3 hdc and then 2 dc. (7 sts: 2 dc, 3 hdc, 2 dc, counting the beginning ch.)
Edging: Work the Tier Edging over 7 sts. (7 sc, 6 ch-1 sps, 2 picots.)
Return: Sl st in each of the 2 remaining chs of the beginning ch-3, then sl st in the apex. (3 sl sts.) Your yarn is now back at the top point.
Tier 2 (9 sts)
Fan: Ch 7. Tr in the 5th ch from the hook. That ch is the new apex, the 3 chs before it form the spine, and the skipped ch-4 counts as the first tr. In the same apex ch, work 5 dc and then 2 tr. (9 sts: 2 tr, 5 dc, 2 tr.)
Edging: Work the Tier Edging over 9 sts. (9 sc, 8 ch-1 sps, 2 picots.)
Return: Sl st down the beginning ch-4 to the apex. (4 sl sts.)
Checkpoint: the edge of Tier 1 should lie over the top of the Tier 2 fan and hide the spine chains.
Tier 3 (11 sts)
Fan: Ch 8. Dtr in the 6th ch from the hook (3 spine chs; the beginning ch-5 counts as the first dtr). In the same ch, work 7 tr and then 2 dtr. (11 sts: 2 dtr, 7 tr, 2 dtr.)
Edging: Work the Tier Edging over 11 sts. (11 sc, 10 ch-1 sps, 2 picots.)
Return: Sl st down the beginning ch-5 to the apex. (5 sl sts.)
Tier 4 (13 sts)
Fan: Ch 10. Trtr in the 7th ch from the hook (4 spine chs; the beginning ch-6 counts as the first trtr). In the same ch, work 9 dtr and then 2 trtr. (13 sts: 2 trtr, 9 dtr, 2 trtr.)
Edging: Work the Tier Edging over 13 sts. (13 sc, 12 ch-1 sps, 2 picots.)
Return: Sl st down the beginning ch-6 to the apex. (6 sl sts.)
Tier 5 (15 sts)
Fan: Ch 11. Quadtr in the 8th ch from the hook (4 spine chs; the beginning ch-7 counts as the first quadtr). In the same ch, work 11 trtr and then 2 quadtr. (15 sts: 2 quadtr, 11 trtr, 2 quadtr.)
Edging: Work the Tier Edging over 15 sts. (15 sc, 14 ch-1 sps, 2 picots.) Fasten off Color A; you do not need a return for the last tier.
Each fan puts all of its stitches into a single chain, so the posts spread out from one point. Because the outer stitches are taller than the center stitches, every tier is wide and fairly shallow instead of round.
Trunk
The Tier 5 edging has 29 stitches along its base (15 sc + 14 ch-1 sps). The picots are not counted. The center is stitch 15. Count from either end to stitch 13, which is a sc, and place a marker.
Row 1: With the right side facing, join Color B in the marked sc with a sl st, ch 1. Sc in the same sc, sc in the next ch-1 sp, sc in the next sc, sc in the next ch-1 sp, sc in the next sc. (5 sc, worked over edging sts 13–17.)
Rows 2–5: Ch 1, turn, sc in each st across. (5 sc.)
Fasten off. The trunk measures 1 1/4 in (3.2 cm) wide × 1 in (2.5 cm) long and hangs from the center of the bottom tier.
Border
On this ornament, the border is the Tier Edging on each tier. It is worked as you go, so this section collects the counts and explains them.
Border gauge: One sc plus one ch-1 is about 3/16 in wide. The edging adds 1/4 in (0.6 cm) of depth, and each picot adds 1/8 in (0.3 cm) at a corner.
| Tier | Fan sts | Sc | Ch-1 sps | Base sts | Picots |
|---|---|---|---|---|---|
| 1 | 7 | 7 | 6 | 13 | 2 |
| 2 | 9 | 9 | 8 | 17 | 2 |
| 3 | 11 | 11 | 10 | 21 | 2 |
| 4 | 13 | 13 | 12 | 25 | 2 |
| 5 | 15 | 15 | 14 | 29 | 2 |
Why the math works:
- One sc goes into the top of each fan stitch, so the edging never adds or loses stitches compared with the fan.
- The ch-1 between sc gives the edge the extra length it needs, because the fan’s outer curve is longer than its base. This keeps the edge from cupping.
- Every tier has an odd number of base stitches, so there is always one true center stitch. On Tier 5 that is stitch 15, and the 5-stitch trunk takes stitches 13–17, which leaves 12 base stitches on each side.
- On Tier 5, the edging (1/4 in, 0.6 cm) plus the picot (1/8 in, 0.3 cm) adds 3/8 in (1.0 cm) on each side. So 2 1/2 in (6.4 cm) of fan + 3/4 in (1.9 cm) of edging and picots = 3 1/4 in (8.3 cm) finished.
Final Blocking
- Weave in all ends along the spine, inside the edging, or up the trunk sides. Do not trim them yet.
- Mist the ornament until it is damp but not soaked.
- Lay it face up on the blocking mat. Pin the Tier 1 top point and the bottom center of the trunk 5 in (12.7 cm) apart.
- Spread each fan so its posts fan out evenly, and pin both picots of each tier. Tier 5 picots should be 3 1/4 in (8.3 cm) apart.
- Pinch each picot so it points slightly upward.
- Pin the trunk square at 1 1/4 in (3.2 cm) wide.
- Pin the hanging loop into a neat oval about 1 1/4 in (3.2 cm) tall.
- Let it dry completely, then trim the ends.
Final Quality-Control Checklist
- Each tier has the right number of fan stitches: 7, 9, 11, 13 and 15.
- All the fan stitches in a tier come from one apex chain.
- Each edging has the count shown in the table and a picot at both ends.
- Each upper tier overlaps the top of the tier below it, and no spine chains show.
- The trunk is 5 sc wide, 5 rows long and centered under stitches 13–17.
- The finished ornament measures 3 1/4 × 5 in (8.3 × 12.7 cm).
- The loop is firmly attached and sits straight above the top point.
Troubleshooting
- Fans curl or cup: The edging is too tight. Redo it with a looser ch-1, or go up a hook size for the edging only.
- Edges ruffle: The fan stitches are too loose. Go down a hook size for the fans.
- Spine chains show between tiers: Your chains are too loose. Tighten the spine chains or work 1 fewer spine ch for that tier.
- Tiers overlap too much: Your chains are too tight. Work the spine chains more loosely, or add 1 spine ch.
- Trunk sits off center: Count the 29 base stitches again, leaving out the picots, and re-mark stitch 13.
- The apex chain splits: Insert the hook under 2 loops of the chain each time, so all the stitches share the same strands.
Care
Hand wash in cool water, press out the water in a towel, and dry flat, re-pinning the picots if needed. Store flat or hanging so the tiers keep their shape.

Final Notes
The sizes build on each other: a 3/4 in (1.9 cm) tr gives five fans from 1 in to 2 1/2 in (2.5 to 6.4 cm) wide. The edging and picots bring the bottom tier to 3 1/4 in (8.3 cm). The spine chains place the tiers over a 4 in (10.2 cm) drop, the trunk adds 1 in (2.5 cm) for a 5 in (12.7 cm) tree, and the loop brings it to 6 1/4 in (15.9 cm). Check your measurements at each stage and the ornament will block out true. Happy crocheting!