
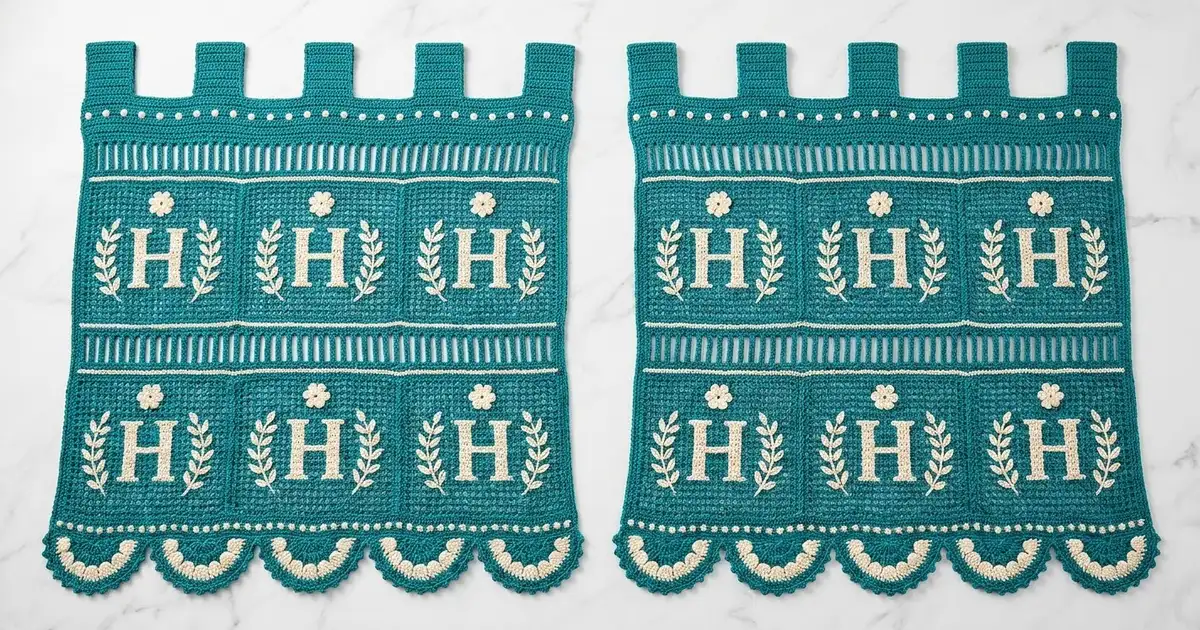
These tall curtain panels look like vintage lace. Each one combines teal filet mesh, airy broomstick-lace bands and a large cream “H” monogram. Embroidered leaf sprigs and small flowers frame each letter, cream French knots dot the solid bands, and a scalloped hem with cream shell fans finishes the bottom edge.
The palette uses two colors: deep teal for the structure and soft cream for every decorative detail. The style is classic heirloom, but the construction is simple: plain rows, mesh rows, and one broomstick band repeated.
The pattern uses US crochet terms. Each finished panel measures 16 in (40.6 cm) wide and 73 in (185.4 cm) long including the hem. The tabs add 3 in (7.6 cm), for a hanging height of 76 in (193.0 cm).
Each panel is worked from the bottom up in one piece. You crochet the body first, then add the tabs along the top and the scalloped hem along the foundation chain. Embroidery comes last. Make two identical panels for a pair.
Finished Size and Construction
- Finished size (one panel): 16 in × 73 in (40.6 cm × 185.4 cm), plus 3 in (7.6 cm) tabs
- Skill level: Intermediate
- Terminology: US
- Yarn weight: Sport (#2 Fine) mercerized cotton
- Hook: 3.5 mm (E-4), plus a 25 mm (US 50) knitting needle or dowel for broomstick loops
- Number of pieces: 1 continuous panel per curtain; make 2 separate panels for a pair
- Layout: Single vertical panel with 5 repeating monogram units
- Panel size before hem: 16 in × 71 in (40.6 cm × 180.3 cm)
- Hem (border) depth: 2 in (5.1 cm) at the scallop tips
Materials
Use a smooth, mercerized sport-weight cotton. It gives crisp mesh, holds its shape when hung, and shows the cross-stitch clearly. Avoid fuzzy or very stretchy fibers, because long panels can drop in length.
| Color | Per panel | Pair of panels |
|---|---|---|
| Teal (main) | 275 g / 825 m | 550 g / 1650 m |
| Cream (accent) | 30 g / 90 m | 60 g / 180 m |
These quantities include a margin of about 15% for gauge swatches and tails.
Tools:
– 3.5 mm (E-4) crochet hook
– 25 mm (US 50) knitting needle or smooth dowel
– Blunt tapestry needle
– Stitch markers
– Rustproof pins and a large blocking surface
– Measuring tape
Abbreviations (US Terms)
- ch – chain
- sl st – slip stitch
- sc – single crochet
- dc – double crochet
- tr – treble crochet
- sp – space
- st(s) – stitch(es)
- RS / WS – right side / wrong side
Special stitches
- Mesh: ch 1, skip 1 st, dc in next st. Each mesh is one open square, 2 sts wide.
- Broomstick band: a pull-up row of loops held on the needle, followed by a work-off row that gathers the loops in groups of 3.
- Picot: ch 3, sl st in the top of the sc just made.
- Embroidery: cross stitch (one X per mesh square), lazy daisy (a chain-stitch petal held down by one tiny stitch), backstitch, and French knot (2 wraps).
Gauge and Checkpoints
Gauge matters a great deal on a panel this long. Make a test swatch before you start.
Gauge:
– 10 mesh squares = 4 in (10.2 cm) wide, and 8 mesh rows = 4 in (10.2 cm) tall
– 20 dc = 4 in (10.2 cm)
– One broomstick band = 1.5 in (3.8 cm) tall
Swatch:
1. Ch 23. Dc in the 4th ch from the hook and in each ch across, for 21 dc. Work 1 more dc row.
2. Work a broomstick band: 21 loops, worked off in 7 groups of 3.
3. Work 2 dc rows, then 8 mesh rows.
Measure 10 squares from the first dc to the 11th dc, not the full swatch edge.
Fixing gauge:
– If the swatch is too big, go down a hook size.
– If it is too small, go up a size.
– If the broomstick band is too tall or short, change the needle size by one step.
Checkpoints on the panel:
– Width throughout: 16 in (40.6 cm)
– After the bottom band: 1 in (2.5 cm)
– After Unit 1: 14.5 in (36.8 cm)
– After Unit 2: 28 in (71.1 cm)
– After Unit 3: 41.5 in (105.4 cm)
– After Unit 4: 55 in (139.7 cm)
– After Unit 5: 68.5 in (174.0 cm)
– After the top band: 71 in (180.3 cm)
Panel Body
Work all body rows in teal.
Bottom Band
Foundation: Ch 83.
Row 1 (WS): Dc in the 4th ch from the hook and in each ch across. The skipped 3 ch count as the first dc. Turn. (81 dc)
Row 2 (RS): Ch 3 (counts as dc throughout). Dc in each st across. Turn only where the pattern says so. (81 dc)
The band measures 1 in (2.5 cm) tall and 16 in (40.6 cm) wide.
Monogram Unit (Work 5 Times)
Each unit measures 13.5 in (34.3 cm) tall.
Row A (RS, broomstick pull-up row):
1. Do not turn. Keep the RS facing.
2. Lengthen the loop on your hook and slip it onto the needle.
3. Working back along the row you just made, pull up a loop in each of the remaining 80 sts. Slip each loop onto the needle. (81 loops)
Row B (RS, broomstick work-off row):
1. Start at the end where the working yarn hangs. Insert the hook through the first 3 loops and slip them off the needle.
2. Yo, draw through, ch 1, then work 3 sc into the center of the group.
3. Insert the hook through the next 3 loops, slip them off, and work 3 sc into the center of the group. Repeat from * across.
4. Turn. (27 groups, 81 sc)
Keep the sc relaxed so that the band stays 16 in (40.6 cm) wide.
Row C (WS): Ch 3. Dc in each sc across. Turn. (81 dc)
Row D (RS): Ch 3. Dc in each st across. Turn. (81 dc)
Mesh Row 1 (WS):
1. Ch 4 (counts as dc + ch 1). Skip the next st and dc in the next st.
2. Ch 1, skip 1 st, dc in the next st. Repeat from * 38 more times.
3. Turn. (40 meshes: 41 dc and 40 ch-1 sps = 81 sts)
Mesh Rows 2–20:
1. Ch 4. Skip the first ch-1 sp and dc in the next dc.
2. Ch 1, dc in the next dc. Repeat from * 37 more times.
3. Ch 1, then dc in the 3rd ch of the turning ch. Turn. (40 meshes)
Mesh Row 20 is a RS row. The finished mesh block measures 10 in (25.4 cm) tall.
Row E (WS): Ch 3. Dc in the next ch-1 sp, dc in the next dc. Repeat from * 40 times, working the last dc into the turning ch. Turn. (1 + 80 = 81 dc)
Row F (RS): Ch 3. Dc in each st across. (81 dc)
Row F ends on the RS, so the next Row A starts without turning.
Top Band
After Unit 5, work Rows A–F once more, then fasten off.
The panel now measures 71 in (180.3 cm).
Tabs
You will work 5 tabs, each 9 sts wide, with gaps of 9 sts between them: 5 × 9 + 4 × 9 = 81 sts.
- With the WS facing, join teal in the first st of the top row.
- Tab Row 1: Ch 3, then dc in the next 8 sts. (9 dc)
- Tab Rows 2–12: Ch 3, then dc in each st. (9 dc)
- Fasten off, leaving a 12 in (30.5 cm) tail.
- Skip 9 sts. Work the next tab in the same way on sts 19–27.
- Repeat for the remaining tabs on sts 37–45, 55–63 and 73–81.
Each tab is 1.8 in (4.6 cm) wide and 6 in (15.2 cm) long. Fold each tab to the WS and whipstitch its last row along the base of the same 9 sts. This makes a loop 3 in (7.6 cm) tall.
Embroidery
Use cream yarn doubled for the cross-stitch and single for everything else.
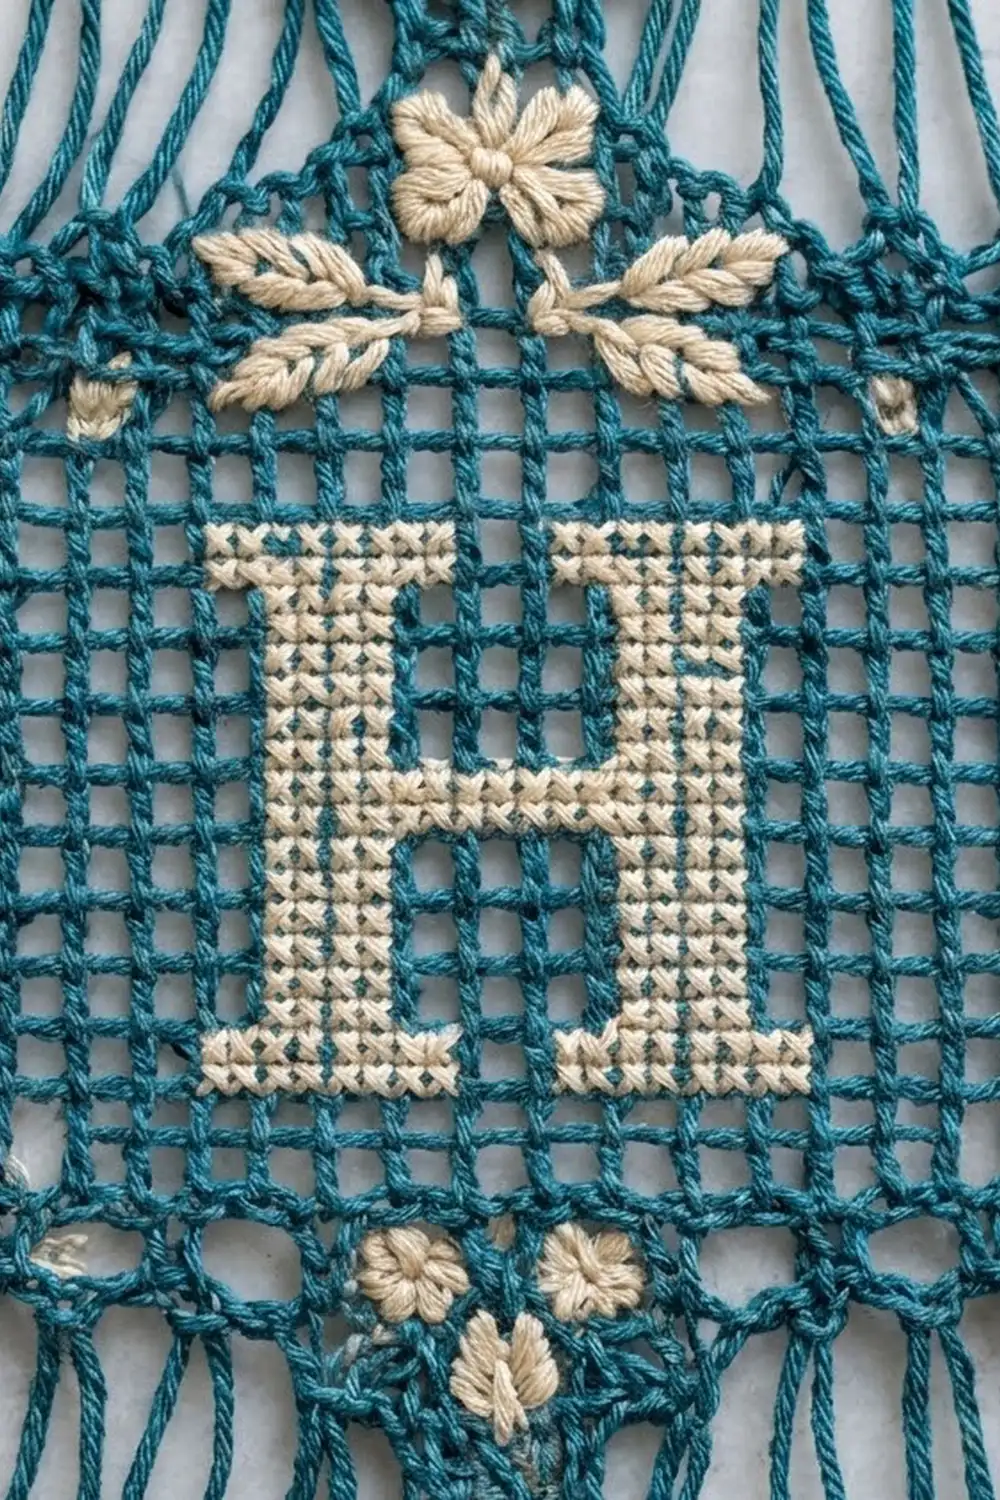
H monogram (each mesh block): Number the mesh columns 1–40 and the mesh rows 1–20, counting from the bottom of the block. Make one X in each listed square:
Rows 4 and 17:   cols 14–18 and 23–27   (10 X per row)
Rows 5–9, 12–16: cols 15–17 and 24–26   (6 X per row)
Rows 10–11:      cols 15–26             (12 X per row)
That gives 104 crosses in total. The letter is 14 meshes wide and 14 rows tall, which is 5.6 in × 7 in (14.2 cm × 17.8 cm). It is centered with 13 columns and 3 rows of mesh on each side.
Leaf sprigs: In columns 4–8 and 33–37, backstitch a stem through mesh rows 6–15. Add 3 pairs of lazy-daisy leaves angled up along the stem and 1 tip leaf.
Flower: Centered on Rows E–F above each block, work a 5-petal lazy-daisy flower with 2 leaves on each side.
French knots: Add a knot in sts 5, 13, 21 and so on through st 77 (every 8th st) in these places:
– Row D of every unit
– Row D of the top band
– Row 2 of the bottom band
That is 10 knots per band and 7 bands per panel.
Scalloped Hem (Border)
Border gauge: One scallop uses 16 sts and measures 3.2 in (8.1 cm). The hem has 5 scallops, which equals 16 in (40.6 cm).
Why the math works: 81 sts = 1 + (16 × 5). Each scallop shares its anchor sc with its neighbor, so the five repeats end exactly on the last stitch. The hem runs along the bottom edge only; the sides and top get no border stitches.
Hem Row 1 (RS, teal):
1. With the RS facing, join teal at the right-hand bottom corner.
2. Ch 1, then sc in each foundation ch loop across.
3. Turn. (81 sc)
Hem Row 2 (WS, teal):
1. Ch 1, sc in the first sc.
2. Skip the next 7 sc. In the next sc work (tr, ch 2) 4 times, then tr. Skip the next 7 sc and sc in the next sc. Repeat from * 4 more times.
3. Fasten off. (5 fans, each with 5 tr and 4 ch-2 sps; 6 sc)
Hem Row 3 (RS, cream):
1. Join cream in the first sc. Ch 1, sc in the same sc.
2. Work 4 dc in each of the next 4 ch-2 sps, then sc in the next sc. Repeat from * 4 more times.
3. Fasten off. (80 dc and 6 sc = 86 sts)
Hem Row 4 (WS, teal):
1. Join teal in the first sc. Ch 1, sl st in the same sc.
2. Sc in the next 2 dc, picot. Work (sc in the next 3 dc, picot) 3 times. Sc in the next 3 dc, sc in the next 2 dc, sl st in the next sc.
Each fan should have 16 sc. If you prefer to count picots evenly, work this sequence instead: 2 sc, picot, (3 sc, picot) 4 times, 2 sc. That gives 16 sc and 5 picots per fan.
Repeat across all 5 fans. Row 4 totals 80 sc, 25 picots and 6 sl st. Fasten off.
The hem adds 2 in (5.1 cm), for a total length of 73 in (185.4 cm).
Make the Second Panel
Repeat everything above for a matching panel. Check that both panels reach the same measurement at every checkpoint before you embroider.
Final Blocking
- Weave in all the ends along the solid dc rows.
- Soak the panel in cool water for 15 minutes, then press out the water in a towel. Do not wring it.
- Lay it flat and pin it to 16 in × 73 in (40.6 cm × 185.4 cm).
- Pin the mesh blocks square, checking the grid lines with a ruler.
- Pin out each scallop and each picot along the hem.
- Ease the broomstick loops straight and evenly vertical.
- Let it dry completely before unpinning. Block both panels together so they match.
Final Quality-Control Checklist
- Every row has 81 sts, and each mesh row has 40 squares.
- Each panel has 5 monogram units, plus the bottom and top bands.
- The width is 16 in (40.6 cm) from top to bottom.
- Each H is centered, with 104 crosses all crossing in the same direction.
- The leaf sprigs mirror each other within each block.
- There are 5 tabs, evenly spaced, and all sewn flat.
- The hem has 5 even scallops with 5 picots each.
- Both panels match in length to within 0.5 in (1.3 cm).
Troubleshooting
- The panel narrows at the broomstick bands. The work-off sc are too tight. Work the 3 sc looser, or switch to a 4.0 mm hook for Row B only.
- The mesh squares are taller than they are wide. Your dc are too tall. Wrap the yarn more firmly, or try a 3.25 mm hook for the mesh rows.
- The cross-stitch looks thin. Use the cream doubled, or tripled if needed.
- The scallops cup. Block the hem harder, or work 3 dc instead of 4 in the outer ch-2 sps.
- The panel grew in length after hanging. Rewash it, block it, and dry it flat. Use mercerized cotton next time.
Care
Hand wash in cool water with mild detergent and dry flat. Re-block lightly after washing, and avoid hanging the panels while they are wet.

Final Notes
The measurement chain is straightforward:
– 81 sts give 16 in (40.6 cm) across.
– The bottom band gives 1 in (2.5 cm).
– Each 13.5 in (34.3 cm) unit is repeated 5 times.
– The top band adds 2.5 in (6.4 cm), bringing the body to 71 in (180.3 cm).
– The 2 in (5.1 cm) hem finishes the panel at 73 in (185.4 cm).
– The 3 in (7.6 cm) tabs bring the hanging height to 76 in (193.0 cm).
Check your gauge, count at each checkpoint, and the monogram blocks will line up beautifully on both panels.
Happy crocheting!