
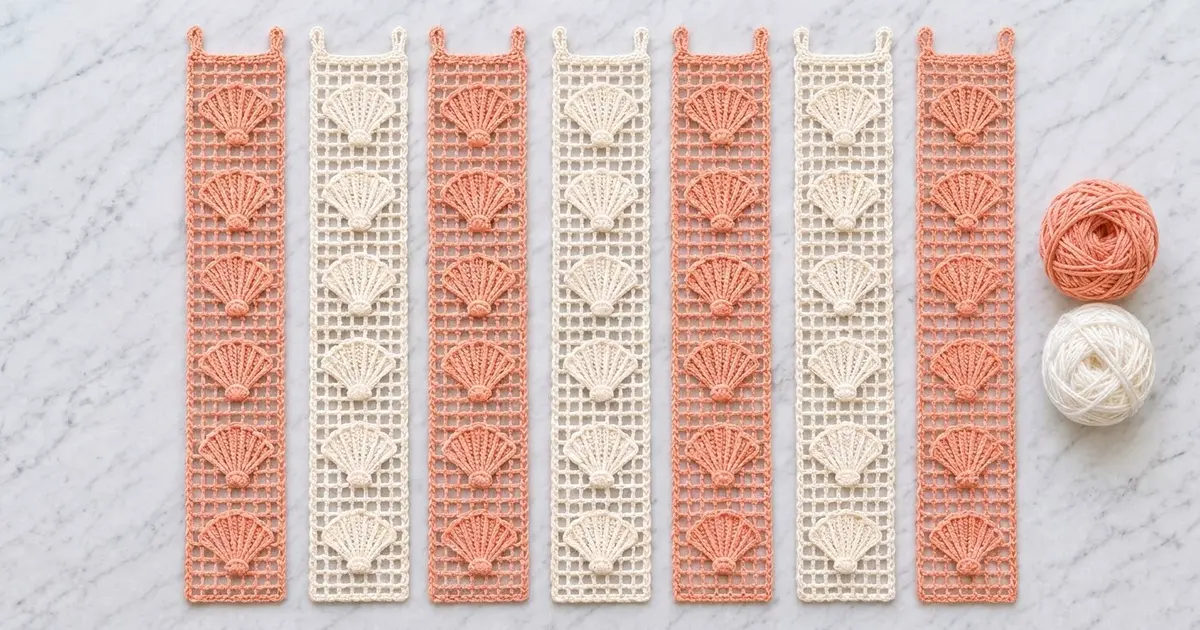
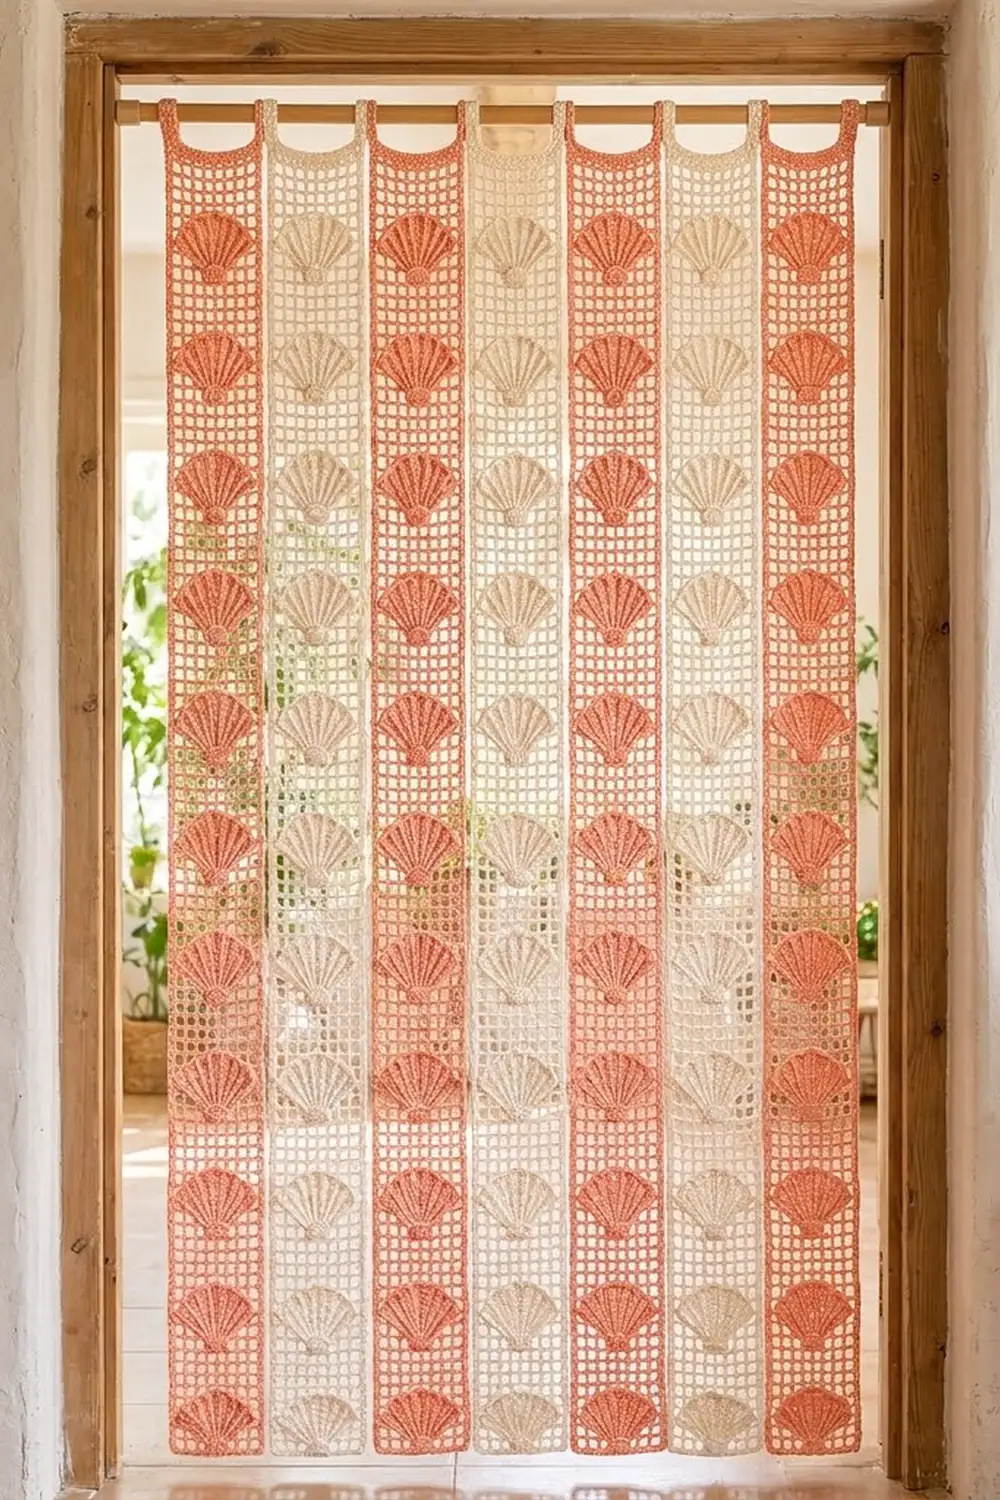
This door curtain is made from seven narrow filet-mesh strips. Each one has a column of raised scallop shells running down its center. Coral and cream strips alternate, so the curtain looks soft and coastal, and light still comes through the open grid.
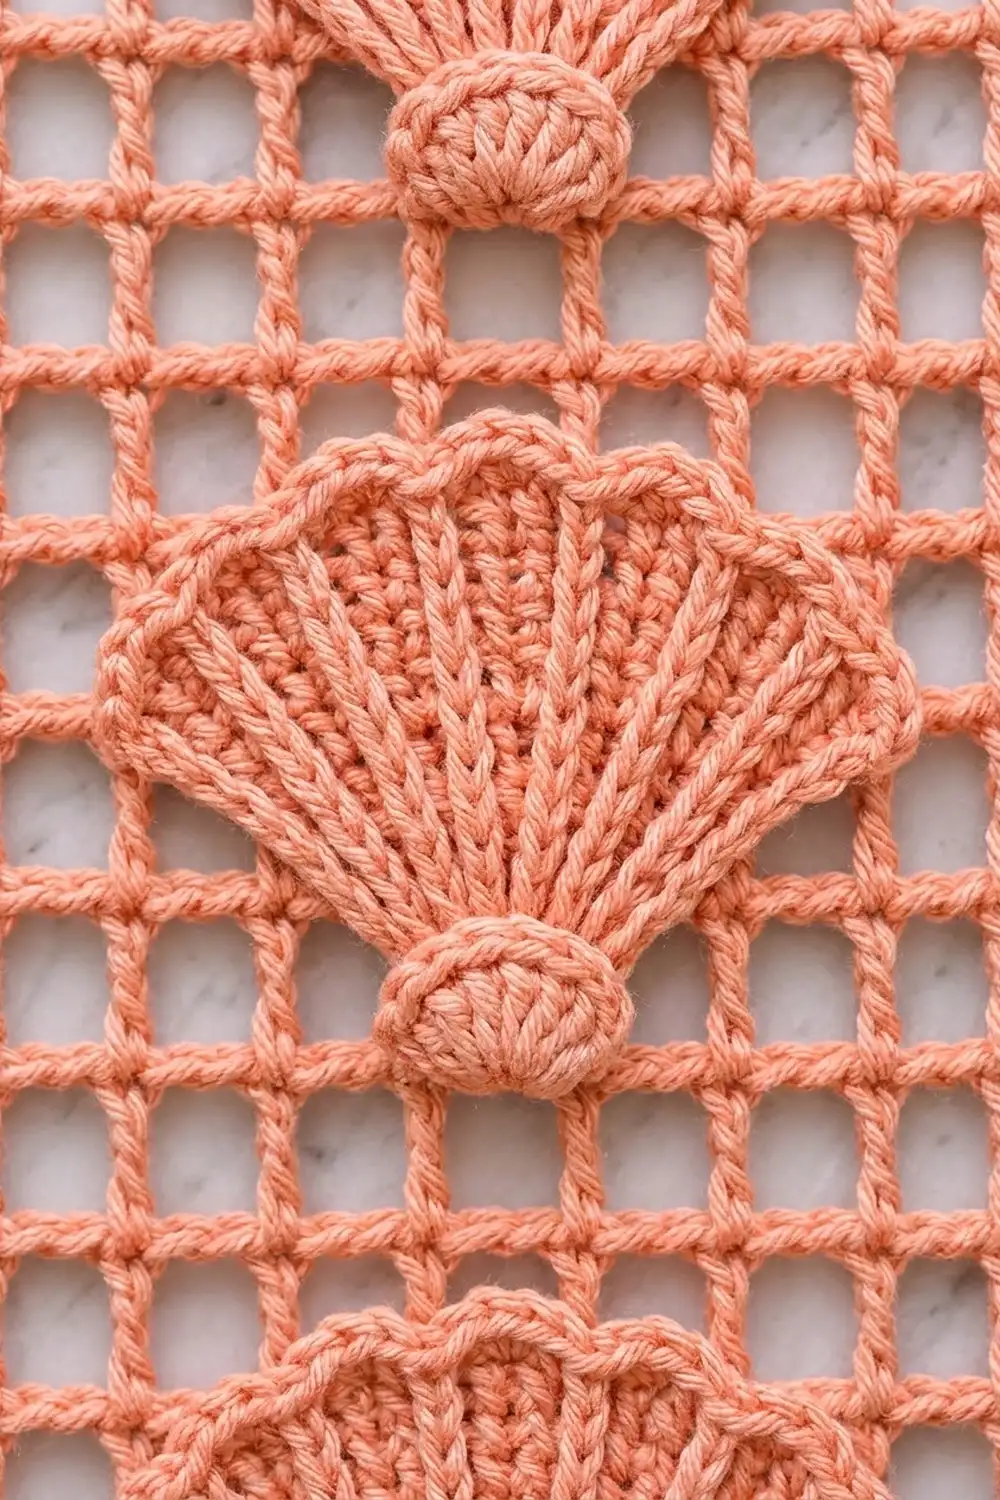
Each shell is a small fan with seven raised ribs and a scalloped top edge. A tiny rounded knob sits under its base, like the hinge of a real seashell. The shells are worked separately and sewn onto the mesh, which keeps them crisp and slightly raised.
The pattern uses US crochet terms. Each finished strip measures 5.8 in (14.7 cm) wide by 72.4 in (183.9 cm) long, not counting the hanging loops. The loops add about 1.2 in (3.0 cm).
You’ll work in this order: crochet a filet-mesh strip, make 15 shells and 15 knobs, sew them on, add a single crochet border with two hanging loops, then block. Repeat for all seven strips. The strips hang separately, so the curtain parts easily when you walk through.
Finished Size and Construction
- Finished strip size: 5.8 x 72.4 in (14.7 x 183.9 cm), plus 1.2 in (3.0 cm) loops
- Full curtain width: 7 strips x 5.8 in = 40.6 in (103.1 cm) of fabric, for a rod about 42 in (106.7 cm) wide
- Skill level: Intermediate
- Terminology: US
- Yarn weight: DK (light worsted) cotton
- Hook: 4.0 mm (G-6)
- Number of pieces: 7 strips, 105 shells, 105 knobs
- Layout: 7 strips side by side, colors alternating, hung separately
- Strip size before border: 9 meshes x 120 rows = 5.4 x 72 in (13.7 x 182.9 cm)
- Border depth: 1 round of sc, 0.2 in (0.5 cm) on each edge
- Shell size: 3 in (7.6 cm) wide x 1.5 in (3.8 cm) tall; the knob is 0.8 x 0.5 in (2.0 x 1.3 cm)
Materials
Yarn: Use a smooth mercerized or combed DK cotton, about 110 m per 50 g. Cotton hangs straight and holds the mesh squares open. Avoid fuzzy or very stretchy fibers, which blur the grid and make long strips grow.
- Coral: 750 g (about 1,650 m) for 4 strips
- Cream: 550 g (about 1,210 m) for 3 strips
One complete strip uses about 160 g (352 m). The quantities above include a margin for the gauge swatch, tails and sewing yarn.
Tools:
– 4.0 mm (G-6) hook
– Tapestry needle
– Stitch markers
– Rust-proof pins
– Measuring tape
– Blocking mats or a clean towel
– Spray bottle
– Scissors
Abbreviations (US Terms)
- ch – chain
- sl st – slip stitch
- sc – single crochet
- hdc – half double crochet
- dc – double crochet
- FPdc – front post double crochet
- sp – space
- st(s) – stitch(es)
- RS / WS – right side / wrong side
Special stitch: FPdc. Yarn over and insert the hook from front to back to front around the post of the stitch. Yarn over and pull up a loop, then finish as a regular dc.
Mesh: One mesh is 1 dc and ch 2, sitting over a ch-2 sp or 2 skipped chains, and it is closed by the next dc.
Gauge and Checkpoints
Mesh gauge: 5 meshes x 5 rows = 3 x 3 in (7.6 x 7.6 cm). One mesh is 0.6 in (1.5 cm) wide and one row is 0.6 in (1.5 cm) tall.
Border gauge: 5 sc = 1 in (2.5 cm).
Test one piece first. Work Rows 1–8 of the first strip. That’s one shell block, and it should measure 5.4 x 4.8 in (13.7 x 12.2 cm). Make one shell too, and check that it measures 3 in (7.6 cm) across.
Checkpoints for the strip body:
– After Row 8: 4.8 in (12.2 cm) long
– After Row 40: 24 in (61.0 cm)
– After Row 80: 48 in (121.9 cm)
– After Row 120: 72 in (182.9 cm)
– The width should stay at 5.4 in (13.7 cm) the whole way
If your piece is too big, go down to a 3.75 mm hook. If it’s too small, go up to a 4.5 mm hook. If only the length is off, check the height of your dc. Pull each one up fully rather than changing the number of rows, so the shell spacing stays correct.
Strip (Make 7)
Ch 32.
Row 1 (RS): Dc in the 8th ch from the hook. Ch 2, skip 2 ch, dc in the next ch, repeat from * to * across. Turn. (9 meshes; 10 dc)
The first 7 skipped chains make the first mesh. 32 − 8 = 24 chains remain, which is 8 more repeats of 3 chains, giving 9 meshes in total.
Row 2: Ch 5 (counts as dc and ch 2). Skip the first ch-2 sp, dc in the next dc. Ch 2, dc in the next dc, repeat across. Work the last dc in the 3rd ch of the turning ch. Turn. (9 meshes; 10 dc)
Rows 3–120: Repeat Row 2. (120 rows; 9 meshes per row)
Fasten off. Place a marker on Row 1 so you know which end is the bottom.
Shell blocks: The strip has 15 blocks of 8 rows each (rows 1–8, 9–16, and so on up to 113–120). Each block gets one shell. The shell covers meshes 3 to 7, centered over mesh 5, the middle mesh.
Shell (Make 15 per Strip, in the Strip’s Color)
Make a magic ring.
Row 1 (WS): Ch 3 (counts as dc), work 8 dc in the ring. Pull the ring closed only until the stitches lie as a flat half-circle. Do not join. Turn. (9 dc)
Row 2 (RS – ribs): Ch 3 (counts as dc), dc in the first st. FPdc around the next dc, then dc in the top of that same dc. Repeat from * to * 7 times. Work 2 dc in the top of the turning ch. Turn. (18 sts: 2 + 14 + 2; 7 raised ribs)
Working 2 stitches into every stitch doubles the count and keeps the fan flat. The FPdc stitches stand up as the 7 ribs.
Row 3 (WS – scallops): Ch 1, sc in the first 3 sts. (Hdc, dc, hdc) in the next rib st, sc in the next dc. Repeat from * to * 6 times. Work (hdc, dc, hdc) in the next rib st, then sc in the last 2 sts. (32 sts: 3 + 24 + 3 + 2; 7 scallops)
Fasten off, leaving an 18 in (45.7 cm) tail for sewing.
Checkpoint: The shell should measure 3 in (7.6 cm) across its flat base and 1.5 in (3.8 cm) tall, with one scallop at the top of each rib.
Knob (Make 15 per Strip, in the Strip’s Color)
Make a magic ring. Ch 1, then work (sc, hdc, 3 dc, hdc, sc) in the ring. Pull the ring closed until the stitches form a small rounded half-circle. (7 sts)
Fasten off, leaving an 8 in (20.3 cm) tail.
Checkpoint: The knob should measure 0.8 in (2.0 cm) wide and 0.5 in (1.3 cm) tall.
Make All Pieces
Coral: 4 strips, 60 shells, 60 knobs
Cream: 3 strips, 45 shells, 45 knobs
Curtain layout (C = coral, W = cream; strips hang left to right on the rod):
| C | W | C | W | C | W | C |
Coral strips go on both outer edges and in the center. Each strip carries a single column of 15 shells.
Joining (Sewing the Shells and Knobs to the Strips)
The joined pieces are the shells and knobs, which are sewn onto their strip. The strips themselves are never sewn together.
Placement in each 8-row block:
– Lay the strip RS up with Row 1 at the bottom.
– Center the shell’s flat base on the top of Row 2 of the block, with the fan opening upward.
– The base spans meshes 3 to 7, which is 5 meshes or 3 in (7.6 cm).
– The scallops reach into Row 5. Rows 6–8 stay open.
– Tuck the straight edge of the knob 0.25 in (0.6 cm) under the center of the shell’s base, with the rounded edge pointing down into Row 2.
Stitch-to-stitch logic: Use the tail and whipstitch through the back loop of each Row 3 shell stitch and into the mesh strand directly underneath, either a dc post or a chain. The outer edge has 32 stitches over about 5 meshes, so you’ll catch the mesh roughly every 3rd shell stitch. Then sew straight across the base. Sew the knob around its 7 stitches, catching the shell base where they overlap.
Tension: Sew snugly but don’t pull. The mesh squares under and around the shell should stay square. If the grid puckers, loosen the stitches.
Size checkpoint: After sewing all 15 shells, the strip should still measure 5.4 x 72 in (13.7 x 182.9 cm), and the shells should sit 4.8 in (12.2 cm) apart, center to center.
Border and Hanging Loops
Border gauge: 5 sc = 1 in (2.5 cm).
Rnd 1: With RS facing, join yarn in the last dc of Row 120 (the top corner).
- Top edge: 3 sc in the corner st. 2 sc in the next ch-2 sp, sc in the next dc, repeat from * to * 8 times. 2 sc in the last ch-2 sp, then 3 sc in the corner st (the 3rd ch of the turning ch). (32 sc: 28 worked into the stitches and spaces + 4 extra corner sc)
- Side edge: Work 3 sc around each row-end post, from Row 120 down to Row 1. (360 sc)
- Bottom edge: Working into the foundation chain, 3 sc in the corner ch. 2 sc in the next skipped-ch sp, sc in the base of the next dc, repeat from * to * 8 times. 2 sc in the last sp, then 3 sc in the corner ch. (32 sc)
- Second side: Work 3 sc around each row-end post, from Row 1 up to Row 120. (360 sc)
Sl st to the first sc. (784 sc total)
Why the math works: Each mesh is 3 sts wide (1 dc + 2 ch). Nine meshes plus the closing dc gives 28 base sts across. Each corner adds 2 extra sc to turn the corner flat, giving 28 + 4 = 32. On the long sides, 120 rows x 3 sc = 360 sc. At 5 sc per inch that’s 72 in, which matches the strip length, so the edges won’t ruffle or draw in.
Hanging loops: Number the 32 top sts 1–32. Sts 2 and 31 are the corner center stitches.
- Loop 1: Join with a sl st in st 2. Ch 14, sl st in st 7. Work 20 sc into the ch-14 loop, then sl st in st 7. Fasten off.
- Loop 2: Join with a sl st in st 26. Ch 14, sl st in st 31. Work 20 sc into the loop, then sl st in st 31. Fasten off.
Each loop arches about 1.2 in (3.0 cm) above the strip and fits a rod up to 1 in (2.5 cm) in diameter.
Checkpoint: The bordered strip should measure 5.8 x 72.4 in (14.7 x 183.9 cm).
Final Blocking
- Weave in all ends along the dc posts so they stay hidden in the mesh.
- Pin the strip flat to 5.8 x 72.4 in (14.7 x 183.9 cm), working in sections if your mats are short.
- Pin through the border every 2 in (5.1 cm), keeping the long edges straight.
- Push the mesh squares into shape so each one is 0.6 in (1.5 cm) square.
- Spray until damp. Gently shape each shell into a smooth half-circle and lift the ribs slightly with your fingers.
- Leave to dry completely, then unpin.
- Slide the loops onto the rod in color order and space the strips evenly.
Final Quality-Control Checklist
- Every strip has 120 rows and 9 meshes across.
- There are 15 shells per strip, each centered over mesh 5.
- Shells are 4.8 in (12.2 cm) apart, center to center.
- Every shell has 7 ribs and 7 scallops.
- Every knob points downward, tucked under its shell’s base.
- The border count is 784 sc, with 32 on each short edge and 360 on each long side.
- Both loops are the same size and at the same height.
- All strips are the same length, within 0.5 in (1.3 cm) of each other.
Troubleshooting
The strip is getting narrower. You may be missing the last dc in the turning ch. Count 10 dc on every row.
The shell cups upward. Your Row 2 tension is too tight. Go up a hook size for the shells only.
The shell ruffles. Your stitches are too loose. Go down half a hook size.
The border waves along the sides. Work 2 sc in every 3rd row end instead of 3, and keep the count consistent on both sides.
One strip hangs longer than the others. Cotton relaxes under its own weight. Hang all seven strips for 24 hours, then re-block any that stand out.
Mesh squares look slanted. Make your ch-2 stitches the same size, and block them square.
Care
Hand wash cold or machine wash on a gentle cycle in a mesh bag, then lay flat to dry. Re-block lightly if the strips have stretched.
Final Notes
Here’s how the measurements build on each other. One mesh is 0.6 in (1.5 cm). Nine meshes make a 5.4 in (13.7 cm) strip, and 120 rows make 72 in (182.9 cm). That gives 15 shell blocks of 4.8 in (12.2 cm). The border adds 0.2 in (0.5 cm) on each edge, so each strip finishes at 5.8 x 72.4 in (14.7 x 183.9 cm). Seven strips make a 40.6 in (103.1 cm) curtain. If you check each link in that chain as you go, the curtain will hang straight and even.
Happy crocheting!