
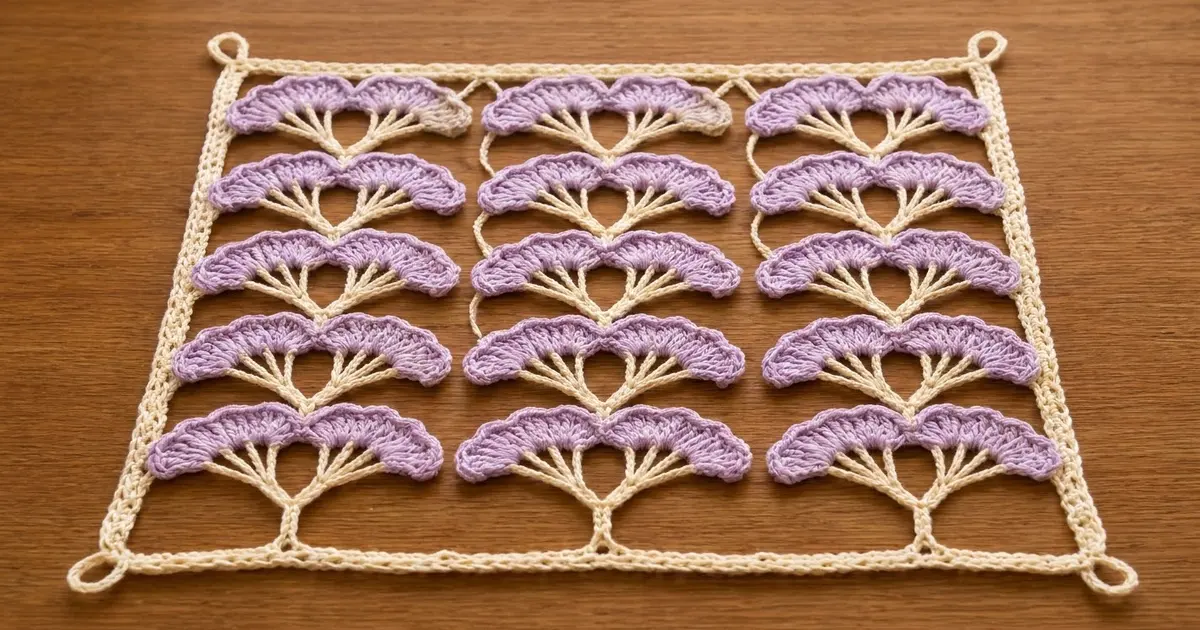
This airy lace panel is built from lavender fans that look like ginkgo leaves. They sit in neat tiers on fine cream stems. Each tier holds a pair of scalloped half-fans, and a slim corded stem rises between them to the next pair. The result looks botanical and a little vintage, and it’s light enough to stitch onto a pillow front, frame, or hang on its own.
The palette is soft lavender on warm cream. The cream framework uses chains and slip stitches for crisp lines, while the lavender fans use double crochet for solid color and texture. The pattern uses US crochet terms throughout.
The finished panel measures 14.5 x 16 in (36.8 x 40.6 cm) and has a small hanging loop at each corner. Before the border, the joined panel measures 13.5 x 15 in (34.3 x 38.1 cm).
Here’s how it comes together. You make three identical strips. Each strip starts as a cream “tree” with a corded stem and spokes, then gets ten lavender fans, then a chain rail around its edges. Next you slip stitch the strips together rail to rail. Finally you work two rounds of border.
Finished Size and Construction
- Finished size: 14.5 x 16 in (36.8 x 40.6 cm), not counting the corner loops
- Skill level: Intermediate
- Terminology: US crochet terms
- Yarn weight: Sport (#2) mercerized cotton
- Hook: 3.25 mm (US D/3)
- Number of pieces: 3 strips, joined into 1 panel
- Layout: 3 strips across x 1 high; each strip holds 5 tiers of fan pairs
- Strip size: 4.5 x 15 in (11.4 x 38.1 cm)
- Size before border: 13.5 x 15 in (34.3 x 38.1 cm)
- Border depth: 0.5 in (1.3 cm) on every side
Materials
Choose a smooth mercerized cotton. It gives the corded stems sharp definition and makes the fans hold their shape after blocking. Soft acrylic or fuzzy blends will blur the fine lines.
- Color A, Lavender: 60 g, about 186 m (203 yd)
- Color B, Cream: 50 g, about 155 m (170 yd)
Tools:
- 3.25 mm (US D/3) crochet hook
- Tapestry needle
- Scissors
- Rust-proof pins and a blocking mat
- Spray bottle
- Ruler or tape measure
These quantities include a margin of about 15% for gauge swatching and weaving in ends.
Abbreviations (US Terms)
- ch – chain
- sl st – slip stitch
- sc – single crochet
- dc – double crochet
- sk – skip
- sp(s) – space(s)
- st(s) – stitch(es)
- RS – right side
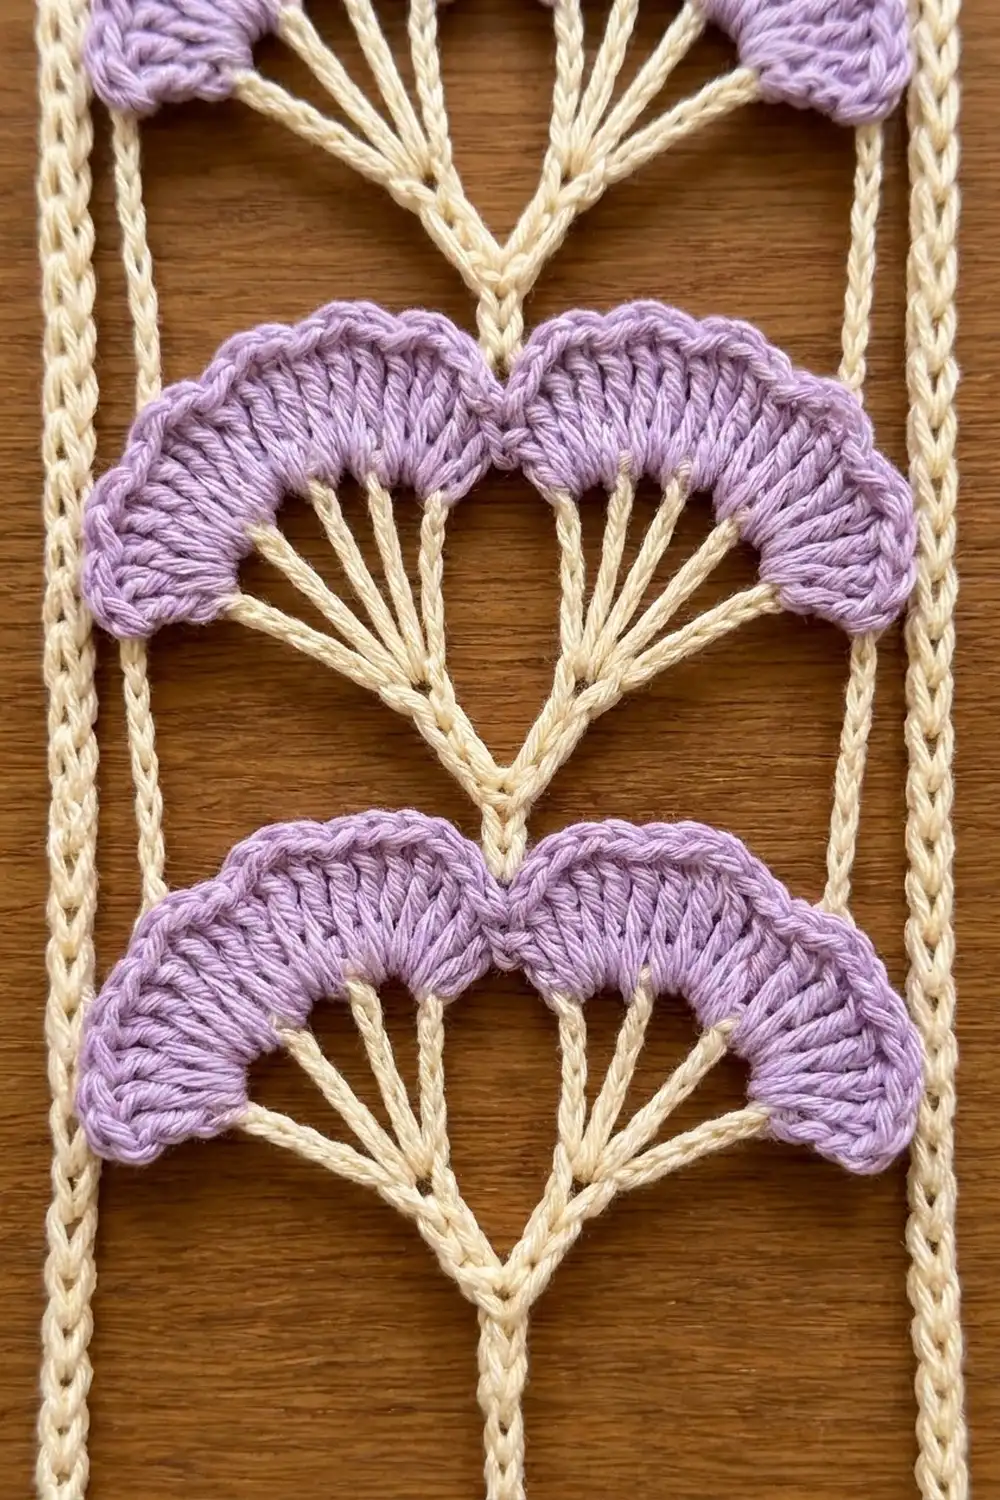
Special stitch – Corded Spoke: Ch 7. Sl st in 2nd ch from hook and in next 5 ch (6 sl sts), then sl st in the node ch you started from. The ch you skipped at the far end is the tip ch. Each spoke is 6 sts long, about 1 in (2.5 cm).
Gauge and Checkpoints
Chain gauge: 6 ch = 1 in (2.5 cm). Every measurement in this pattern depends on that number, because the rails and the base are chains.
Fan gauge: Rows 2–4 of one fan are about 1 in (2.5 cm) deep after blocking.
Border gauge: 6 sc = 1 in (2.5 cm); 2 sc rounds = 0.5 in (1.3 cm).
Make one complete strip, rails included, and block it before you start the others. Check these measurements:
- Base: 27 sl sts = 4.5 in (11.4 cm).
- Spine: from the base to node 5 measures 13 in (33.0 cm), because 78 ch ÷ 6 = 13 in.
- Fan pair: about 4 in (10.2 cm) across, from the outer end of one fan to the outer end of the other.
- Blocked strip: 4.5 x 15 in (11.4 x 38.1 cm).
If your strip comes out too big, go down 0.25 mm in hook size. If it’s too small, go up 0.25 mm. Try to keep the stitch counts as written, because the joining and border math relies on them.
Strip Framework (Cream, Make 3)
The framework is one continuous cream piece: the base, then the spine with five nodes, then the corded return down to the base.
Base: With B, ch 28. Sl st in 2nd ch from hook and in next 12 ch (13 sl sts). Sl st in next ch. This is the center st, number 14 of 27. Don’t finish the base yet.
Tier 1 stem: Ch 6 (1 in / 2.5 cm). The last ch you made is node 1.
Node spokes: Work 5 Corded Spokes, fanning them to the left. Then work 5 Corded Spokes fanning to the right. That’s 10 spokes on the node.
Tiers 2–5: Ch 18 (3 in / 7.6 cm). The last ch is the next node. Work 10 Corded Spokes as before. Repeat from * to * 3 more times. You now have 5 nodes and 50 spokes.
Return: Sl st in each stem ch back down to the base: 18 + 18 + 18 + 18 + 6 = 78 sl sts. This turns the stem into a firm cord. Sl st in each of the remaining 13 base ch.
Base count: 13 + 1 + 13 = 27 sts. Fasten off.
Lay the framework flat. At each node, spread the left spokes over a quarter circle, running from horizontal up to almost vertical. Do the same with the right spokes.
Lavender Fans (10 Per Strip)
Each node gets two fans. Work every fan with RS facing, starting at its outermost (most horizontal) spoke.
Row 1 (arc row): With A, join with sl st in the tip ch of spoke 1. [Ch 3, sl st in tip ch of next spoke] 4 times. You’ll have 4 ch-3 sps. Turn.
Row 2: Ch 3 (counts as dc). Work 4 dc in each ch-3 sp, then dc in the last sl st. Count: 18 dc. Turn.
Row 3 (growth row): Ch 3 (counts as dc). Dc in next st. [2 dc in next st, dc in next st] 7 times. Dc in last 2 sts. Count: 25 dc. That’s 1 + 1 + 21 + 2. You’ve worked into all 18 sts of Row 2. Turn.
Row 4 (scallop edge): Ch 1, sc in first st. [Sk 1 st, 5 dc in next st, sk 1 st, sc in next st] 6 times. Count: 6 scallops and 7 sc, which uses all 25 sts. Fasten off.
Repeat on all 10 spoke groups. The two fans at each node frame the stem rising between them, so each pair looks like a wide pair of wings. The top pair’s inner ends sit about 2 in (5.1 cm) above node 5, at the 15 in (38.1 cm) line.
Rails and Top Edge (Cream)
The rails give the strip straight sides with exact lengths, so the joining and border will work. You’ll make them in one trip around the strip.
Right rail: With B, join with sl st in the last base st (bottom right). Ch 9. Sl st in the outer end of Row 3 of the right fan on tier 1. [Ch 18, sl st in the same spot on the right fan of the next tier] 4 times. Ch 9.
Count: 9 + 72 + 9 = 90 ch, or 15 in (38.1 cm).
Top edge: Ch 13. Sl st in the last sc of Row 4 at the inner top end of the right fan on tier 5. Sl st in the first sc at the inner top end of the left fan on tier 5. Ch 14.
Count: 13 + 14 = 27 ch, or 4.5 in (11.4 cm).
Left rail: Ch 9. Sl st in the outer end of Row 3 of the left fan on tier 5. [Ch 18, sl st in the same spot on the left fan of the next tier down] 4 times. Ch 9. Sl st in the first base st.
Count: 90 ch. Fasten off.
The tacking sl sts go into the fans, not into the rail, so they don’t count as rail sts. Each strip has 27 sts across the bottom, 27 ch across the top, and 90 ch up each side.
Block the first strip and check that it measures 4.5 x 15 in (11.4 x 38.1 cm) before you make strips 2 and 3.
Make All Pieces
- Framework (Color B): 3 total
- Fans (Color A): 30 total, 10 per strip
- Rails and top edge (Color B): 3 total
Layout grid, viewed from RS:
[Strip 1] [Strip 2] [Strip 3]
 5 tiers   5 tiers   5 tiers
Block all three strips to the same size before you join them.
Joining
Method: Slip stitch the rails together, working 1 to 1.
Lay Strip 1 and Strip 2 side by side with RS facing up. With B, join with sl st through the first ch of Strip 1’s right rail and the first ch of Strip 2’s left rail at the bottom. Then sl st through both layers in each matching ch pair up the seam. Count: 90 sl sts. Fasten off. Join Strip 2 to Strip 3 the same way.
Stitch-to-stitch logic: Each rail has 90 ch, so the counts match exactly and nothing is added or skipped. The seam joins two chains into one cord without adding width.
Tension: Keep each sl st as loose as the chains themselves. If you pull them tight, the seam will shorten and the panel will bow.
Checkpoint: The joined panel should measure 13.5 x 15 in (34.3 x 38.1 cm). That’s 3 x 4.5 in across and 15 in tall.
Border (Cream)
Border gauge: 6 sc = 1 in (2.5 cm).
Round 1: With RS facing, join B in the first base st at the bottom left.
- Bottom: Ch 1, sc in each base st across all three strips, for 81 sc (3 x 27). Ch 2 for the corner.
- Right side: Sc in each rail ch, for 90 sc. Ch 2.
- Top: Sc in each top-edge ch, for 81 sc. Ch 2.
- Left side: Sc in each rail ch, for 90 sc. Ch 2.
- Sl st to the first sc.
Count: 342 sc (81 + 90 + 81 + 90) and 4 ch-2 corner sps.
Each side count includes the end stitches of that side. The corners are ch-2 spaces between the sides, so no stitch is counted twice. Nothing is added at the seams, either. The 81 bottom sts come from 3 strips x 27 sts each.
Round 2: Ch 1. Sc in each sc around. In each corner ch-2 sp, work (sc, ch 8, sc). Sl st to the first sc. Fasten off.
- Bottom and top: 83 sc each (81 + 1 corner sc at each end)
- Each side: 92 sc (90 + 2)
- Count: 350 sc and 4 ch-8 corner loops
Why the math works: The bottom and top have 81 sts. At 6 sts per inch, that’s 13.5 in (34.3 cm), which matches the joined panel exactly, so the border lies flat. The sides have 90 sts, or 15 in (38.1 cm), which also matches. The extra sc in each corner only turns the corner. Two rounds add 0.5 in (1.3 cm) on every side, so the final size is 14.5 x 16 in (36.8 x 40.6 cm).
Final Blocking
- Weave in all ends along the cream cords or inside the fan stitches.
- Soak the panel in cool water for 10 minutes, then press out the water in a towel. Don’t wring it.
- Pin the four border corners to 14.5 x 16 in (36.8 x 40.6 cm).
- Pin the border edges straight every 1 in (2.5 cm).
- Pin each stem straight and centered in its strip.
- Spread each fan’s spokes evenly. Then pin 2–3 scallops per fan so every scallop is rounded.
- Pin the corner loops open into small rings.
- Mist the panel lightly and let it dry completely before you unpin it.
Final Quality-Control Checklist
- 3 strips, each with 5 fan pairs, for 30 fans in total
- Every fan has 6 scallops
- Every rail has 90 ch, and every base and top edge has 27 sts
- Seams are flat and the same length as the rails
- Border Round 1 has 342 sc; Round 2 has 350 sc plus 4 loops
- Finished size is 14.5 x 16 in (36.8 x 40.6 cm)
- Corners are square and the stems are vertical
- All ends are secure and hidden
Troubleshooting
Fans ruffle: Your Row 3 tension is loose. Go down a hook size for the lavender only.
Fans cup: The ch-3 arcs are too short or tight. Chain more loosely in Row 1.
Strip is shorter than 15 in (38.1 cm): Your chains are tight. Go up a hook size for the framework and rails.
Panel bows at a seam: The joining sl sts are too tight. Remove the seam and rework it loosely.
Border waves: Check that you have exactly 81 and 90 sc per side, and that you didn’t work into the tacking sl sts.
Spokes twist: Twisted chains in the spokes are the usual cause. Untwist each spoke before you sl st back.
Care
Hand wash in cool water with mild soap, then lay flat to dry, reshaping the fans while damp. If you’ve appliquéd the panel to a pillow, spot clean it or wash it on a gentle cycle inside a mesh bag.

Final Notes
Everything in this panel follows one chain of measurements:
- 6 ch = 1 in (2.5 cm)
- Each strip is 27 x 90 sts, or 4.5 x 15 in (11.4 x 38.1 cm)
- Three strips joined make 81 x 90 sts, or 13.5 x 15 in (34.3 x 38.1 cm)
- Two border rounds add 0.5 in (1.3 cm) per side, for a finished size of 14.5 x 16 in (36.8 x 40.6 cm)
If your first strip measures correctly, the rest of the panel will measure correctly too. You can hang it from its corner loops, frame it, or stitch it to the front of a cream pillow, as shown.
Happy crocheting!