
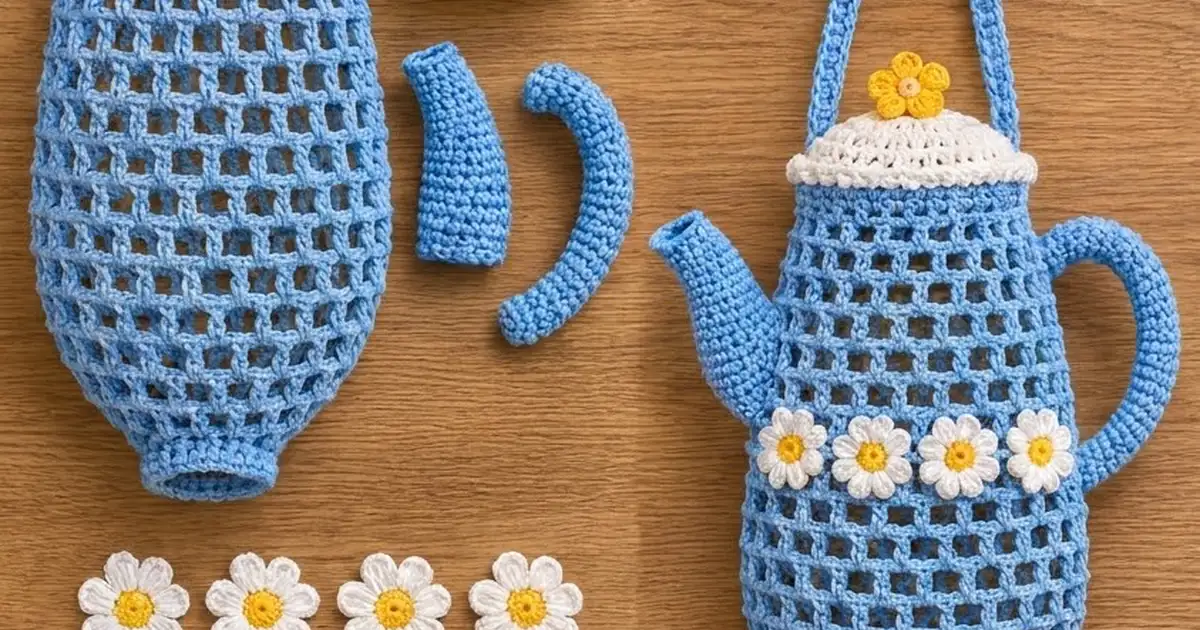
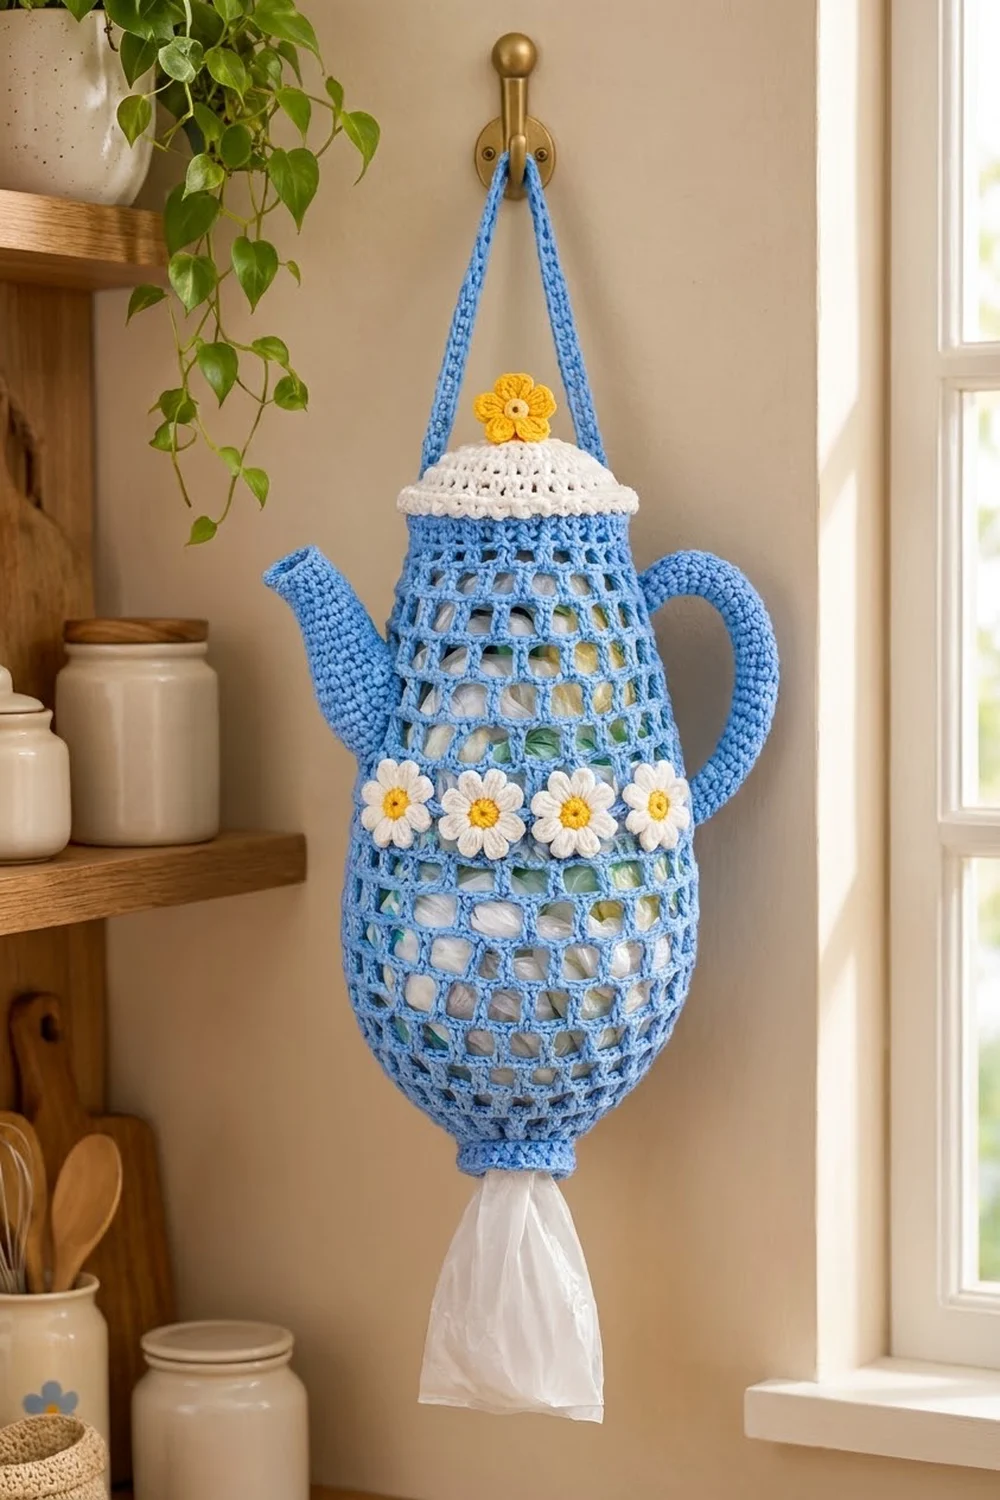
The Daisy Teapot is a kitchen plastic-bag holder shaped like a cheerful blue teapot. The open mesh body shows the bags inside, a white domed lid with a little yellow flower sits on top, and a band of four white daisies runs across the front. The bags go in at the top and come out one at a time through the solid cuff at the bottom.
The palette is sky blue, white and golden yellow, which gives it a fresh cottage-kitchen look. The style is simple. The mesh is plain dc-and-chain filet work, and the spout and handle are solid sc tubes.
This pattern uses US crochet terms. Laid flat, the finished body is 11.8 in (30.0 cm) tall, 9 in (22.9 cm) wide at its widest point and 6 in (15.2 cm) wide at the rim. With the lid on, the holder is about 13.5 in (34.3 cm) tall and about 14.5 in (36.8 cm) wide from spout tip to handle.
You work the body bottom-up in joined rounds: first a solid cuff, then mesh that widens and narrows again, and finally a solid rim. The lid, flower, spout, handle, daisies and strap are made separately and sewn on.
Finished Size and Construction
- Finished size: body 11.8 in (30.0 cm) tall × 9 in (22.9 cm) wide; overall about 13.5 in (34.3 cm) tall × 14.5 in (36.8 cm) wide
- Skill level: Intermediate
- Terminology: US
- Yarn weight: worsted (#4), cotton
- Hook: 4.5 mm (US 7)
- Number of pieces: 10 (body, lid, lid flower, spout, handle, 4 daisies, strap)
- Layout: spout on the left, handle on the right, daisies across the front, lid on top, strap above
- Body size before rim: 10.9 in (27.7 cm) tall, 6 in (15.2 cm) wide at the top
- Rim (border) depth: 0.9 in (2.3 cm)
Materials
Use a smooth 100% cotton or cotton-blend worsted yarn. Cotton holds the mesh shape and copes well with kitchen use. These amounts assume skeins of 50 g / 85 m.
- Sky blue: 150 g (255 m) for the body, spout, handle and strap
- White: 30 g (51 m) for the lid and daisy petals
- Golden yellow: 10 g (17 m) for the lid flower and daisy centers
The quantities include a margin of about 15% for your gauge swatch and any differences in tension.
Tools:
– 4.5 mm (US 7) crochet hook
– Tapestry needle
– 6 stitch markers
– Small handful of fiberfill
– Pins
– Scissors
Abbreviations (US Terms)
- ch – chain
- sl st – slip stitch
- sc – single crochet
- hdc – half double crochet
- dc – double crochet
- dc2tog – double crochet 2 together
- sp – space
- MR – magic ring
- BLO – back loop only
- rep – repeat
Special stitches:
– Regular mesh (rm): ch 2, dc in next dc. Makes 1 space.
– Mesh increase (mi): ch 2, dc in next ch-2 sp, ch 2, dc in next dc. Turns 1 old space into 2 new spaces.
– Mesh decrease (md): ch 2, dc2tog worked over the next 2 dc (first leg in the next dc, second leg in the dc after it). Turns 2 old spaces into 1 new space.
Every mesh round starts with ch 3, which counts as the first dc. In the last repeat of a round, replace the final “dc in next dc” with a sl st to the top of the beginning ch-3.
Gauge and Checkpoints
- Solid gauge: 16 sc × 18 rounds = 4 in (10.2 cm)
- Mesh gauge: 4 spaces = 3 in (7.6 cm), so 1 space = 0.75 in (1.9 cm); 10 mesh rounds = 7 in (17.8 cm), so 1 round = 0.7 in (1.8 cm)
Swatch first. Then use the bottom cuff as your test piece, because it is small and quick.
Checkpoints (measured flat):
1. After the cuff: 2.5 in (6.4 cm) wide, 1.1 in (2.8 cm) tall.
2. After Rnd 9: about 9 in (22.9 cm) wide, 3.9 in (9.9 cm) tall from the bottom edge.
3. After Rnd 13: still 9 in (22.9 cm) wide, 6.7 in (17.0 cm) tall.
4. After Rnd 19: 6 in (15.2 cm) wide, 10.9 in (27.7 cm) tall.
5. After the rim: 11.8 in (30.0 cm) tall.
If your piece is too big, change to a 4 mm (US 6) hook. If it is too small, change to a 5 mm (US 8) hook. If only your mesh rounds are too tall, pull the ch-2 snug and keep the dc posts short.
Body (Sky Blue)
Bottom Cuff
Foundation: Ch 20 and join with a sl st to the first ch, taking care not to twist the chain.
Rnd 1: Ch 1, sc in each ch around, join. (20 sc)
Rnds 2–5: Ch 1, sc in each sc around, join. (20 sc)
Check that the cuff is 5 in (12.7 cm) around and 2.5 in (6.4 cm) wide when flat.
Mesh Section
Rnd 6 (conversion): Ch 3 (counts as dc), *ch 2, skip next sc, dc in next sc; rep from * around, ending with ch 2, skip last sc, join. This round is 10 dc (one in every other sc) + 10 ch-2 sp. (10 spaces)
Rnd 7 (growth): Ch 3, *mi, rm; rep from * 5 times. (15 spaces)
Rnd 8 (growth): Ch 3, *mi, rm, rm; rep from * 5 times. (20 spaces)
Rnd 9 (growth): Ch 3, *mi, rm, rm, rm, rm; rep from * 4 times. (24 spaces)
Place a marker at each side fold: one at the beginning of the round and one 12 spaces later. Those 2 points are where the spout and handle will go.
Rnds 10–13: Ch 3, rm around. (24 spaces)
Rnd 14 (shaping): Ch 3, *md, rm 10 times; rep from * twice. Each repeat uses up 12 old spaces and makes 11 new ones. (22 spaces)
Rnd 15: Ch 3, *md, rm 9 times; rep from * twice. (20 spaces)
Rnds 16–17: Ch 3, rm around. (20 spaces)
Rnd 18: Ch 3, *md, rm 8 times; rep from * twice. (18 spaces)
Rnd 19: Ch 3, *md, rm 7 times; rep from * twice. (16 spaces)
Start each decrease repeat at a side marker so that the taper happens under the spout and the handle, and move the markers up as you go. You now have 14 mesh rounds × 0.7 in = 9.8 in (24.9 cm) of mesh above the cuff. Do not fasten off.
Make All Pieces
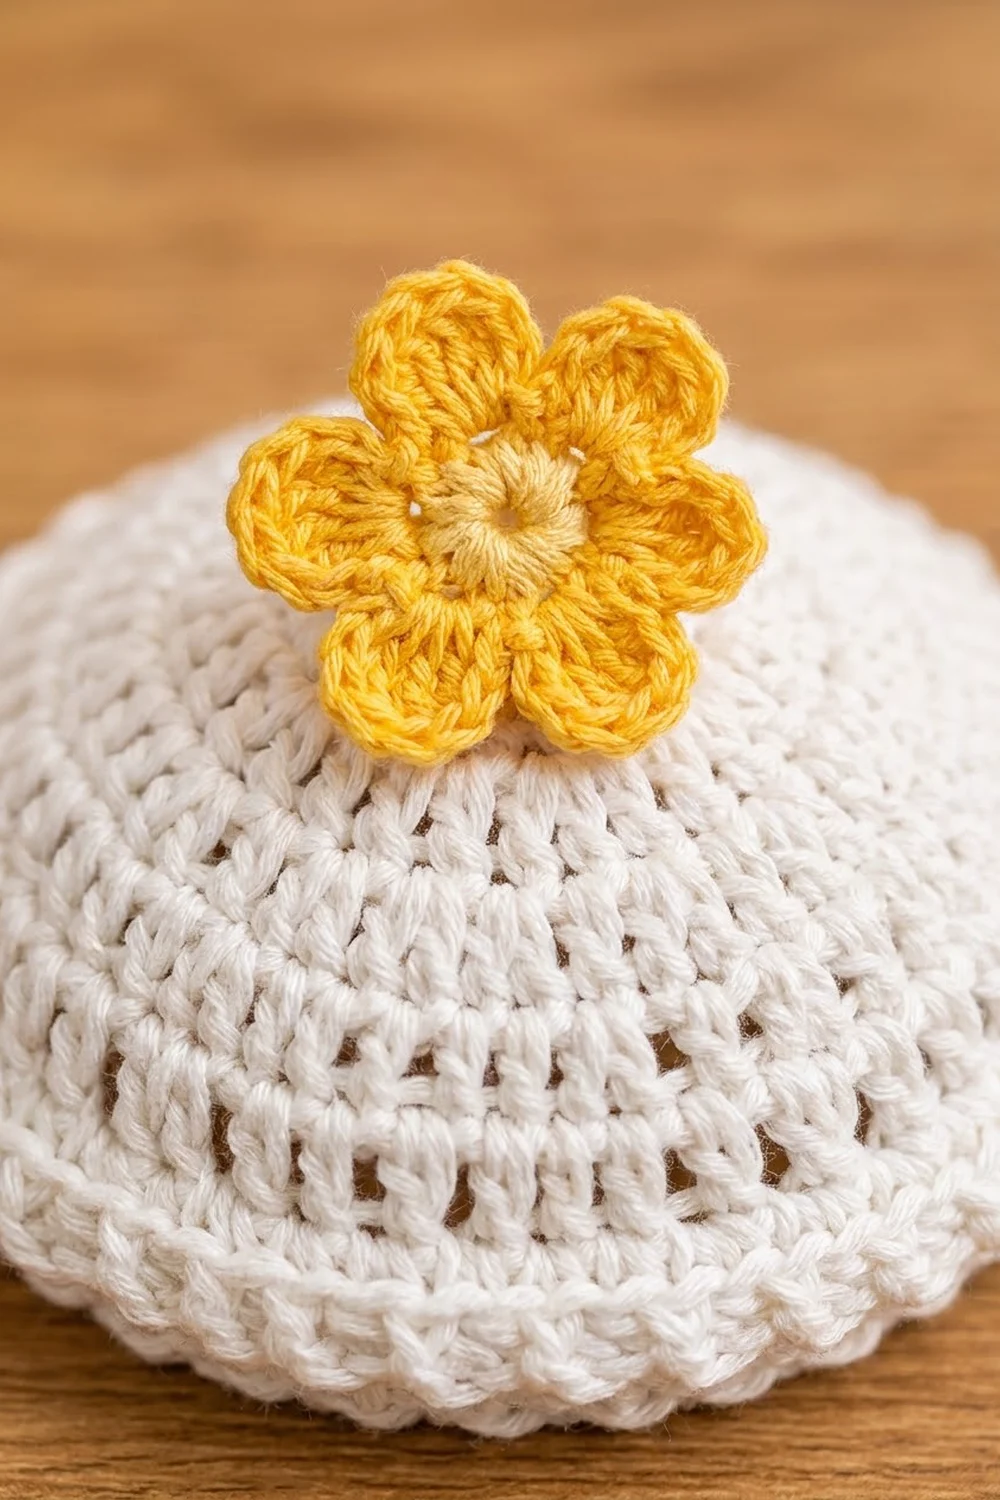
Lid (White)
Rnd 1: 6 sc in MR, join. (6)
Rnd 2: 2 sc in each st. (12)
Rnd 3: Sc 1, 2 sc in next; rep around. (18)
Rnd 4: Sc 2, 2 sc in next; rep around. (24)
Rnd 5: Sc 3, 2 sc in next; rep around. (30)
Rnd 6: Sc 4, 2 sc in next; rep around. (36)
Rnd 7: Sc 5, 2 sc in next; rep around. (42)
Rnd 8: Sc 6, 2 sc in next; rep around. (48)
The circle should now measure 3.6 in (9.1 cm) across.
Rnds 9–11: Sc around. (48) These even rounds make the sides of the dome.
Rnd 12 (brim): Sc 7, 2 sc in next; rep around. (54)
Rnd 13: Sc in BLO around. (54)
Rnd 14: Sl st loosely in each st around. (54)
Fasten off and leave a 12 in (30.5 cm) tail. Flattened, the lid is about 6.75 in (17.1 cm) wide and 1.5 in (3.8 cm) tall.
Lid Flower (Yellow)
Rnd 1: 5 sc in MR, join. (5)
Rnd 2: In each sc work (sl st, ch 2, 2 dc, ch 2, sl st). (5 petals)
Fasten off. The flower measures about 1.25 in (3.2 cm) across.
Daisies (make 4)
Rnd 1 (yellow): 8 sc in MR, join. (8) Fasten off.
Rnd 2 (white): Join white in any sc. In each sc work (sl st, ch 3, 2 dc, ch 3, sl st). (8 petals)
Fasten off. Each daisy measures about 1.75 in (4.4 cm) across.
Spout (Sky Blue)
Foundation: Ch 14 and join.
Rnd 1: Sc in each ch. (14)
Rnds 2–4: Sc around. (14)
Rnd 5: Sc 6, 2 sc in next; rep twice. (16)
Rnds 6–8: Sc around. (16)
Rnd 9: Sc 7, 2 sc in next; rep twice. (18)
Rnds 10–15: Sc 9, hdc 9. (18)
The taller hdc side bends the spout upward. Fasten off and leave a long tail. The spout is about 3.5 in (8.9 cm) long. Stuff it lightly, but only the outer half.
Handle (Sky Blue)
Foundation: Ch 10 and join.
Rnd 1: Sc in each ch. (10)
Rnds 2–36: Sc 5, hdc 5. (10)
The hdc side becomes the outer curve of the C shape. Fasten off and leave a long tail. Stuff lightly. The handle is about 8 in (20.3 cm) along its inner curve and about 0.8 in (2.0 cm) thick.
Strap (Sky Blue)
Foundation: Ch 81.
Row 1: Sc in 2nd ch from hook and in each ch across. (80)
Rows 2–3: Ch 1, turn, sc across. (80)
Fasten off. The strap is 20 in (50.8 cm) long and about 0.7 in (1.8 cm) wide.
Pieces by color:
– Sky blue: body, spout, handle, strap (4 pieces)
– White: lid, plus the petals of all 4 daisies (1 piece + 4 petal rounds)
– Yellow: lid flower, plus the centers of all 4 daisies (1 piece + 4 center rounds)
Layout (front view):
            [ strap loop ]
         [  flower on lid  ]
         [  rim + lid hinge]
[spout] |   mesh Rnds 15-19 | [handle top, Rnd 18]
[spout] | D    D    D    D  | (daisies on Rnd 14)
        |   mesh Rnds 6-13  | [handle base, Rnd 12]
        |      [ cuff ]     |
Joining
Sew all the pieces with whipstitch and matching yarn. Pass the needle around the mesh bars, not through the chain spaces, and keep the tension firm but flat. If you pull too hard the mesh puckers; if you sew too loosely the parts droop.
- Spout: Pin the base into an oval about 2.25 in (5.7 cm) tall, centered on the left side marker over Rnds 14–16. Each stitch around the base catches 1 mesh bar, working around the oval.
- Handle: Sew the lower end to the right side marker at Rnd 12 and the upper end at Rnd 18, so the hdc side faces outward.
- Daisies: Center the 4 daisies across the front on Rnd 14, with their centers 2 in (5.1 cm) apart. Tack each daisy at its center and at the tip of every other petal.
- Flower: Sew the flower to the center of the lid.
Size checkpoint: Measured from spout tip to the outer edge of the handle, the holder should be about 14.5 in (36.8 cm) wide. If it is noticeably wider, angle the spout up more steeply.
Border: Top Rim and Cuff Edge
Border gauge: 16 sc = 4 in (10.2 cm).
Rnd 1 (conversion): Ch 1. Work 1 sc in each of the 16 dc and 2 sc in each of the 16 ch-2 sp, then join. That is 16 sc (one per dc) + 32 sc (added in the spaces) = 48 sc, or 24 per side when flat.
Rnds 2–4: Ch 1, sc around, join. (48 sc; 24 per side)
Fasten off.
Cuff edge: Join sky blue at the bottom foundation edge and sl st in each of the 20 ch loops, then join. (20 sl st; 10 per side) This firms up the edge the bags come out of.
Why the math works: Each side has 8 mesh spaces, and each space gets 3 sc (1 for its dc + 2 in its space), so 8 × 3 = 24 sc per side. At 4 sc per inch, 24 sc = 6 in (15.2 cm). That matches the body width at Rnd 19, so the rim neither flares nor pulls in. The 4 rim rounds add 0.9 in (2.3 cm), bringing the body to 11.8 in (30.0 cm) tall.
Finishing the top:
– Lid hinge: Center the lid on the rim and sew the back 8 stitches of the lid’s Rnd 13 to the back 8 rim stitches. That hinge is 2 in (5.1 cm) wide, and the front of the lid lifts so you can load bags.
– Strap: Sew each end 1 in (2.5 cm) down inside the rim, one at each side fold. The loop rises about 8.5 in (21.6 cm) above the rim.
Final Blocking
- Mist the body until it is evenly damp.
- Stuff a plastic grocery bag or a rolled towel into the body until it takes on the teapot curve: wide in the lower half, narrowing toward the rim.
- Pull the mesh spaces square with your fingers.
- Lay it flat and pin the rim to 6 in (15.2 cm) wide and the widest point to 9 in (22.9 cm).
- Shape the lid brim outward and flatten the daisy petals.
- Let it dry completely before you take out the pins and stuffing.
Final Quality-Control Checklist
- Cuff is 2.5 in (6.4 cm) wide and opens freely
- Mesh rounds show 10, 15, 20, 24, 22, 20, 18 and 16 spaces where stated
- Rim has 48 sc, 24 per side
- Body is 11.8 in (30.0 cm) tall
- Spout and handle sit level with each other, at the side folds
- Daisies are evenly spaced and centered on Rnd 14
- Lid lifts on its hinge and closes flat
- Strap is secure and not twisted
- All tails are woven in
Troubleshooting
- Mesh spaces lean or twist: Check that every dc goes into a dc, not into a space (except where a mi tells you to).
- Body flares too much at Rnd 7: Tighten your ch-2s, or work Rnd 7 with 14 spaces and add 1 more increase in Rnd 8.
- Rim ruffles: Work only 1 sc in some of the spaces on Rnd 1 so you reach exactly 48.
- Handle curls into a ring: Change some of the hdc to sc in the last 10 rounds.
- Lid slides off: Make the hinge 10 stitches instead of 8.
- Bags fall out of the bottom: Add 1 more sc round to the cuff to narrow the opening.
Care
Hand wash in cool water, reshape and dry flat. Avoid the dryer, which can shrink cotton and distort the mesh.
Final Notes
The measurement chain runs like this. A 20-sc cuff (2.5 in / 6.4 cm) opens into mesh that widens to 24 spaces (9 in / 22.9 cm), then tapers to 16 spaces (6 in / 15.2 cm). The 16 spaces convert to 48 rim sc, or 24 per side, which matches the 6 in (15.2 cm) top width exactly. Cuff, mesh and rim stack up to 1.1 + 9.8 + 0.9 = 11.8 in (30.0 cm). If you check each stage against its checkpoint, the lid, spout and handle will fit without any adjustment.
Happy crocheting!