

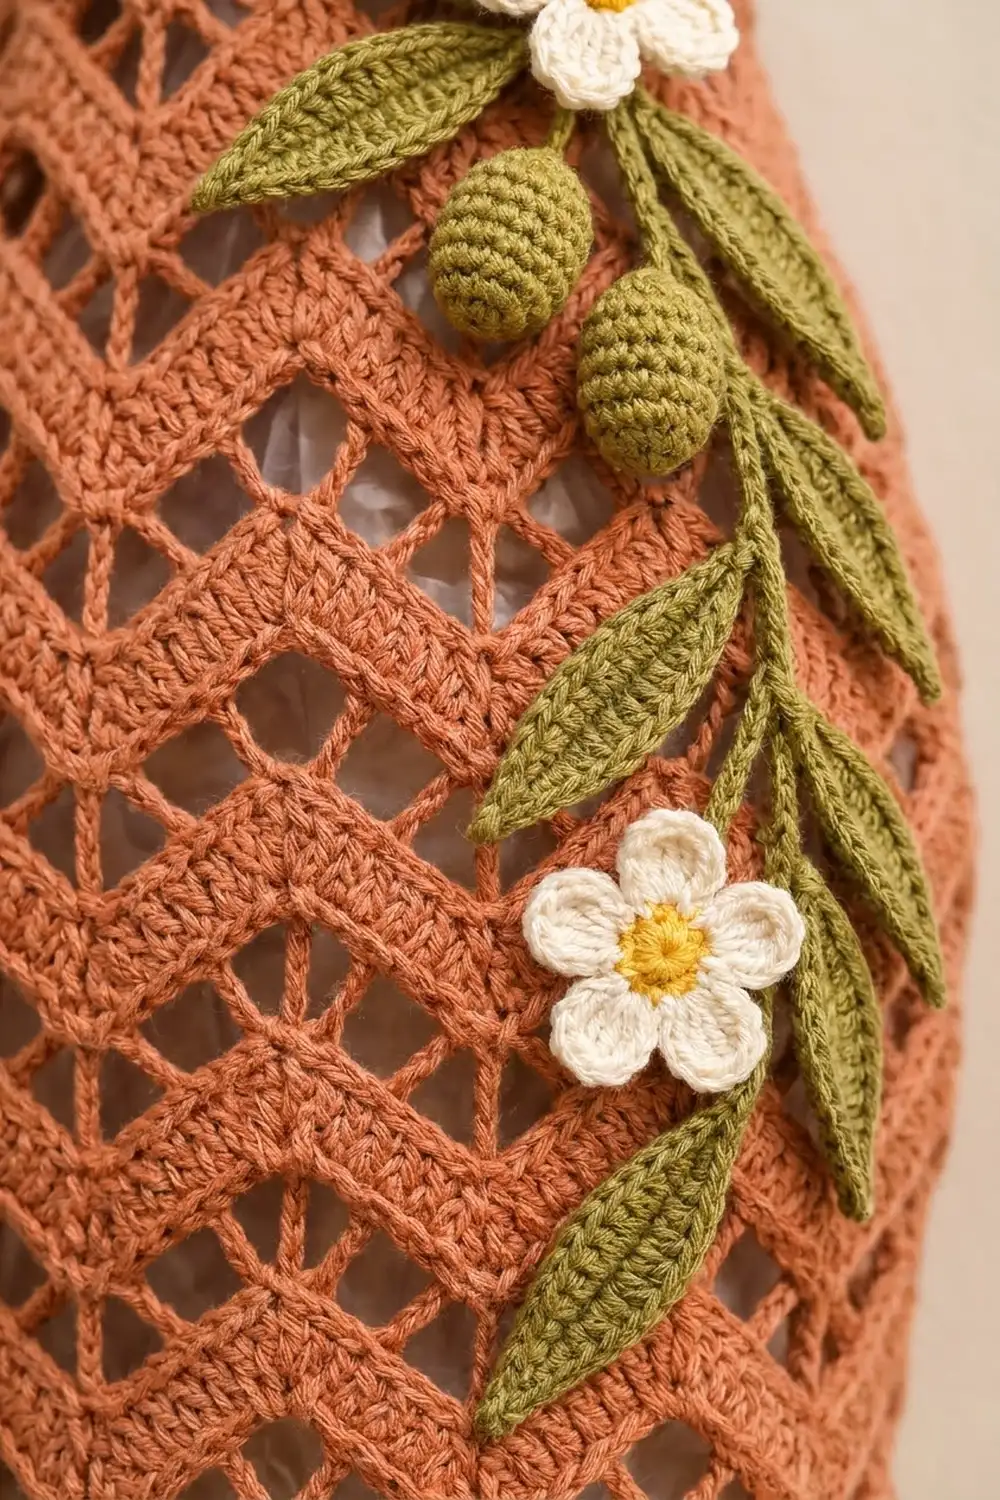
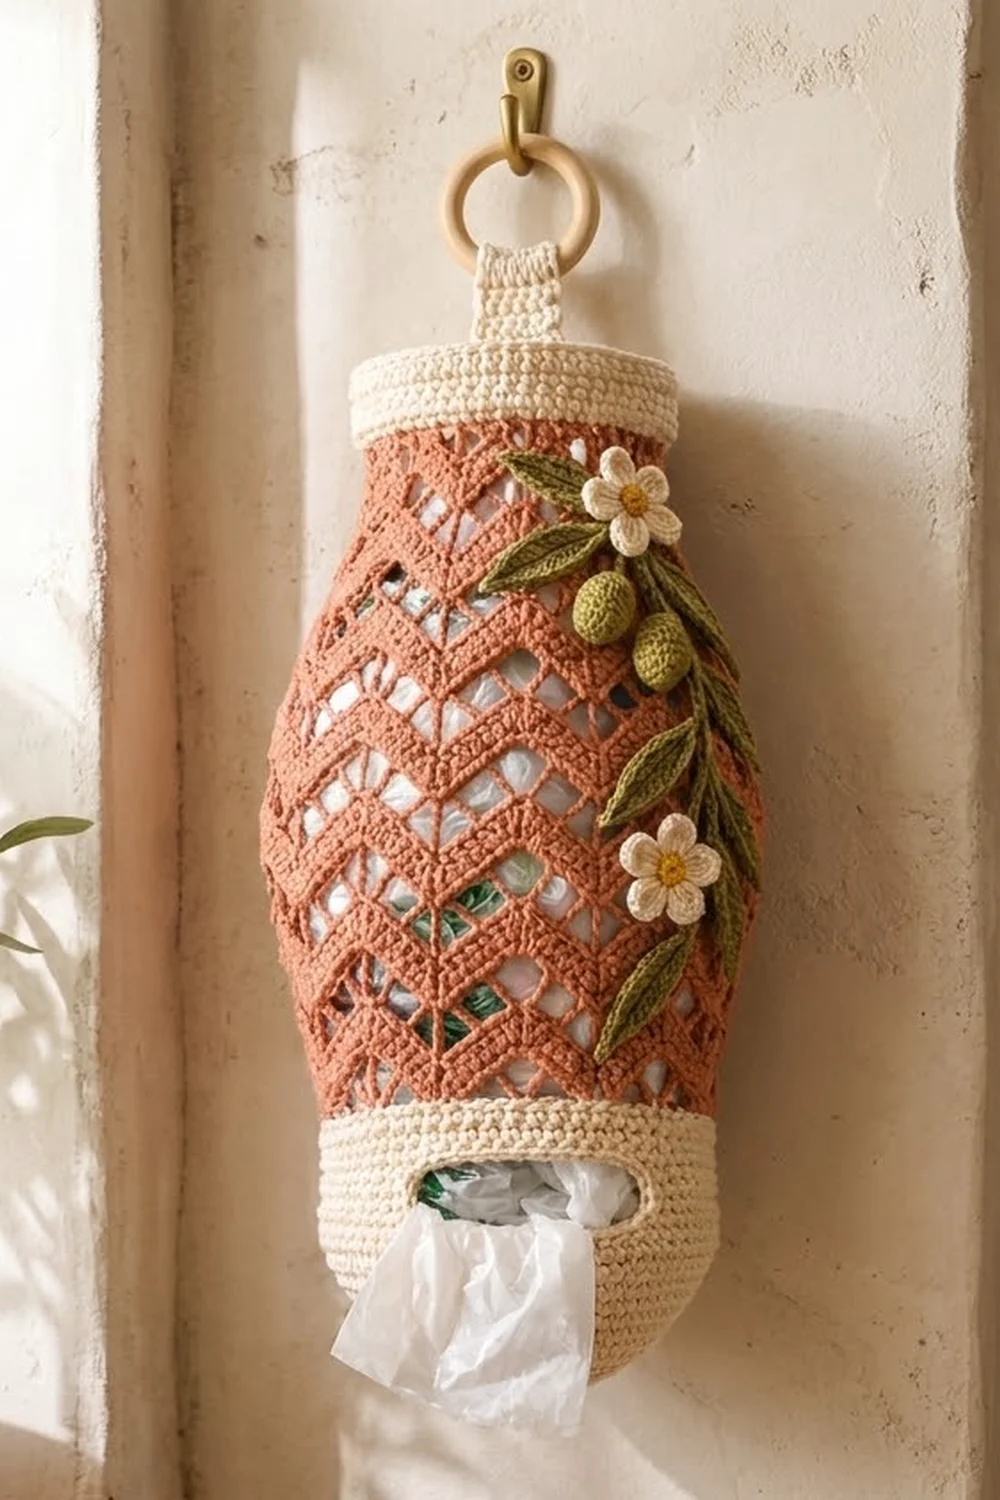
The Olive Grove Bag Holder gives your plastic bags a tidy home that also looks nice on the wall. The body is an open terracotta chevron lace. Cream bands in solid stitches frame it at the top and bottom, and a small olive branch with two daisies runs down the front.
The colors are warm terracotta, soft cream, olive green, white and a touch of yellow. The style is rustic Mediterranean kitchen: earthy, handmade and practical. A wooden ring at the top hangs from any hook or cabinet knob.
This pattern uses US crochet terms. The finished holder is about 16.5 in (41.9 cm) tall, not counting the tab and ring. It is about 9 in (22.9 cm) wide at the widest part of the body when laid flat, and the bands are 7.5 in (19.1 cm) wide when laid flat.
You work the holder in one continuous piece from the bottom up. You start with a flat circle for the base, work the bottom band with the slot, then the lace body, then the top band. The hanging tab is worked straight off the top band. Last, you make the appliqués and sew them on.
Finished Size and Construction
- Finished size: about 16.5 in (41.9 cm) tall; body 9 in (22.9 cm) wide laid flat; bands 7.5 in (19.1 cm) wide laid flat
- Skill level: Intermediate
- Terminology: US crochet terms
- Yarn weight: worsted weight (#4) cotton
- Hook: 4.5 mm (US 7)
- Number of pieces: 1 main piece (base, bands, body and tab worked together), plus 2 daisies, 7 leaves, 3 olives and 1 stem
- Layout: a vertical tube, with the slot centered on the front and the tab centered on the back
- Piece size: base 4.75 in (12.1 cm) across; bottom band 3.3 in (8.4 cm) tall; body 10 in (25.4 cm) tall
- Size before border: about 14.5 in (36.8 cm) tall without the top band
- Border depth: top band 2 in (5.1 cm)
Materials
Use a smooth, firm, worsted-weight cotton or cotton blend. Cotton keeps the stitches crisp, holds the lace open and doesn’t stretch much when the holder is full of bags. These amounts assume about 90 m (98 yd) per 50 g.
- Cream (base, bands, tab): 80 g / 144 m
- Terracotta (lace body): 60 g / 108 m
- Olive green (stem, leaves, olives): 10 g / 18 m
- White (daisy petals): 5 g / 9 m
- Yellow (daisy centers): 2 g / 4 m
All amounts include a margin of about 15 percent, so you have extra for your gauge swatch and small differences in tension.
Tools:
– 4.5 mm (US 7) crochet hook
– Wooden ring, 2 in (5.1 cm) outer diameter
– Tapestry needle
– 4 stitch markers
– Small amount of scrap yarn or fiberfill for the olives
– Tape measure
– Rust-proof pins and a blocking mat or towel
Abbreviations (US Terms)
- ch – chain
- sl st – slip stitch
- sc – single crochet
- hdc – half double crochet
- dc – double crochet
- sc2tog – single crochet 2 together
- BLO – back loop only
- MR – magic ring
- sp – space
- st(s) – stitch(es)
- rep – repeat
Special stitch: split dc2tog. Yarn over and insert your hook in the first place given. Yarn over, pull up a loop, yarn over and pull through 2 loops. Skip the stitch or space given. Yarn over, insert your hook in the second place given, and pull up a loop. Yarn over and pull through 2 loops, then yarn over and pull through all 3 loops on the hook. This makes the V-shaped valleys of the chevron.
Stitch counting: in the lace, each ch counts as 1 stitch. A ch-3 space counts as 3 stitches, and a ch-1 space counts as 1.
Gauge and Checkpoints
Single crochet gauge: 16 sc and 18 rounds = 4 in (10.2 cm).
Lace gauge: 1 chevron repeat (12 sts) = 3 in (7.6 cm) wide, and 6 rounds = 4 in (10.2 cm) tall, measured flat.
Before you start, test one piece: crochet the base (Rounds 1–10) and measure it. This is a small, quick check that tells you whether your whole holder will come out the right size.
Checkpoints:
– After Round 10: the base lies flat and is 4.75 in (12.1 cm) across, with a circumference of about 15 in (38.1 cm).
– After Round 25: the bottom band is 3.3 in (8.4 cm) tall.
– After Body Round 6: the lace adds 4 in (10.2 cm) of height.
– After Body Round 15: the lace is 10 in (25.4 cm) tall.
– After Top Band Round 9: the top band is 2 in (5.1 cm) tall and 7.5 in (19.1 cm) wide laid flat.
If your base is too big, go down 0.5 mm in hook size. If it is too small, go up 0.5 mm. If the base ruffles, you are crocheting too loosely. If it cups, you are crocheting too tightly.
Base
Use cream yarn. Join each round with a sl st to the first sc. The ch 1 at the start of a round does not count as a stitch.
Round 1: Make a MR, ch 1, and work 6 sc in the ring. Pull the ring closed. (6 sts)
Round 2: 2 sc in each st around. (12 sts)
Round 3: [Sc in next st, 2 sc in next st] 6 times. (18 sts)
Round 4: [Sc in next 2 sts, 2 sc in next st] 6 times. (24 sts)
Round 5: [Sc in next 3 sts, 2 sc in next st] 6 times. (30 sts)
Round 6: [Sc in next 4 sts, 2 sc in next st] 6 times. (36 sts)
Round 7: [Sc in next 5 sts, 2 sc in next st] 6 times. (42 sts)
Round 8: [Sc in next 6 sts, 2 sc in next st] 6 times. (48 sts)
Round 9: [Sc in next 7 sts, 2 sc in next st] 6 times. (54 sts)
Round 10: [Sc in next 8 sts, 2 sc in next st] 6 times. (60 sts)
Checkpoint: the base is 4.75 in (12.1 cm) across.
Bottom Band with Slot
Round 11: Ch 1, sc in BLO of each st around. (60 sts) The unused front loops make a neat ridge where the sides turn up.
Rounds 12–15: Ch 1, sc in each st around. (60 sts)
Now you work in turned rows to make the slot. The last 14 stitches of the round stay unworked, and they become the center front of the holder.
Row 16: Ch 1, sc in the same st as the join and in the next 45 sts, turn. (46 sts; 14 sts unworked)
Rows 17–19: Ch 1, sc in each st across, turn. (46 sts)
Row 20: Ch 1, sc in each st across. Do not turn. Ch 14 and sl st to the first sc of Row 20. This chain closes the top of the slot.
Round 21: Ch 1, sc in each of the 46 sc and in each of the 14 ch. Join. (46 + 14 = 60 sts)
Rounds 22–24: Ch 1, sc in each st around. (60 sts)
Round 25 (increase round): Ch 1, [sc in next 4 sts, 2 sc in next st] 12 times. Join. (72 sts)
The slot is 3.5 in (8.9 cm) wide and 1.1 in (2.8 cm) tall. Fasten off cream.
Slot edging: Join cream at a bottom corner of the slot. Work 14 sc along the unworked stitches at the bottom, 5 sc up the side (1 per row end), 14 sc into the underside of the chain, and 5 sc down the other side. Sl st to the first sc. (38 sts) Fasten off.
Lace Body
Join terracotta in the joining stitch of Round 25.
Body Round 1 (set-up): Ch 3 (counts as dc) and work (ch 3, dc) in the same st. Then ch 1, skip next sc, dc in next sc, ch 1, skip next 2 sc. Work a split dc2tog over the next 3 sc: first leg in the next sc, skip 1 sc, second leg in the next sc. Ch 1, skip next 2 sc, dc in next sc, ch 1, skip next sc.
*(Dc, ch 3, dc) in next sc, ch 1, skip next sc, dc in next sc, ch 1, skip next 2 sc, split dc2tog over next 3 sc, ch 1, skip next 2 sc, dc in next sc, ch 1, skip next sc. Rep from * 4 more times. Join to the 3rd ch of the beginning ch-3.
(6 repeats of 12 sts = 72 sts)
Each repeat uses exactly 12 sc: 1 + 1 + 1 + 2 + 3 + 2 + 1 + 1 = 12.
Body Round 2: Sl st in the next ch-3 sp. Ch 3 (counts as dc) and work (ch 3, dc) in the same sp.
Ch 1, dc in next ch-1 sp, ch 1. Work a split dc2tog with the first leg in the next ch-1 sp, skip the dc2tog, and the second leg in the following ch-1 sp. Ch 1, dc in next ch-1 sp, ch 1. (Dc, ch 3, dc) in next ch-3 sp. Rep from * around, ending the last repeat at *. Join to the 3rd ch of the beginning ch-3.
(72 sts)
Each repeat is: dc, ch 3, dc, ch 1, dc, ch 1, dc2tog, ch 1, dc, ch 1, which is 1 + 3 + 1 + 1 + 1 + 1 + 1 + 1 + 1 + 1 = 12 sts.
Body Rounds 3–15: Repeat Body Round 2. (72 sts)
The peaks stack on top of the peaks and the valleys stack on top of the valleys, which makes the zigzag lace. Checkpoint: the lace is 10 in (25.4 cm) tall. Fasten off terracotta.
Border: Top Band
The top band works as the border of the holder. Border gauge: the same 16 sc and 18 rounds = 4 in (10.2 cm).
Join cream at the top of the joining stitch.
Top Band Round 1 (conversion): Ch 1. Sc in each dc and each dc2tog, 1 sc in each ch-1 sp, and 3 sc in each ch-3 sp. Join.
(72 sts worked 1 per existing stitch + 0 extra = 72 sts)
Top Band Round 2 (decrease): Ch 1, [sc in next 4 sts, sc2tog] 12 times. Join. (60 sts)
Top Band Rounds 3–9: Ch 1, sc in each st around. Join. (60 sts)
Counts per side: lay the holder flat with the slot centered on the front. You should have 30 sts on the front and 30 sts on the back.
Why the math works: the lace has 72 stitches, which is 6 repeats of 12. That number came from the 60-stitch bottom band plus 12 increases. The top band takes away the same 12 stitches, so it ends with 60 again. The top and bottom bands match in width at 7.5 in (19.1 cm), and the 9 in (22.9 cm) lace body bulges out between them to give the vase shape.
Hanging tab: With the slot facing you, flatten the holder and mark the 6 center stitches on the back of Round 9. Join cream at the first marked stitch.
– Row 1: Ch 1, sc in the same st and the next 5 sts, turn. (6 sts)
– Rows 2–16: Ch 1, sc in each st, turn. (6 sts)
Fasten off with a 12 in (30.5 cm) tail. The tab is 1.5 in (3.8 cm) wide and 3.6 in (9.1 cm) long. Fold the top 1.5 in (3.8 cm) through the wooden ring and sew it down on the back. About 2 in (5.1 cm) of tab stays visible.
Appliqués
Daisy (make 2):
– Round 1: With yellow, make a MR, ch 1, work 5 sc in the ring. Join. (5 sts) Fasten off.
– Round 2: Join white in any sc. In each sc, work (sl st, ch 2, 2 dc, ch 2, sl st). (5 petals) Fasten off.
Each daisy is about 1.5 in (3.8 cm) across.
Leaf (make 7): With green, ch 9.
– Side 1: Starting in the 2nd ch from the hook, work sl st, sc, hdc, dc, dc, hdc, sc, sl st.
– Tip: Ch 2.
– Side 2: Working along the other side of the foundation chain, work sl st, sc, hdc, dc, dc, hdc, sc, sl st.
Fasten off. Working along both sides of the chain leaves a natural center vein. Each leaf is about 2 in (5.1 cm) long.
Olive (make 3): With green:
– Round 1: 6 sc in a MR. (6 sts)
– Round 2: 2 sc in each st. (12 sts)
– Rounds 3–4: Sc in each st. (12 sts)
– Round 5: Sc2tog 6 times. (6 sts)
Stuff lightly, close the opening and fasten off. Each olive is about 1 in (2.5 cm) long.
Stem: With green, ch 41. Sl st in the 2nd ch from the hook and in each ch across. (40 sl sts) The stem is about 9 in (22.9 cm) long.
Placement:
1. Pin the stem on the front, starting just below the top band, right of center. Let it curve gently down toward the right side and stop 0.5 in (1.3 cm) above the bottom band.
2. Sew one daisy 1.25 in (3.2 cm) below the top band and the other near the middle of the stem.
3. Sew the leaves on both sides of the stem.
4. Sew two olives just below the top daisy and one lower down.
Use a matching thread or yarn tail, and stitch through the lace bars only so the openwork stays clear.
Final Blocking
- Weave in all ends and secure them along solid stitches, not lace bars.
- Spritz the holder lightly with water until it is damp.
- Stuff the holder loosely with a rolled towel so it takes on its vase shape.
- Smooth each chevron peak and valley so the ch-3 peaks open evenly.
- Shape the base into a gentle dome and line up the slot with the center front.
- Check that the body measures 9 in (22.9 cm) across at its widest when flattened.
- Let it dry completely before you take out the towel.
Final Quality-Control Checklist
- Base is 4.75 in (12.1 cm) across and lies smooth
- Bottom band has 60 sts and the slot is centered on the front
- Slot edging has 38 sts with no gaps at the corners
- Body has 6 even chevron repeats on every round
- Top band ends with 60 sts: 30 on the front, 30 on the back
- Tab is centered on the back and the ring is sewn securely
- Appliqués lie flat, with the stem on the right front
- Overall height is about 16.5 in (41.9 cm)
Troubleshooting
The chevrons are drifting sideways. Check that each split dc2tog skips the dc2tog below it, and that each peak goes into a ch-3 space.
The stitch count is off in the lace. Count each repeat: there should be 12 sts, with the ch-3 counted as 3.
There is a gap at the slot corners. Add 1 extra sc at each corner on the edging, then sc2tog it away on the next pass, or close the gap with a few stitches from the yarn tail.
The top band flares. Go down 0.5 mm in hook size for the band only.
The holder sags when full. Your lace is too loose. Block it again and pin it slightly shorter, or rework the body with a smaller hook.
The tab twists. Re-center it on the 6 back stitches before sewing it to the ring.
Care
Hand wash in cool water with mild soap, press out the water gently, and lay flat to dry, shaped around a towel. Do not tumble dry, because heat can shrink the cotton and distort the lace.
Final Notes
The measurement chain is simple. A 4.75 in (12.1 cm) base with 60 stitches sets a 15 in (38.1 cm) circumference. The bottom band keeps those 60 stitches for 3.3 in (8.4 cm), then grows to 72 for the lace. The lace’s 6 repeats of 12 stitches build 10 in (25.4 cm) of body, and the top band brings it back to 60 for a 2 in (5.1 cm) finish. If you check each link in the chain, your holder will come out 16.5 in (41.9 cm) tall, every time.
Happy crocheting!