

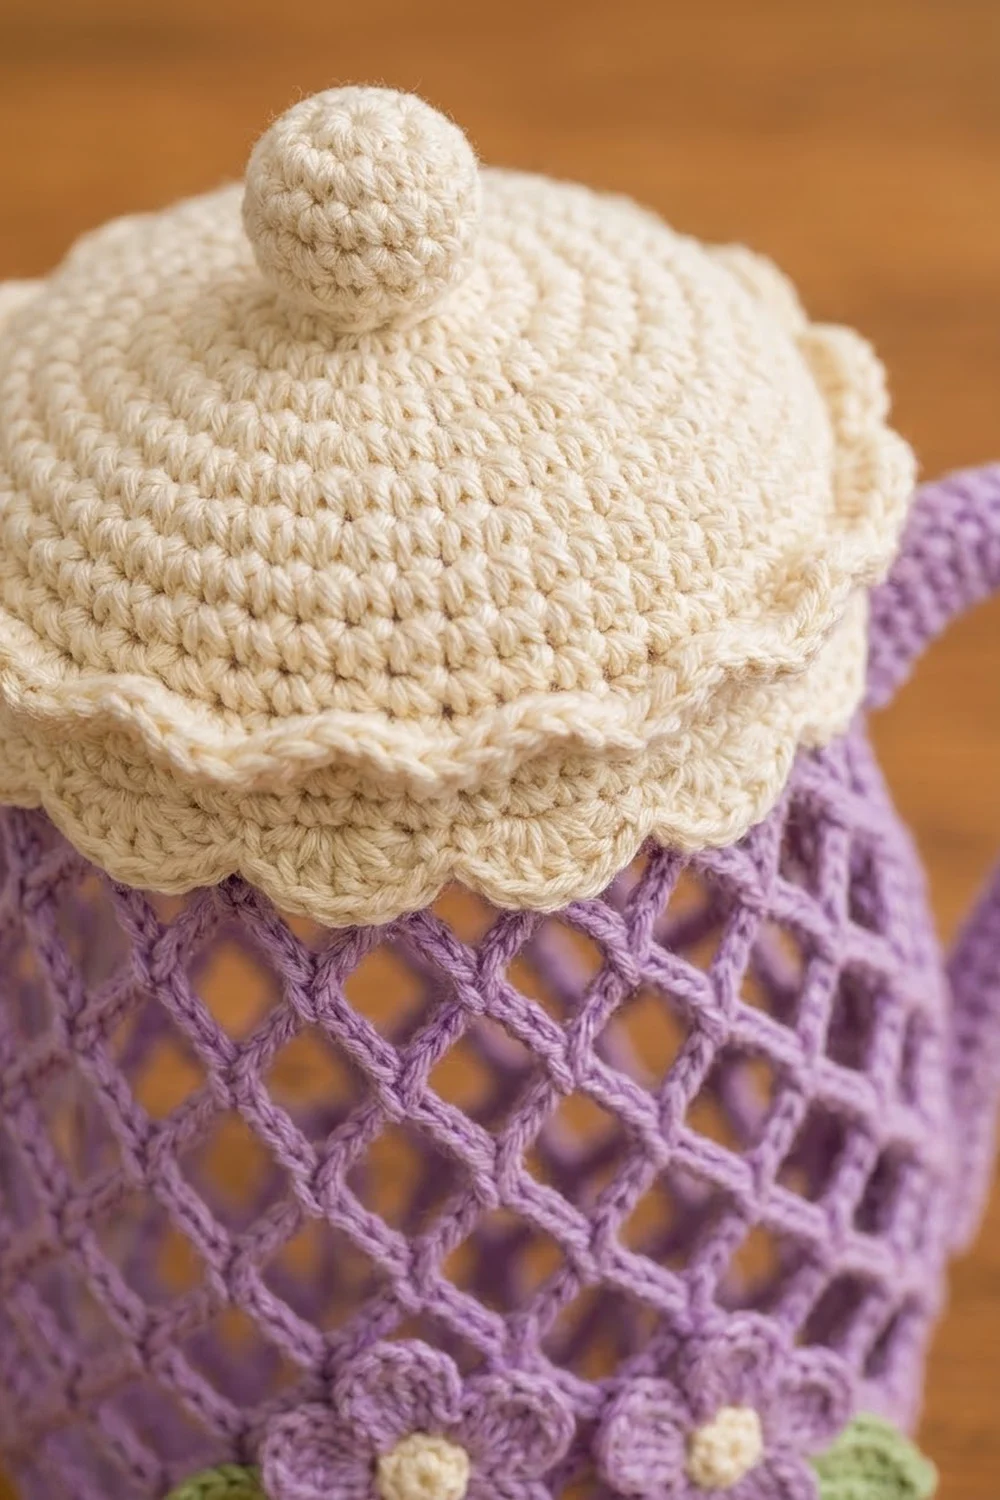
This bag holder looks like a lavender pitcher. The body is open diamond mesh, so you can see the bags inside. A cream scalloped collar and a matching domed lid give it a vintage kitchen look, and a curved handle and two small flowers finish the pitcher shape.
The colors are soft lavender, warm cream and a little sage green. The pattern uses US crochet terms throughout.
The finished holder measures about 19 in (48.3 cm) tall without the loop and 23.5 in (59.7 cm) with it. It is about 8.5 in (21.6 cm) wide including the handle. The mesh body alone is about 16 in (40.6 cm) long and 6.5 in (16.5 cm) wide flat at the belly.
You work the body from the bottom up in joined rounds: a solid cuff, a chain-loop mesh that grows and then narrows, and a solid neck. The collar, lid, knob, handle, loop, flowers and leaves are made separately and sewn on. Stuff bags in through the top and pull them out of the bottom opening.
Finished Size and Construction
- Finished size: 19 in (48.3 cm) tall without loop; 23.5 in (59.7 cm) with loop; 8.5 in (21.6 cm) wide including handle
- Skill level: Intermediate
- Terminology: US
- Yarn weight: Worsted (#4), cotton or cotton blend
- Hook: 5.0 mm (H-8)
- Number of pieces: 10 (body, collar, lid, knob, loop, handle, 2 flowers, 2 leaves)
- Layout: Single vertical pitcher, with the handle on the right and the flowers centered on the front
- Body size: 16 in (40.6 cm) long, 6.5 in (16.5 cm) wide flat at the belly
- Size before border (neck): 40 sts around, 5 in (12.7 cm) wide flat
- Border (collar) depth: 1.5 in (3.8 cm)
Materials
Use a smooth worsted cotton. It holds the mesh shape, washes well and doesn’t stretch out under a full load of bags. The amounts below are based on cotton that runs about 170 m per 100 g.
- Lavender (A): 100 g / 170 m (body, handle, loop, flowers)
- Cream (B): 50 g / 85 m (collar, lid, knob, flower centers)
- Sage green (C): 10 g / 17 m (leaves)
Tools:
– 5.0 mm (H-8) hook
– Yarn needle
– Stitch markers
– A small amount of fiberfill
– Optional: one chenille stem for the handle
– Rust-proof pins and a tape measure
All amounts include roughly a 20% margin.
Abbreviations (US Terms)
- ch – chain
- sl st – slip stitch
- sc – single crochet
- hdc – half double crochet
- dc – double crochet
- sk – skip
- st(s) – stitch(es)
- sc2tog – single crochet 2 together
- BLO – back loop only
- rnd(s) – round(s)
Special stitch – Scallop: sk 1 st, 5 dc in the next st, sk 1 st, sc in the next st. Each scallop uses 4 sts.
Gauge and Checkpoints
- Solid gauge: 16 sc and 18 rnds = 4 in (10.2 cm)
- Mesh gauge (ch-7 loops): 3 loops = 2 in (5.1 cm) across, measured relaxed; 5 rnds = 4 in (10.2 cm) tall
Make the knob or one flower first and check it against the size given before you start the body. Measure the body at each of these points:
- After Rnd 4 (cuff): 3.75 in (9.5 cm) wide flat, about 0.9 in (2.3 cm) tall
- After Rnd 11: about 5.5 in (14.0 cm) long
- After Rnd 22: about 14.3 in (36.3 cm) long, 6.5 in (16.5 cm) wide flat
- After Rnd 26: about 16 in (40.6 cm) long, neck 5 in (12.7 cm) wide flat
If your cuff is too wide, go down half a hook size. If it’s too narrow, go up half a size. If the mesh is too long but the width is right, work one fewer ch-7 round (Rnds 12–22).
Body (Make 1, Color A)
Cuff
Ch 30 and sl st to the first ch to form a ring. Don’t twist the chain.
Rnd 1: Ch 1, sc in each ch around, sl st to first sc. (30 sts)
Rnds 2–4: Ch 1, sc in each st around, sl st to first sc. (30 sts)
Mesh
Each mesh round starts with sl sts in the next 3 ch, which moves you to the center of the first loop. Then work ch 1 and sc in that same loop. The ch 1 does not count as a stitch.
Rnd 5: Ch 1, sc in same st as join, ch 5, sk 2 sts, sc in next st; repeat from * 8 more times, ch 5, sk last 2 sts, sl st to first sc. (10 ch-5 loops)
Rnd 6: Sl st to the center of the first loop, ch 1, sc in same loop, ch 5, sc in next loop; repeat from * 8 more times, ch 5, sl st to first sc. (10 ch-5 loops)
Rnd 7 (increase): Sl st to the center of the first loop, ch 1, in the next loop work (sc, ch 5, sc), ch 5, sc in next loop, ch 5; repeat from * 4 more times, sl st to first sc. Each repeat turns 2 old loops into 3 new ones. (15 ch-5 loops)
Rnds 8–10: Work as Rnd 6, but use ch 6 between sc. (15 ch-6 loops)
Rnd 11 (increase): Sl st to the center of the first loop, ch 1, in the next loop work (sc, ch 6, sc), ch 6, sc in next loop, ch 6, sc in next loop, ch 6; repeat from * 4 more times, sl st to first sc. Each repeat turns 3 old loops into 4 new ones. (20 ch-6 loops)
Rnds 12–22: Work as Rnd 6, but use ch 7 between sc. (20 ch-7 loops)
Rnds 23–24: Work as Rnd 6, but use ch 6 between sc. (20 ch-6 loops) The shorter loops draw the shoulder in.
Neck
Rnd 25 (conversion): Ch 1, sc in same sc as join, sc in next ch-6 loop, sc in next sc, sc in next ch-6 loop; repeat from * 18 more times, sl st to first sc. (20 sc worked into sc + 20 sc worked into loops = 40 sts)
Rnd 26: Ch 1, sc in each st around, sl st to first sc. (40 sts) Fasten off and weave in the ends.
Lid (Make 1, Color B)
Work in joined rounds and sl st to the first sc at the end of each round.
Rnd 1: 6 sc in a magic ring. (6)
Rnd 2: 2 sc in each st. (12)
Rnd 3: (Sc in next st, 2 sc in next) 6 times. (18)
Rnd 4: (Sc in next 2, 2 sc in next) 6 times. (24)
Rnd 5: (Sc in next 3, 2 sc in next) 6 times. (30)
Rnd 6: (Sc in next 4, 2 sc in next) 6 times. (36)
Rnd 7: (Sc in next 5, 2 sc in next) 6 times. (42)
Rnds 8–9: Sc in each st. (42) The edge now turns down to form a shallow dome.
Rnd 10: (Sc in next 6, 2 sc in next) 6 times. (48)
Rnd 11: Ch 1, sc in first st, work Scallops around, ending the last repeat with a sl st to the first sc. (12 scallops)
The lid should measure about 4.5 in (11.4 cm) across the scallops and 1.25 in (3.2 cm) tall. Fasten off and leave a long tail.
Knob (Make 1, Color B)
Rnd 1: 6 sc in a magic ring. (6)
Rnd 2: 2 sc in each st. (12)
Rnds 3–4: Sc in each st. (12)
Rnd 5: Sc2tog 6 times. (6)
Stuff firmly and close the opening. The knob is about 1 in (2.5 cm) across. Leave a tail for sewing.
Hanging Loop (Make 1, Color A)
Ch 51. Sl st in the back bump of the 2nd ch from the hook and in each ch across. (50 sl sts)
The cord is about 10 in (25.4 cm) long. Folded in half, it makes a loop of about 4.5 in (11.4 cm) once anchored. Leave both tails long.
Handle (Make 1, Color A)
Rnd 1: 8 sc in a magic ring. (8)
Rnds 2–44: Sc in each st, working in a continuous spiral. (8)
The tube is about 9.75 in (24.8 cm) long and 0.6 in (1.5 cm) thick. Stuff it lightly as you go. If you like, slide a chenille stem through the center so the curve holds its shape. Fasten off and leave a long tail.
Flowers (Make 2)
Rnd 1 (Color B): 10 sc in a magic ring, sl st to first sc. (10) Fasten off.
Rnd 2 (Color A): Join A in any st. Ch 2, 3 dc in next st, ch 2, sl st in next st; repeat from * 4 more times. (5 petals)
Each flower is about 1.75 in (4.4 cm) across.
Leaves (Make 2, Color C)
Ch 7. Starting in the 2nd ch from the hook, work sc, hdc, dc, dc, hdc. Work 3 sc in the last ch. Then work along the other side of the chain: hdc, dc, dc, hdc, sc. Sl st to the first sc. (13 sts)
Each leaf is about 1.5 in (3.8 cm) long.
Make All Pieces
Count your pieces by color before you assemble:
- Color A: 1 body, 1 handle, 1 hanging loop, 2 flower petal rounds
- Color B: 1 collar (see Border), 1 lid, 1 knob, 2 flower centers
- Color C: 2 leaves
Front view layout, top to bottom:
            [ loop ]
            [ knob ]
         [  lid (B)  ]
       [ collar (B)  ]  ( handle top
       [ mesh neck   ]      |
       [  mesh body  ]      )  handle
       [ leaf flower flower leaf ]  ← Rnds 16–17
       [  mesh body  ]  ( handle bottom, Rnd 15
       [  mesh body  ]
          [ cuff ]
Joining
Sew everything on with matching yarn and a yarn needle. Work through whole stitches and keep the tension firm but flat, so the mesh doesn’t pucker.
- Collar: Slide the collar over the neck so its foundation edge lines up with the boundary between Rnd 24 and Rnd 25. Whipstitch each collar foundation stitch to the matching neck stitch, all 40 of them. Both pieces have 40 sts, so no easing is needed. The scallops rise about 1 in (2.5 cm) above the neck.
- Lid: Set the lid on the collar so the lid scallops overlap the collar scallops. Sew the back half only (24 lid sts) to the top of the collar. The front stays free so it lifts like a hinge for refilling.
- Knob and loop: Fold the loop in half. Pass both tails down through the center of the knob and into the lid, then anchor them firmly around the lid’s Rnd 2. Sew the knob to the top of the lid.
- Handle: Sew the top end to the right side of the body at Rnd 24, just below the collar. Curve the handle outward and sew the bottom end at Rnd 15, about 7 in (17.8 cm) lower.
- Flowers and leaves: Center the two flowers on the front across Rnds 16–17, about 0.25 in (0.6 cm) apart. Tuck one leaf under the outer edge of each flower, angled downward. Sew them through the mesh sc stitches, not across open loops.
Size check: The assembled piece should measure about 19 in (48.3 cm) from the cuff to the top of the knob.
Border
The cream collar is the border. Make it separately and then sew it on as described in Joining.
Border gauge: 16 sc = 4 in (10.2 cm), the same as the neck.
With B, ch 40 and sl st to the first ch to form a ring. Don’t twist.
Rnd 1: Ch 1, sc in each ch, sl st to first sc. (40 sts; 20 per side when flattened)
Rnds 2–3: Ch 2 (does not count as a st), hdc BLO in each st, sl st to first hdc. (40 sts; 20 per side) The BLO stitches form horizontal ridges.
Rnd 4: Ch 1, sc in first st. Work Scallops around, omitting the final sc on the last repeat, and sl st to the first sc. (10 scallops; 5 per side)
The collar is 10 in (25.4 cm) around, 5 in (12.7 cm) wide flat, and 1.5 in (3.8 cm) deep.
Why the math works: The neck has 40 sts at 4 sts per inch, which is 10 in (25.4 cm) around. The collar has the same 40 sts at the same gauge, so it matches the neck exactly. Each Scallop uses 4 sts, and 40 ÷ 4 = 10 scallops with nothing left over. The lid follows the same logic: its 48 sts ÷ 4 = 12 scallops. At 10.5 in (26.7 cm) around at Rnd 9, the lid is just big enough to sit over the 10 in (25.4 cm) collar.
Final Blocking
- Lightly mist the body with water. Don’t soak cotton that has stuffed parts attached.
- Lay the holder flat with the handle and flowers facing up.
- Ease the mesh into even diamonds, so the belly is 6.5 in (16.5 cm) wide and the cuff is 3.75 in (9.5 cm) wide.
- Pin each collar and lid scallop into an even curve.
- Shape the handle into a smooth C-curve.
- Leave it to dry completely before hanging.
Final Quality-Control Checklist
- Cuff has 30 sts and the opening is about 2.4 in (6.1 cm) across
- Mesh has 10, then 15, then 20 loops, with even diamonds
- Neck has 40 sts and matches the 40-st collar
- Collar has 10 even scallops; lid has 12
- Lid back is secure and the front lifts freely
- Loop is anchored deep in the lid, not only in the knob
- Handle ends are sewn firmly at Rnds 24 and 15
- All ends are woven in
Troubleshooting
- Diamonds lean or spiral: Make sure each sc goes into the center of its loop and that every round is joined, not worked in a spiral.
- Belly too narrow: Recount Rnds 7 and 11. Missing an increase repeat leaves you with fewer than 20 loops.
- Collar too loose on the neck: Your foundation chain was too loose. Remake it with a hook half a size smaller.
- Scallops ruffle: Use 4 dc per scallop instead of 5.
- Handle droops: Add the chenille stem or stuff it more firmly.
- Holder sags under weight: Move the loop anchor down to the lid’s Rnd 3 and add a few stitches through the collar.
Care
Hand wash in cool water and lay flat to dry, reshaping the mesh and scallops while damp. Don’t tumble dry or wring.

Final Notes
The measurements build on each other. A 30-st cuff gives 3.75 in (9.5 cm) flat. The mesh grows to 20 loops for a 6.5 in (16.5 cm) belly. The 40-st neck matches the 40-st collar with 10 scallops, and the 48-st lid brim makes 12 scallops on top. If your gauge matches at each checkpoint, the pitcher will come out at 19 in (48.3 cm) tall and hang straight from its loop.
Happy crocheting!