
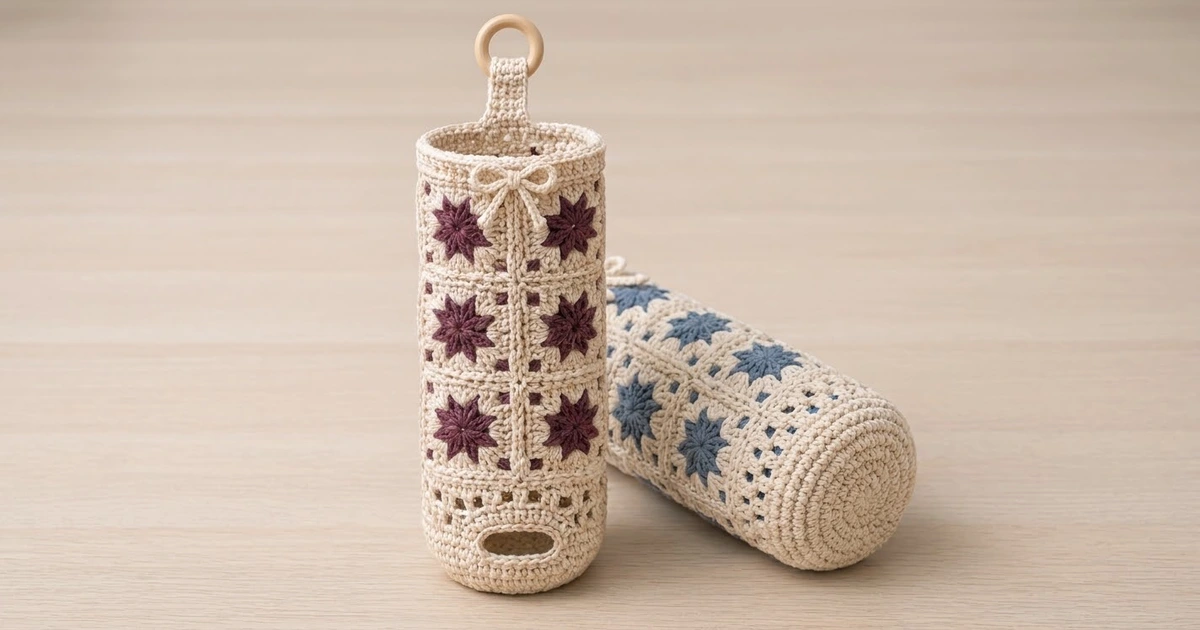
This hanging bag holder turns a pile of plastic grocery bags into something you won’t mind seeing on the wall. It is a slim cream tube built from twelve small granny squares, each with a deep plum 8-point star in the center, and it hangs from a natural wooden ring.
The look is cozy and a little vintage. It has raised cream seams between the squares, small open eyelets around each star, a solid rim at the top, and a sweet chain-cord bow at the front. You push bags in at the top and pull them out one at a time through an oval slot near the bottom. The same pattern also works in a dusty blue for the stars.
The pattern uses US crochet terms. The finished holder is about 14 in (35.6 cm) around, 4.5 in (11.4 cm) across, and 13.5 in (34.3 cm) tall without the strap. The strap adds 3 in (7.6 cm) above the rim, plus the ring.
The construction is simple. You make 12 squares, join them into 4 columns of 3, and join the columns into a tube. Then you work a rim around the top edge, and a mesh band, slot, and closed base down from the bottom edge. The strap and bow go on last.
Finished Size and Construction
- Finished size: 14 in (35.6 cm) around, 4.5 in (11.4 cm) diameter, 13.5 in (34.3 cm) tall
- Skill level: Intermediate
- Terminology: US
- Yarn weight: Worsted (#4) cotton
- Hook: US H-8 (5 mm)
- Number of pieces: 12 squares, plus a bow cord
- Layout: 4 squares around × 3 squares tall, joined into a tube
- Square size: 3.5 in × 3.5 in (8.9 cm × 8.9 cm)
- Size before border: 14 in (35.6 cm) around × 10.5 in (26.7 cm) tall
- Border depth: top rim 1 in (2.5 cm); bottom band 2 in (5.1 cm), plus a flat base
Materials
Use a smooth, firm worsted-weight cotton or cotton blend. Cotton holds the tube’s shape and doesn’t stretch out under the weight of the bags. Acrylic also works, but the tube will be softer.
- Color A, cream: 130 g, about 220 m
- Color B, plum (or dusty blue): 35 g, about 60 m
- US H-8 (5 mm) crochet hook
- One 2 in (5.1 cm) wooden ring
- Tapestry needle
- 4 locking stitch markers
- Scissors
- Measuring tape
The quantities include a safety margin of roughly 15%.
Abbreviations (US Terms)
- ch – chain
- sl st – slip stitch
- sc – single crochet
- hdc – half double crochet
- dc – double crochet
- tr – treble crochet
- sc2tog – single crochet 2 together
- hdc2tog – half double crochet 2 together
- sp – space
- st(s) – stitch(es)
- RS / WS – right side / wrong side
Special stitch – Star Point: work (hdc, dc, ch 2, dc, hdc) in the same stitch. The ch-2 forms the tip of the point.
Gauge and Checkpoints
Make one complete square before anything else and block it lightly. It should measure 3.5 in (8.9 cm) square, with 17 sc along each side, counting both corner stitches. That works out to about 4.9 sc per inch (2.54 cm), and 5 rounds of sc measure about 1 in (2.5 cm).
Check the square at each stage:
- After Rnd 2 (star): about 1.75 in (4.4 cm) from point to point
- After Rnd 3: about 2.5 in (6.4 cm) square
- After Rnd 4: about 3.1 in (7.9 cm) square
- After Rnd 5: 3.5 in (8.9 cm) square
Too big? Go down half a hook size, or try US G-6 (4 mm). Too small? Go up to US I-9 (5.5 mm). Even a 0.25 in (0.6 cm) difference per square adds up to 1 in (2.5 cm) around the tube and 0.75 in (1.9 cm) in height, so match the gauge before you make all 12.
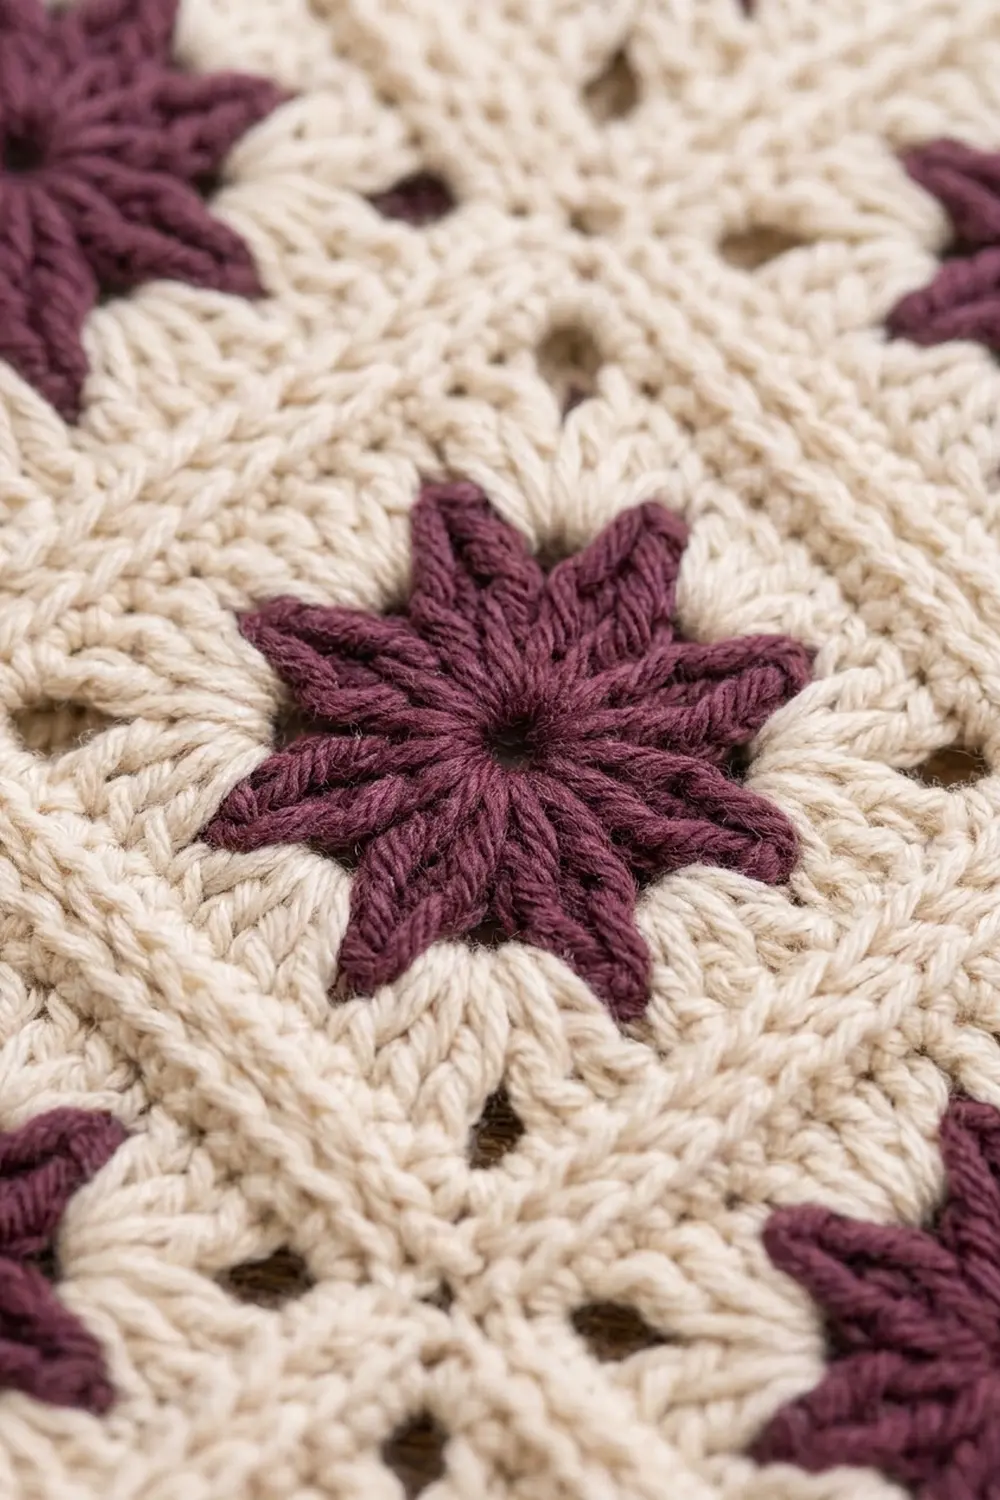
Star Square (Make 12)
Rnd 1 (Color B): Make a magic ring, ch 3 (counts as dc), work 15 dc in the ring, and join with a sl st to the top of the ch-3. Pull the ring closed. (16 dc)
Rnd 2 (Color B): Work a Star Point in the next dc, then sl st in the next dc; repeat from * 7 more times. The last sl st lands in the joining stitch. (8 Star Points: 32 sts + 8 ch-2 tips, plus 8 sl sts)* Fasten off Color B.
Each point is built in a single stitch, with a sl st valley on each side. This gives the eight separate, rounded points of the star.
Rnd 3 (Color A): Join Color A with an sc in any ch-2 tip. This is a side tip. Ch 3, work (tr, ch 2, tr) in the next tip (a corner tip), ch 3, sc in the next tip; repeat from * 3 more times, leaving out the last sc. Join to the first sc. (4 sc, 8 tr, 8 ch-3 sps, 4 ch-2 corner sps)*
The tall tr stitches push the corner tips outward, turning the round star into a square. The ch-3 arcs leave small openings in the valleys between the points.
Rnd 4 (Color A): Ch 3 (counts as dc). *Work (dc, ch 1, dc) in the next ch-3 sp, dc in the next tr, (2 dc, ch 2, 2 dc) in the corner sp, dc in the next tr, (dc, ch 1, dc) in the next ch-3 sp, dc in the next sc; repeat from * around, leaving out the last dc. Join to the top of the ch-3.
Each side between corner spaces now has 11 dc and 2 ch-1 eyelets, which is 13 stitch positions. (44 dc, 8 ch-1 sps, 4 ch-2 corners)
The ch-1 spaces are the small open windows in the frame around each star.
Rnd 5 (Color A): Ch 1. Work an sc in each dc and each ch-1 sp, and 3 sc in each corner ch-2 sp. Join to the first sc. (52 + 12 = 64 sc)
Each side counts 17 sc: the corner stitch at each end plus the 15 stitches between them. Four sides × 17 = 68, minus the 4 shared corner stitches, = 64. ✓
Fasten off, leaving a 6 in (15.2 cm) tail. Weave in the plum tails now. Block each square to 3.5 in (8.9 cm).
Make All Pieces
- Squares: 12 total, each with a Color B star and a Color A frame
- Color B per square: about 2 g (24 g total)
- Color A per square: about 6 g (72 g total)
Layout of the tube, unrolled flat (F = front, B = back; columns 1 and 4 meet at the closing seam):
Col:   1     2     3     4
     [ S ] [ S ] [ S ] [ S ]   ← top tier (rim above)
     [ S ] [ S ] [ S ] [ S ]   ← middle tier
     [ S ] [ S ] [ S ] [ S ]   ← bottom tier (band below)
       F  ^  F     B  ^  B
     front seam   back seam
The seam between columns 1 and 2 is the front center, where the bow and slot go. The seam between columns 3 and 4 is the back center, where the strap goes.
Joining
Method: sc join, worked on the RS with wrong sides together. This makes the raised cream ridges seen between the squares.
Stitch-to-stitch logic: match the squares corner to corner. Work 1 sc through both loops of each pair of matching stitches, so each seam is 17 sc, one for each stitch along the side.
- Columns: join 3 squares into a vertical strip using 2 horizontal seams of 17 sc each. Make 4 strips.
- Vertical seams: join strip 1 to strip 2, then 2 to 3, then 3 to 4. Each seam is 3 × 17 = 51 sc.
- Close the tube: join strip 4 back to strip 1 the same way (51 sc).
Tension: keep the joining stitches the same size as your square stitches. If the seams pucker, loosen up or go up one hook size for the joining only.
Size checkpoint: laid flat, the tube should be 7 in (17.8 cm) wide, which is 14 in (35.6 cm) around, and 10.5 in (26.7 cm) tall.
Border: Top Rim, Bottom Band, and Base
Border gauge: the borders use the same gauge as the squares: about 4.9 sc per inch (2.54 cm) and 5 sc rounds per inch.
Edge count: each open end of the tube has 4 squares × 17 sts = 68 sts. At each seam, the two corner stitches from neighboring squares stay as 2 separate stitches. That’s already part of each square’s 17, so nothing gets added at the seams. Mark the front seam and the back seam.
Top Rim
Rnd 1: With the RS facing, join Color A just left of the back seam. Ch 1 and sc in each st around, 17 per square. Join. (68 sc)
Rnds 2–5: Ch 1, sc in each st around, and join. (68 sc each round) Fasten off.
The rim is 1 in (2.5 cm) deep. The tube now measures 11.5 in (29.2 cm) tall.
Bottom Band
Turn the tube upside down and join Color A just left of the back seam, working into the bottom edge.
Rnd 1: Ch 1, sc in each st around, and join. (68 sc)
Rnd 2 (mesh): Ch 4 (counts as dc + ch 1), skip the next st. Dc in the next st, ch 1, skip the next st; repeat from * 32 more times. Join to the 3rd ch of the ch-4. (34 dc + 34 ch-1 = 68 sts)* This round makes the row of open eyelets under the squares.
Rnd 3: Ch 1. Sc in each dc and each ch-1 sp around, and join. (68 sc)
Rnd 4: Ch 1, sc in each st around, and join. (68 sc)
Rnd 5 (slot): Ch 3 (counts as dc), then dc in the next 28 sts (29 dc so far). Ch 10, skip the next 10 sts, and dc in the remaining 29 sts. Join. (58 dc + ch-10 = 68 positions)
Stitches 30–39 are skipped, so the slot sits right on the front seam, which falls between stitches 34 and 35.
Rnd 6: Ch 1. Sc in each dc, and work 10 sc into the ch-10 sp, around the chain. Join. (58 + 10 = 68 sc)
The opening is 2 in (5.1 cm) wide and about 0.5 in (1.3 cm) tall, and it eases into an oval once it’s in use.
Rnd 7: Ch 1, sc in each st around, and join. (68 sc)
Rnd 8: Ch 1. Sc in the next 15 sts, sc2tog; repeat from * 3 more times. Join. (4 × 16 = 64 sc)*
The bottom band is now 2 in (5.1 cm) deep, and the body is 13.5 in (34.3 cm) tall.
Base
The ch 2 at the start of each round does not count as a stitch.
- Rnd 9: Ch 2, hdc in the next 6 sts, hdc2tog; repeat from * around, and join. (56 hdc)*
- Rnd 10: Ch 2, hdc 5, hdc2tog; repeat from * around. (48)*
- Rnd 11: Ch 2, hdc 4, hdc2tog; repeat from * around. (40)*
- Rnd 12: Ch 2, hdc 3, hdc2tog; repeat from * around. (32)*
- Rnd 13: Ch 2, hdc 2, hdc2tog; repeat from * around. (24)*
- Rnd 14: Ch 2, hdc 1, hdc2tog; repeat from * around. (16)*
- Rnd 15: Ch 2, work hdc2tog 8 times. (8)
Fasten off, thread the tail through the front loops of the last 8 stitches, pull it tight, and weave it in.
Why the math works: a flat hdc circle changes by about 8 stitches per round. So 7 rounds take 64 stitches down to 0, and 7 hdc rounds (about 2.1 in / 5.3 cm) match the radius of a 13.2 in (33.5 cm) circle. The result is a flat base about 4.5 in (11.4 cm) across.
Strap
With the RS facing, find the back seam on Rnd 5 of the rim. Join Color A 3 stitches to the right of the seam.
- Row 1: Ch 1 and sc in the next 6 sts, 3 on each side of the seam. (6 sc)
- Rows 2–20: Ch 1, turn, and sc in each st across. (6 sc each row)
The strap is 1.25 in (3.2 cm) wide and 4 in (10.2 cm) long. Fold the last 1 in (2.5 cm) through the wooden ring to the inside of the strap and whipstitch it down. That leaves 3 in (7.6 cm) of strap showing above the rim.
Bow
With Color A, ch 60, which is about 12 in (30.5 cm). Sl st into the back bump of each chain back to the start to firm up the cord.
Tie it into a bow about 2.5 in (6.4 cm) wide. Sew the knot to the front seam, just below the rim, and tack down the loops and tails so they lie flat.
Final Blocking
- Weave in all remaining ends along the seam ridges.
- Spray the holder lightly with water until it is damp, not soaked.
- Stuff it with a rolled towel to fill out the 4.5 in (11.4 cm) diameter.
- Line up the seams so they run straight up and across.
- Flatten the base on a table and shape the slot into an even oval.
- Leave it to dry completely before hanging.
Final Quality-Control Checklist
- [ ] All 12 squares measure 3.5 in (8.9 cm) and have 17 sts per side
- [ ] Every seam has a raised ridge on the outside, with no gaps
- [ ] The top and bottom edges each start with 68 sts
- [ ] The slot is centered on the front seam
- [ ] The base lies flat and the holder stands up on its own
- [ ] The strap is centered over the back seam and firmly sewn to the ring
- [ ] The bow is centered over the front seam
- [ ] The body is 13.5 in (34.3 cm) tall and 14 in (35.6 cm) around
Troubleshooting
- The star points curl: loosen the Star Points, or block the square flat before Rnd 3.
- The square isn’t square: check that each corner tip has (tr, ch 2, tr) and each side tip has 1 sc.
- The seams pull in: join more loosely, or use a hook one size larger.
- The rim flares: check that you have exactly 68 sts; you may have added stitches at the seams.
- The base cups or ruffles: if it cups, go up a hook size for the base. If it ruffles, go down a size.
- Bags fall out of the slot: make the slot ch 8 and skip 8, with 30 dc on each side (30 + 8 + 30 = 68).
Care
Hand wash in cool water, press out the water in a towel, and reshape it to dry flat. Don’t put it in the dryer.

Final Notes
Everything depends on the square. If one square has 17 sts per side and measures 3.5 in (8.9 cm), then 4 around gives 68 sts and 14 in (35.6 cm). Three tiers give 10.5 in (26.7 cm). The 1 in (2.5 cm) rim and 2 in (5.1 cm) bottom band bring the body to 13.5 in (34.3 cm), and seven hdc rounds close a flat base 4.5 in (11.4 cm) across. Match the first square and the rest follows.
Happy crocheting!