

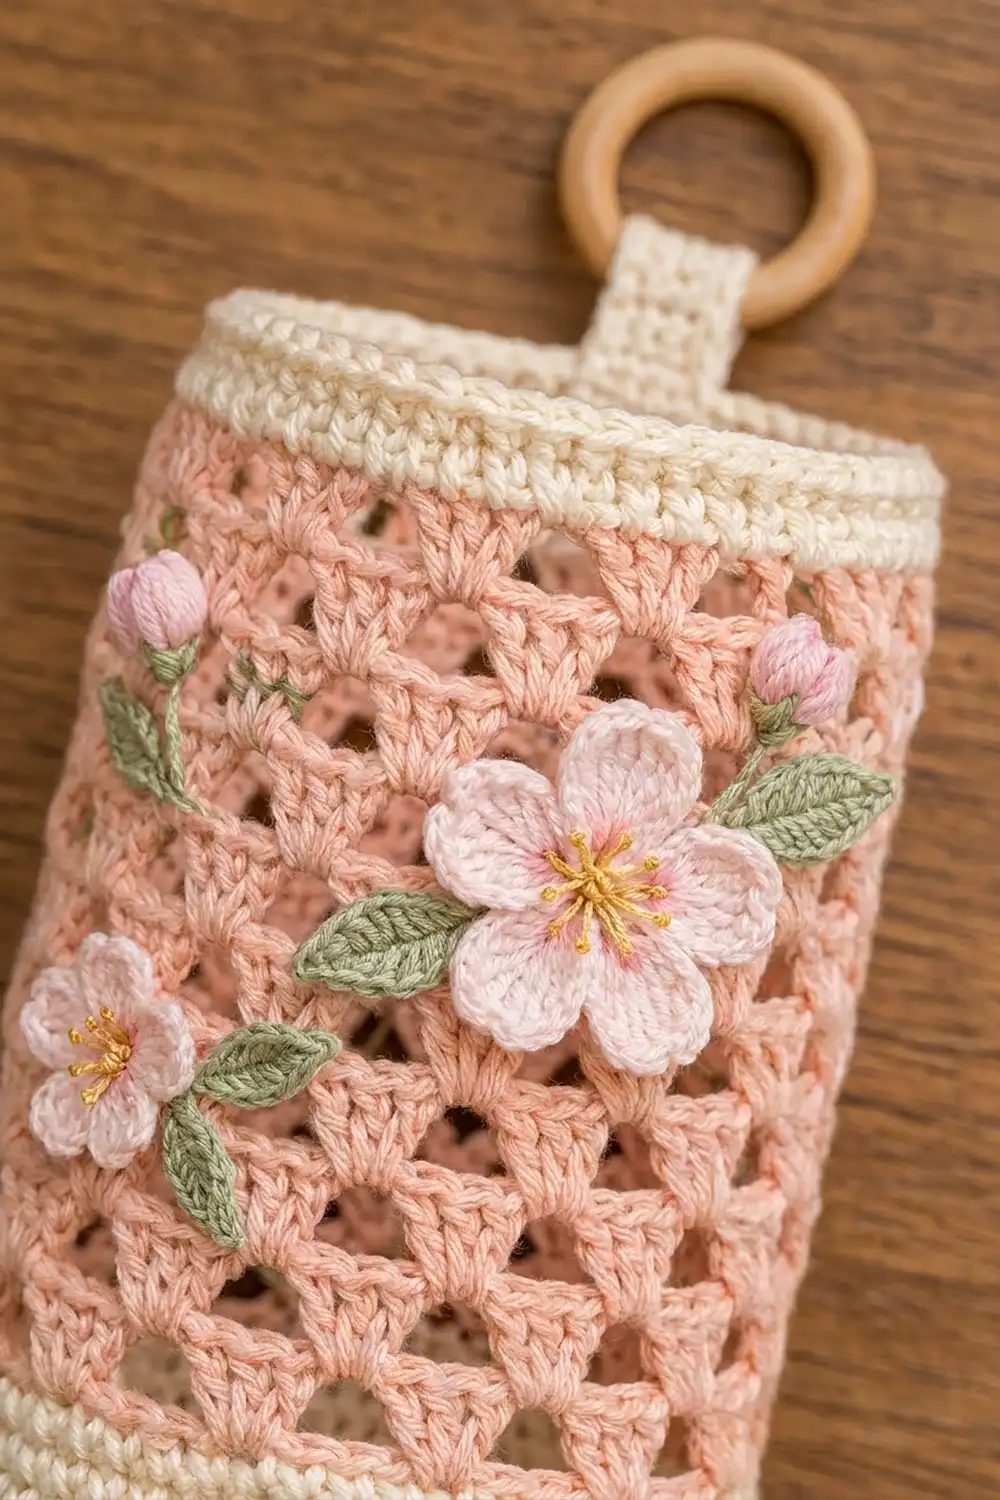
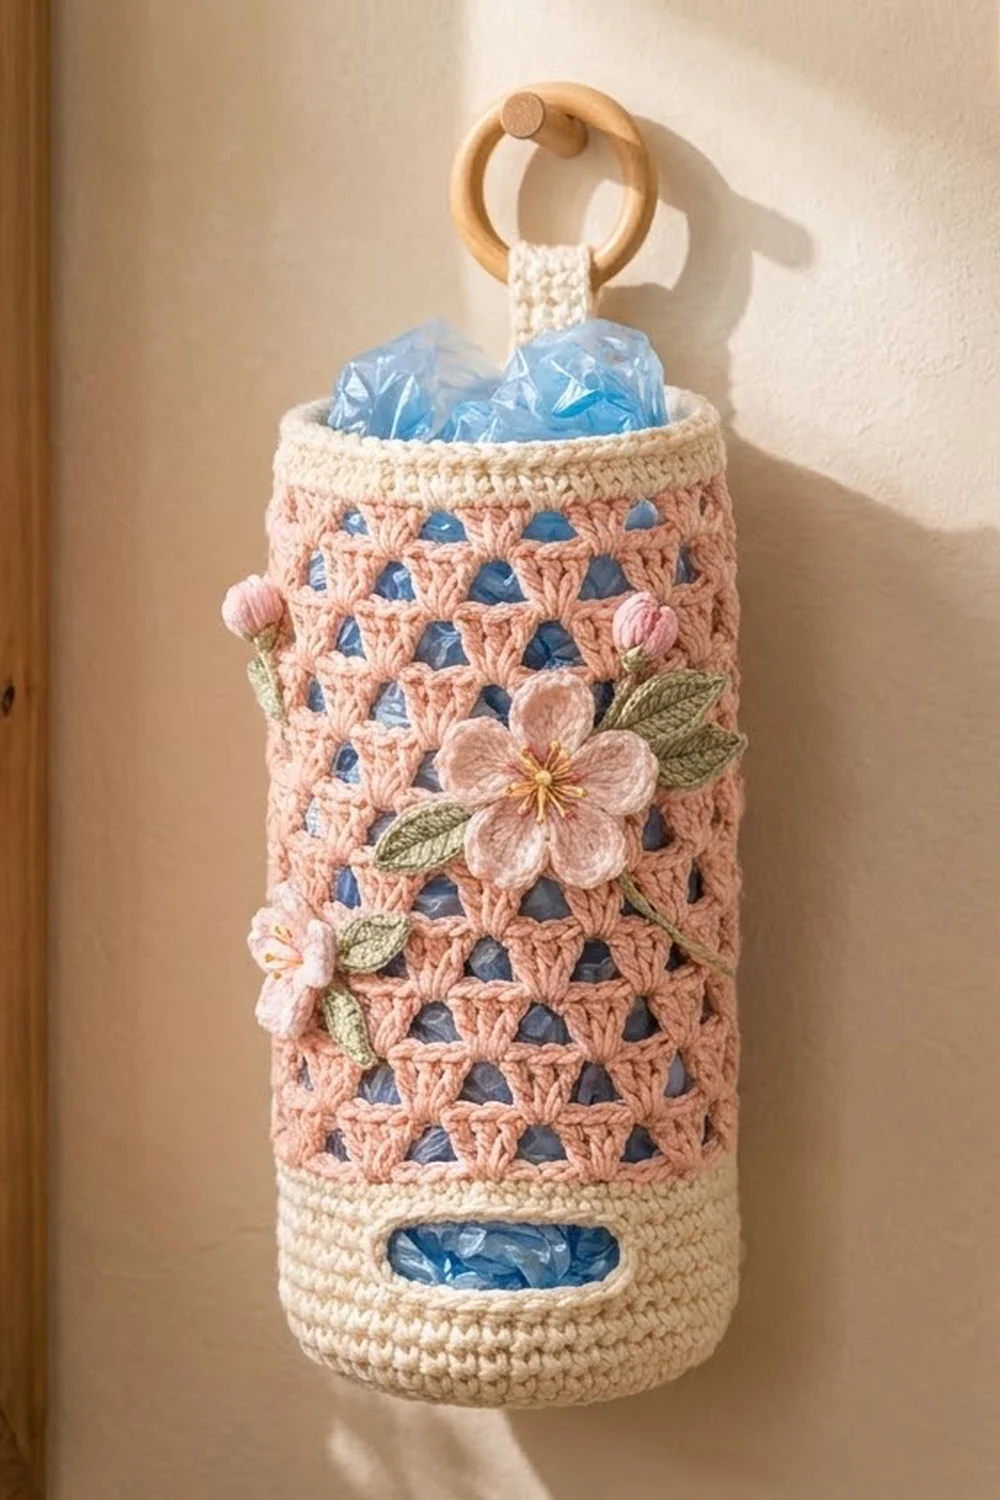
This cylindrical bag holder has a solid cream base, a soft peach-pink triangle mesh, and a scatter of cherry blossoms. You can see the bags through the mesh, while the solid lower band hides the bundle at the bottom. An oval slot near the base lets you pull out one bag at a time.
The palette is gentle and springlike. Cream is used for the base, slot band, top rim, and hanging tab, and peach pink for the mesh body. The flowers and buds are pale blossom pink, the leaves and stems are sage green, and the stamens are golden yellow. A wooden ring at the top lets it hang from a hook or peg.
The pattern uses US crochet terms. The finished holder measures 16 in (40.6 cm) around, about 5 in (12.7 cm) across, and 11 in (27.9 cm) tall from base to rim. The tab rises 1.6 in (4.1 cm) above the rim. Laid flat, the holder is 8 in (20.3 cm) wide.
The holder is worked in one continuous piece:
- Crochet a flat single crochet base.
- Build the cream wall, working the slot in short rows.
- Switch to pink for 14 rounds of shell mesh.
- Return to cream for the rim.
- Work the tab directly off the rim.
The blossoms and leaves are small separate appliqués that you sew on at the end.
Finished Size and Construction
- Finished size: 16 in (40.6 cm) circumference, about 5 in (12.7 cm) diameter, 11 in (27.9 cm) tall
- Skill level: Easy-intermediate
- Terminology: US crochet terms
- Yarn weight: Worsted (#4) cotton
- Hook: 4.0 mm (US G-6)
- Number of pieces: 1 main holder (base, wall, mesh, rim, and tab worked as one piece) plus 10 small appliqués
- Layout: Single upright cylinder, with the slot at the front and the tab at center back
- Piece size: Cream wall 3 in (7.6 cm), mesh 7 in (17.8 cm), rim 1 in (2.5 cm)
- Size before border: 10 in (25.4 cm) tall after the mesh
- Border depth: Top rim 1 in (2.5 cm); slot edging about 0.2 in (0.5 cm)
Materials
Choose a smooth worsted-weight cotton. Cotton keeps its shape under the weight of bags and gives crisp definition in the mesh. Avoid acrylic for the body, because it can sag over time.
- Cream: 70 g / 112 m
- Peach pink: 50 g / 80 m
- Pale blossom pink: 10 g / 16 m
- Sage green: 8 g / 13 m
- Golden yellow: 3 g / 5 m
These quantities include a margin of about 15 to 20 percent for swatching and tension differences.
Tools:
- 4.0 mm (US G-6) crochet hook
- Wooden ring, 2 in (5.1 cm) diameter
- Tapestry needle
- Stitch markers
- Scissors and measuring tape
- Rust-proof pins
- A tall jar or rolled towel about 5 in (12.7 cm) across, for blocking
Abbreviations (US Terms)
- ch: chain
- sl st: slip stitch
- sc: single crochet
- hdc: half double crochet
- dc: double crochet
- sk: skip
- st(s): stitch(es)
- sp: space
- MR: magic ring
- BLO: back loop only
- Rnd(s): round(s)
- RS / WS: right side / wrong side
Shell: Work 3 dc into the same stitch or space. Each shell fans upward into a triangle with its point at the bottom.
Puff bud: (Yarn over, insert hook, pull up a loop) 4 times in the same stitch, giving 9 loops on the hook. Yarn over, pull through all loops, then ch 1 to close.
Gauge and Checkpoints
- Single crochet: 18 sts and 20 rnds = 4 in (10.2 cm)
- Shell mesh: 3 repeats (shell plus ch-3) = 4 in (10.2 cm) wide; 8 rnds = 4 in (10.2 cm) tall
Treat the base as your gauge swatch, because every later round depends on its 72 stitches.
Checkpoints:
- After base Rnd 12: a flat circle about 4.8 in (12.2 cm) across.
- After wall Rnd 5: a tube 16 in (40.6 cm) around and 1 in (2.5 cm) tall.
- After wall Rnd 15: 3 in (7.6 cm) tall, with a slot about 3.5 in (8.9 cm) wide and 0.8 in (2.0 cm) tall.
- After mesh Rnd 14: 10 in (25.4 cm) tall from the base.
- After the rim: 11 in (27.9 cm) tall.
If your base is too big, go down a hook size (3.75 mm). If it is too small, go up (4.5 mm). If only the mesh is too tall, work your dc a little snugger instead of changing hooks.
Base
Use cream. The base grows by 6 sts every round. Stagger the increases from round to round so the circle stays round instead of turning into a hexagon.
Rnd 1: MR, ch 1, 6 sc in ring, join to first sc. (6 sts)
Rnd 2: Ch 1, 2 sc in each st around, join. (12 sts)
Rnd 3: Ch 1, sc in next st, 2 sc in next st; rep from * around, join. (18 sts)
Rnd 4: Ch 1, sc in next 2 sts, 2 sc in next st; rep around, join. (24 sts)
Rnds 5–12: Continue the same way, working 1 more sc between increases each round:
| Round | Stitches |
|---|---|
| Rnd 5 | 30 sts |
| Rnd 6 | 36 sts |
| Rnd 7 | 42 sts |
| Rnd 8 | 48 sts |
| Rnd 9 | 54 sts |
| Rnd 10 | 60 sts |
| Rnd 11 | 66 sts |
| Rnd 12 | 72 sts |
Checkpoint: 72 sts, about 4.8 in (12.2 cm) across, lying flat.
Cream Wall with Slot
Rnd 1: Ch 1, sc in BLO of each st around, join. (72 sts) The unused front loops make a crisp fold at the base edge.
Rnds 2–5: Ch 1, sc in each st around, join. (72 sts)
Next you work the slot in short rows. The 16 sts you leave unworked become the bottom edge of the slot.
Row 6 (WS): Ch 1, turn, sc in same st as join and in next 55 sts. (56 sts) Leave the remaining 16 sts unworked.
Rows 7–9: Ch 1, turn, sc in each of the 56 sts. (56 sts) Row 9 is a RS row and ends beside the gap.
Rnd 10 (RS): Do not turn. Ch 16 to bridge the gap. Sc in the first st of Row 9 on the far side of the gap and in each of the remaining 55 sts, then sc in each of the 16 ch. Join to first sc. (56 sc + 16 sc = 72 sts)
Rnds 11–15: Ch 1, sc in each st around, join. (72 sts) Fasten off.
Checkpoint: The wall is 3 in (7.6 cm) tall, and the slot is 3.5 in (8.9 cm) wide by 0.8 in (2.0 cm) tall. The center of the slot marks the front of the holder.
Peach Pink Shell Mesh
Rnd 1 (set-up): Join peach pink in the st directly opposite the slot center. Ch 3 (counts as dc), 2 dc in same st, ch 3, sk 5 sts. 3 dc in next st, ch 3, sk 5 sts; rep from * 10 more times. Join to top of beginning ch-3. (12 shells: 36 dc and 12 ch-3 sps)
Check: 12 repeats × 6 sts (1 worked plus 5 skipped) = 72 sts, which matches the wall exactly.
Rnd 2: Sl st in next 2 dc and into the next ch-3 sp. Ch 3, 2 dc in same sp, ch 3. 3 dc in next ch-3 sp, ch 3; rep from * 10 more times, join. (12 shells: 36 dc and 12 ch-3 sps)
Each new shell sits in the space between two shells below, and each ch-3 arches over a shell. This offset creates the alternating triangles and triangular openings.
Rnds 3–14: Repeat Rnd 2. (12 shells in every round) Fasten off after Rnd 14.
Checkpoint: The mesh is 7 in (17.8 cm) tall, and the total height is 10 in (25.4 cm). With a gentle stretch, the circumference still measures 16 in (40.6 cm).
Border: Top Rim and Slot Edge
The rim uses the same sc gauge as the wall: 18 sts and 20 rnds = 4 in (10.2 cm).
Rim Rnd 1 (conversion): Join cream in the first dc of any shell. Ch 1, sc in each dc and 3 sc in each ch-3 sp around, join. (36 sc worked 1 per dc + 36 sc worked 3 per ch-3 sp = 72 sts)
Rim Rnds 2–5: Ch 1, sc in each st around, join. (72 sts)
Rim Rnd 6: Sl st loosely in each st around, join. (72 sl sts) Fasten off.
Why the math works: Each mesh repeat (3 dc plus a ch-3 space) receives 3 + 3 = 6 sc. Twelve repeats × 6 = 72, the same as the wall. The rim matches the base circumference, so the holder stays a straight cylinder instead of flaring or pinching at the top.
Slot edge: With RS facing, join cream at a bottom corner of the slot. Work these sts in order, then join:
- Sc in each of the 16 unworked sts along the bottom.
- Work 4 sc up the row ends (1 per row).
- Work 16 sc into the free loops of the ch-16.
- Work 4 sc down the other row ends.
(16 + 4 + 16 + 4 = 40 sts) Fasten off.
One sc per row end works because sc rows (5 per inch) are nearly the same size as sc widths (4.5 per inch). The short sides lie flat without ruffling or puckering.
Hanging Tab
With RS facing, find center back on the rim, opposite the slot. Join cream 3 sts to the right of center.
Row 1: Ch 1, sc in same st and in next 5 sts. (6 sts, about 1.3 in / 3.3 cm wide)
Rows 2–16: Ch 1, turn, sc in each st across. (6 sts) The tab is now 3.2 in (8.1 cm) long.
Attach the ring:
- Pass Rows 9–16 through the wooden ring from front to back.
- Fold them down behind Rows 1–8 so the ring sits in the fold.
- Sew the last row to the inside of the rim, directly behind Row 1.
- Whipstitch both side edges of the two layers together.
The visible tab stands 1.6 in (4.1 cm) above the rim.
Cherry Blossom Appliqués
Large blossom (make 1), pale pink:
Rnd 1: MR, ch 1, 5 sc in ring, join. (5 sts)
Rnd 2: Ch 1, sc in next st, ch 3; rep 4 more times, join. (5 sc and 5 ch-3 sps)
Rnd 3: In each ch-3 sp, work (sc, hdc, 2 dc, sl st, 2 dc, hdc, sc), then sl st in the next sc. (5 petals) The center sl st pulls a notch into each petal tip, like a real cherry blossom. The finished blossom is 2.5 in (6.4 cm) across.
Small blossom (make 2), pale pink:
Rnd 1: MR, ch 1, 5 sc in ring, join. (5 sts)
Rnd 2: In each st, work (sl st, ch 2, 2 dc, ch 2, sl st). (5 petals) The finished blossom is 1.25 in (3.2 cm) across.
Bud (make 3), pale pink: Ch 3, then work a puff bud in the 3rd ch from the hook. Leave a long tail. The finished bud is 0.5 in (1.3 cm).
Leaf (make 4), sage green: Ch 8. Sc in 2nd ch from hook, hdc, dc, dc, hdc, sc, then 3 sc in the last ch. Working along the other side of the chain: sc, hdc, dc, dc, hdc, sc, sl st to first sc. (6 + 3 + 6 = 15 sts) The finished leaf is 1.5 in (3.8 cm) long.
Embroidery:
- Stamens: With golden yellow, work 8 to 10 straight stitches radiating from each blossom center and tip them with French knots.
- Sepals: With sage, work 2 lazy daisy stitches at the base of each bud.
Placement:
- Center the large blossom on the front, slightly right of the slot, over mesh Rnds 7–10.
- Place one small blossom low on the left (Rnds 3–4) and one high on the right (Rnd 12).
- Tuck the leaves beside the blossoms and the buds between them.
- Link everything with curving sage split-stitch stems.
Sew each appliqué through the dc posts of the mesh, never across an open hole, so nothing sags.
Final Blocking
- Weave in all ends through the dc posts so they stay hidden.
- Spritz the holder until it is damp but not soaked.
- Slide it over a jar or rolled towel about 5 in (12.7 cm) across.
- Gently tug each mesh round so the triangles open evenly.
- Pat the rim and base edge into straight, crisp lines.
- Shape the petals with your fingers and pin the leaves flat.
- Let it dry completely, at least 12 hours.
- Check that it measures 16 in (40.6 cm) around and 11 in (27.9 cm) tall.
Final Quality-Control Checklist
- The base lies flat and measures about 4.8 in (12.2 cm) across.
- Every sc round has 72 sts, and the slot edge has 40 sts.
- Every mesh round has 12 shells and 12 ch-3 sps.
- Rim Rnd 1 has exactly 72 sts.
- The slot is centered at the front, opposite the tab.
- The tab is 6 sts wide and sewn securely along both edges.
- The ring is locked in the fold and cannot slip out.
- All appliqués are stitched through dc posts.
- No yarn ends show on the outside.
Troubleshooting
Base cups or ruffles: Cupping means too few increases or tight tension. Ruffling means too many increases. Recount each round against the listed totals.
Base looks hexagonal: Stagger the increase positions each round.
Mesh leans or spirals: Start every round with sl sts into the ch-3 sp so the shells always sit between the shells below.
Rim flares: You probably worked 4 sc into some ch-3 sps. Recount to 72.
Slot gapes: Rework the slot edging with exactly 4 sc along each short side.
Holder sags when full: Use a firmer cotton or a smaller hook.
Blossoms curl: Pin them flat and block them before sewing.
Care
Hand wash in cool water with mild soap and press out the water in a towel. Dry it over a jar to keep the cylinder shape, and do not tumble dry.
Final Notes
Here is the measurement chain from start to finish:
- A 72-st base about 4.8 in (12.2 cm) across sets the 16 in (40.6 cm) circumference.
- The cream wall adds 3 in (7.6 cm) and includes a 3.5 in (8.9 cm) slot.
- Fourteen mesh rounds of 12 shells add 7 in (17.8 cm), bringing the height to 10 in (25.4 cm).
- The 72-st rim adds 1 in (2.5 cm), for a finished height of 11 in (27.9 cm).
- A 1.6 in (4.1 cm) tab and a wooden ring finish the top.
If your counts stay steady, the blossoms will sit on a straight, tidy cylinder.
Happy crocheting!