

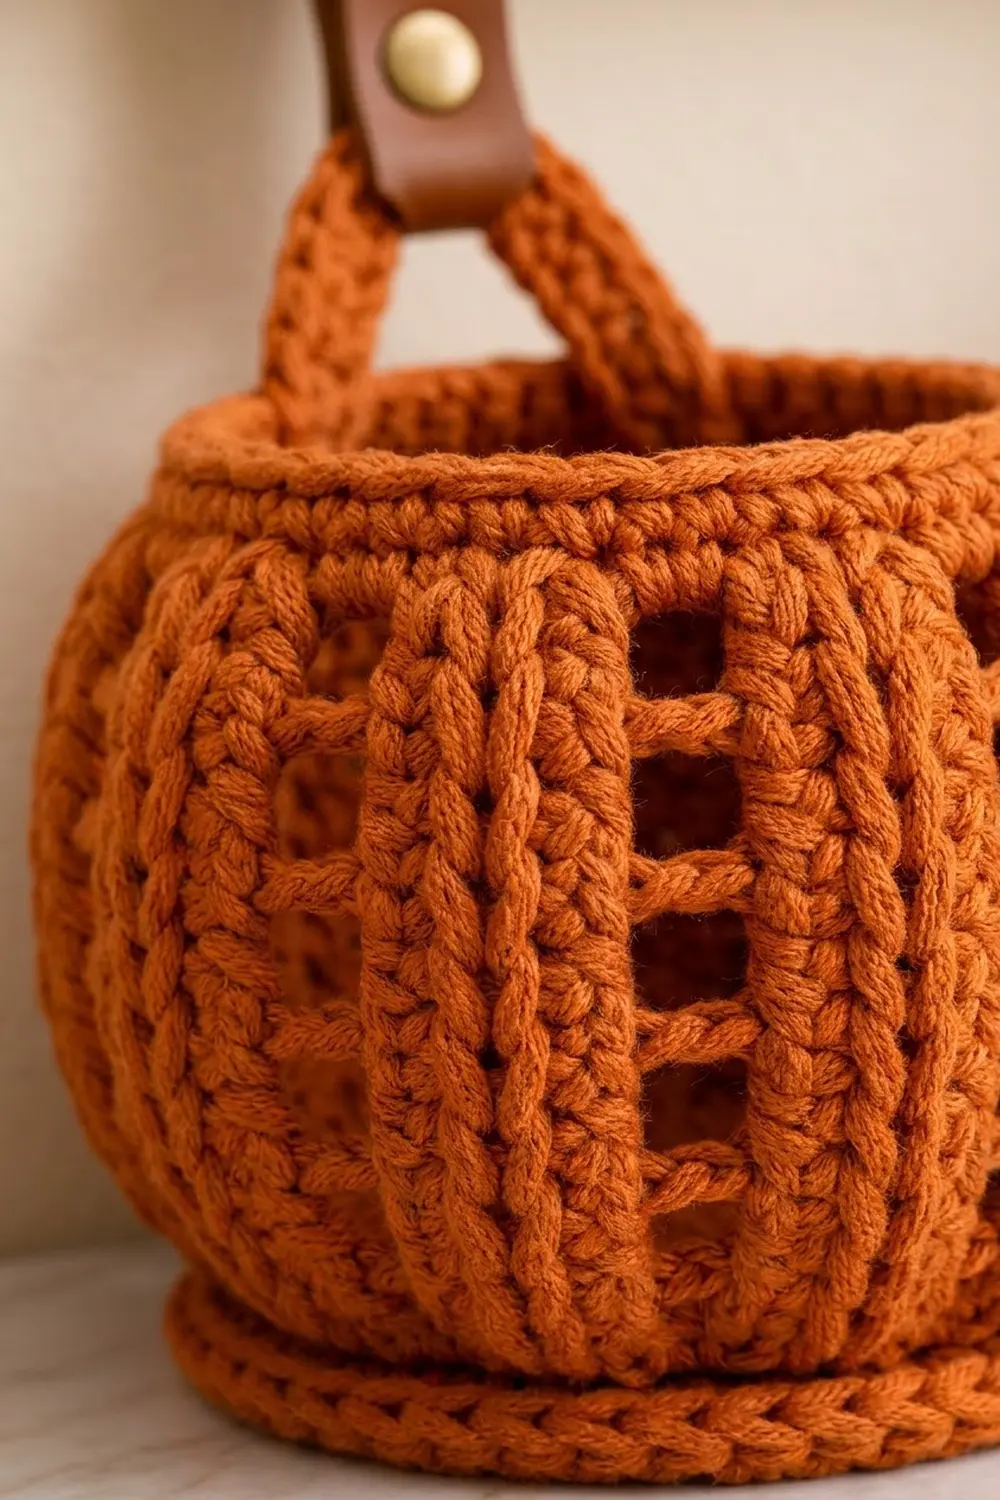
These little pumpkin baskets bring a warm autumn feel to a bathroom, vanity or craft corner. Each basket has a flat round base, a rounded belly with knit-look vertical ribs, and neat columns of small “windows” between the ribs. Together, the ribs and windows give the classic segmented pumpkin look.
The set is worked in one burnt-orange worsted yarn. Each basket hangs from a short crocheted strap held in a leather tab. The tab snaps over a wooden dowel, so you can lift each basket off for refilling. This pattern uses US crochet terms throughout.
Each finished basket is about 6¼ in (15.9 cm) wide at the belly and 4¼ in (10.8 cm) tall, with a 4½ in (11.4 cm) rim opening. You’ll make three baskets and three straps.
Construction is simple. Work the base in joined rounds of single crochet. Turn the edge up with a back-loop round, then build the body in alternating window and solid half double crochet rounds. Finish with a single crochet rim and a reverse single crochet edge. The straps are short strips sewn inside the back rim.
Finished Size and Construction
- Finished size (one basket): 6¼ in (15.9 cm) wide x 4¼ in (10.8 cm) tall
- Skill level: Easy-intermediate
- Terminology: US crochet terms
- Yarn weight: Worsted (#4)
- Hook: 5.0 mm (H-8)
- Number of pieces: 3 baskets + 3 straps (6 crocheted pieces)
- Layout: 3 baskets in a row on one dowel, 6½ in (16.5 cm) apart center to center
- Base diameter: 5½ in (14.0 cm)
- Size before rim border (after Round 19): 6¼ in (15.9 cm) wide x 3½ in (8.9 cm) tall
- Rim border depth: ¾ in (1.9 cm)
- Strap: 1 in (2.5 cm) wide x 8½ in (21.6 cm) long
Materials
Yarn: Use a smooth worsted-weight cotton or cotton blend. Cotton holds the pumpkin shape well and doesn’t stretch much under the weight of brushes and bottles. A tightly plied yarn shows the ribs most clearly.
- Burnt orange: 180 g / about 360 m (394 yd)
- Each basket uses about 45 g, and each strap about 5 g, so 150 g covers the full set. The quantity above includes a margin of about 20% for your gauge swatch and tension differences.
Tools:
- 5.0 mm (H-8) crochet hook
- Tapestry needle
- 6 stitch markers
- Scissors and a measuring tape
- 3 leather strap tabs, ¾ in (1.9 cm) wide x 5 in (12.7 cm) long, with a snap or rivet closure
- 1 wooden dowel, ¾ in (1.9 cm) thick x 20 in (50.8 cm) long
- 2 small screw hooks or brackets for the wall
- Spray bottle and a round form for blocking (a small bowl or balloon)
Abbreviations (US Terms)
- ch – chain
- sl st – slip stitch
- sc – single crochet
- hdc – half double crochet
- sc2tog – single crochet 2 together
- hdc2tog – half double crochet 2 together
- BLO – back loop only
- MR – magic ring
- sp – space
- sk – skip
- st(s) – stitch(es)
- rev sc – reverse single crochet (crab stitch)
Special stitch: Third-loop hdc (3L-hdc). Look behind the top V of an hdc and you’ll see a horizontal bar. Insert the hook under that bar only and work a regular hdc. The top V is pushed to the front, which gives the knit-like stacked V’s that form the raised ribs.
Rev sc: Work single crochet from left to right (right-handed), inserting the hook into the next stitch to the right.
Gauge and Checkpoints
- Sc gauge (base and rim): 14 sts x 16 rows = 4 in (10.2 cm)
- Hdc gauge (body): 14 sts x 10 rounds = 4 in (10.2 cm)
Make one complete basket before starting the others. Use it as your full gauge test.
Checkpoints:
- After Round 5 of the base: diameter 2¾ in (7.0 cm).
- After Round 10: diameter 5½ in (14.0 cm), lying flat with no ruffles or cupping.
- After Round 13: the sides stand 1½ in (3.8 cm) tall from the table.
- After Round 19: about 3½ in (8.9 cm) tall and 6¼ in (15.9 cm) wide at the belly.
- After Round 22: 4¼ in (10.8 cm) tall, with a 4½ in (11.4 cm) rim opening.
If your basket is too big, go down to a 4.5 mm hook. If it’s too small, go up to a 5.5 mm hook. If only the base is off (it ruffles or cups), adjust your base tension rather than the counts. The body math depends on exactly 60 sts at the end of the base.
Base (Make 3)
Join every round with a sl st to the first st. Start each sc round with ch 1, which doesn’t count as a stitch.
Round 1: In a MR, work 6 sc. (6 sts)
Round 2: 2 sc in each st around. (12 sts)
Round 3: Sc in next st, 2 sc in next st; repeat 6 times. (18 sts)
Round 4: Sc in next 2 sts, 2 sc in next st; repeat 6 times. (24 sts)
Round 5: Sc in next 3 sts, 2 sc in next st; repeat 6 times. (30 sts)
Checkpoint: 2¾ in (7.0 cm).
Round 6: Sc in next 4 sts, 2 sc in next st; repeat 6 times. (36 sts)
Round 7: Sc in next 5 sts, 2 sc in next st; repeat 6 times. (42 sts)
Round 8: Sc in next 6 sts, 2 sc in next st; repeat 6 times. (48 sts)
Round 9: Sc in next 7 sts, 2 sc in next st; repeat 6 times. (54 sts)
Round 10: Sc in next 8 sts, 2 sc in next st; repeat 6 times. (60 sts)
Checkpoint: 5½ in (14.0 cm). Sixty stitches split evenly into 10 rib repeats of 6 sts each.
Body
Round 11 (turning round): Ch 1, sc in BLO of each st around. (60 sts)
The unused front loops leave a crisp ridge at the bottom edge, and the sides begin to rise.
From here on, start each hdc round with ch 2, which doesn’t count as a stitch. Work the first st into the same st as the join. Join with a sl st to the first hdc.
Round 12 (window): Hdc in next 4 sts, ch 2, sk 2 sts; repeat 10 times. (40 hdc + 10 ch-2 sps = 60 sts)
These are the first openings. Each block of 4 hdc is the start of one rib.
Round 13 (solid, increase): 3L-hdc in next st, 2 3L-hdc in next st, 3L-hdc in next 2 sts, 2 hdc in ch-2 sp; repeat 10 times. (7 sts per repeat: 5 rib + 2 window column = 70 sts)
This is a growth round, and 70 is the complete count for this round.
Checkpoint: the sides measure 1½ in (3.8 cm).
Round 14 (window): 3L-hdc in next 5 sts, ch 2, sk 2 sts; repeat 10 times. (50 hdc + 10 ch-2 sps = 70 sts)
The 2 skipped sts are the ones you worked into the previous ch-2 sp, so the windows stack in straight columns.
Round 15 (solid): 3L-hdc in next 5 sts, 2 hdc in ch-2 sp; repeat 10 times. (70 sts)
Round 16 (window): Repeat Round 14. (70 sts)
This is the widest point of the pumpkin.
Round 17 (solid, decrease): 3L-hdc in next st, hdc2tog (through third loops), 3L-hdc in next 2 sts, 2 hdc in ch-2 sp; repeat 10 times. (6 sts per repeat: 4 rib + 2 window column = 60 sts)
Round 18 (window): 3L-hdc in next 4 sts, ch 2, sk 2 sts; repeat 10 times. (40 hdc + 10 ch-2 sps = 60 sts)
Round 19 (solid): 3L-hdc in next 4 sts, 2 hdc in ch-2 sp; repeat 10 times. (60 sts)
There are now four windows in each of the 10 columns.
Checkpoint: 3½ in (8.9 cm) tall and 6¼ in (15.9 cm) wide. If the belly looks flat, the windows are probably drifting out of line. Check that each window round skips the 2 sts worked into the ch-2 sp below.
Make All Pieces
Make 3 complete baskets (Rounds 1–22, including the rim border below) and 3 straps. Everything is burnt orange.
| Piece | Quantity | Yarn each | Total |
|---|---|---|---|
| Basket | 3 | 45 g | 135 g |
| Strap | 3 | 5 g | 15 g |
Strap (Make 3):
Row 1: Ch 31, sc in 2nd ch from hook and in each ch across. (30 sts)
Rows 2–4: Ch 1, turn, sc in BLO of each st across. (30 sts)
Fasten off and leave a 12 in (30.5 cm) tail. The strap measures 1 in (2.5 cm) x 8½ in (21.6 cm).
Layout (front view on the dowel):
|=========== dowel 20 in (50.8 cm) ===========|
     [tab]          [tab]          [tab]
       V              V              V
   (Basket A)     (Basket B)     (Basket C)
  3½ in edge |←6½ in→|←6½ in→| 3½ in edge
Joining
Each basket and its strap stay separate from the other baskets. “Joining” here means sewing each strap to its own basket, then fitting the leather tab.
Mark the attachment points. Choose one rib as the center back. On Round 21, count 5 sts to each side of that rib’s center. Mark the strap positions 10 sts apart, which is 2.9 in (7.4 cm) at sc gauge. That spacing creates the inverted V shown on the hanging set.
Stitch-to-stitch logic. Each strap end is 4 rows wide, about 1 in (2.5 cm). Lay one end inside the rim so it overlaps Rounds 20–21 by ½ in (1.3 cm), centered on its marker. Whipstitch the 4 row-ends of the strap end to 4 consecutive rim sts, one row-end to one rim st. Then sew a second line along Round 20 to lock the end in place. Repeat for the other end. Twist-check that the strap isn’t twisted before sewing the second end.
Tension advice. Sew snugly, but don’t pull so hard that the rim puckers. The rim should stay round when you lift the basket by the strap.
Fit the tab. Fold the strap at its center (st 15). Wrap the leather tab around the fold, then close the snap or rivet. Leave a ¾ in (1.9 cm) leather loop above the crochet so the dowel can pass through.
Size checkpoint: When you hang the basket, its rim should sit about 3½ in (8.9 cm) below the dowel.
Rim Border
Border gauge: 14 sc = 4 in (10.2 cm). Because the basket is round, the border counts are given per rib repeat (10 repeats around) rather than per side.
Round 20: Ch 1, sc in next 4 sts, sc2tog over the 2 window-column sts; repeat 10 times. (5 sts per repeat = 50 sts)
Round 21: Ch 1, sc in each st around. (50 sts)
Round 22: Ch 1, rev sc in each st around. (50 sts)
Fasten off and weave in the ends.
Why the math works: Round 19 has 10 repeats of 6 sts each. Taking 1 st from each window column leaves 10 repeats of 5 sts, or 50 sts. At 14 sc per 4 in, 50 sts makes a rim circumference of 14.3 in (36.3 cm), so the opening is 4½ in (11.4 cm). That’s narrower than the 20 in (50.8 cm) belly, which creates the curved pumpkin shoulder. The decrease sits over the window columns, so each rib stays centered under the rim.
The border adds ¾ in (1.9 cm), bringing the 3½ in (8.9 cm) body to a finished height of 4¼ in (10.8 cm).
Final Blocking
- Weave in all ends before blocking.
- Mist each basket until it’s evenly damp, not soaked.
- Fit the basket over a small round form so the belly fills out to 6¼ in (15.9 cm).
- Push each rib outward and pinch the window columns slightly inward to deepen the segments.
- Flatten the base on the table so it measures 5½ in (14.0 cm).
- Roll the rev sc edge slightly outward with your fingers.
- Lay the straps flat at 1 in x 8½ in (2.5 cm x 21.6 cm).
- Let everything dry completely, then fit the tabs and hang.
Final Quality-Control Checklist
- The base is 5½ in (14.0 cm) and lies flat
- There are 10 ribs, each lined up straight from base to rim
- Each column has 4 windows, stacked vertically
- The belly is 6¼ in (15.9 cm) wide, and the rim opening is 4½ in (11.4 cm)
- The height is 4¼ in (10.8 cm)
- The rim has 50 sts, with an even rev sc edge
- The strap ends are 10 sts apart and sewn securely
- All three baskets match within ¼ in (0.6 cm)
- The tabs are spaced 6½ in (16.5 cm) apart on the dowel
Troubleshooting
The base ruffles. You’re crocheting too loosely or your count is off. Recount, or use a smaller hook for the base only.
The base cups. Your tension is too tight. Loosen up or go up half a hook size.
The windows lean. Start each round in the same st as the join, and recount each repeat.
The ribs look flat. You’re working into both loops. Use the third loop for every rib st.
The windows are too small. Make the ch-2 a little looser, or chain 3 and still work 2 hdc into the space.
The rim flares. Check that Round 20 has exactly 50 sts.
The basket tilts when hanging. The strap ends aren’t evenly spaced around the center rib. Re-sew them 5 sts on each side of center.
Care
Hand wash in cool water, press out the water in a towel, and reshape the baskets to dry flat. Remove the leather tabs before washing.

Final Notes
Here’s the full measurement chain. The 60-stitch base measures 5½ in (14.0 cm). The 70-stitch belly measures 6¼ in (15.9 cm) wide. The body is 3½ in (8.9 cm) tall before the rim. The 50-stitch rim adds ¾ in (1.9 cm), for a finished height of 4¼ in (10.8 cm). Three baskets hang 6½ in (16.5 cm) apart on a 20 in (50.8 cm) dowel. Check each stage on your first basket, and the other two will match.
Happy crocheting!