

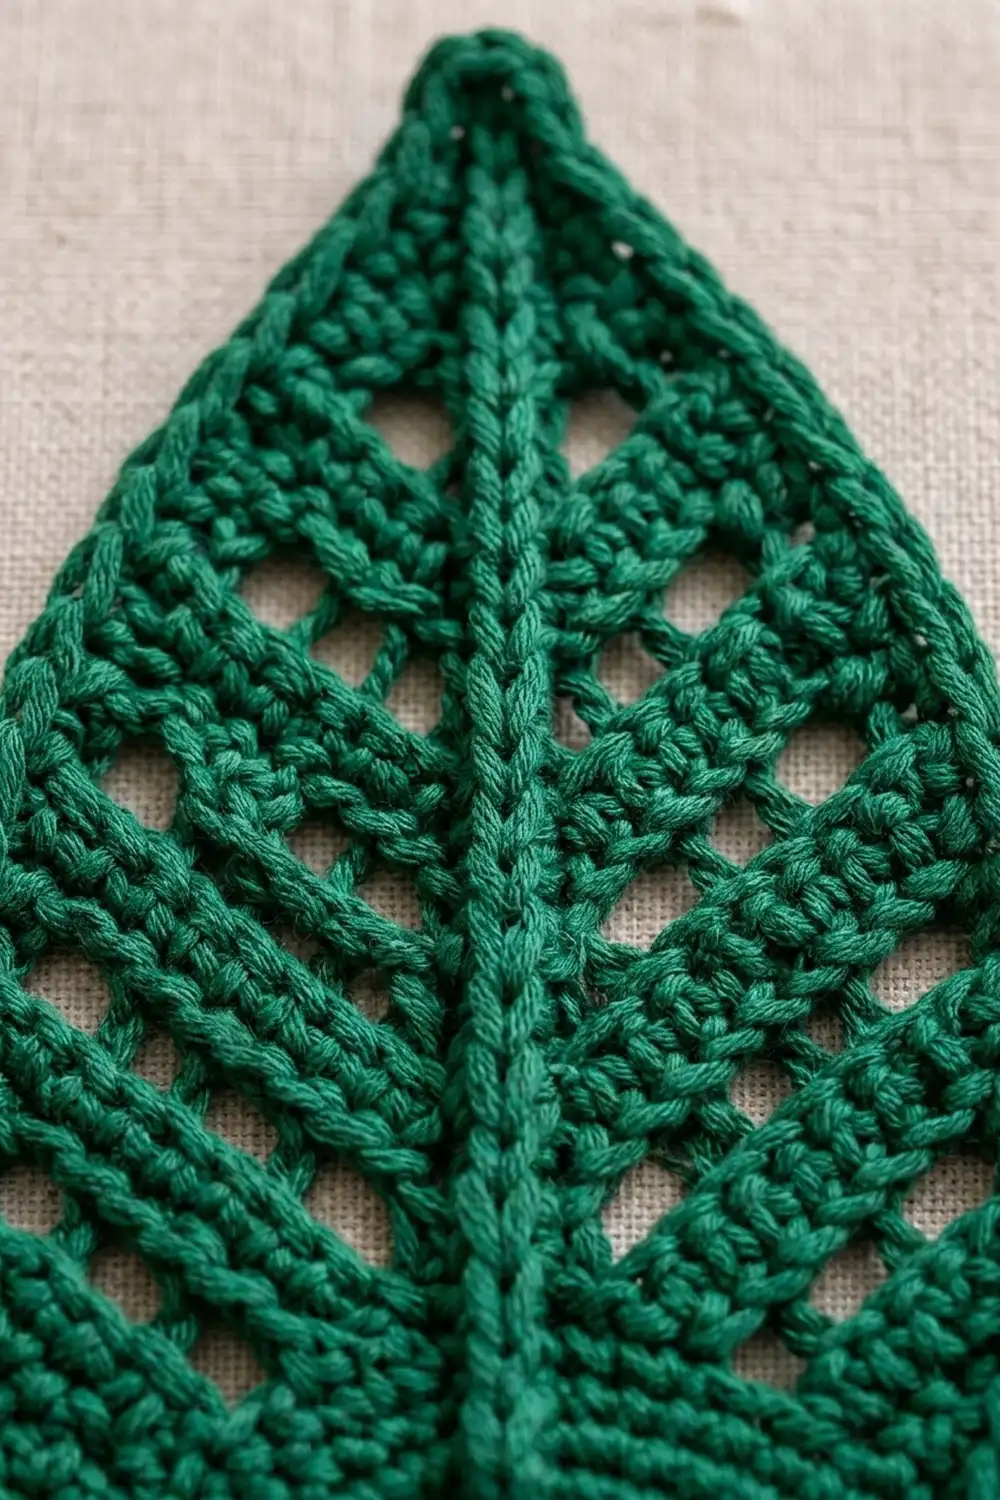
The Evergreen Leaf Hanging Pocket is a small, sturdy wall organizer shaped like a folded leaf. A raised center ridge runs up the front and back like a midrib. Slanted eyelet slots on each side form upward-pointing chevrons, like leaf veins, and the back rises into a solid pointed tip that hangs from a crocheted loop.
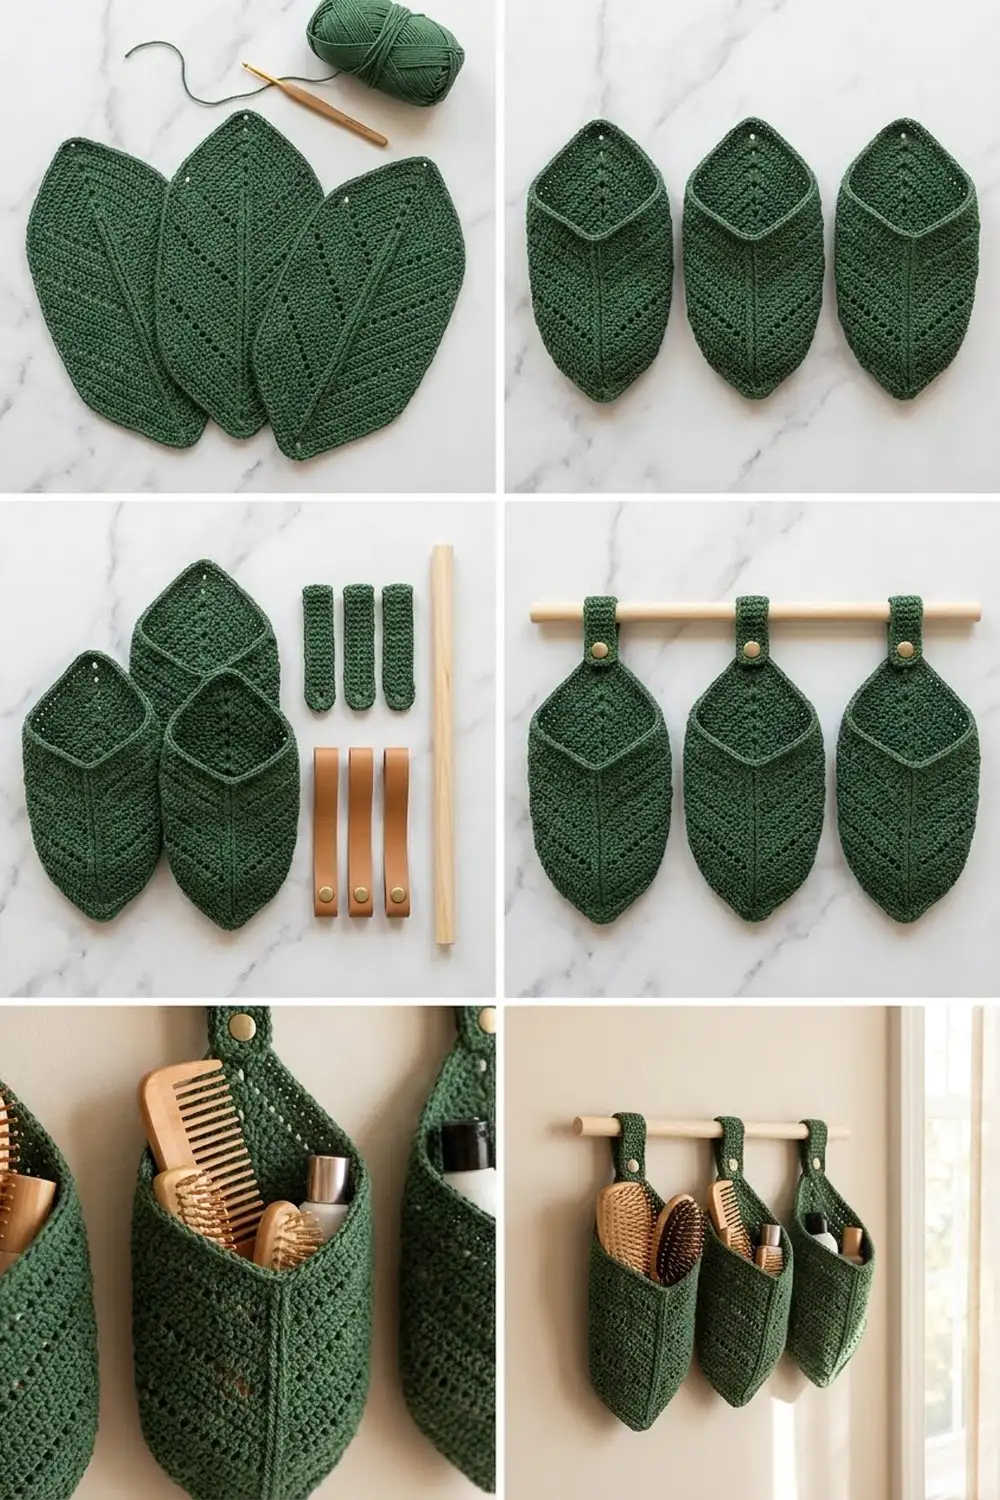
This pattern makes a set of three identical pockets in one deep forest green, hung side by side from a wooden dowel with leather snap straps. The pockets are not joined to each other. Each one hangs on its own, so you can space them, rearrange them, or make just one.
Each finished pocket measures 5.5 in (14.0 cm) wide when flat, 6 in (15.2 cm) tall at the front opening, and 8.75 in (22.2 cm) tall to the tip of the back. The pattern uses US crochet terms throughout.
Construction is simple. You crochet an oval base in rounds, then turn the edge upward and work the body in joined rounds. Post stitches build the ridge, and staggered chain spaces make the chevron slots. After the body, the back half continues in rows and decreases to a point. A two-round edging finishes the opening, and a folded crochet strip becomes the hanging loop.
Finished Size and Construction
- Finished pocket size: 5.5 in (14.0 cm) wide flat × 8.75 in (22.2 cm) tall to tip
- Front opening height: 6 in (15.2 cm)
- Base: about 4 in × 2 in (10.2 cm × 5.1 cm) oval
- Size before border: 5.5 in × 8.5 in (14.0 cm × 21.6 cm)
- Border depth: about 0.25 in (0.6 cm)
- Skill level: Intermediate
- Terminology: US
- Yarn weight: #4 worsted, cotton
- Hook: 4.0 mm (G-6)
- Number of pieces: 3 pockets + 3 hanging loops (plus purchased straps and dowel)
- Layout: 3 pockets in one row, hung 1.5 in (3.8 cm) apart, not joined
Materials
Yarn: Use a smooth, firm worsted-weight cotton or cotton blend. Cotton holds the pocket shape and keeps the slots crisp. Soft acrylic will sag once the pockets are loaded.
- Forest green: 100 g, about 208 yd (190 m). Each pocket and its loop uses about 25 g.
These quantities include a margin for your gauge swatch and small differences in tension.
Tools and notions:
- 4.0 mm (G-6) crochet hook
- 4 locking stitch markers
- Tapestry needle
- Scissors
- 3 leather snap straps, about 1 in × 5 in (2.5 cm × 12.7 cm)
- Wooden dowel, 24 in (61.0 cm) long, 0.75 in (1.9 cm) diameter
- Optional: 2 wall brackets for the dowel
- Rust-proof pins and a jar or rolled towel for blocking
Abbreviations (US Terms)
- ch – chain
- sl st – slip stitch
- sc – single crochet
- inc – 2 sc in the same stitch
- sc2tog – single crochet 2 together
- sc3tog – single crochet 3 together
- BLO – back loop only
- FPdc – front post double crochet
- BPdc – back post double crochet
- rev sc – reverse single crochet (crab stitch)
- st(s) – stitch(es)
- RS / WS – right side / wrong side
Special stitch – Spine stitch: Work FPdc around the post of the spine stitch in the previous round or row, then skip the stitch behind it. It counts as 1 stitch. On WS rows, work BPdc instead so the ridge stays raised on the RS.
Slot: Ch 2, skip 2 sts. It counts as 2 stitches. On the next round, chains count as stitches, so work into a chain like any other stitch.
Gauge and Checkpoints
Gauge: 16 sc and 18 rounds = 4 in (10.2 cm) in sc, worked firmly.
The best gauge test is one complete pocket. Make one first, check it against the measurements below, and only then make the other two.
Checkpoints:
- After Rnd 5, the base lies flat and measures about 4 in × 2 in (10.2 cm × 5.1 cm).
- After Rnd 13, the body is about 1.5 in (3.8 cm) tall above the base ridge.
- After Rnd 19, the body is about 3 in (7.6 cm) tall.
- After Rnd 32, the body is 5.75 in (14.6 cm) tall and 5.5 in (14.0 cm) wide flat.
- The finished back flap adds 2.75 in (7.0 cm).
- With the border, the pocket is 8.75 in (22.2 cm) tall.
If your pocket is too big, change to a 3.5 mm hook. If it is too small or stiff, change to a 4.5 mm hook. Don’t add or remove stitches, because the slot layout depends on exactly 44 stitches.
Pocket (Make 3)
Base
Ch 9.
Rnd 1: Sc in 2nd ch from hook, sc in next 6 ch, 3 sc in last ch. Working along the opposite side of the chain, sc in next 6 ch, 2 sc in last ch (the same ch as the first sc). Join with sl st to first sc. (18 sts)
Rnd 2: Ch 1, inc in first st, sc in next 6 sts, inc in each of next 3 sts, sc in next 6 sts, inc in each of last 2 sts. Join. (24 sts)
Rnd 3: Ch 1, sc in first st, inc in next st, sc in next 6 sts, (sc 1, inc) 3 times, sc in next 6 sts, (sc 1, inc) 2 times. Join. (30 sts)
Rnd 4: Ch 1, sc in next 2 sts, inc, sc in next 6 sts, (sc 2, inc) 3 times, sc in next 6 sts, (sc 2, inc) 2 times. Join. (36 sts)
Rnd 5: Ch 1, sc in next 3 sts, inc, sc in next 6 sts, (sc 3, inc) 3 times, sc in next 6 sts, (sc 3, inc) 2 times. Join. (42 sts)
Rnd 6 (BLO): Ch 1, working in BLO, (sc in next 20 sts, inc) 2 times. Join. (44 sts)
The BLO round leaves a ridge that turns the edge upward and outlines the base. Fasten off.
Placing the Markers
Flatten the base so its long sides face front and back. Place marker A in the center stitch of one long side (the front spine) and marker B in the center stitch of the other long side (the back spine). There must be exactly 21 stitches between A and B on each side.
Count 11 stitches from A in the working direction and mark that stitch S1 (side stitch). Count 11 stitches from B and mark that stitch S2. Now each side stitch has 10 stitches on either side before the next spine.
Body
Each round has the same layout, repeated twice:
side sc + 10-st wing toward the spine + spine stitch + 10-st wing away from the spine = 22 sts, × 2 = 44 sts.
Rnd 7 (set-up): Join yarn in S1. Ch 1, sc in side st, sc in next 10 sts, FPdc around marked spine st of Rnd 6, sc in next 10 sts; repeat from * once. Join with sl st to first sc. (44 sts)* Move markers up to the side stitches and spines as you go.
The slot rounds follow. “Wing in” is the 10 stitches from the side stitch to the spine. “Wing out” is the 10 stitches from the spine to the next side stitch.
Slot round a: Ch 1, sc in side st; wing in: sc 2, slot, sc 6; spine stitch; wing out: sc 6, slot, sc 2; repeat from * once. Join. (44 sts)*
Slot round b: Ch 1, sc in side st; wing in: sc 3, slot, sc 5; spine stitch; wing out: sc 5, slot, sc 3; repeat from * once. Join. (44 sts)*
Slot round c: Ch 1, sc in side st; wing in: sc 4, slot, sc 4; spine stitch; wing out: sc 4, slot, sc 4; repeat from * once. Join. (44 sts)*
Slot round d: Ch 1, sc in side st; wing in: sc 5, slot, sc 3; spine stitch; wing out: sc 3, slot, sc 5; repeat from * once. Join. (44 sts)*
Plain round: Ch 1, sc in side st, sc in next 10 sts, spine stitch, sc in next 10 sts; repeat from * once. Join. (44 sts)*
Each round moves the slot 1 stitch closer to the spine. The slots stack into a diagonal line that rises toward the ridge, making an upward-pointing chevron on each side of the front and back spines.
Rnds 8–13 (band 1): Work slot rounds a, b, c, d, then 2 plain rounds.
Rnds 14–19 (band 2): Repeat band 1.
Rnds 20–25 (band 3): Repeat band 1.
Rnds 26–31 (band 4): Repeat band 1.
Rnd 32: Work a plain round. Join with sl st to the first sc (S1). Don’t fasten off. (44 sts)
Checkpoint: the body is 26 rounds (Rnds 7–32), 5.75 in (14.6 cm) tall and 5.5 in (14.0 cm) wide flat.
Back Flap
The back half is 23 stitches: S1, 10 sts, spine B, 10 sts, S2. Work it in rows. The 21 front stitches stay unworked and become the front of the opening.
Row 1 (RS): Ch 1, sc in S1, sc in next 10 sts, FPdc around spine, sc in next 10 sts, sc in S2. Turn. (23 sts)
Row 2 (WS): Ch 1, sc2tog, sc 9, BPdc around spine, sc 9, sc2tog. Turn. (21 sts)
Row 3: Ch 1, sc2tog, sc 8, FPdc, sc 8, sc2tog. Turn. (19 sts)
Keep working sc2tog at each end of every row, the spine stitch in the center (FPdc on RS rows, BPdc on WS rows), and 1 fewer sc on each side each row:
- Row 4: 17 sts
- Row 5: 15 sts
- Row 6: 13 sts
- Row 7: 11 sts
- Row 8: 9 sts
- Row 9: 7 sts
- Row 10: 5 sts
Row 11 (RS): Ch 1, sc2tog, FPdc, sc2tog. Turn. (3 sts)
Row 12 (WS): Ch 1, sc3tog. (1 st) Don’t fasten off.
Checkpoint: the flap is 12 rows, about 2.75 in (7.0 cm) tall. Each slanted side edge is about 4 in (10.2 cm) long.
Border
Border gauge: 4 sc per inch (2.5 cm) along stitch tops. On the slanted flap edges, work 4 sc in every 3 row ends.
Border Rnd 1: Ch 1, 3 sc in the tip stitch. Work down the first slanted edge with 15 sc spread evenly over the row ends (4 sc per 3 row ends). Sc2tog over the last row end and the first front stitch. Sc in the next 19 front sts. Sc2tog over the last front stitch and the first row end of the other edge. Work 15 sc evenly up the second edge. Join to the first sc.
Count: 3 (tip) + 15 + 1 + 19 + 1 + 15 = 54 sts. All 21 front stitches are used: 1 + 19 + 1.
Border Rnd 2: Ch 1, rev sc in each stitch around. Join and fasten off.
Count: 54 worked 1 per existing stitch + 0 added = 54 sts.
Why the math works: Each flap edge is about 3.8–4 in (9.7–10.2 cm) long. Sixteen stitch positions at 4 sc per inch cover 4 in (10.2 cm), so the edge lies flat. The sc2tog at each inner corner, where the flap meets the front, uses up the extra fabric that would otherwise ripple. The 3 sc at the tip turn the point sharply. The rev sc round makes the rope-like edge without changing the count.
Hanging Loop (Make 3)
Ch 25.
Row 1: Sc in 2nd ch from hook and in each ch across. Turn. (24 sts)
Row 2: Ch 1, sc in each st across. (24 sts) Fasten off, leaving a 10 in (25.4 cm) tail.
The strip is 6 in (15.2 cm) long and about 0.5 in (1.3 cm) wide. Fold it in half to make a 3 in (7.6 cm) loop.
Make All Pieces
- Forest green: 3 pockets + 3 hanging loops
- Purchased: 3 leather snap straps, 1 dowel
Layout grid (front view, dowel on top):
====================== dowel 24 in (61.0 cm) ======================
   [strap]             [strap]             [strap]
   [loop]              [loop]              [loop]
  POCKET 1  -- 1.5 in --  POCKET 2  -- 1.5 in --  POCKET 3
Joining
The pockets are never joined to each other. “Joining” here means attaching each loop and hanging the pockets.
- Attach the loop: Lay the folded loop ends on the WS of the back flap so they overlap the tip by 0.75 in (1.9 cm). Whipstitch both ends to the flap, stitch to stitch, catching only the WS loops so nothing shows on the front. About 2.25 in (5.7 cm) of loop stays free above the tip.
- Tension: Pull each stitch snug but not tight. If you overstitch, the tip puckers and leans forward.
- Strap: Pass a leather strap through the loop, wrap it around the dowel, and snap it closed.
- Spacing: Center pocket 2 on the dowel. Place pockets 1 and 3 so their centers are 7 in (17.8 cm) from pocket 2’s center. That leaves 1.5 in (3.8 cm) between pocket edges.
Size checkpoint: The three pockets span 19.5 in (49.5 cm), leaving 2.25 in (5.7 cm) of dowel at each end for brackets.
Final Blocking
- Soak each pocket in cool water for 10 minutes, then press out the water in a towel. Don’t wring.
- Stuff the pocket with a rolled towel, or slip it over a jar about 4 in × 2 in (10.2 cm × 5.1 cm) at the base.
- Line up the spines so they run straight up the center front and center back.
- Pin the back flap flat to shape the point. The flap measures 2.75 in (7.0 cm) and the whole pocket 8.75 in (22.2 cm) tall.
- Open each slot gently with a fingertip so the chevrons look even.
- Let it dry completely, then remove the form and pins.
Final Quality-Control Checklist
- [ ] Each pocket has exactly 44 stitches in every body round.
- [ ] Each wing has 4 slots in a clean diagonal, rising toward the spine.
- [ ] The spines run straight with no twist from base to tip.
- [ ] The front opening is 6 in (15.2 cm) tall and the tip is 8.75 in (22.2 cm).
- [ ] Width is 5.5 in (14.0 cm) on all three pockets.
- [ ] The border lies flat with no ripple at the inner corners.
- [ ] The loops are secure and centered behind each tip.
- [ ] All ends are woven in on the WS.
Troubleshooting
- The spine leans to one side: You skipped the wrong stitch behind the FPdc. Always skip the stitch directly behind the post stitch.
- The slots don’t line up diagonally: Count your wing stitches, because chains count as stitches. Each wing must total 10.
- The base cups instead of lying flat: Your tension is too tight. Go up 0.5 mm for Rnds 1–5 only.
- The flap edge ripples: Use 15 sc per side, not more, and keep the sc2tog at the inner corners.
- The pocket sags when loaded: Your fabric is too loose. Remake it with a smaller hook so it meets gauge.
- The tip curls forward: Re-block it flat, and loosen the loop stitching.
Care
Hand wash in cool water and reshape while damp. Dry flat or over a form, and remove the straps before washing.
Final Notes
The measurements build on each other. Gauge of 16 sc and 18 rounds = 4 in (10.2 cm) gives a 44-stitch body that is 5.5 in (14.0 cm) wide. Twenty-six body rounds make 5.75 in (14.6 cm). Twelve flap rows add 2.75 in (7.0 cm), and the border adds 0.25 in (0.6 cm), for a finished height of 8.75 in (22.2 cm). If your first pocket hits these numbers, the other two will match it. Hang them up and fill them with combs, brushes or plant tools.
Happy crocheting!