
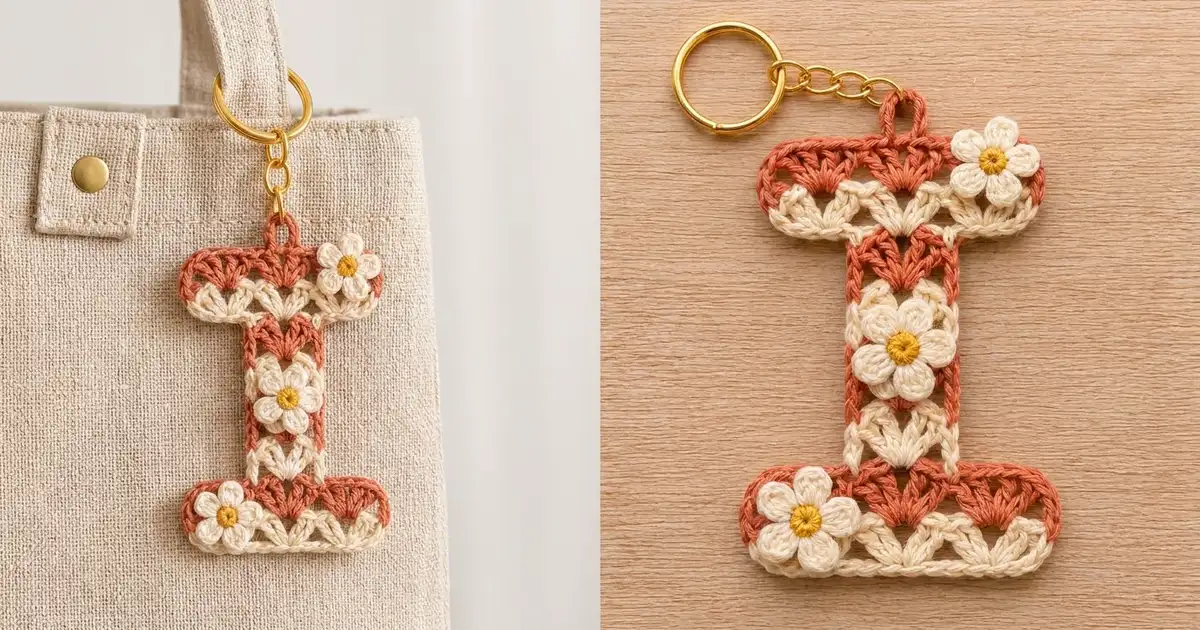
This little letter “I” keychain is made of stacked fan shells in warm terracotta and soft cream. A crisp terracotta outline frames the letter, and three puffy daisies with golden centers sit on top. It’s a cheerful monogram gift that you can clip to a tote bag, backpack, or set of keys.
The look is cottage-style and slightly retro. The two colors trade places every row, so the letter reads as neat bands of fans with small lacy V-gaps between them. The flowers add texture and break up the stripes.
This pattern uses US crochet terms. The finished keychain measures 4.2 x 5.2 in (10.7 x 13.2 cm), not counting the hanging loop and hardware.
You’ll work the letter flat in rows, from the bottom bar up. You’ll narrow to a one-fan stem, widen again with two short chain extensions for the top bar, and then work one round of single crochet border around everything. Finally, you’ll make three flowers, sew them on, add a hanging loop, and attach the key ring.
Finished Size and Construction
- Finished size: 4.2 x 5.2 in (10.7 x 13.2 cm)
- Skill level: Easy-Intermediate
- Terminology: US crochet terms
- Yarn weight: DK / light (#3) cotton
- Hook: 3.5 mm (E-4)
- Number of pieces: 1 letter, plus 3 small flower appliqués
- Layout: Capital “I”: two bars, each 3 fans wide x 2 rows tall, joined by a stem 1 fan wide x 4 rows tall
- Piece size before border: 3.8 x 4.8 in (9.7 x 12.2 cm)
- Stem width before border: 1.4 in (3.6 cm)
- Border depth: 0.2 in (0.5 cm) on every edge, 1 round of sc
Materials
Use a smooth, mercerized or matte DK cotton. Cotton keeps the shells crisp and holds up well on a keychain that gets handled every day. Don’t use fuzzy or very stretchy yarns, because they blur the fan shapes.
- Terracotta (Color A): 8 g, about 18 m (rows, border, hanging loop)
- Cream (Color B): 8 g, about 18 m (rows, extension chains, flower petals)
- Golden yellow (Color C): 2 g, about 5 m (flower centers)
These quantities include a comfortable margin for gauge testing and weaving in ends.
Tools:
- 3.5 mm (E-4) crochet hook
- Tapestry needle
- Scissors
- 3 or 4 locking stitch markers
- Rust-proof pins and a foam blocking mat
- Spray bottle with water
- 1 in (2.5 cm) gold split key ring with a short chain, about 1.5 in (3.8 cm) long
- Small gold jump ring (optional)
Abbreviations (US Terms)
- ch: chain
- sl st: slip stitch
- sc: single crochet
- dc: double crochet
- st(s): stitch(es)
- sk: skip
- sp: space
- MR: magic ring
- RS: right side
Special stitches:
- Standing sc: With a slip knot on your hook, insert the hook into the stitch, yarn over, pull up a loop, yarn over, and pull through both loops.
- Shell: 5 dc in the same stitch.
- Petal: (sl st, ch 2, 3 dc, ch 2, sl st) all in the same stitch.
Gauge and Checkpoints
Gauge: 5 sts = 1 in (2.5 cm), so one 6-st shell repeat = 1.2 in (3.0 cm). One shell row = 0.6 in (1.5 cm) tall.
Use the bottom bar (Rows 1–2) as your gauge swatch. It’s part of the finished piece, so nothing is wasted.
Checkpoints:
- After Row 2: The bottom bar measures 3.8 x 1.2 in (9.7 x 3.0 cm).
- After Row 6: The stem measures 1.4 in (3.6 cm) wide, and the total height is 3.6 in (9.1 cm).
- After Row 8: The letter measures 3.8 x 4.8 in (9.7 x 12.2 cm).
- After the border: The letter measures 4.2 x 5.2 in (10.7 x 13.2 cm).
If your bottom bar is too wide (more than 4.0 in / 10.2 cm), go down to a 3.25 mm hook. If it’s too narrow (less than 3.6 in / 9.1 cm), go up to a 3.75 mm hook.
If only the height is off, check your dc. Pull each one up to the full height of the shell instead of compressing it.

Pattern: The Letter
Notes:
- Work every row with the RS facing, from right to left. If you’re left-handed, work from left to right.
- Fasten off at the end of each row and leave 4 in (10.2 cm) tails. The border will cover these tails.
- In Rows 2–8, ch-2 spaces are not counted as stitches.
- The rows alternate colors: odd rows are cream, even rows are terracotta.
Bottom Bar
Row 1 (cream): Ch 20. Sc in the 2nd ch from the hook. Sk 2 ch, shell in next ch, sk 2 ch, sc in next ch. Repeat from * 2 more times. Fasten off.
(19 sts: 4 sc + 3 shells of 5 dc)
Number the stitches 1–19 from right to left. The sc are sts 1, 7, 13, and 19. The center dc of the three shells are sts 4, 10, and 16.
Row 2 (terracotta): Standing sc in st 1. Ch 2, sk 2 dc, shell in the center dc, ch 2, sk 2 dc, sc in the next sc. Repeat from * 2 more times. Fasten off.
(19 sts: 4 sc + 15 dc, plus 6 ch-2 sps)
Each new fan sits directly on top of the fan below. The ch-2s form the open V-gaps between them.
Checkpoint: 3.8 x 1.2 in (9.7 x 3.0 cm).
Stem
The stem is worked over the center 7 stitches of Row 2 (sts 7–13).
Row 3 (cream): Standing sc in st 7. Ch 2, sk 2 dc, shell in st 10, ch 2, sk 2 dc, sc in st 13. Fasten off.
(7 sts: 2 sc + 5 dc, plus 2 ch-2 sps)
Row 4 (terracotta): Standing sc in the first sc. Ch 2, sk 2 dc, shell in the center dc, ch 2, sk 2 dc, sc in the last sc. Fasten off.
(7 sts)
Row 5 (cream): Repeat Row 4. (7 sts)
Row 6 (terracotta): Repeat Row 4. (7 sts)
Checkpoint: The stem is 1.4 in (3.6 cm) wide, and the total height is 3.6 in (9.1 cm). Stitches 1–6 and 14–19 of Row 2 stay free; they become the top edges of the bottom bar.
Extension Chains (make 2)
Right extension: With cream, join with a sl st in the first sc of Row 6 (the right edge of the stem). Ch 6 and fasten off.
Left extension: With cream, join with a sl st in the last sc of Row 6 (the left edge of the stem). Ch 6 and fasten off.
Each extension gives you 6 chains that point straight out from the stem. They form the base for the outer fans of the top bar.
Top Bar
Row 7 (cream): Standing sc in the outermost (6th) ch of the right extension. Sk 2 ch, shell in the next ch, sk 2 ch, then sc in the first sc of Row 6, working under the sl st.
Continue with ch 2, sk 2 dc, shell in the center dc, ch 2, sk 2 dc, sc in the last sc of Row 6.
Finish on the left extension: sk 2 ch, shell in the next ch, sk 2 ch, sc in the outermost ch. Fasten off.
(19 sts: 4 sc + 15 dc, plus 2 ch-2 sps over the stem)
The stitch count matches Row 1: 6 sts from the right extension + 7 over the stem + 6 from the left extension = 19.
Row 8 (terracotta): Work as for Row 2.
(19 sts: 4 sc + 15 dc, plus 6 ch-2 sps)
Checkpoint: 3.8 x 4.8 in (9.7 x 12.2 cm). There are 8 rows at 0.6 in (1.5 cm) each.
Lightly spray-block the letter flat now. A square letter gives you a much neater border.
Border
Border gauge: 5 sc = 1 in (2.5 cm). This matches the body gauge: 1 sc per stitch across the top and bottom edges, and 3 sc per 0.6 in (1.5 cm) row end along the sides.
Rules:
- Horizontal edges: Work sc in each sc and dc, and skip the ch-2 sps. Each repeat gives 6 sc (1 sc + 5 dc).
- Row ends: Work 3 sc evenly along each row end.
- Underside of the top bar: Work sc into the free bottom loop of each extension chain.
- Convex corners (8 in total): Work 3 sc in the corner stitch. Each corner adds 2 sts.
- Concave inner corners (4 in total): Don’t add or skip anything. Move straight from one segment to the next.
- Ends: Work over all row tails as you go to enclose them.
Round 1 (terracotta): Standing sc in st 2 of Row 8, then work clockwise around the letter as follows:
| Segment | Base sts | Corners | Total |
|---|---|---|---|
| Top edge (Row 8) | 19 | 2 | 23 |
| Right side, top bar (2 rows) | 6 | 0 | 6 |
| Underside, right extension | 6 | 1 | 8 |
| Right side of stem (4 rows) | 12 | 0 | 12 |
| Top of bottom bar, right (sts 14–19 of Row 2) | 6 | 1 | 8 |
| Right side, bottom bar (2 rows) | 6 | 0 | 6 |
| Bottom edge (foundation ch) | 19 | 2 | 23 |
| Left side, bottom bar | 6 | 0 | 6 |
| Top of bottom bar, left (sts 1–6 of Row 2) | 6 | 1 | 8 |
| Left side of stem | 12 | 0 | 12 |
| Underside, left extension | 6 | 1 | 8 |
| Left side, top bar | 6 | 0 | 6 |
For the outermost extension chain and for sts 19 and 1 of Row 2, work 3 sc in that stitch. These are the outer corners of the bars.
Finish with 3 sc in st 1 of Row 8, then sl st to the first sc. Fasten off.
(126 sc: 110 base sts + 16 corner extras)
Why the math works:
- The top and bottom edges are 19 sts at 5 per in = 3.8 in (9.7 cm).
- Each bar side is 6 sc over 1.2 in (3.0 cm), and each stem side is 12 sc over 2.4 in (6.1 cm). Both are exactly 5 per in.
- The free bar sections are 6 + 6 sts, and the stem is 7 sts: 6 + 7 + 6 = 19, which matches the full bar width.
- The corners don’t count twice: each corner stitch is already in its segment’s base count, and only the 2 extra sc per corner are added.
Checkpoint: 4.2 x 5.2 in (10.7 x 13.2 cm).
Hanging Loop
Count to the 12th sc of the top edge, which is the center of its 23 sts. Join terracotta with a sl st there. Ch 12, then sl st in the same st.
Work 16 sc into the ch-12 loop, then sl st in the same st again. Fasten off and weave in the end securely.
The loop stands about 1 in (2.5 cm) tall.
Daisy Flowers (make 3)
Round 1 (yellow): Make a MR and work 5 sc into it. Pull the ring tight and sl st to the first sc. Fasten off.
(5 sc)
Round 2 (cream): Join in any sc. Work a petal in each sc around, then sl st to the first sl st. Fasten off, leaving a 6 in (15.2 cm) tail for sewing.
(5 petals)
Each flower is about 1 in (2.5 cm) across, with a 0.4 in (1.0 cm) center.
Final Blocking
- Lightly mist the letter until it’s damp but not wet.
- Lay it RS up on the blocking mat.
- Pin the eight outer corners first, to 4.2 in (10.7 cm) wide across both bars and 5.2 in (13.2 cm) tall overall.
- Pin each stem side straight, 1.8 in (4.6 cm) apart including the border.
- Nudge each fan open with your fingertip so the V-gaps look even.
- Let it dry completely before unpinning.
- Don’t block the flowers. Leave them puffy.
Assembly
- Sew one flower onto the top-right corner of the top bar, using the cream tail to stitch through the petal bases.
- Sew one flower onto the center of the stem, over Rows 4–5.
- Sew one flower onto the bottom-left corner of the bottom bar.
- Make a few small stitches around the yellow center of each flower so it stays domed.
- Open the end link of the key ring chain (or use a jump ring) and close it through the hanging loop.
Final Quality-Control Checklist
- The letter measures 4.2 x 5.2 in (10.7 x 13.2 cm).
- Both bars are three fans wide, and the stem is one fan wide and four rows tall.
- The colors alternate cream and terracotta, starting with cream at the bottom.
- The border has 126 sc, with smooth corners and no puckering at the inner corners.
- All row tails are enclosed in the border.
- The hanging loop is centered and firm.
- The three flowers are secure, with their centers domed.
- The key ring is fully closed.
Troubleshooting
- Fans lean sideways: You put the shell in the wrong dc. Count to the center (3rd) dc of each shell before working.
- Stem is off-center: Make sure Row 3 starts in st 7 and ends in st 13 of Row 2.
- Top bar is narrower than the bottom bar: One extension chain probably has the wrong count. Each one needs exactly 6 ch.
- Border ruffles: Your border tension is too loose. Switch to a hook 0.5 mm smaller for the border round only.
- Border pulls in: Check that you worked 3 sc into every row end, not 2.
- Inner corners pucker: Make sure you didn’t add any extra sts there.
- Flowers are flat: Pull the MR tighter and stitch the centers down a little more firmly.
Care
Hand wash in cool water with mild soap. Press out the water in a towel and dry flat. Reshape the fans and flowers while the piece is damp.

Final Notes
The measurement chain is simple:
- 5 sts per in and 0.6 in (1.5 cm) per row
- The bottom bar measures 3.8 x 1.2 in (9.7 x 3.0 cm)
- The stem is 1.4 in (3.6 cm) wide
- The full letter is 3.8 x 4.8 in (9.7 x 12.2 cm) before the border
- One 0.2 in (0.5 cm) border round brings it to 4.2 x 5.2 in (10.7 x 13.2 cm)
If you check each stage, the border count of 126 sc will fall into place. You can use the same bar-and-stem method to make other block letters.
Happy crocheting!